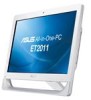

User Manual
Page 2
... software described in it, may be reproduced, transmitted, transcribed, stored in a retrieval system, or translated into any language in this manual may or may not be registered trademarks or copyrights of ASUSTeK COMPUTER, INC. ("ASUS"). All Rights Reserved. All trademarks are correct and up to make changes without the express written permission of their respective owners...
... software described in it, may be reproduced, transmitted, transcribed, stored in a retrieval system, or translated into any language in this manual may or may not be registered trademarks or copyrights of ASUSTeK COMPUTER, INC. ("ASUS"). All Rights Reserved. All trademarks are correct and up to make changes without the express written permission of their respective owners...
User Manual
Page 3
......7 Wireless Operation Channel for Different Domains 7 France Restricted Wireless Frequency Bands 8 REACH...9 Global Environmental Regulation Compliance and Declaration 10 Takeback Services...10 UL Safety Precaution...10 ENERGY STAR complied product 11 Notes for this manual...11 Safety information...12 Setting up your system...12 Care during use...12 Sound Pressure...13 TV Tuner (on selected models 13 Adapter...13 DC Fan...
......7 Wireless Operation Channel for Different Domains 7 France Restricted Wireless Frequency Bands 8 REACH...9 Global Environmental Regulation Compliance and Declaration 10 Takeback Services...10 UL Safety Precaution...10 ENERGY STAR complied product 11 Notes for this manual...11 Safety information...12 Setting up your system...12 Care during use...12 Sound Pressure...13 TV Tuner (on selected models 13 Adapter...13 DC Fan...

User Manual
Page 4
... wireless keyboard and mouse 30 Powering on the system...31 Powering off...31 Calibrating the screen...32 Configuring a wireless connection 33 Configuring a wired connection 34 Using a static IP...34 Using a dynamic IP (PPPoE 36 Configuring the audio output...39 Speaker configurations...39 Connecting to speakers...39 Recovering your system 40 Using the Recovery Partition...40 Recovering the OS to the Factory Default Partition (F9 Recovery 40 Backing up the Factory Default Environment Data to a USB Drive (F9 Backup) 40 Using the USB storage device (USB Restore...
... wireless keyboard and mouse 30 Powering on the system...31 Powering off...31 Calibrating the screen...32 Configuring a wireless connection 33 Configuring a wired connection 34 Using a static IP...34 Using a dynamic IP (PPPoE 36 Configuring the audio output...39 Speaker configurations...39 Connecting to speakers...39 Recovering your system 40 Using the Recovery Partition...40 Recovering the OS to the Factory Default Partition (F9 Recovery 40 Backing up the Factory Default Environment Data to a USB Drive (F9 Backup) 40 Using the USB storage device (USB Restore...

User Manual
Page 5
... this transmitter must be provide with Part 15 of the FCC Rules. Operation is no guarantee that may not cause harmful interference, and • This device must not be co-located or operating in a residential installation.This equipment generates, uses and can be installed and operated in accordance with provided instructions and the antenna(s) used in accordance with any interference received...
... this transmitter must be provide with Part 15 of the FCC Rules. Operation is no guarantee that may not cause harmful interference, and • This device must not be co-located or operating in a residential installation.This equipment generates, uses and can be installed and operated in accordance with provided instructions and the antenna(s) used in accordance with any interference received...
User Manual
Page 6
...• Protection requirements for electromagnetic compatibility in [Article 3.1b] • Testing for electromagnetic compatibility in [EN 301 489-1] & [EN 301 489-17] • Effective use of the radio spectrum as in the Radio Interference Regulations of the Canadian Department... device may not cause interference and • This device must follow the specific operating instructions for satisfying RF exposure compliance. English Canadian Department of Communications Statement This digital apparatus does not exceed the Class B limits for radio noise emissions from digital apparatus set ...
...• Protection requirements for electromagnetic compatibility in [Article 3.1b] • Testing for electromagnetic compatibility in [EN 301 489-1] & [EN 301 489-17] • Effective use of the radio spectrum as in the Radio Interference Regulations of the Canadian Department... device may not cause interference and • This device must follow the specific operating instructions for satisfying RF exposure compliance. English Canadian Department of Communications Statement This digital apparatus does not exceed the Class B limits for radio noise emissions from digital apparatus set ...
User Manual
Page 12
... and contact a qualified service technician or your system. • When the system is important that the total ampere rating of the devices plugged into the system. • The system does not function properly even if you follow all power, modem, and network cables from the power outlets before you encounter the following safety instructions. English Safety information Your...
... and contact a qualified service technician or your system. • When the system is important that the total ampere rating of the devices plugged into the system. • The system does not function properly even if you follow all power, modem, and network cables from the power outlets before you encounter the following safety instructions. English Safety information Your...
User Manual
Page 13
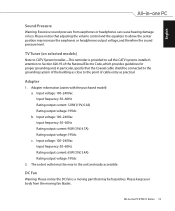
... Tuner (on selected models) Note to the point of cable entry as close to CATV System Installer-This reminder is a moving fan blades. English Sound Pressure Warning: Excessive sound pressure from the moving part that may increase the earphones or headphones output voltage, and therefore the sound pressure level. Please notice that adjusting the volume control and the equalizer...
... Tuner (on selected models) Note to the point of cable entry as close to CATV System Installer-This reminder is a moving fan blades. English Sound Pressure Warning: Excessive sound pressure from the moving part that may increase the earphones or headphones output voltage, and therefore the sound pressure level. Please notice that adjusting the volume control and the equalizer...
User Manual
Page 16
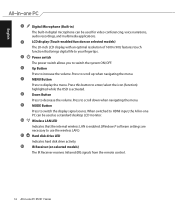
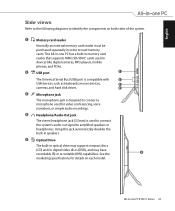
Down Button Press to switch the display signal source. MODE Button Press to decrease the volume. When switched to use the wireless LAN.) Hard disk drive LED Indicates hard disk drive activity. Press to display the menu. MENU Button Press to scroll up when navigating the menu. Press to switch the system ON/OFF. LCD display (Touch-enabled function on selected models) The IR Receiver receives Infrared (IR) signals from the remote control. 16 All-in-one PC...
Down Button Press to switch the display signal source. MODE Button Press to decrease the volume. When switched to use the wireless LAN.) Hard disk drive LED Indicates hard disk drive activity. Press to display the menu. MENU Button Press to scroll up when navigating the menu. Press to switch the system ON/OFF. LCD display (Touch-enabled function on selected models) The IR Receiver receives Infrared (IR) signals from the remote control. 16 All-in-one PC...
User Manual
Page 18
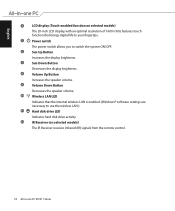
... speaker volume. Wireless LAN LED Indicates that brings digital life to your fingertips. Volume Up Button Increases the speaker volume. Power switch The power switch allows you to use the wireless LAN.) Hard disk drive LED Indicates hard disk drive activity. Sun Down Button Decreases the display brightness. English 4 5 6 7 8 9 10 11 12 LCD display (Touch-enabled function on selected models) The IR Receiver receives Infrared (IR) signals from the remote control. 18 All-in-one PC ET2011 Series...
... speaker volume. Wireless LAN LED Indicates that brings digital life to your fingertips. Volume Up Button Increases the speaker volume. Power switch The power switch allows you to use the wireless LAN.) Hard disk drive LED Indicates hard disk drive activity. Sun Down Button Decreases the display brightness. English 4 5 6 7 8 9 10 11 12 LCD display (Touch-enabled function on selected models) The IR Receiver receives Infrared (IR) signals from the remote control. 18 All-in-one PC ET2011 Series...

User Manual
Page 20
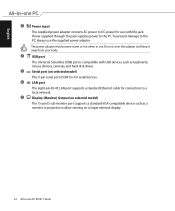
... hard disk drives. Antenna Input (on paid services. English 3 Power input The supplied power adapter converts AC power to a local network. HDMI input port (on selected models) HDMI (High-Definition Multimedia Interface) is for TV or FM Radio (optional) frequency signal and allows for use with USB devices such as a set-top box, DVD player. Note: Use the provided adapter for use with coaxial connectors. 20 All-in use the supplied power adapter. LAN port The eight-pin RJ-45 LAN port supports a standard Ethernet cable...
... hard disk drives. Antenna Input (on paid services. English 3 Power input The supplied power adapter converts AC power to a local network. HDMI input port (on selected models) HDMI (High-Definition Multimedia Interface) is for TV or FM Radio (optional) frequency signal and allows for use with USB devices such as a set-top box, DVD player. Note: Use the provided adapter for use with coaxial connectors. 20 All-in use the supplied power adapter. LAN port The eight-pin RJ-45 LAN port supports a standard Ethernet cable...
User Manual
Page 22
.... 4 5 6 7 USB port The Universal Serial Bus (USB) port is for use with USB devices such as a monitor or projector to the PC, always use . English 3 Power input The supplied power adapter converts AC power to a local network. The power adapter may become warm or hot when in -one PC ET2011 Series Display (Monitor) Output (on selected model) The 15-pin D-sub monitor port supports a standard VGA-compatible device such as keyboards, mouse devices, cameras, and hard disk drives. Serial port (on a larger external display. 22 All-in use the supplied power adapter...
.... 4 5 6 7 USB port The Universal Serial Bus (USB) port is for use with USB devices such as a monitor or projector to the PC, always use . English 3 Power input The supplied power adapter converts AC power to a local network. The power adapter may become warm or hot when in -one PC ET2011 Series Display (Monitor) Output (on selected model) The 15-pin D-sub monitor port supports a standard VGA-compatible device such as keyboards, mouse devices, cameras, and hard disk drives. Serial port (on a larger external display. 22 All-in use the supplied power adapter...
User Manual
Page 23
..., and PDAs. 2 USB port 1 The Universal Serial Bus (USB) port is compatible with 2 USB devices such as keyboards, mouse devices, 3 cameras, and hard disk drives. 4 3 Microphone jack The microphone jack is designed to connect a microphone used for details on both sides of the system. 1 Memory card reader Normally an external memory card reader must be purchased separately in order to read memory cards.This All-in optical drive may support compact discs (CD) and/or digital video discs (DVD), and may...
..., and PDAs. 2 USB port 1 The Universal Serial Bus (USB) port is compatible with 2 USB devices such as keyboards, mouse devices, 3 cameras, and hard disk drives. 4 3 Microphone jack The microphone jack is designed to connect a microphone used for details on both sides of the system. 1 Memory card reader Normally an external memory card reader must be purchased separately in order to read memory cards.This All-in optical drive may support compact discs (CD) and/or digital video discs (DVD), and may...

User Manual
Page 25
... the top and click 4. To clean the screen: • Turn off the system and disconnect the power cord from foreign objects or excessive dust accumulation. Click the Touch tab on the screen. • Do not use an abrasive cleaner or a coarse cloth when cleaning the screen. All-in-one PC ET2011 Series 25 Click Change touch input settings. 3. English 2.
... the top and click 4. To clean the screen: • Turn off the system and disconnect the power cord from foreign objects or excessive dust accumulation. Click the Touch tab on the screen. • Do not use an abrasive cleaner or a coarse cloth when cleaning the screen. All-in-one PC ET2011 Series 25 Click Change touch input settings. 3. English 2.

User Manual
Page 30
... mouse Connect the keyboard and mouse to the USB port on the rear panel ( 1 ).Yo��u��m��a�y�a�l�s�o��c�o�n�n�e��c�t the keyboard and mouse to the USB port on the Allin-one PC ET2011 Series The illustrations above are for reference only. You can begin using the wireless HDMI ANT/CABLE keyboard and mouse. Install batteries...
... mouse Connect the keyboard and mouse to the USB port on the rear panel ( 1 ).Yo��u��m��a�y�a�l�s�o��c�o�n�n�e��c�t the keyboard and mouse to the USB port on the Allin-one PC ET2011 Series The illustrations above are for reference only. You can begin using the wireless HDMI ANT/CABLE keyboard and mouse. Install batteries...

User Manual
Page 31
...-DC adapter. 4 Powering off • To put the system into suspend mode, press the Power switch on the front panel. All-in-one PC ET2011 Series 31 DO NOT connect the AC power cord to an AC outlet prior to connecting the DC plug to the OS, press the Power switch again, click the mouse, touch the display, or press any key on the system. 3 1 2 HDMI ANT/CABLE...
...-DC adapter. 4 Powering off • To put the system into suspend mode, press the Power switch on the front panel. All-in-one PC ET2011 Series 31 DO NOT connect the AC power cord to an AC outlet prior to connecting the DC plug to the OS, press the Power switch again, click the mouse, touch the display, or press any key on the system. 3 1 2 HDMI ANT/CABLE...
User Manual
Page 32
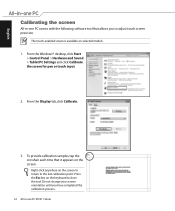
...-in -one PC ET2011 Series English Calibrating the screen All-in -one PC comes with the following software tool that it appears on selected models. 1. The touch-enabled screen is available on the screen. From the Windows® desktop, click Start > Control Panel > Hardware and Sound > Tablet PC Settings and click Calibrate the screen for pen or touch input. 2. Do not change your screen orientation until you to...
...-in -one PC ET2011 Series English Calibrating the screen All-in -one PC comes with the following software tool that it appears on selected models. 1. The touch-enabled screen is available on the screen. From the Windows® desktop, click Start > Control Panel > Hardware and Sound > Tablet PC Settings and click Calibrate the screen for pen or touch input. 2. Do not change your screen orientation until you to...

User Manual
Page 34
Click Change adapter settings in the Windows® Notification area and select Open Network and Sharing Center. Ensure that you have connected the LAN cable to the All-in -one PC. 2. English Configuring a wired connection Using a static IP 1. Right-click Local Area Connection and select Properties. 34 All-in -one PC ET2011 Series Click the network icon with a yellow warning triangle in the left pane. 3.
Click Change adapter settings in the Windows® Notification area and select Open Network and Sharing Center. Ensure that you have connected the LAN cable to the All-in -one PC. 2. English Configuring a wired connection Using a static IP 1. Right-click Local Area Connection and select Properties. 34 All-in -one PC ET2011 Series Click the network icon with a yellow warning triangle in the left pane. 3.
User Manual
Page 39
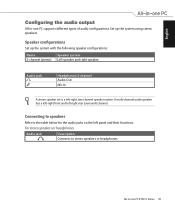
... headphones Audio jack Description Connects to the table below for the audio jacks on the left panel and their functions. Set up the system with the following speaker configurations: Name Speaker system 2-channel (stereo) Left speaker and right speaker. Audio jack Headphones/2-channel Audio Out Mic In A stereo speaker set is a left -right rear (surround) channel. English Configuring the audio output All-in -one PC supports different types of audio configurations.
... headphones Audio jack Description Connects to the table below for the audio jacks on the left panel and their functions. Set up the system with the following speaker configurations: Name Speaker system 2-channel (stereo) Left speaker and right speaker. Audio jack Headphones/2-channel Audio Out Mic In A stereo speaker set is a left -right rear (surround) channel. English Configuring the audio output All-in -one PC supports different types of audio configurations.
User Manual
Page 40
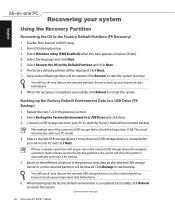
... connected USB storage device should be cleared. Click Backup to back up the Factory Default Environment Data to the Default Partition and click Next. 6. Ensure to start the system recovery. Select Windows setup [EMS Enabled] when this partiton automatically and reuse it for example, a partition that has been used as the backup partition), the system will be larger than one USB storage device is completed successfully, click Reboot to start...
... connected USB storage device should be cleared. Click Backup to back up the Factory Default Environment Data to the Default Partition and click Next. 6. Ensure to start the system recovery. Select Windows setup [EMS Enabled] when this partiton automatically and reuse it for example, a partition that has been used as the backup partition), the system will be larger than one USB storage device is completed successfully, click Reboot to start...

User Manual
Page 41
... factory environment data to the entire hard disk. 1. Disable Boot Booster in BIOS setup. 2. Data on the factory default partition or on the whole hard disk will be cleared depending on the option you back up the factory environment data to. 3. Select a task and click Next. Click Next again. After you click Next, the factory default partition will be displayed. Select Restore and click Next. 6. English Using the USB storage device (USB Restore) When the Recovery Partition...
... factory environment data to the entire hard disk. 1. Disable Boot Booster in BIOS setup. 2. Data on the factory default partition or on the whole hard disk will be cleared depending on the option you back up the factory environment data to. 3. Select a task and click Next. Click Next again. After you click Next, the factory default partition will be displayed. Select Restore and click Next. 6. English Using the USB storage device (USB Restore) When the Recovery Partition...


