

User Manual
Page 2
...the right to make changes without the express written permission of ASUSTeK COMPUTER, INC. ("ASUS"). No part of this manual are correct and up to ensure that the contents of their respective companies, and are the property of this manual, including the products and software described in ...Edition V2 November 2010 Copyright © 2010 ASUSTeK COMPUTER INC. All trademarks are used for backup purposes, without prior notice. All Rights Reserved. Every effort has been made to date. However, the manufacturer makes no guarantee regarding the accuracy of their respective owners.
...the right to make changes without the express written permission of ASUSTeK COMPUTER, INC. ("ASUS"). No part of this manual are correct and up to ensure that the contents of their respective companies, and are the property of this manual, including the products and software described in ...Edition V2 November 2010 Copyright © 2010 ASUSTeK COMPUTER INC. All trademarks are used for backup purposes, without prior notice. All Rights Reserved. Every effort has been made to date. However, the manufacturer makes no guarantee regarding the accuracy of their respective owners.
User Manual
Page 3
... Rear view...15 Side view...17 Using the touch screen...18 Using the keyboard...19 Positioning your EeeTop PC 21 Placing on the desktop...21 Mounting to the wall...21 Setting up your EeeTop PC 23 Connecting the wired keyboard and mouse 23 Connecting the wireless keyboard and mouse 23 Powering on the system...24 Powering off...24 Calibrating the screen...25 Configuring a wireless connection 27 Configuring a wired connection 28 Configuring the audio output...32 Configuring audio output settings...
... Rear view...15 Side view...17 Using the touch screen...18 Using the keyboard...19 Positioning your EeeTop PC 21 Placing on the desktop...21 Mounting to the wall...21 Setting up your EeeTop PC 23 Connecting the wired keyboard and mouse 23 Connecting the wireless keyboard and mouse 23 Powering on the system...24 Powering off...24 Calibrating the screen...25 Configuring a wireless connection 27 Configuring a wired connection 28 Configuring the audio output...32 Configuring audio output settings...
User Manual
Page 4
... equipment has been tested and found to comply with the limits for help. English Notices Federal Communications Commission Statement This device complies with Part 15 of this device could void the user's authority to operate the equipment. End-users and installers must be provide with antenna installation instructions and transmitter operating conditions for this transmitter must be co-located or operating in a particular...
... equipment has been tested and found to comply with the limits for help. English Notices Federal Communications Commission Statement This device complies with Part 15 of this device could void the user's authority to operate the equipment. End-users and installers must be provide with antenna installation instructions and transmitter operating conditions for this transmitter must be co-located or operating in a particular...
User Manual
Page 5
... 3.1a] • Testing for electric safety according to [EN 60950] • Protection requirements for electromagnetic compatibility in [Article 3.1b] • Testing for electromagnetic compatibility in [EN 301 489-1] & [EN 301 489-17] • Effective use of the radio spectrum ...cause interference and • This device must follow the specific operating instructions for satisfying RF exposure compliance. IC Radiation Exposure Statement for Canada This equipment complies with IC radiation exposure limits set out in [Article 3.2] • Radio test suites according to the transmitting ...
... 3.1a] • Testing for electric safety according to [EN 60950] • Protection requirements for electromagnetic compatibility in [Article 3.1b] • Testing for electromagnetic compatibility in [EN 301 489-1] & [EN 301 489-17] • Effective use of the radio spectrum ...cause interference and • This device must follow the specific operating instructions for satisfying RF exposure compliance. IC Radiation Exposure Statement for Canada This equipment complies with IC radiation exposure limits set out in [Article 3.2] • Radio test suites according to the transmitting ...

User Manual
Page 11
... openings. • Use this product near water or a heated source such as a radiator. • Set up your system • Read and follow all power, modem, and network cables from the power outlets before you follow the operating instructions....changes. Always unplug all instructions in environments with the product, unplug the power cord and contact a qualified service technician or your system. • Do not use this product in the documentation before cleaning the system. • The touch screen requires periodic cleaning to meet the latest standards of the devices plugged...
... openings. • Use this product near water or a heated source such as a radiator. • Set up your system • Read and follow all power, modem, and network cables from the power outlets before you follow the operating instructions....changes. Always unplug all instructions in environments with the product, unplug the power cord and contact a qualified service technician or your system. • Do not use this product in the documentation before cleaning the system. • The touch screen requires periodic cleaning to meet the latest standards of the devices plugged...
User Manual
Page 14
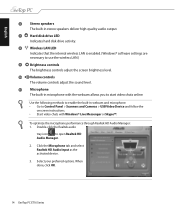
... speakers deliver high-quality audio output. 7 Hard disk drive LED Indicates hard disk drive activity. 8 Wireless LAN LED Indicates that the internal wireless LAN is enabled. (Windows® software settings are necessary to use the wireless LAN.) 9 Brightness controls The brightness controls adjust the screen brightness level. 10 Volume controls The volume controls adjust the sound level. 11 Microphone The built-in webcam and microphone. • Go to Control Panel > Scanners and Cameras > USB Video Device and follow the onscreen instructions. • Start video...
... speakers deliver high-quality audio output. 7 Hard disk drive LED Indicates hard disk drive activity. 8 Wireless LAN LED Indicates that the internal wireless LAN is enabled. (Windows® software settings are necessary to use the wireless LAN.) 9 Brightness controls The brightness controls adjust the screen brightness level. 10 Volume controls The volume controls adjust the sound level. 11 Microphone The built-in webcam and microphone. • Go to Control Panel > Scanners and Cameras > USB Video Device and follow the onscreen instructions. • Start video...
User Manual
Page 15
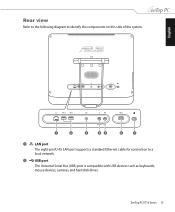
English 1 2 3 45 6 7 1 LAN port The eight-pin RJ-45 LAN port supports a standard Ethernet cable for connection to identify the components on this side of the system. EeeTop PC ET16 Series 15 Rear view Refer to the following diagram to a local network. 2 USB port The Universal Serial Bus (USB) port is compatible with USB devices such as keyboards, mouse devices, cameras, and hard disk drives.
English 1 2 3 45 6 7 1 LAN port The eight-pin RJ-45 LAN port supports a standard Ethernet cable for connection to identify the components on this side of the system. EeeTop PC ET16 Series 15 Rear view Refer to the following diagram to a local network. 2 USB port The Universal Serial Bus (USB) port is compatible with USB devices such as keyboards, mouse devices, cameras, and hard disk drives.

User Manual
Page 16
... secured using Kensington® compatible security products. Do not cover the adapter and keep it away from a fixed object. 16 EeeTop PC ET16 Series Power supplied through this port to prevent conflict with USB devices such as keyboards, mouse devices, cameras, and hard disk drives. To prevent damage to the PC. These security products usually include a metal cable and lock that you connect a USB TV tuner (not supplied) or...
... secured using Kensington® compatible security products. Do not cover the adapter and keep it away from a fixed object. 16 EeeTop PC ET16 Series Power supplied through this port to prevent conflict with USB devices such as keyboards, mouse devices, cameras, and hard disk drives. To prevent damage to the PC. These security products usually include a metal cable and lock that you connect a USB TV tuner (not supplied) or...

User Manual
Page 17
English Side view Refer to the following diagram to identify the components on this side of the system. 1 Memory card reader The built-in memory card reader reads MMC/SD cards used in devices like digital cameras, MP3 players, mobile phones, and PDAs. 2 USB port The Universal Serial Bus (USB) port is compatible with USB devices such as keyboards, mouse devices, cameras, and hard disk drives. 1 2 EeeTop PC ET16 Series 17
English Side view Refer to the following diagram to identify the components on this side of the system. 1 Memory card reader The built-in memory card reader reads MMC/SD cards used in devices like digital cameras, MP3 players, mobile phones, and PDAs. 2 USB port The Universal Serial Bus (USB) port is compatible with USB devices such as keyboards, mouse devices, cameras, and hard disk drives. 1 2 EeeTop PC ET16 Series 17
User Manual
Page 20
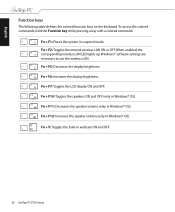
...-in Windows® OS). When enabled, the corresponding wireless LAN LED lights up. Fn + F11: Decreases the speaker volume (only in webcam ON and OFF. 20 EeeTop PC ET16 Series Fn + F1: Places the system in suspend mode. Fn + F2: Toggles the internal wireless LAN ON or OFF. Fn + F5: Decreases the display brightness. To access the colored commands, hold the Function key while pressing a key...
...-in Windows® OS). When enabled, the corresponding wireless LAN LED lights up. Fn + F11: Decreases the speaker volume (only in webcam ON and OFF. 20 EeeTop PC ET16 Series Fn + F1: Places the system in suspend mode. Fn + F2: Toggles the internal wireless LAN ON or OFF. Fn + F5: Decreases the display brightness. To access the colored commands, hold the Function key while pressing a key...

User Manual
Page 21
... ET16 Series 21 Install the wall mount pad according to the wall, purchase the optional wall mount pad (160mm x 92mm) and a wall mount kit (VESA 75). Keep the screws for future use in place. Remove the four screws on a flat surface such as a table or desk, and pull the stand open until it snaps in case you...
... ET16 Series 21 Install the wall mount pad according to the wall, purchase the optional wall mount pad (160mm x 92mm) and a wall mount kit (VESA 75). Keep the screws for future use in place. Remove the four screws on a flat surface such as a table or desk, and pull the stand open until it snaps in case you...

User Manual
Page 23
Actual appearances and specifications (wired or wireless) of the keyboard and mouse may route the cable through the cable routing clip. Then, connect the mouse to the keyboard USB port ( 2 ). 1 2 Connecting the wireless keyboard and mouse Connect the supplied USB receiver to the USB port on the rear panel ( 1 ) and begin using the wireless keyboard and mouse ( 2 ). 1 2 The illustrations above are for reference only. English Setting up your EeeTop PC Connecting the wired keyboard and mouse Connect the keyboard to the USB port on the rear panel ( 1 ).To avoid...
Actual appearances and specifications (wired or wireless) of the keyboard and mouse may route the cable through the cable routing clip. Then, connect the mouse to the keyboard USB port ( 2 ). 1 2 Connecting the wireless keyboard and mouse Connect the supplied USB receiver to the USB port on the rear panel ( 1 ) and begin using the wireless keyboard and mouse ( 2 ). 1 2 The illustrations above are for reference only. English Setting up your EeeTop PC Connecting the wired keyboard and mouse Connect the keyboard to the USB port on the rear panel ( 1 ).To avoid...

User Manual
Page 24
... mode, press the Power switch on the keyboard. • To shut down the system completely, follow the normal Windows shutdown process. 24 EeeTop PC ET16 Series English Powering on the system Connect the supplied AC adapter to the DC IN jack on the rear panel ( 1 2 3 ) and then press the Power switch on the front panel ( 4 ) to the OS, press the Power switch again, click the mouse, touch the display...
... mode, press the Power switch on the keyboard. • To shut down the system completely, follow the normal Windows shutdown process. 24 EeeTop PC ET16 Series English Powering on the system Connect the supplied AC adapter to the DC IN jack on the rear panel ( 1 2 3 ) and then press the Power switch on the front panel ( 4 ) to the OS, press the Power switch again, click the mouse, touch the display...

User Manual
Page 27
English Configuring a wireless connection 1. EeeTop PC ET16 Series 27 From the Windows® notification area, right-click the wireless network icon and select View Available Wireless Networks. 2. Enter the network security key if necessary. 3. Select the wireless network you want to connect to from the list and click Connect. After establishing a successful connection, the connection status is displayed.
English Configuring a wireless connection 1. EeeTop PC ET16 Series 27 From the Windows® notification area, right-click the wireless network icon and select View Available Wireless Networks. 2. Enter the network security key if necessary. 3. Select the wireless network you want to connect to from the list and click Connect. After establishing a successful connection, the connection status is displayed.

User Manual
Page 28
Right-click the network icon on the notification area and select Open Network Connections. 2. English Configuring a wired connection Using a static IP 1. Select Internet Protocol (TCP/IP) and click Properties. 28 EeeTop PC ET16 Series Right-click Local Area Connection and select Properties. 3.
Right-click the network icon on the notification area and select Open Network Connections. 2. English Configuring a wired connection Using a static IP 1. Select Internet Protocol (TCP/IP) and click Properties. 28 EeeTop PC ET16 Series Right-click Local Area Connection and select Properties. 3.

User Manual
Page 30
Select Connect to the Internet and click Next. Enter your User name and Password. 4. Enter your ISP Name and click Next. 9. Select your connection type and click Next. 8. Click Next. 5. Click Next. 30 EeeTop PC ET16 Series English 6. Select Set up my connection manually. 7.
Select Connect to the Internet and click Next. Enter your User name and Password. 4. Enter your ISP Name and click Next. 9. Select your connection type and click Next. 8. Click Next. 5. Click Next. 30 EeeTop PC ET16 Series English 6. Select Set up my connection manually. 7.

User Manual
Page 31
Click Connect to connect to finish the configuration. 11. EeeTop PC ET16 Series 31 Contact your user name and password. English 10. Enter your Internet Service Provider (ISP) if you have problems connecting to the network. Click Finish to the Internet.
Click Connect to connect to finish the configuration. 11. EeeTop PC ET16 Series 31 Contact your user name and password. English 10. Enter your Internet Service Provider (ISP) if you have problems connecting to the network. Click Finish to the Internet.

User Manual
Page 32
... speakers or headphones Audio jack Description Connects to the table below for the audio jacks on the rear panel and their functions. A multi-channel audio speaker has a left-right front and left -right, two channel speaker system. English Configuring the audio output EeeTop PC supports different types of audio configurations. For instance, 2.1-channel refers to the SUB/CENTER jack on your subwoofer. 32 EeeTop PC ET16 Series...
... speakers or headphones Audio jack Description Connects to the table below for the audio jacks on the rear panel and their functions. A multi-channel audio speaker has a left-right front and left -right, two channel speaker system. English Configuring the audio output EeeTop PC supports different types of audio configurations. For instance, 2.1-channel refers to the SUB/CENTER jack on your subwoofer. 32 EeeTop PC ET16 Series...

User Manual
Page 33
English Configuring audio output settings After connecting a speaker system to your EeeTop PC, follow the steps below to configure the speaker settings. 3. Click the Speakers tab. EeeTop PC ET16 Series 33 Click the Volume tab and then click Advanced to configure the speaker settings: 1. From the drop-down menu, select the speaker configuration you are using and click OK. Right-click the volume icon on the Windows® notification area and click Adjust Audio Properties. 2.
English Configuring audio output settings After connecting a speaker system to your EeeTop PC, follow the steps below to configure the speaker settings. 3. Click the Speakers tab. EeeTop PC ET16 Series 33 Click the Volume tab and then click Advanced to configure the speaker settings: 1. From the drop-down menu, select the speaker configuration you are using and click OK. Right-click the volume icon on the Windows® notification area and click Adjust Audio Properties. 2.

User Manual
Page 34
... changes. Boot Device Priority Boot Settings Configuration Boot Settings Configuration Security Options Disabled Enabled ←→ Select Screen ↑↓ Select Item +- Press again to Sub Screen F1 General Help F10 Save and Exit ESC Exit v02.61 (C)Copyright 1985-2009, American Megatrends, Inc. 34 EeeTop PC ET16 Series Set Boot Booster to a network drive and make note of the operating system, drivers, and utilities installed on your system at the factory.The recovery partition provides a comprehensive recovery...
... changes. Boot Device Priority Boot Settings Configuration Boot Settings Configuration Security Options Disabled Enabled ←→ Select Screen ↑↓ Select Item +- Press again to Sub Screen F1 General Help F10 Save and Exit ESC Exit v02.61 (C)Copyright 1985-2009, American Megatrends, Inc. 34 EeeTop PC ET16 Series Set Boot Booster to a network drive and make note of the operating system, drivers, and utilities installed on your system at the factory.The recovery partition provides a comprehensive recovery...


