
User Manual
Page 2
... 1-5 Preparing your Eee PC 1-6 Chapter 2: Knowing the Parts Top Side...2-2 Bottom Side...2-5 Right Side...2-7 Left Side...2-8 Rear Side...2-9 Chapter 3: Getting Started Power System 3-2 Using AC Power 3-2 Using Battery Power 3-3 Battery Care...3-4 Touchpad Usage 3-6 Single-finger gesture input 3-6 Multi-finger gesture input 3-7 Keyboard Usage 3-8 Special Function Keys 3-8 First Run Wizard 3-11 Operating Mode 3-13 Shutdown...3-14 Chapter 4: Using the Eee PC Internet...4-2 Configuring a wireless network connection 4-2 Configuring a network connection 4-4 Wireless Point-to-Point...
... 1-5 Preparing your Eee PC 1-6 Chapter 2: Knowing the Parts Top Side...2-2 Bottom Side...2-5 Right Side...2-7 Left Side...2-8 Rear Side...2-9 Chapter 3: Getting Started Power System 3-2 Using AC Power 3-2 Using Battery Power 3-3 Battery Care...3-4 Touchpad Usage 3-6 Single-finger gesture input 3-6 Multi-finger gesture input 3-7 Keyboard Usage 3-8 Special Function Keys 3-8 First Run Wizard 3-11 Operating Mode 3-13 Shutdown...3-14 Chapter 4: Using the Eee PC Internet...4-2 Configuring a wireless network connection 4-2 Configuring a network connection 4-4 Wireless Point-to-Point...

User Manual
Page 3
... Science ...4-24 Language...4-25 Math ...4-25 Paint ...4-26 Web Learn...4-26 Play ...4-27 Media Player 4-27 Music Manager 4-28 Photo Manager 4-29 Video Manager 4-30 Webcam ...4-30 Sound Recorder 4-31 Games ...4-31 Settings...4-32 Desktop Mode 4-32 Anti-Virus...4-33 Volume ...4-33 Instant Shutdown 4-34 Printers ...4-34 System Info...4-35 Date & Time 4-35 Personalization 4-36 Add/Remove Software 4-36 Touchpad...4-39 Disk Utility...4-40 ASUS Eee PC iii
... Science ...4-24 Language...4-25 Math ...4-25 Paint ...4-26 Web Learn...4-26 Play ...4-27 Media Player 4-27 Music Manager 4-28 Photo Manager 4-29 Video Manager 4-30 Webcam ...4-30 Sound Recorder 4-31 Games ...4-31 Settings...4-32 Desktop Mode 4-32 Anti-Virus...4-33 Volume ...4-33 Instant Shutdown 4-34 Printers ...4-34 System Info...4-35 Date & Time 4-35 Personalization 4-36 Add/Remove Software 4-36 Touchpad...4-39 Disk Utility...4-40 ASUS Eee PC iii

User Manual
Page 4
... Command (in selected territories 4-42 Task Manager 4-43 Favorites...4-44 System Recovery 5-1 Chapter 5: System Recovery System Recovery 5-2 Using Hidden Partition 5-2 Using the Recovery DVD 5-3 Using USB Flash Disk 5-4 Preparing to Install Windows® XP 6-1 Installing Windows® XP 6-1 Support CD Information 6-1 Chapter 6: Installing Windows® XP Preparing to install Windows® XP 6-2 Installing Windows® XP 6-2 Support CD information 6-4 Running the support CD 6-4 Drivers menu 6-5 Utilities menu 6-7 Contact ...6-8 Other information 6-8 Appendix Trademark...
... Command (in selected territories 4-42 Task Manager 4-43 Favorites...4-44 System Recovery 5-1 Chapter 5: System Recovery System Recovery 5-2 Using Hidden Partition 5-2 Using the Recovery DVD 5-3 Using USB Flash Disk 5-4 Preparing to Install Windows® XP 6-1 Installing Windows® XP 6-1 Support CD Information 6-1 Chapter 6: Installing Windows® XP Preparing to install Windows® XP 6-2 Installing Windows® XP 6-2 Support CD information 6-4 Running the support CD 6-4 Drivers menu 6-5 Utilities menu 6-7 Contact ...6-8 Other information 6-8 Appendix Trademark...

User Manual
Page 7
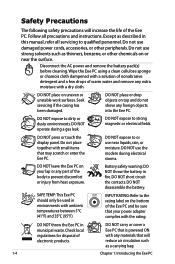
NOTE: Information for completing tasks. Important information that must be followed to prevent damage to complete certain tasks safely and effectively.These notes have different degrees of importance as follows: WARNING! TIP: Tips for special situations. Notes for This Manual A few notes and warnings are used throughout this guide, allowing you to data, components, or persons. Vital information that must be followed for safe operation. ASUS Eee PC 1-3 IMPORTANT!
NOTE: Information for completing tasks. Important information that must be followed to prevent damage to complete certain tasks safely and effectively.These notes have different degrees of importance as follows: WARNING! TIP: Tips for special situations. Notes for This Manual A few notes and warnings are used throughout this guide, allowing you to data, components, or persons. Vital information that must be followed for safe operation. ASUS Eee PC 1-3 IMPORTANT!
User Manual
Page 8
...power and remove the battery pack(s) before cleaning. DO NOT place on top and do not shove any foreign objects into the Eee PC. Seek servicing if the casing has been damaged. DO NOT expose to the rating label on the bottom of the Eee PC and be used in this manual, refer all precautions and instructions... body to strong magnetic or electrical fields. DO NOT press or touch the display panel. DO NOT expose to qualified personnel. Do not use the modem during a gas leak. Wipe the Eee PC using a clean cellulose sponge or chamois cloth dampened with ambient temperatures between...
...power and remove the battery pack(s) before cleaning. DO NOT place on top and do not shove any foreign objects into the Eee PC. Seek servicing if the casing has been damaged. DO NOT expose to the rating label on the bottom of the Eee PC and be used in this manual, refer all precautions and instructions... body to strong magnetic or electrical fields. DO NOT press or touch the display panel. DO NOT expose to qualified personnel. Do not use the modem during a gas leak. Wipe the Eee PC using a clean cellulose sponge or chamois cloth dampened with ambient temperatures between...

User Manual
Page 15
... skype, voice narrations, or simple audio recordings. 2 Built-in Camera The built-in camera allows picture taking or video recording. 3 Display Panel The display panel functions the same as a desktop mouse. Use a soft cloth without chemical liquids (use plain water if necessary) to turn OFF the Eee PC. The power switch only works when the display panel is opened. 5 Keyboard The keyboard provides keys with comfortable travel (depth at which...
... skype, voice narrations, or simple audio recordings. 2 Built-in Camera The built-in camera allows picture taking or video recording. 3 Display Panel The display panel functions the same as a desktop mouse. Use a soft cloth without chemical liquids (use plain water if necessary) to turn OFF the Eee PC. The power switch only works when the display panel is opened. 5 Keyboard The keyboard provides keys with comfortable travel (depth at which...
User Manual
Page 18
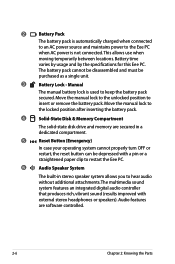
... specifications for this Eee PC. Move the manual lock to insert or remove the battery pack. Audio features are secured in a dedicated compartment. 5 Reset Button (Emergency) In case your operating system cannot properly turn OFF or restart, the reset button can be purchased as a single unit. 3 Battery Lock - Move the manual lock to the unlocked position to the locked position after inserting the battery pack. 4 Solid-State Disk & Memory Compartment The solid-state disk drive...
... specifications for this Eee PC. Move the manual lock to insert or remove the battery pack. Audio features are secured in a dedicated compartment. 5 Reset Button (Emergency) In case your operating system cannot properly turn OFF or restart, the reset button can be purchased as a single unit. 3 Battery Lock - Move the manual lock to the unlocked position to the locked position after inserting the battery pack. 4 Solid-State Disk & Memory Compartment The solid-state disk drive...

User Manual
Page 19
..., with USB 2.0 or USB 1.1 devices such as keyboards, pointing devices, cameras, and storage devices, connected in sites or hubs. ASUS Eee PC 2-7 compatible device such as a monitor or projector to allow viewing on a larger external display. 4 Kensington® Lock Port The Kensington® lock port allows the Eee PC to be secured using Kensington® compatible security products. These security products usually include a metal cable and lock that prevent the Eee PC to be removed from devices such...
..., with USB 2.0 or USB 1.1 devices such as keyboards, pointing devices, cameras, and storage devices, connected in sites or hubs. ASUS Eee PC 2-7 compatible device such as a monitor or projector to allow viewing on a larger external display. 4 Kensington® Lock Port The Kensington® lock port allows the Eee PC to be secured using Kensington® compatible security products. These security products usually include a metal cable and lock that prevent the Eee PC to be removed from devices such...

User Manual
Page 20
... supports hot-swapping function. 3 Microphone Jack The microphone jack is compatible with some peripherals acting as keyboards, pointing devices, cameras, and storage devices, connected in speakers. 2-8 Chapter 2: Knowing the Parts USB allows many devices to run simultaneously on this jack automatically disables the built-in a series up to 12Mbits/sec (USB 1.1) and 480Mbits/sec (USB 2.0). The built-in connector allows convenient use without additional adapters. 2 2.0 USB Port (2.0/1.1) The USB (Universal Serial Bus) port...
... supports hot-swapping function. 3 Microphone Jack The microphone jack is compatible with some peripherals acting as keyboards, pointing devices, cameras, and storage devices, connected in speakers. 2-8 Chapter 2: Knowing the Parts USB allows many devices to run simultaneously on this jack automatically disables the built-in a series up to 12Mbits/sec (USB 1.1) and 480Mbits/sec (USB 2.0). The built-in connector allows convenient use without additional adapters. 2 2.0 USB Port (2.0/1.1) The USB (Universal Serial Bus) port...
User Manual
Page 24
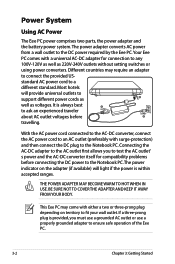
... Eee PC. BE SURE NOT TO COVER THE ADAPTER AND KEEP IT AWAY FROM YOUR BODY. Most hotels will light if the power is within accepted ranges. Power System Using AC Power The Eee PC power comprises two parts, the power adapter and the battery power system.The power adapter converts AC power from a wall outlet to support different power cords as well as 220V-240V outlets without setting switches or using power...
... Eee PC. BE SURE NOT TO COVER THE ADAPTER AND KEEP IT AWAY FROM YOUR BODY. Most hotels will light if the power is within accepted ranges. Power System Using AC Power The Eee PC power comprises two parts, the power adapter and the battery power system.The power adapter converts AC power from a wall outlet to support different power cords as well as 220V-240V outlets without setting switches or using power...

User Manual
Page 25
... optional and can be purchased separately through an Eee PC retailer. Never attempt to remove the battery pack while the Eee PC is designed to work with a removable battery pack.The battery pack consists of a set of working data. 1 To install the battery pack: 1 To remove the battery pack: 2 2 1 1 3 2 Only use battery packs and power adapters supplied with this 1 Eee PC or specifically approved by the manufacturer or retailer for...
... optional and can be purchased separately through an Eee PC retailer. Never attempt to remove the battery pack while the Eee PC is designed to work with a removable battery pack.The battery pack consists of a set of working data. 1 To install the battery pack: 1 To remove the battery pack: 2 2 1 1 3 2 Only use battery packs and power adapters supplied with this 1 Eee PC or specifically approved by the manufacturer or retailer for...

User Manual
Page 30
... LCD -> External Monitor -> Both. Sun Up Icon (F4): Increases the display brightness. zzZ Icon (F1): Places the Eee PC in the Notification area after activation. The Hot Key locations on the function keys may vary depending on - screen-display. When enabled, the corresponding wireless indicator will light. Some function icons appear in suspend mode (Save-to-RAM). Sun Down Icon (F3): Decreases the display brightness. Connect an external monitor before booting up the Eee PC. 3-8 Chapter 3: Getting Started Keyboard...
... LCD -> External Monitor -> Both. Sun Up Icon (F4): Increases the display brightness. zzZ Icon (F1): Places the Eee PC in the Notification area after activation. The Hot Key locations on the function keys may vary depending on - screen-display. When enabled, the corresponding wireless indicator will light. Some function icons appear in suspend mode (Save-to-RAM). Sun Down Icon (F3): Decreases the display brightness. Connect an external monitor before booting up the Eee PC. 3-8 Chapter 3: Getting Started Keyboard...

User Manual
Page 31
.... ASUS Eee PC 3-9 Home (←): Press to move the pointer to capture, save, or print the contents of the keyboard for number entering. End (→): Press to move the pointer to scroll down in documents or the web browser. Speaker Up Icon (F9): Increases the speaker volume. Prt Sc (Ins): Toggles the "Print Screen" key to initiate screen capture utility to...
.... ASUS Eee PC 3-9 Home (←): Press to move the pointer to capture, save, or print the contents of the keyboard for number entering. End (→): Press to move the pointer to scroll down in documents or the web browser. Speaker Up Icon (F9): Increases the speaker volume. Prt Sc (Ins): Toggles the "Print Screen" key to initiate screen capture utility to...
User Manual
Page 35
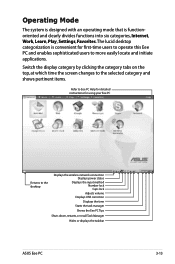
... wireless network connection Displays power status Displays the input method Number lock Caps lock Adjusts volume Displays USB connction Displays the time Starts the task manager Shows the Eee PC Tips Shuts down, restarts, or recall Task Manager Hides or displays the taskbar ASUS Eee PC 3-13 The lucid desktop categorization is functionoriented and clearly divides functions into six categories, Internet, Work, Learn, Play, Settings, Favorites. Operating Mode The system is designed with an operating mode that is convenient for using...
... wireless network connection Displays power status Displays the input method Number lock Caps lock Adjusts volume Displays USB connction Displays the time Starts the task manager Shows the Eee PC Tips Shuts down, restarts, or recall Task Manager Hides or displays the taskbar ASUS Eee PC 3-13 The lucid desktop categorization is functionoriented and clearly divides functions into six categories, Internet, Work, Learn, Play, Settings, Favorites. Operating Mode The system is designed with an operating mode that is convenient for using...

User Manual
Page 50
...button to Pidgin screen displays. Select an instant messaging service you are using from different service providers, press Add button again to add and configure more IM accounts. 4-14 Chapter 4: Using the Eee PC If you do not have multiple IM accounts from the drop-down list and fill out your password... along with friends Messenger 1. Select Messenger from the service providers. Press to select an instant messaging service 2. Select an instant messaging service If you have an IM account, apply one from the Internet tab and the Welcome to configure your instant...
...button to Pidgin screen displays. Select an instant messaging service you are using from different service providers, press Add button again to add and configure more IM accounts. 4-14 Chapter 4: Using the Eee PC If you do not have multiple IM accounts from the drop-down list and fill out your password... along with friends Messenger 1. Select Messenger from the service providers. Press to select an instant messaging service 2. Select an instant messaging service If you have an IM account, apply one from the Internet tab and the Welcome to configure your instant...
User Manual
Page 68
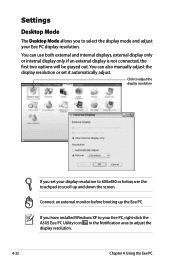
... external monitor before booting up and down the screen. If an external display is not connected, the first two options will be grayed out. If you set it automatically adjust. You can use the touchpad to select the display mode and adjust your Eee PC, right-click the ASUS Eee PC Utility icon in the Notification area to 600x480 or below, use both external and internal displays, external display only or internal display only. Settings...
... external monitor before booting up and down the screen. If an external display is not connected, the first two options will be grayed out. If you set it automatically adjust. You can use the touchpad to select the display mode and adjust your Eee PC, right-click the ASUS Eee PC Utility icon in the Notification area to 600x480 or below, use both external and internal displays, external display only or internal display only. Settings...

User Manual
Page 72
... with network access. You can download and install software from our server later when they are no longer needed. Locate the software you want to install/update the selected software. Removing the pre-installed software is not allowed. Click to switch the 2 category Press the Install button to 4 install/update the software 3 Locate the software you want to install/update 4-36 Chapter 4: Using the Eee PC Personalization Select Personalization to network. 2. Add/Remove Software You can remove the software you have connected...
... with network access. You can download and install software from our server later when they are no longer needed. Locate the software you want to install/update the selected software. Removing the pre-installed software is not allowed. Click to switch the 2 category Press the Install button to 4 install/update the software 3 Locate the software you want to install/update 4-36 Chapter 4: Using the Eee PC Personalization Select Personalization to network. 2. Add/Remove Software You can remove the software you have connected...

User Manual
Page 82
Using Hidden Partition 1. If you have installed WIndows XP to edit the commands before recovering your Eee PC disk drive. If the system recovery fails, there might be used for command-line. Press enter to boot the selected OS, 'e' to your Eee PC, the builtin hidden partition would be cleared and cannot be something wrong with your system. The OS image file bundled in the Settings tab to select which entry...
Using Hidden Partition 1. If you have installed WIndows XP to edit the commands before recovering your Eee PC disk drive. If the system recovery fails, there might be used for command-line. Press enter to boot the selected OS, 'e' to your Eee PC, the builtin hidden partition would be cleared and cannot be something wrong with your system. The OS image file bundled in the Settings tab to select which entry...
User Manual
Page 90
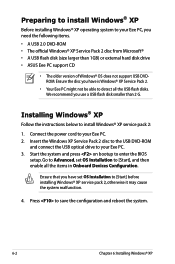
... Service Pack 2. • Your Eee PC might not be able to enter the BIOS setup. Connect the power cord to [Start] before installing Windows® XP service pack 2, otherwise it may cause the system malfunction. 4. Ensure that you use a USB flash disk smaller than 1GB) or external hard disk drive • ASUS Eee PC support CD • The older version of Windows® OS does not support USB DVDROM. Preparing to install Windows® XP Before installing Windows® XP operating...
... Service Pack 2. • Your Eee PC might not be able to enter the BIOS setup. Connect the power cord to [Start] before installing Windows® XP service pack 2, otherwise it may cause the system malfunction. 4. Ensure that you use a USB flash disk smaller than 1GB) or external hard disk drive • ASUS Eee PC support CD • The older version of Windows® OS does not support USB DVDROM. Preparing to install Windows® XP Before installing Windows® XP operating...
User Manual
Page 91
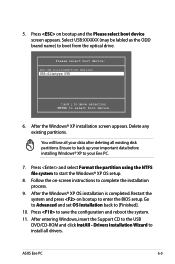
... USB DVD/CD-ROM and click InstAll - Restart the system and press on bootup and the Please select boot device screen appears. Press on bootup to install all existing disk partitions. Delete any existing partitions. After entering Windows, insert the Support CD to select boot device 6. After the Windows® XP installation screen appears. Go to Advanced and set OS Installation back to save the configuration and reboot the system. 11. ASUS Eee...
... USB DVD/CD-ROM and click InstAll - Restart the system and press on bootup and the Please select boot device screen appears. Press on bootup to install all existing disk partitions. Delete any existing partitions. After entering Windows, insert the Support CD to select boot device 6. After the Windows® XP installation screen appears. Go to Advanced and set OS Installation back to save the configuration and reboot the system. 11. ASUS Eee...


