User Manual
Page 2
......2-2 Bottom Side...2-5 Right Side...2-7 Left Side...2-8 Rear Side...2-9 Chapter 3: Getting Started Power System 3-2 Using AC Power 3-2 Using Battery Power 3-3 Battery Care...3-4 Touchpad Usage 3-6 Single-finger gesture input 3-6 Multi-finger gesture input 3-7 Keyboard Usage 3-8 Special Function Keys 3-8 First-time Startup 3-11 Desktop...3-14 ASUS EeePC Tray Utility 3-15 Enabling and Disabling Devices 3-15 Adjusting the display resolution 3-16 Shutdown...3-17 Chapter 4: Using the Eee PC Network Connection 4-2 Configuring a wireless network connection 4-2 ii Table of Contents
......2-2 Bottom Side...2-5 Right Side...2-7 Left Side...2-8 Rear Side...2-9 Chapter 3: Getting Started Power System 3-2 Using AC Power 3-2 Using Battery Power 3-3 Battery Care...3-4 Touchpad Usage 3-6 Single-finger gesture input 3-6 Multi-finger gesture input 3-7 Keyboard Usage 3-8 Special Function Keys 3-8 First-time Startup 3-11 Desktop...3-14 ASUS EeePC Tray Utility 3-15 Enabling and Disabling Devices 3-15 Adjusting the display resolution 3-16 Shutdown...3-17 Chapter 4: Using the Eee PC Network Connection 4-2 Configuring a wireless network connection 4-2 ii Table of Contents
User Manual
Page 3
... 4-23 StarSuite Writer 4-26 StarSuite Calc 4-26 StarSuite Draw 4-26 StarSuite Database 4-26 InterVideo DVD XPack 4-28 Launching InterVideo DVD XPack 4-28 Using InterVideo DVD XPack 4-29 Chapter 5: Support DVD &System Recovery Support DVD information 5-2 Running the support DVD 5-2 Drivers menu 5-3 Utilities menu 5-4 Contact ...5-6 Other information 5-6 System Recovery 5-7 Using the Support DVD 5-7 Appendix Declarations and Safety Statements A-2 Copyright Information A-12 Limitation of Liability A-13 Service and Support A-13 ASUS Eee PC iii
... 4-23 StarSuite Writer 4-26 StarSuite Calc 4-26 StarSuite Draw 4-26 StarSuite Database 4-26 InterVideo DVD XPack 4-28 Launching InterVideo DVD XPack 4-28 Using InterVideo DVD XPack 4-29 Chapter 5: Support DVD &System Recovery Support DVD information 5-2 Running the support DVD 5-2 Drivers menu 5-3 Utilities menu 5-4 Contact ...5-6 Other information 5-6 System Recovery 5-7 Using the Support DVD 5-7 Appendix Declarations and Safety Statements A-2 Copyright Information A-12 Limitation of Liability A-13 Service and Support A-13 ASUS Eee PC iii
User Manual
Page 6
Knowing the Parts Provides information on using the Eee PC's utilities. 5. Notes for safe operation. Using the Eee PC Provides information on the Eee PC's components. 3. Vital information that must be followed for This Manual A few notes and warnings are major sections of importance as follows: WARNING! Getting Started Provides information on the support DVD and system recovery. 6. Support DVD & System Recovery Gives you safety...
Knowing the Parts Provides information on using the Eee PC's utilities. 5. Notes for safe operation. Using the Eee PC Provides information on the Eee PC's components. 3. Vital information that must be followed for This Manual A few notes and warnings are major sections of importance as follows: WARNING! Getting Started Provides information on the support DVD and system recovery. 6. Support DVD & System Recovery Gives you safety...
User Manual
Page 7
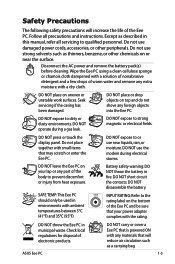
... other peripherals. ASUS Eee PC 1-3 DO NOT place on the bottom of the Eee PC and be used in this manual, refer all precautions and instructions. Safety Precautions The following safety precautions will reduce air circulation such as a carrying bag. Do not use near the surface. DO NOT disassemble the battery. DO NOT press or touch the display panel. Check...
... other peripherals. ASUS Eee PC 1-3 DO NOT place on the bottom of the Eee PC and be used in this manual, refer all precautions and instructions. Safety Precautions The following safety precautions will reduce air circulation such as a carrying bag. Do not use near the surface. DO NOT disassemble the battery. DO NOT press or touch the display panel. Check...

User Manual
Page 13
... simple audio recordings. 2 Built-in Camera The built-in camera allows picture taking or video recording. 3 Display Panel The display panel functions the same as a desktop mouse. Press the switch once to turn OFF the Eee PC. The power switch only works when the display panel is available to turn ON and hold it is easier on the eyes. Multi-finger gesture input is opened. 5 Keyboard The keyboard provides keys with comfortable...
... simple audio recordings. 2 Built-in Camera The built-in camera allows picture taking or video recording. 3 Display Panel The display panel functions the same as a desktop mouse. Press the switch once to turn OFF the Eee PC. The power switch only works when the display panel is available to turn ON and hold it is easier on the eyes. Multi-finger gesture input is opened. 5 Keyboard The keyboard provides keys with comfortable...

User Manual
Page 14
... power is turned OFF. OFF: The Eee PC's battery is written to or read from the disk drive. Solid-State disk (SSD) Indicator The solid-state disk drive indicator blinks when data is charged or completely drained. Battery Charge Indicator The battery charge indicator (LED) shows the status of the battery's power as follows: ON: The Eee PC's battery is charging when AC power is enabled, this indicator lights. 2-4 Chapter 2: Knowing the Parts When the built-in wireless LAN is connected...
... power is turned OFF. OFF: The Eee PC's battery is written to or read from the disk drive. Solid-State disk (SSD) Indicator The solid-state disk drive indicator blinks when data is charged or completely drained. Battery Charge Indicator The battery charge indicator (LED) shows the status of the battery's power as follows: ON: The Eee PC's battery is charging when AC power is enabled, this indicator lights. 2-4 Chapter 2: Knowing the Parts When the built-in wireless LAN is connected...
User Manual
Page 15
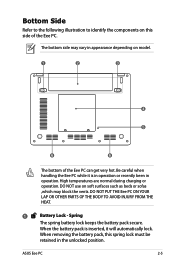
... on this spring lock must be retained in operation. Be careful when handling the Eee PC while it is inserted, it will automatically lock. High temperatures are normal during charging or operation. Spring The spring battery lock keeps the battery pack secure. The...PARTS OF THE BODY TO AVOID INJURY FROM THE HEAT. 1 Battery Lock - ASUS Eee PC 2-5 When the battery pack is in operation or recently been in the unlocked position. DO NOT use on model. 1 2 3 4 5 6 6 The bottom of the Eee PC. When removing the battery pack, this side of the Eee PC can get very hot...
... on this spring lock must be retained in operation. Be careful when handling the Eee PC while it is inserted, it will automatically lock. High temperatures are normal during charging or operation. Spring The spring battery lock keeps the battery pack secure. The...PARTS OF THE BODY TO AVOID INJURY FROM THE HEAT. 1 Battery Lock - ASUS Eee PC 2-5 When the battery pack is in operation or recently been in the unlocked position. DO NOT use on model. 1 2 3 4 5 6 6 The bottom of the Eee PC. When removing the battery pack, this side of the Eee PC can get very hot...
User Manual
Page 16
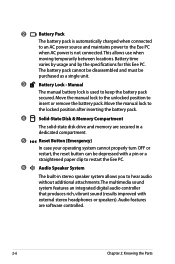
... operating system cannot properly turn OFF or restart, the reset button can be purchased as a single unit. 3 Battery Lock - 2 Battery Pack The battery pack is automatically charged when connected to an AC power source and maintains power to insert or remove the battery pack. Manual The manual battery lock is used to the locked position after inserting the battery pack. 4 Solid-State Disk & Memory Compartment The solid-state disk drive and memory are software controlled. 2-6 Chapter 2: Knowing the Parts...
... operating system cannot properly turn OFF or restart, the reset button can be purchased as a single unit. 3 Battery Lock - 2 Battery Pack The battery pack is automatically charged when connected to an AC power source and maintains power to insert or remove the battery pack. Manual The manual battery lock is used to the locked position after inserting the battery pack. 4 Solid-State Disk & Memory Compartment The solid-state disk drive and memory are software controlled. 2-6 Chapter 2: Knowing the Parts...
User Manual
Page 17
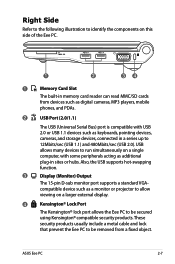
... of the Eee PC. 1 2 34 1 Memory Card Slot The built-in memory card reader can read MMC/SD cards from a fixed object. These security products usually include a metal cable and lock that prevent the Eee PC to be secured using Kensington® compatible security products. Also, the USB supports hot-swapping function. 3 Display (Monitor) Output The 15-pin D-sub monitor port supports a standard VGA- compatible device such as additional plug-in...
... of the Eee PC. 1 2 34 1 Memory Card Slot The built-in memory card reader can read MMC/SD cards from a fixed object. These security products usually include a metal cable and lock that prevent the Eee PC to be secured using Kensington® compatible security products. Also, the USB supports hot-swapping function. 3 Display (Monitor) Output The 15-pin D-sub monitor port supports a standard VGA- compatible device such as additional plug-in...
User Manual
Page 18
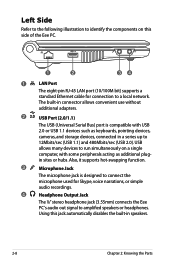
... a single computer, with USB 2.0 or USB 1.1 devices such as additional plugin sites or hubs. Also, it supports hot-swapping function. 3 Microphone Jack The microphone jack is compatible with some peripherals acting as keyboards, pointing devices, cameras, and storage devices, connected in speakers. 2-8 Chapter 2: Knowing the Parts Using this side of the Eee PC. 1 2 34 1 LAN Port The eight-pin RJ-45 LAN port (10/100M bit) supports a standard Ethernet cable for Skype, voice...
... a single computer, with USB 2.0 or USB 1.1 devices such as additional plugin sites or hubs. Also, it supports hot-swapping function. 3 Microphone Jack The microphone jack is compatible with some peripherals acting as keyboards, pointing devices, cameras, and storage devices, connected in speakers. 2-8 Chapter 2: Knowing the Parts Using this side of the Eee PC. 1 2 34 1 LAN Port The eight-pin RJ-45 LAN port (10/100M bit) supports a standard Ethernet cable for Skype, voice...
User Manual
Page 19
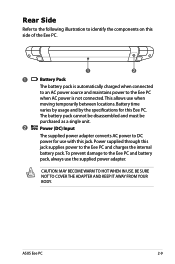
... AC power is not connected. Power supplied through this jack. CAUTION: MAY BECOME WARM TO HOT WHEN IN USE. Rear Side Refer to the following illustration to identify the components on this Eee PC. This allows use the supplied power adapter. Battery time varies by usage and by the specifications for use with this jack supplies power to the Eee PC and charges the internal battery pack...
... AC power is not connected. Power supplied through this jack. CAUTION: MAY BECOME WARM TO HOT WHEN IN USE. Rear Side Refer to the following illustration to identify the components on this Eee PC. This allows use the supplied power adapter. Battery time varies by usage and by the specifications for use with this jack supplies power to the Eee PC and charges the internal battery pack...
User Manual
Page 22
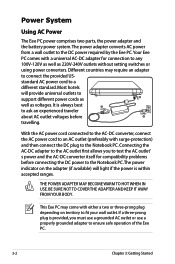
... 220V-240V outlets without setting switches or using power converters. BE SURE NOT TO COVER THE ADAPTER AND KEEP IT AWAY FROM YOUR BODY. THE POWER ADAPTER MAY BECOME WARM TO HOT WHEN IN USE. Different countries may come with surge-protection) and then connect the DC plug to ensure safe operation of the Eee PC. 3-2 Chapter 3: Getting Started The power indicator on territory to a different...
... 220V-240V outlets without setting switches or using power converters. BE SURE NOT TO COVER THE ADAPTER AND KEEP IT AWAY FROM YOUR BODY. THE POWER ADAPTER MAY BECOME WARM TO HOT WHEN IN USE. Different countries may come with surge-protection) and then connect the DC plug to ensure safe operation of the Eee PC. 3-2 Chapter 3: Getting Started The power indicator on territory to a different...
User Manual
Page 23
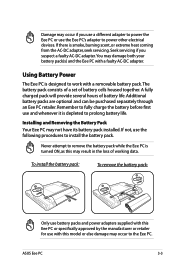
... to power other electrical devices. Seek servicing if you use a different adapter to the Eee PC. 3 ASUS Eee PC 3-3 Never attempt to remove the battery pack while the Eee PC is smoke, burning scent, or extreme heat coming from the AC-DC adapter, seek servicing. If there is 2 turned ON, as this model or else damage may not have its battery pack installed. A fully charged...
... to power other electrical devices. Seek servicing if you use a different adapter to the Eee PC. 3 ASUS Eee PC 3-3 Never attempt to remove the battery pack while the Eee PC is smoke, burning scent, or extreme heat coming from the AC-DC adapter, seek servicing. If there is 2 turned ON, as this model or else damage may not have its battery pack installed. A fully charged...
User Manual
Page 24
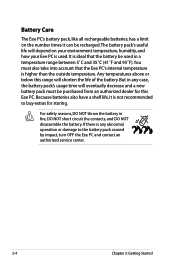
... to the battery pack caused by impact, turn OFF the Eee PC and contact an authorized service center. 3-4 Chapter 3: Getting Started Because batteries also have a shelf life, it can be recharged.The battery pack's useful life will depend on the number times it is used in fire, DO NOT short circuit the contacts, and DO NOT disassemble the battery. It is...
... to the battery pack caused by impact, turn OFF the Eee PC and contact an authorized service center. 3-4 Chapter 3: Getting Started Because batteries also have a shelf life, it can be recharged.The battery pack's useful life will depend on the number times it is used in fire, DO NOT short circuit the contacts, and DO NOT disassemble the battery. It is...
User Manual
Page 28
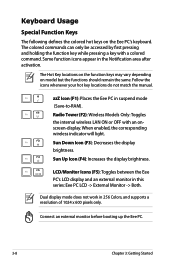
... series: Eee PC LCD -> External Monitor -> Both. Radio Tower (F2): Wireless Models Only:Toggles the internal wireless LAN ON or OFF with a colored command. Sun Down Icon (F3): Decreases the display brightness. Connect an external monitor before booting up the Eee PC. 3-8 Chapter 3: Getting Started screen-display. The Hot Key locations on the function keys may vary depending on - LCD/Monitor Icons (F5): Toggles between the Eee PC's LCD display and an external monitor in the Notification area after activation...
... series: Eee PC LCD -> External Monitor -> Both. Radio Tower (F2): Wireless Models Only:Toggles the internal wireless LAN ON or OFF with a colored command. Sun Down Icon (F3): Decreases the display brightness. Connect an external monitor before booting up the Eee PC. 3-8 Chapter 3: Getting Started screen-display. The Hot Key locations on the function keys may vary depending on - LCD/Monitor Icons (F5): Toggles between the Eee PC's LCD display and an external monitor in the Notification area after activation...

User Manual
Page 34
Desktop The are several shortcuts on the desktop. Displays the start menu Displays the network connection status Adjusts system volume Displays USB connection Displays the power status Adjusts the display resolution Adjusts the touchpad settings Displays the time 3-14 Chapter 3: Getting Started Some applications would form minimized icons in the Notification area. Double-click them to launch the corresponding applications and enter the specified folders.
Desktop The are several shortcuts on the desktop. Displays the start menu Displays the network connection status Adjusts system volume Displays USB connection Displays the power status Adjusts the display resolution Adjusts the touchpad settings Displays the time 3-14 Chapter 3: Getting Started Some applications would form minimized icons in the Notification area. Double-click them to launch the corresponding applications and enter the specified folders.
User Manual
Page 36
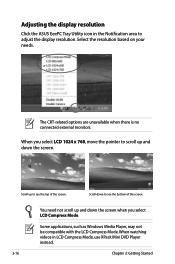
... need not scroll up to scroll up and down to adjust the display resolution. Adjusting the display resolution Click the ASUS EeePC Tray Utility icon in LCD Compress Mode, use XPack Mini DVD Player instead. 3-16 Chapter 3: Getting Started Scroll down the screen. Some applications, such as Windows Media Player, may not be compatible with the LCD Compress Mode. The CRT-related options are unavailable when there is no connected external monitors. When watching videos...
... need not scroll up to scroll up and down to adjust the display resolution. Adjusting the display resolution Click the ASUS EeePC Tray Utility icon in LCD Compress Mode, use XPack Mini DVD Player instead. 3-16 Chapter 3: Getting Started Scroll down the screen. Some applications, such as Windows Media Player, may not be compatible with the LCD Compress Mode. The CRT-related options are unavailable when there is no connected external monitors. When watching videos...
User Manual
Page 54
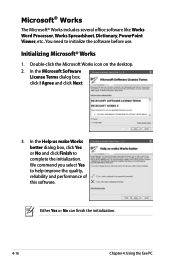
... on the desktop. 2. In the Help us make Works better dialog box, click Yes or No and click Finish to help improve the quality, reliability and performance of this software. You need to initialize the software before use. Microsoft® Works The Microsoft® Works includes several office software like Works Word Processor, Works Spreadsheet, Dictionary, PowerPoint Viewer, etc.. Either Yes...
... on the desktop. 2. In the Help us make Works better dialog box, click Yes or No and click Finish to help improve the quality, reliability and performance of this software. You need to initialize the software before use. Microsoft® Works The Microsoft® Works includes several office software like Works Word Processor, Works Spreadsheet, Dictionary, PowerPoint Viewer, etc.. Either Yes...
User Manual
Page 72
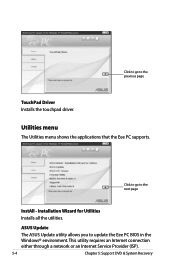
ASUS Update The ASUS Update utility allows you to the previous page TouchPad Driver Installs the touchpad driver. This utility requires an Internet connection either through a network or an Internet Service Provider (ISP). 5-4 Chapter 5: Support DVD & System Recovery Installation Wizard for Utilities Installs all the utilities. Utilities menu The Utilities menu shows the applications that the Eee PC supports. Click to go to the next page InstAll - Click to go to update the Eee PC BIOS in the Windows® environment.
ASUS Update The ASUS Update utility allows you to the previous page TouchPad Driver Installs the touchpad driver. This utility requires an Internet connection either through a network or an Internet Service Provider (ISP). 5-4 Chapter 5: Support DVD & System Recovery Installation Wizard for Utilities Installs all the utilities. Utilities menu The Utilities menu shows the applications that the Eee PC supports. Click to go to the next page InstAll - Click to go to update the Eee PC BIOS in the Windows® environment.

User Manual
Page 75
... quickly restores your data files (such as the ODD brand name) to boot from the optical drive. Press on bootup to enter the BIOS setup. Before using the Support DVD, copy your system to its original working state, provided that you have set OS Installation to [Start], and then enable all the items in good working order. Start the system and press on bootup and the Please select boot device screen...
... quickly restores your data files (such as the ODD brand name) to boot from the optical drive. Press on bootup to enter the BIOS setup. Before using the Support DVD, copy your system to its original working state, provided that you have set OS Installation to [Start], and then enable all the items in good working order. Start the system and press on bootup and the Please select boot device screen...


