
User Manual
Page 22
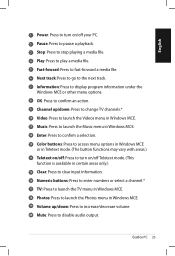
Refer to the next page to play media files. The remote control type and MCE functions may vary depending on selected models) Use the remote to launch the Windows® MCE (Media Center) or control the TotalMedia Center to familiarize yourself with the functions of the remote control buttons. English Using the remote control (on models. 1 2 26 3 4 25 5 24 6 23 22 7 21 8 20 19 9 18 10 17 11 16 15 12 14 13 22 EeeBox PC
Refer to the next page to play media files. The remote control type and MCE functions may vary depending on selected models) Use the remote to launch the Windows® MCE (Media Center) or control the TotalMedia Center to familiarize yourself with the functions of the remote control buttons. English Using the remote control (on models. 1 2 26 3 4 25 5 24 6 23 22 7 21 8 20 19 9 18 10 17 11 16 15 12 14 13 22 EeeBox PC
User Manual
Page 23
...5 Fast-foward: Press to fast-forward a media file. 6 Next track: Press to go to the next track. 7 Information: Press to display program information under the Windows MCE or other menu options. 8 OK: Press to confirm an action. 9 Channel up/down: Press to change TV channels.* 10 Video: Press to launch the... clear input information. 16 Numeric buttons: Press to enter numbers or select a channel.* 17 TV: Press to launch the TV menu in Windows MCE. 18 Photos: Press to launch the Photos menu in Windows MCE. 19 Volume up/down: Press to increase/decrease volume. 20 Mute: Press to disable audio output.
...5 Fast-foward: Press to fast-forward a media file. 6 Next track: Press to go to the next track. 7 Information: Press to display program information under the Windows MCE or other menu options. 8 OK: Press to confirm an action. 9 Channel up/down: Press to change TV channels.* 10 Video: Press to launch the... clear input information. 16 Numeric buttons: Press to enter numbers or select a channel.* 17 TV: Press to launch the TV menu in Windows MCE. 18 Photos: Press to launch the Photos menu in Windows MCE. 19 Volume up/down: Press to increase/decrease volume. 20 Mute: Press to disable audio output.

User Manual
Page 24
English 21 Four-way navigation buttons: Press to scroll through menu options. 22 Return: Press to return to the previous page. 23 Windows MCE: Press to open the Windows MCE. 24 Previous track: Press to go back to the previous track. 25 Rewind: Press to rewind a media file. 26 Record: Press to start recording TV.* *The TV function is available in certain areas only. 24 EeeBox PC
English 21 Four-way navigation buttons: Press to scroll through menu options. 22 Return: Press to return to the previous page. 23 Windows MCE: Press to open the Windows MCE. 24 Previous track: Press to go back to the previous track. 25 Rewind: Press to rewind a media file. 26 Record: Press to start recording TV.* *The TV function is available in certain areas only. 24 EeeBox PC
User Manual
Page 29
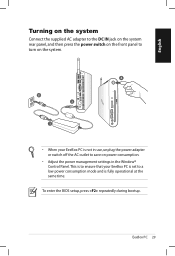
To enter the BIOS setup, press repeatedly during bootup. EeeBox PC 29 This is to ensure that your EeeBox PC is not in use, unplug the power adapter or switch off the AC outlet to a low power consumption mode and is set to save on power consumption. • Adjust the power management settings in the Window® Control Panel. English Turning on the system Connect the supplied AC adapter to the DC IN jack on the system rear panel, and then press the power switch on the front panel to turn on the system. 4 2 3 1 • When your EeeBox PC is fully operational at the same time.
To enter the BIOS setup, press repeatedly during bootup. EeeBox PC 29 This is to ensure that your EeeBox PC is not in use, unplug the power adapter or switch off the AC outlet to a low power consumption mode and is set to save on power consumption. • Adjust the power management settings in the Window® Control Panel. English Turning on the system Connect the supplied AC adapter to the DC IN jack on the system rear panel, and then press the power switch on the front panel to turn on the system. 4 2 3 1 • When your EeeBox PC is fully operational at the same time.
User Manual
Page 30
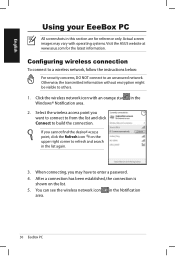
... in the 3. in this section are for the latest information. Click the wireless network icon with operating systems. Visit the ASUS website at www.asus.com for reference only. Select the wireless access point you cannot find the desired access point, click the Refresh icon on the... list. 5. If you want to connect to from the list and click Connect to build the connection. When connecting, you may vary with an orange star Windows...
... in the 3. in this section are for the latest information. Click the wireless network icon with operating systems. Visit the ASUS website at www.asus.com for reference only. Select the wireless access point you cannot find the desired access point, click the Refresh icon on the... list. 5. If you want to connect to from the list and click Connect to build the connection. When connecting, you may vary with an orange star Windows...

User Manual
Page 31
Right-click Local Area Connection and select Properties. EeeBox PC 31 Click the network icon with a yellow warning triangle in the left blue pane. 3. Click Change adapter settings in the Windows® Notification area and select Open Network and Sharing Center. 2. English Configuring wired connection To establish a wired network, follow the instructions below: Using a dynamic IP / PPPoE network connection: 1.
Right-click Local Area Connection and select Properties. EeeBox PC 31 Click the network icon with a yellow warning triangle in the left blue pane. 3. Click Change adapter settings in the Windows® Notification area and select Open Network and Sharing Center. 2. English Configuring wired connection To establish a wired network, follow the instructions below: Using a dynamic IP / PPPoE network connection: 1.
User Manual
Page 37
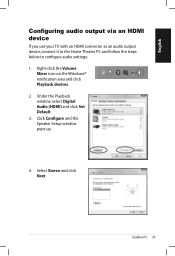
Under the Playback window, select Digital Audio (HDMI) and click Set Default. 3. Select Stereo and click Next. English Configuring audio output via an HDMI device If you use your TV with an HDMI connector as an audio output device, connect it to the Home Theater PC and follow the steps below to configure audio settings: 1. Click Configure and the Speaker Setup window pops up. 4. Right-click the Volume Mixer icon on the Windows® notification area and click Playback devices. 2. EeeBox PC 37
Under the Playback window, select Digital Audio (HDMI) and click Set Default. 3. Select Stereo and click Next. English Configuring audio output via an HDMI device If you use your TV with an HDMI connector as an audio output device, connect it to the Home Theater PC and follow the steps below to configure audio settings: 1. Click Configure and the Speaker Setup window pops up. 4. Right-click the Volume Mixer icon on the Windows® notification area and click Playback devices. 2. EeeBox PC 37

User Manual
Page 39
Select Schedule to set how often you want to update your EeeBox PC. 1. Check the item(s) you can download. 5. Select Update to display the items you want to download, and then click OK. English ASUS Easy Update ASUS Easy Update is a software tool that automatically detects and downloads the latest BIOS, drivers, and applications for your system. 3. Click OK to activate the update. 4. From the Windows® notification area, right-click the ASUS Easy Update icon. 2. EeeBox PC 39
Select Schedule to set how often you want to update your EeeBox PC. 1. Check the item(s) you can download. 5. Select Update to display the items you want to download, and then click OK. English ASUS Easy Update ASUS Easy Update is a software tool that automatically detects and downloads the latest BIOS, drivers, and applications for your system. 3. Click OK to activate the update. 4. From the Windows® notification area, right-click the ASUS Easy Update icon. 2. EeeBox PC 39
User Manual
Page 44
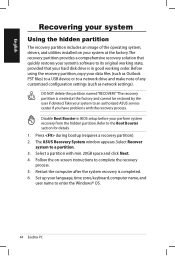
...recovery solution that quickly restores your system's software to its original working state, provided that your hard disk drive is completed. 6. The ASUS Recovery System window appears. Follow the on your system at the factory and cannot be restored by the user if deleted.Take your system to an ...authorized ASUS service center if you have problems with min. 20GB space and click Next. 4. Select a partition with the recovery process. Before using ...
...recovery solution that quickly restores your system's software to its original working state, provided that your hard disk drive is completed. 6. The ASUS Recovery System window appears. Follow the on your system at the factory and cannot be restored by the user if deleted.Take your system to an ...authorized ASUS service center if you have problems with min. 20GB space and click Next. 4. Select a partition with the recovery process. Before using ...


