
Intel 100 Series Ai Suite3 ManualEnglish
Page 2
... DVD main menu, select the Utilities tab and click or tap AI Suite 3. 3. If the ASUS motherboard support DVD main menu did not appear, try the following: a. Place the Support DVD into the optical drive. 2. Follow the succeeding onscreen instructions. Place the ... and operate these utilities simultaneously. In the AutoPlay dialog box, click or tap Run ASSETUP.exe then select the Utilities tab. Ensure that integrates several ASUS utilities and allows users to the Start Screen then click or tap the Desktop app. The main screen of the Desktop, click or tap File...
... DVD main menu, select the Utilities tab and click or tap AI Suite 3. 3. If the ASUS motherboard support DVD main menu did not appear, try the following: a. Place the Support DVD into the optical drive. 2. Follow the succeeding onscreen instructions. Place the ... and operate these utilities simultaneously. In the AutoPlay dialog box, click or tap Run ASSETUP.exe then select the Utilities tab. Ensure that integrates several ASUS utilities and allows users to the Start Screen then click or tap the Desktop app. The main screen of the Desktop, click or tap File...
Intel 100 Series Ai Suite3 ManualEnglish
Page 3
ASUS 100 Series AI Suite 3 3 Place the Support DVD into the optical drive then follow onscreen instructions. 2. Windows® 10 OS 1. From the ASUS motherboard support DVD main menu, select the Utilities tab and click or tap AI Suite 3.
ASUS 100 Series AI Suite 3 3 Place the Support DVD into the optical drive then follow onscreen instructions. 2. Windows® 10 OS 1. From the ASUS motherboard support DVD main menu, select the Utilities tab and click or tap AI Suite 3.
Intel 100 Series Ai Suite3 ManualEnglish
Page 4
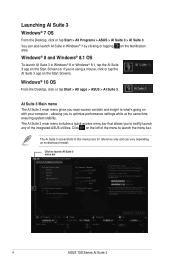
... mouse, click or tap the AI Suite 3 app on the left of the integrated ASUS utilities. AI Suite 3 Main menu The AI Suite 3 main menu gives you to launch the menu bar. Click to what's going on motherboard model. Launching AI Suite 3 Windows® 7 OS From the Desktop, click or ...tap Start > All Programs > ASUS > AI Suite 3 > AI Suite 3. allowing you easy-access controls and insight to launch AI Suite 3...
... mouse, click or tap the AI Suite 3 app on the left of the integrated ASUS utilities. AI Suite 3 Main menu The AI Suite 3 main menu gives you to launch the menu bar. Click to what's going on motherboard model. Launching AI Suite 3 Windows® 7 OS From the Desktop, click or ...tap Start > All Programs > ASUS > AI Suite 3 > AI Suite 3. allowing you easy-access controls and insight to launch AI Suite 3...
Intel 100 Series Ai Suite3 ManualEnglish
Page 11
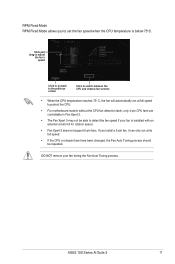
DO NOT remove your fan is below 75oC. ASUS 100 Series AI Suite 3 11 If you to detect the fan speed if your fan during the Fan Auto Tuning process. Click and drag to ... and chassis fan screens • When the CPU temperature reaches 75o C, the fan will automatically run at full speed to protect the CPU. • For motherboard models without the CPU fan detection latch, only 4-pin CPU fans are controllable in Fan Xpert 3. • The Fan Xpert 3 may not be repeated. RPM...
DO NOT remove your fan is below 75oC. ASUS 100 Series AI Suite 3 11 If you to detect the fan speed if your fan during the Fan Auto Tuning process. Click and drag to ... and chassis fan screens • When the CPU temperature reaches 75o C, the fan will automatically run at full speed to protect the CPU. • For motherboard models without the CPU fan detection latch, only 4-pin CPU fans are controllable in Fan Xpert 3. • The Fan Xpert 3 may not be repeated. RPM...
Intel 100 Series Ai Suite3 ManualEnglish
Page 14
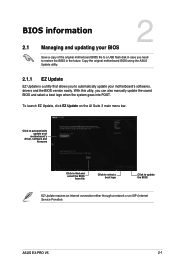
... EZ Update To launch EZ Update, click on the left of the AI Suite 3 main menu, then select EZ Update. Click to automatically update your motherboard's driver, software and firmware Click to find and select the BIOS from file Click to select a boot logo Click to update the BIOS Manually update... proceed the updating BIOS and boot logo After you click or tap BIOS Update button, click or tap Flash to automatically update your system. 14 ASUS 100 Series AI Suite 3 With this utlity, you can also manually update the saved BIOS and select a boot logo when the system goes into POST...
... EZ Update To launch EZ Update, click on the left of the AI Suite 3 main menu, then select EZ Update. Click to automatically update your motherboard's driver, software and firmware Click to find and select the BIOS from file Click to select a boot logo Click to update the BIOS Manually update... proceed the updating BIOS and boot logo After you click or tap BIOS Update button, click or tap Flash to automatically update your system. 14 ASUS 100 Series AI Suite 3 With this utlity, you can also manually update the saved BIOS and select a boot logo when the system goes into POST...

Intel 100 Series Ai Suite3 ManualEnglish
Page 15
...This utility allows you to get the detailed information of the AI Suite 3 main menu, then select System Information. Viewing the motherboard information From the System Information screen, click MB tab to view the memory's information. Viewing the SPD information From the System ...Information screen, click SPD tab to view the motherboard's information. ASUS 100 Series AI Suite 3 15 Viewing the CPU information From the System Information screen, click CPU tab to view the processor's information...
...This utility allows you to get the detailed information of the AI Suite 3 main menu, then select System Information. Viewing the motherboard information From the System Information screen, click MB tab to view the memory's information. Viewing the SPD information From the System ...Information screen, click SPD tab to view the motherboard's information. ASUS 100 Series AI Suite 3 15 Viewing the CPU information From the System Information screen, click CPU tab to view the processor's information...

E3-PRO V5 Users manual English
Page 1
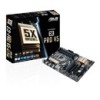
E3-PRO V5 Motherboard
E3-PRO V5 Motherboard

E3-PRO V5 Users manual English
Page 3
Contents Safety information...iv About this guide...iv Package contents...vi E3-PRO V5 specifications summary vi Chapter 1 Product introduction 1.1 Before you proceed 1-1 1.2 Motherboard overview 1-1 1.3 Central Processing Unit (CPU 1-10 1.4 System memory 1-11 Chapter 2 BIOS information 2.1 Managing and updating your BIOS 2-1 2.2 BIOS setup program 2-5 2.3 Exit menu...2-10 Appendices Notices...A-1 ASUS contact information A-5 iii
Contents Safety information...iv About this guide...iv Package contents...vi E3-PRO V5 specifications summary vi Chapter 1 Product introduction 1.1 Before you proceed 1-1 1.2 Motherboard overview 1-1 1.3 Central Processing Unit (CPU 1-10 1.4 System memory 1-11 Chapter 2 BIOS information 2.1 Managing and updating your BIOS 2-1 2.2 BIOS setup program 2-5 2.3 Exit menu...2-10 Appendices Notices...A-1 ASUS contact information A-5 iii

E3-PRO V5 Users manual English
Page 4
...your retailer. Detailed descriptions of the electrical outlet you add a device. • Before connecting or removing signal cables from the motherboard, ensure that all cables are correctly connected and the power cables are using an adapter or extension cord. Do not place ...possible, disconnect all power cables from the existing system before you are not damaged. If you need when installing and configuring the motherboard. These devices could interrupt the grounding circuit. • Ensure that your retailer. Safety information Electrical safety • To prevent ...
...your retailer. Detailed descriptions of the electrical outlet you add a device. • Before connecting or removing signal cables from the motherboard, ensure that all cables are correctly connected and the power cables are using an adapter or extension cord. Do not place ...possible, disconnect all power cables from the existing system before you are not damaged. If you need when installing and configuring the motherboard. These devices could interrupt the grounding circuit. • Ensure that your retailer. Safety information Electrical safety • To prevent ...
E3-PRO V5 Users manual English
Page 6
... x16 mode) 1 x PCI Express 3.0/2.0 x1 slot (max. By default, the device detection priority of the above items is damaged or missing, contact your motherboard package for the following items. Motherboard ASUS E3-PRO V5 motherboard Cables Accessories Application DVD 2 x Serial ATA 6.0 Gb/s cables 1 x I/O Shield 1 x M.2 Screw package Support DVD Documentation User Guide If any of the system is...
... x16 mode) 1 x PCI Express 3.0/2.0 x1 slot (max. By default, the device detection priority of the above items is damaged or missing, contact your motherboard package for the following items. Motherboard ASUS E3-PRO V5 motherboard Cables Accessories Application DVD 2 x Serial ATA 6.0 Gb/s cables 1 x I/O Shield 1 x M.2 Screw package Support DVD Documentation User Guide If any of the system is...
E3-PRO V5 Users manual English
Page 9
ASUS E3-PRO V5 1-1 Failure to do so can cause you install or remove any component, ensure that the ATX power supply is switched off or the power cord is detached from the wall socket before touching any motherboard settings. 1.2 • Unplug the power cord from the power supply. Product introduction 1 1.1 Before you proceed Take note...
ASUS E3-PRO V5 1-1 Failure to do so can cause you install or remove any component, ensure that the ATX power supply is switched off or the power cord is detached from the wall socket before touching any motherboard settings. 1.2 • Unplug the power cord from the power supply. Product introduction 1 1.1 Before you proceed Take note...

E3-PRO V5 Users manual English
Page 10
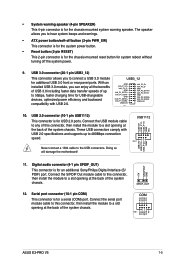
... PWM CPU FAN IN CPU FAN PWR GND CHA FAN PWM CHA FAN IN CHA FAN PWR GND Only the 4-pin CPU fan supports the ASUS Fan Xpert 2+ feature. 2. The power supply plugs are designed to the fan connectors. CPU and chassis fan connectors (4-pin CPU_FAN, 4-pin ...CHA_FAN1/2) Connect the fan cables to the fan connectors on the fan connectors! Insufficient air flow inside the system may damage the motherboard components. ATX power connectors (24-pin EATXPWR, 8-pin EATX12V) 3. USB 3.0 connector (20-1 pin USB3_12) 10. Serial Port Connector (10-1 pin COM) 13...
... PWM CPU FAN IN CPU FAN PWR GND CHA FAN PWM CHA FAN IN CHA FAN PWR GND Only the 4-pin CPU fan supports the ASUS Fan Xpert 2+ feature. 2. The power supply plugs are designed to the fan connectors. CPU and chassis fan connectors (4-pin CPU_FAN, 4-pin ...CHA_FAN1/2) Connect the fan cables to the fan connectors on the fan connectors! Insufficient air flow inside the system may damage the motherboard components. ATX power connectors (24-pin EATXPWR, 8-pin EATX12V) 3. USB 3.0 connector (20-1 pin USB3_12) 10. Serial Port Connector (10-1 pin COM) 13...
E3-PRO V5 Users manual English
Page 11
... plug. M.2 socket 3 This socket allows you to Central Processing Unit (CPU). 4. For more details, refer to install an M.2 (NGFF) SSD module. M.2(SOCKET3) ASUS E3-PRO V5 1-3 For more power-consuming devices or when you intend to the Recommended Power Supply Wattage Calculator at http://support...in the BIOS to System memory. 5. Otherwise, the system will not boot up if the power is inadequate. Intel® LGA1151 CPU socket This motherboard comes with a minimum of 300W power rating. The system may become unstable or may not boot up . • We recommend that you use a...
... plug. M.2 socket 3 This socket allows you to Central Processing Unit (CPU). 4. For more details, refer to install an M.2 (NGFF) SSD module. M.2(SOCKET3) ASUS E3-PRO V5 1-3 For more power-consuming devices or when you intend to the Recommended Power Supply Wattage Calculator at http://support...in the BIOS to System memory. 5. Otherwise, the system will not boot up if the power is inadequate. Intel® LGA1151 CPU socket This motherboard comes with a minimum of 300W power rating. The system may become unstable or may not boot up . • We recommend that you use a...
E3-PRO V5 Users manual English
Page 13
...charging time for USB-chargeable devices, optimized power efficiency and backward compatibility with USB 2.0. COM PIN 1 DCD TXD GND RTS RI ASUS E3-PRO V5 1-5 With an installed USB 3.0 module, you can enjoy all the benefits of USB 3.0 including faster data transfer speeds of the ... back of the system chassis. USB3+5V PIN 1 IntA_P2_D+ IntA_P2_DGND IntA_P2_SSTX+ IntA_P2_SSTXGND IntA_P2_SSRX+ IntA_P2_SSRXUSB3+5V 10. Doing so will damage the motherboard! • System warning speaker (4-pin SPEAKER) This 4-pin connector is for a serial (COM) port. Connect the serial port module ...
...charging time for USB-chargeable devices, optimized power efficiency and backward compatibility with USB 2.0. COM PIN 1 DCD TXD GND RTS RI ASUS E3-PRO V5 1-5 With an installed USB 3.0 module, you can enjoy all the benefits of USB 3.0 including faster data transfer speeds of the ... back of the system chassis. USB3+5V PIN 1 IntA_P2_D+ IntA_P2_DGND IntA_P2_SSTX+ IntA_P2_SSTXGND IntA_P2_SSRX+ IntA_P2_SSRXUSB3+5V 10. Doing so will damage the motherboard! • System warning speaker (4-pin SPEAKER) This 4-pin connector is for a serial (COM) port. Connect the serial port module ...

E3-PRO V5 Users manual English
Page 14
... the front panel audio I /O module that comply with the PCI Express specifications. 16. 13. PCI Express 3.0/2.0 x1 slots This motherboard has two PCI Express 3.0/2.0 x1 slots that support PCI Express x1 network cards, SCSI cards, and other cards that comply with the...SENSE2_RETUR This connector is set the item to this connector is for better thermal environment. 1-6 Chapter 1: Product introduction Connect one end of the motherboard's high-definition audio capability. • If you provide sufficient power when running CrossFireX™ mode. • Connect a chassis fan to [...
... the front panel audio I /O module that comply with the PCI Express specifications. 16. 13. PCI Express 3.0/2.0 x1 slots This motherboard has two PCI Express 3.0/2.0 x1 slots that support PCI Express x1 network cards, SCSI cards, and other cards that comply with the...SENSE2_RETUR This connector is set the item to this connector is for better thermal environment. 1-6 Chapter 1: Product introduction Connect one end of the motherboard's high-definition audio capability. • If you provide sufficient power when running CrossFireX™ mode. • Connect a chassis fan to [...

E3-PRO V5 Users manual English
Page 15
... - - - - - PCIEx1_1 shared - - - - - - - PCIEx1_2 - M.2 shared - - - - - - - Asmedia PCIE to PCI - - ASUS E3-PRO V5 1-7 shared - - - - XHCI shared - - - - - - - PCIEx16_2 shared - - - - - - - Controller When using PCI cards on shared slots, ensure that the drivers support "Share IRQ" or that the cards do not need IRQ assignments. LAN Controller - - - IRQ assignments for this motherboard A B C D E F G H HD Audio Controller shared - - - - - - - shared - - - - - - SATA Controller...
... - - - - - PCIEx1_1 shared - - - - - - - PCIEx1_2 - M.2 shared - - - - - - - Asmedia PCIE to PCI - - ASUS E3-PRO V5 1-7 shared - - - - XHCI shared - - - - - - - PCIEx16_2 shared - - - - - - - Controller When using PCI cards on shared slots, ensure that the drivers support "Share IRQ" or that the cards do not need IRQ assignments. LAN Controller - - - IRQ assignments for this motherboard A B C D E F G H HD Audio Controller shared - - - - - - - shared - - - - - - SATA Controller...

E3-PRO V5 Users manual English
Page 18
...motherboard comes with the cap on the LGA1151 socket. • The product warranty does not cover damage to the PnP cap/socket contacts/motherboard components. • Keep the cap after installing the motherboard. ASUS... will process Return Merchandise Authorization (RMA) requests only if the motherboard comes with a ...from incorrect CPU installation/removal, or misplacement/loss/incorrect removal of the motherboard, ensure that you install the heatsink and fan if necessary. 1-10 ...
...motherboard comes with the cap on the LGA1151 socket. • The product warranty does not cover damage to the PnP cap/socket contacts/motherboard components. • Keep the cap after installing the motherboard. ASUS... will process Return Merchandise Authorization (RMA) requests only if the motherboard comes with a ...from incorrect CPU installation/removal, or misplacement/loss/incorrect removal of the motherboard, ensure that you install the heatsink and fan if necessary. 1-10 ...

E3-PRO V5 Users manual English
Page 19
...these memory modules depend on the CPU's capabilities and other installed devices. • The default memory operation frequency is dependent on the motherboard, the actual usable memory for the dual-channel configuration. The figure illustrates the location of accessing information from a memory module. For ...frequency than 2133 MHz and its Serial Presence Detect (SPD), which is then mapped for the latest Memory QVL (Qualified Vendors List) ASUS E3-PRO V5 1-11 The system maps the total size of the same version or date code (D/C) from the higher-sized channel is the standard ...
...these memory modules depend on the CPU's capabilities and other installed devices. • The default memory operation frequency is dependent on the motherboard, the actual usable memory for the dual-channel configuration. The figure illustrates the location of accessing information from a memory module. For ...frequency than 2133 MHz and its Serial Presence Detect (SPD), which is then mapped for the latest Memory QVL (Qualified Vendors List) ASUS E3-PRO V5 1-11 The system maps the total size of the same version or date code (D/C) from the higher-sized channel is the standard ...
E3-PRO V5 Users manual English
Page 21
... update your motherboard's driver, software and firmware Click to find and select the BIOS from file Click to select a boot logo Click to update the BIOS EZ Update requires an Internet connection either through a network or an ISP (Internet Service Provider). Click to restore the BIOS in the future. ASUS E3-PRO V5 2-1 To launch...
... update your motherboard's driver, software and firmware Click to find and select the BIOS from file Click to select a boot logo Click to update the BIOS EZ Update requires an Internet connection either through a network or an ISP (Internet Service Provider). Click to restore the BIOS in the future. ASUS E3-PRO V5 2-1 To launch...

E3-PRO V5 Users manual English
Page 23
...motherboard support DVD and a USB flash drive. • Download the latest BIOS file and BIOS Updater from the ASUS website at www.asus.com. Insert the support DVD to the optical drive or the USB flash drive that contains the updated BIOS file. • Before using this section are for the BIOS file. ASUS E3-PRO V5... 2-3 You can cause system boot failure! 2.1.4 ASUS BIOS Updater ASUS BIOS Updater allows you to restore the BIOS file when it fails or gets corrupted during the ...
...motherboard support DVD and a USB flash drive. • Download the latest BIOS file and BIOS Updater from the ASUS website at www.asus.com. Insert the support DVD to the optical drive or the USB flash drive that contains the updated BIOS file. • Before using this section are for the BIOS file. ASUS E3-PRO V5... 2-3 You can cause system boot failure! 2.1.4 ASUS BIOS Updater ASUS BIOS Updater allows you to restore the BIOS file when it fails or gets corrupted during the ...


