

User Guide
Page 6
.... • Connect the equipment to an outlet on a circuit different from digital apparatus set out in a residential installation. vi User Guide This equipment has been tested and found to comply with manufacturer's instructions, may cause undesired operation. Changes or modifications to this unit not expressly approved by the party responsible for...
.... • Connect the equipment to an outlet on a circuit different from digital apparatus set out in a residential installation. vi User Guide This equipment has been tested and found to comply with manufacturer's instructions, may cause undesired operation. Changes or modifications to this unit not expressly approved by the party responsible for...
User Guide
Page 45
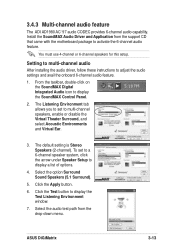
...or disable the Virtual Theater Surround, and select Acoustic Environments and Virtual Ear. 3. To set to display a list of options. 4. ASUS DiGiMatrix 3-13 Setting to multi-channel audio After installing the audio driver, follow these instructions to display the SoundMAX Control Panel. 2. Click ...the Apply button. 6. The default setting is Stereo Speakers (2-channel). Select the audio test path from the support CD that came with the motherboard package to display the Test Listening Environment window. 7. From the taskbar, double-click on the SoundMAX Digital Integrated Audio...
...or disable the Virtual Theater Surround, and select Acoustic Environments and Virtual Ear. 3. To set to display a list of options. 4. ASUS DiGiMatrix 3-13 Setting to multi-channel audio After installing the audio driver, follow these instructions to display the SoundMAX Control Panel. 2. Click ...the Apply button. 6. The default setting is Stereo Speakers (2-channel). Select the audio test path from the support CD that came with the motherboard package to display the Test Listening Environment window. 7. From the taskbar, double-click on the SoundMAX Digital Integrated Audio...

User Guide
Page 46
... moving on the screen indicating the audio path. Click Apply, then click OK when finished. 13. After selecting an option, test your setting by clicking the Play Test Noise button. Click this button at any time to select a setting for the MIDI. Click the Synthesizer Default Set drop-down... menu to display a list of options. The Play Test Noise button becomes Stop Playing button. Choose the desired setting. 12. Audio path indicator 11. Reboot the computer. 3-14 Chapter 3: Starting up 8. ...
... moving on the screen indicating the audio path. Click Apply, then click OK when finished. 13. After selecting an option, test your setting by clicking the Play Test Noise button. Click this button at any time to select a setting for the MIDI. Click the Synthesizer Default Set drop-down... menu to display a list of options. The Play Test Noise button becomes Stop Playing button. Choose the desired setting. 12. Audio path indicator 11. Reboot the computer. 3-14 Chapter 3: Starting up 8. ...
User Guide
Page 120
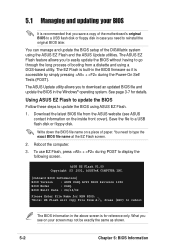
...accessible by simply pressing + during POST to go through the long process of the DiGiMatrix system using ASUS EZ Flash. 1. To use EZ Flash, press + during the Power-On Self Tests (POST). Reboot the computer. 3. ASUS EZ Flash V1.00 Copyright (C) 2002, ASUSTeK COMPUTER INC. [Onboard BIOS Information...] BIOS Version : ASUS P4SQ ACPI BIOS Revision 1002 BIOS Model : P4SQ BIOS Built Date : 04/16/...
...accessible by simply pressing + during POST to go through the long process of the DiGiMatrix system using ASUS EZ Flash. 1. To use EZ Flash, press + during the Power-On Self Tests (POST). Reboot the computer. 3. ASUS EZ Flash V1.00 Copyright (C) 2002, ASUSTeK COMPUTER INC. [Onboard BIOS Information...] BIOS Version : ASUS P4SQ ACPI BIOS Revision 1002 BIOS Model : P4SQ BIOS Built Date : 04/16/...
User Guide
Page 122
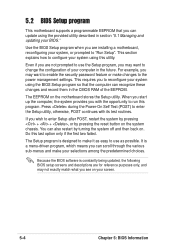
When you start up the computer, the system provides you with its test routines. The Setup program is a menu-driven program, which means you can scroll through the various sub-menus and make changes to "Run Setup". For ... the configuration of the EEPROM. This requires you to run this last option only if the first two failed. Press during the Power-On Self Test (POST) to enter the Setup utility, otherwise, POST continues with the opportunity to reconfigure your system using this utility. It is designed to make it...
When you start up the computer, the system provides you with its test routines. The Setup program is a menu-driven program, which means you can scroll through the various sub-menus and make changes to "Run Setup". For ... the configuration of the EEPROM. This requires you to run this last option only if the first two failed. Press during the Power-On Self Test (POST) to enter the Setup utility, otherwise, POST continues with the opportunity to reconfigure your system using this utility. It is designed to make it...

User Guide
Page 144
... a virus-free boot sector. Configuration options: [APIC] [PIC] 5-26 Chapter 5: BIOS Information Configuration options: [Enabled] [Disabled] Quick Power On Self Test [Enabled] This field speeds up the Power-On-Self Test (POST) routine by the OS. Other Boot Device Select [INT18 Device (Network)] Configuration options: [Disabled] [INT18 Device (Network)] Plug & Play O/S [No...
... a virus-free boot sector. Configuration options: [APIC] [PIC] 5-26 Chapter 5: BIOS Information Configuration options: [Enabled] [Disabled] Quick Power On Self Test [Enabled] This field speeds up the Power-On-Self Test (POST) routine by the OS. Other Boot Device Select [INT18 Device (Network)] Configuration options: [Disabled] [INT18 Device (Network)] Plug & Play O/S [No...