
User Guide
Page 2
... number of ASUSTeK COMPUTER INC. ("ASUS"). SPECIFICATIONS AND INFORMATION CONTAINED IN THIS MANUAL ARE FURNISHED FOR INFORMATIONAL USE ONLY, AND ARE SUBJECT TO CHANGE AT ANY TIME WITHOUT NOTICE, AND SHOULD NOT BE CONSTRUED AS A COMMITMENT BY ASUS. ASUS ASSUMES NO RESPONSIBILITY OR LIABILITY FOR ...or may be reproduced, transmitted, transcribed, stored in a retrieval system, or translated into any means, except documentation kept by ASUS; Product warranty or service will not be registered trademarks or copyrights of alteration is defaced or missing. Products and corporate names ...
... number of ASUSTeK COMPUTER INC. ("ASUS"). SPECIFICATIONS AND INFORMATION CONTAINED IN THIS MANUAL ARE FURNISHED FOR INFORMATIONAL USE ONLY, AND ARE SUBJECT TO CHANGE AT ANY TIME WITHOUT NOTICE, AND SHOULD NOT BE CONSTRUED AS A COMMITMENT BY ASUS. ASUS ASSUMES NO RESPONSIBILITY OR LIABILITY FOR ...or may be reproduced, transmitted, transcribed, stored in a retrieval system, or translated into any means, except documentation kept by ASUS; Product warranty or service will not be registered trademarks or copyrights of alteration is defaced or missing. Products and corporate names ...

User Guide
Page 5
A-7 A.3 Optical drive technical specifications A-9 A.4 Wireless LAN adapter channels A-10 ASUS DiGiMatrix v Table of contents 4.4 Central Processing Unit (CPU 4-6 4.5 System memory 4-7 4.6 Jumper 4-8 4.7 Connectors 4-9 Chapter 5: BIOS information ... features A-2 A.1.2 Removing the top cover A-3 A.1.3 Installing a hard disk drive A-3 A.1.4 Connecting the Subsystem to DiGiMatrix A-4 A.2 DiGiMatrix remote controller A-5 A.2.1 Specifications A-5 A.2.2 Remote control layout A-5 A.2.3 Remote control functions in Audio DJ A-6 A.2.4 Remote control functions in Home Theater ..........
A-7 A.3 Optical drive technical specifications A-9 A.4 Wireless LAN adapter channels A-10 ASUS DiGiMatrix v Table of contents 4.4 Central Processing Unit (CPU 4-6 4.5 System memory 4-7 4.6 Jumper 4-8 4.7 Connectors 4-9 Chapter 5: BIOS information ... features A-2 A.1.2 Removing the top cover A-3 A.1.3 Installing a hard disk drive A-3 A.1.4 Connecting the Subsystem to DiGiMatrix A-4 A.2 DiGiMatrix remote controller A-5 A.2.1 Specifications A-5 A.2.2 Remote control layout A-5 A.2.3 Remote control functions in Audio DJ A-6 A.2.4 Remote control functions in Home Theater ..........
User Guide
Page 8
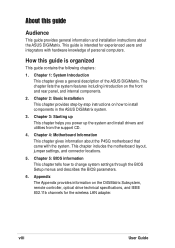
...the P4SQ motherboard that came with hardware knowledge of the ASUS DiGiMatrix. Chapter 2: Basic Installation This chapter provides step-by-step instructions on the DiGiMatrix Subsystem, remote controller, optical drive technical specifications, and IEEE 802.11b channels for experienced users and integrators...guide is organized This guide contains the following chapters: 1. Chapter 4: Motherboard Information This chapter gives information about the ASUS DiGiMatrix. viii User Guide Safeguards About this guide is intended for the wireless LAN adapter. The chapter lists the system ...
...the P4SQ motherboard that came with hardware knowledge of the ASUS DiGiMatrix. Chapter 2: Basic Installation This chapter provides step-by-step instructions on the DiGiMatrix Subsystem, remote controller, optical drive technical specifications, and IEEE 802.11b channels for experienced users and integrators...guide is organized This guide contains the following chapters: 1. Chapter 4: Motherboard Information This chapter gives information about the ASUS DiGiMatrix. viii User Guide Safeguards About this guide is intended for the wireless LAN adapter. The chapter lists the system ...
User Guide
Page 24
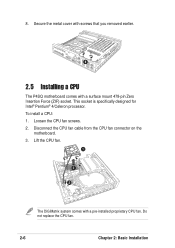
Do not replace the CPU fan. 2-6 Chapter 2: Basic Installation This socket is specifically designed for Intel® Pentium® 4/Celeron processor. Loosen the CPU fan screws. 2. Disconnect the CPU fan cable from the CPU fan connector on the motherboard. 3. Secure the metal cover with screws that you removed earlier. 8 2.5 Installing a CPU The P4SQ motherboard comes with a pre-installed proprietary CPU fan. Lift the CPU fan. 1 3 2 The DiGiMatrix system comes with a surface mount 478-pin Zero Insertion Force (ZIF) socket. To install a CPU: 1. 8.
Do not replace the CPU fan. 2-6 Chapter 2: Basic Installation This socket is specifically designed for Intel® Pentium® 4/Celeron processor. Loosen the CPU fan screws. 2. Disconnect the CPU fan cable from the CPU fan connector on the motherboard. 3. Secure the metal cover with screws that you removed earlier. 8 2.5 Installing a CPU The P4SQ motherboard comes with a pre-installed proprietary CPU fan. Lift the CPU fan. 1 3 2 The DiGiMatrix system comes with a surface mount 478-pin Zero Insertion Force (ZIF) socket. To install a CPU: 1. 8.
User Guide
Page 108
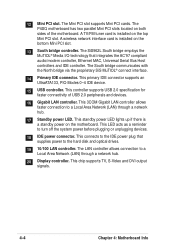
... signals. 4-4 Chapter 4: Motherboard Info A wireless network interface card is a standby power on the bottom Mini PCI slot. 13 South bridge controller. This controller supports USB 2.0 specification for faster connectivity of the motherboard. The LAN controller allows connection to the IDE power plug that integrates the AC'97 compliant audio/modem controller...
... signals. 4-4 Chapter 4: Motherboard Info A wireless network interface card is a standby power on the bottom Mini PCI slot. 13 South bridge controller. This controller supports USB 2.0 specification for faster connectivity of the motherboard. The LAN controller allows connection to the IDE power plug that integrates the AC'97 compliant audio/modem controller...
User Guide
Page 110
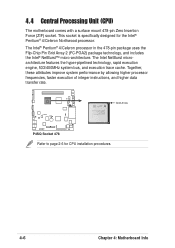
...® NetBurst™ micro-architecture. 4.4 Central Processing Unit (CPU) The motherboard comes with a surface mount 478-pin Zero Insertion Force (ZIF) socket. This socket is specifically designed for CPU installation procedures. 4-6 Chapter 4: Motherboard Info
...® NetBurst™ micro-architecture. 4.4 Central Processing Unit (CPU) The motherboard comes with a surface mount 478-pin Zero Insertion Force (ZIF) socket. This socket is specifically designed for CPU installation procedures. 4-6 Chapter 4: Motherboard Info
User Guide
Page 124
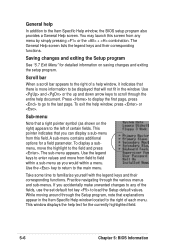
Scroll bar When a scroll bar appears to the Item Specific Help window, the BIOS setup program also provides a General Help screen. Practice navigating through the entire help In addition to the right of certain fields. ... menu. Use the key to return to the last page. While moving around through the Setup program, note that will not fit in the Item Specific Help window located to the right of the fields, use the set default hot key to the field and press . You may launch this field...
Scroll bar When a scroll bar appears to the Item Specific Help window, the BIOS setup program also provides a General Help screen. Practice navigating through the entire help In addition to the right of certain fields. ... menu. Use the key to return to the last page. While moving around through the Setup program, note that will not fit in the Item Specific Help window located to the right of the fields, use the set default hot key to the field and press . You may launch this field...
User Guide
Page 141
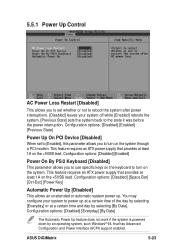
... [Disabled] This parameter allows you to use specific keys on the keyboard to turn on the system. You may configure your system off while [Enabled] reboots the system. [Previous State] sets the system back to the state it was before the power interruption. ASUS DiGiMatrix 5-23 This feature requires an ATX power supply...
... [Disabled] This parameter allows you to use specific keys on the keyboard to turn on the system. You may configure your system off while [Enabled] reboots the system. [Previous State] sets the system back to the state it was before the power interruption. ASUS DiGiMatrix 5-23 This feature requires an ATX power supply...
User Guide
Page 147
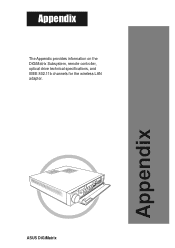
ASUS DiGiMatrix Appendix Appendix The Appendix provides information on the DiGiMatrix Subsystem, remote controller, optical drive technical specifications, and IEEE 802.11b channels for the wireless LAN adapter.
ASUS DiGiMatrix Appendix Appendix The Appendix provides information on the DiGiMatrix Subsystem, remote controller, optical drive technical specifications, and IEEE 802.11b channels for the wireless LAN adapter.
User Guide
Page 151
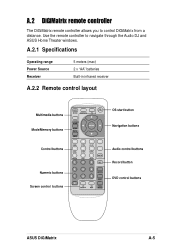
Use the remote controller to control DiGiMatrix from a distance. A.2 DiGiMatrix remote controller The DiGiMatrix remote controller allows you to navigate through the Audio DJ and ASUS Home Theater windows. A.2.1 Specifications Operating range Power Source Receiver 5 meters (max) 2 x "AA" batteries Built-in infrared receiver A.2.2 Remote control layout Multimedia buttons Mode/Memory buttons Control buttons Numeric buttons Screen control buttons OS start button Navigation buttons Audio control buttons Record button DVD control buttons ASUS DiGiMatrix A-5
Use the remote controller to control DiGiMatrix from a distance. A.2 DiGiMatrix remote controller The DiGiMatrix remote controller allows you to navigate through the Audio DJ and ASUS Home Theater windows. A.2.1 Specifications Operating range Power Source Receiver 5 meters (max) 2 x "AA" batteries Built-in infrared receiver A.2.2 Remote control layout Multimedia buttons Mode/Memory buttons Control buttons Numeric buttons Screen control buttons OS start button Navigation buttons Audio control buttons Record button DVD control buttons ASUS DiGiMatrix A-5