User Manual
Page 3
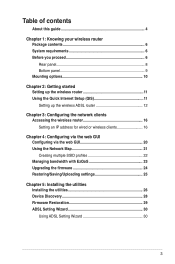
... 6 System requirements 6 Before you proceed 6 Rear panel 8 Bottom panel 9 Mounting options 10 Chapter 2: Getting started Setting up the wireless router 11 Using the Quick Internet Setup (QIS 11 Setting up the wireless ADSL router 12 Chapter 3: Configuring the network clients Accessing the wireless router 16 Setting an IP address for wired...
... 6 System requirements 6 Before you proceed 6 Rear panel 8 Bottom panel 9 Mounting options 10 Chapter 2: Getting started Setting up the wireless router 11 Using the Quick Internet Setup (QIS 11 Setting up the wireless ADSL router 12 Chapter 3: Configuring the network clients Accessing the wireless router 16 Setting an IP address for wired...
User Manual
Page 11
...hardware DSL-N10 11 You may also launch the QIS from the Network Map page in setting up your wireless router using the web GUI, refer to configure the wireless ADSL router using your web browser on your web browser. Using the Quick Internet Setup (QIS) The Quick Internet Setup (QIS...web GUI. 2 Getting started Setting up the wireless router The ASUS Wireless ADSL Router includes a web Graphical User Interface (web GUI) that allows you to Chapter 4: Configuring via the web GUI. To do this, click Quick Internet Setup on configuring your network quickly. The QIS web page appears ...
...hardware DSL-N10 11 You may also launch the QIS from the Network Map page in setting up your wireless router using the web GUI, refer to configure the wireless ADSL router using your web browser on your web browser. Using the Quick Internet Setup (QIS) The Quick Internet Setup (QIS...web GUI. 2 Getting started Setting up the wireless router The ASUS Wireless ADSL Router includes a web Graphical User Interface (web GUI) that allows you to Chapter 4: Configuring via the web GUI. To do this, click Quick Internet Setup on configuring your network quickly. The QIS web page appears ...
User Manual
Page 12
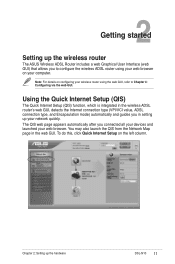
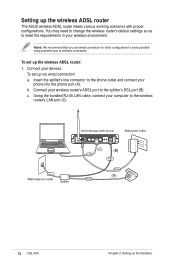
...'s line connector to the splitter's DSL port (B). ASUS Wireless ADSL Router ANT Reset Power Power LAN4 LAN3 LAN2 LAN1 Wireless WPS On/Off ADSL ADSL (C) (B) (A) 12 DSL-N10 Chapter 2: Setting up the wireless ADSL router The ASUS wireless ADSL router meets various working scenarios... with proper configurations. Notes: We recommend that you use wired connection for initial configuration to avoid possible setup problems due to the wireless...
...'s line connector to the splitter's DSL port (B). ASUS Wireless ADSL Router ANT Reset Power Power LAN4 LAN3 LAN2 LAN1 Wireless WPS On/Off ADSL ADSL (C) (B) (A) 12 DSL-N10 Chapter 2: Setting up the wireless ADSL router The ASUS wireless ADSL router meets various working scenarios... with proper configurations. Notes: We recommend that you use wired connection for initial configuration to avoid possible setup problems due to the wireless...

User Manual
Page 14
..., VPI/VCI value and encapsulation mode. The setup screen varies with different Internet connection types. • Obtain the required information such as the user name and password from your Internet Service Provider (ISP). 14 DSL-N10 Chapter 2: Setting up the Internet connection manually.... The QIS web page appears automatically and starts detecting your web browser. 4. If the QIS cannot detect your web browser. Key in this setup case. Launch your Internet connection ...
..., VPI/VCI value and encapsulation mode. The setup screen varies with different Internet connection types. • Obtain the required information such as the user name and password from your Internet Service Provider (ISP). 14 DSL-N10 Chapter 2: Setting up the Internet connection manually.... The QIS web page appears automatically and starts detecting your web browser. 4. If the QIS cannot detect your web browser. Key in this setup case. Launch your Internet connection ...
User Manual
Page 15
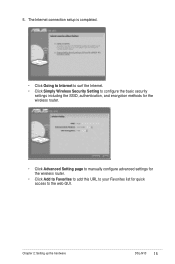
The Internet connection setup is completed. • Click Going to Internet to surf the Internet. • Click Simply Wireless Security Setting to configure the basic security settings including the SSID, authentication, and encryption methods for the wireless router. • Click Advanced Setting page to manually configure advanced settings for the wireless router. • Click Add to Favorites to add this URL to your Favorites list for quick access to the web GUI. Chapter 2: Setting up the hardware DSL-N10 15 5.
The Internet connection setup is completed. • Click Going to Internet to surf the Internet. • Click Simply Wireless Security Setting to configure the basic security settings including the SSID, authentication, and encryption methods for the wireless router. • Click Advanced Setting page to manually configure advanced settings for the wireless router. • Click Add to Favorites to add this URL to your Favorites list for quick access to the web GUI. Chapter 2: Setting up the hardware DSL-N10 15 5.
User Manual
Page 20
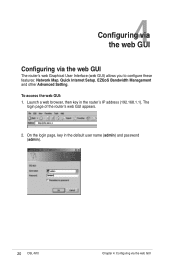
On the login page, key in the router's IP address (192.168.1.1). Launch a web browser, then key in the default user name (admin) and password (admin). 20 DSL-N10 Chapter 4: Configuring via the web GUI The router's web Graphical User Interface (web GUI) allows you to configure these features: Network Map, Quick Internet Setup, EZQoS Bandwidth Management and other Advanced Setting. 4 Configuring via the web GUI Configuring via the web GUI The login page of the router's web GUI appears. 2. To access the web GUI: 1.
On the login page, key in the router's IP address (192.168.1.1). Launch a web browser, then key in the default user name (admin) and password (admin). 20 DSL-N10 Chapter 4: Configuring via the web GUI The router's web Graphical User Interface (web GUI) allows you to configure these features: Network Map, Quick Internet Setup, EZQoS Bandwidth Management and other Advanced Setting. 4 Configuring via the web GUI Configuring via the web GUI The login page of the router's web GUI appears. 2. To access the web GUI: 1.
User Manual
Page 21
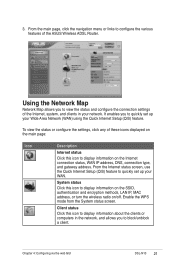
... quickly set up your WAN. From the Internet status screen, use the Quick Internet Setup (QIS) feature to view the status and configure the connection settings of the ASUS Wireless ADSL Router. Chapter 4: Configuring via the web GUI DSL-N10 21 From the main page, click the navigation menu or links to configure the...
... quickly set up your WAN. From the Internet status screen, use the Quick Internet Setup (QIS) feature to view the status and configure the connection settings of the ASUS Wireless ADSL Router. Chapter 4: Configuring via the web GUI DSL-N10 21 From the main page, click the navigation menu or links to configure the...
User Manual
Page 26
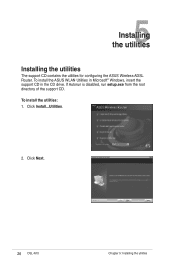
To install the utilities: 1. Click Install...Utilities. 2. Click Next. 26 DSL-N10 Chapter 5: Installing the utilities If Autorun is disabled, run setup.exe from the root directory of the support CD. To install the ASUS WLAN Utilities in Microsoft® Windows, insert the support CD in the CD drive. 5Installing the utilities Installing the utilities The support CD contains the utilities for configuring the ASUS Wireless ADSL Router.
To install the utilities: 1. Click Install...Utilities. 2. Click Next. 26 DSL-N10 Chapter 5: Installing the utilities If Autorun is disabled, run setup.exe from the root directory of the support CD. To install the ASUS WLAN Utilities in Microsoft® Windows, insert the support CD in the CD drive. 5Installing the utilities Installing the utilities The support CD contains the utilities for configuring the ASUS Wireless ADSL Router.

User Manual
Page 27
Click Finish when setup is completed. 3. Chapter 5: Installing the utilities DSL-N10 27 Click Next to specify another name. 5. Click Next to accept the default destination folder or click Browse to accept the default program folder or enter another path. 4.
Click Finish when setup is completed. 3. Chapter 5: Installing the utilities DSL-N10 27 Click Next to specify another name. 5. Click Next to accept the default destination folder or click Browse to accept the default program folder or enter another path. 4.
User Manual
Page 33
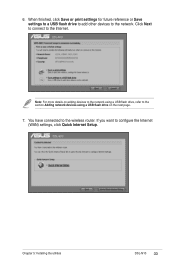
You have connected to the network. When finished, click Save or print settings for future reference or Save settings to a USB flash drive to add other devices to the wireless router. Note: For more details on adding devices to the network using a USB flash drive on the next page. 7. 6. Chapter 5: Installing the utilities DSL-N10 33 Click Next to connect to the section Adding network devices using a USB flash drive, refer to the Internet. If you want to configure the Internet (WAN) settings, click Quick Internet Setup.
You have connected to the network. When finished, click Save or print settings for future reference or Save settings to a USB flash drive to add other devices to the wireless router. Note: For more details on adding devices to the network using a USB flash drive on the next page. 7. 6. Chapter 5: Installing the utilities DSL-N10 33 Click Next to connect to the section Adding network devices using a USB flash drive, refer to the Internet. If you want to configure the Internet (WAN) settings, click Quick Internet Setup.

User Manual
Page 34
8. If you are a Russian user, follow the onscreen instructions to section Using the Quick Internet Setup (QIS) in Chapter 2 of this manual. For Internet (WAN) settings, refer to finish the ADSL Internet (WAN) settings. 34 DSL-N10 Chapter 5: Installing the utilities
8. If you are a Russian user, follow the onscreen instructions to section Using the Quick Internet Setup (QIS) in Chapter 2 of this manual. For Internet (WAN) settings, refer to finish the ADSL Internet (WAN) settings. 34 DSL-N10 Chapter 5: Installing the utilities
User Manual
Page 36
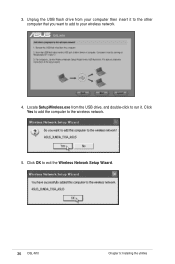
Click OK to the wireless network. 5. Click Yes to add the computer to exit the Wireless Network Setup Wizard. 36 DSL-N10 Chapter 5: Installing the utilities Unplug the USB flash drive from the USB drive, and double-click to run it to the other computer that you want to add to your computer then insert it . 3. Locate SetupWireless.exe from your wireless network. 4.
Click OK to the wireless network. 5. Click Yes to add the computer to exit the Wireless Network Setup Wizard. 36 DSL-N10 Chapter 5: Installing the utilities Unplug the USB flash drive from the USB drive, and double-click to run it to the other computer that you want to add to your computer then insert it . 3. Locate SetupWireless.exe from your wireless network. 4.


