
CUV4X User Manual
Page 7
...and specifications Intructions on setting up the motherboard. Package Contents (1) ASUS Motherboard (1) 40-pin 80-conductor ribbon cable for internal UltraDMA/ 66 or UltraDMA/33 IDE drives (1) Ribbon cable for the included software Optional items and general ...drives Optional Items ASUS CIDB chassis intrusion detection module ASUS IrDA-compliant infrared module ASUS PCI-L101 Wake-On-LAN 10/100 Ethernet Card (1) ASUS 2-port USB Connector Set (1) 9-pin COM2 cable (1) Bag of spare jumper caps (1) ASUS Support CD with drivers and utilities (1) This Motherboard User's Manual ASUS CUV4X...
...and specifications Intructions on setting up the motherboard. Package Contents (1) ASUS Motherboard (1) 40-pin 80-conductor ribbon cable for internal UltraDMA/ 66 or UltraDMA/33 IDE drives (1) Ribbon cable for the included software Optional items and general ...drives Optional Items ASUS CIDB chassis intrusion detection module ASUS IrDA-compliant infrared module ASUS PCI-L101 Wake-On-LAN 10/100 Ethernet Card (1) ASUS 2-port USB Connector Set (1) 9-pin COM2 cable (1) Bag of spare jumper caps (1) ASUS Support CD with drivers and utilities (1) This Motherboard User's Manual ASUS CUV4X...

CUV4X User Manual
Page 8
...Bus Master IDE DMA Mode 2, and Enhanced IDE devices, such as DVD-ROM, CD-ROM, CDR/RW, LS-120, and Tape Backup drives. • Wake-On-LAN Connector: Supports Wake-On-LAN activity through BIOS setup when JumperFree™ mode is carefully designed for the demanding...8226; North Bridge System Chipset: Features the VIA VT82C694Z system controller or VIA Apollo Pro133Z PCI-to 1.5GB. FEATURES 2.1 The ASUS CUV4X The ASUS CUV4X motherboard is enabled. Appendix). 8 ASUS CUV4X User's Manual and four USB ports. • PC133 SDRAM / VC133 VCM / HSDRAM Support: Equipped with three Dual Inline ...
...Bus Master IDE DMA Mode 2, and Enhanced IDE devices, such as DVD-ROM, CD-ROM, CDR/RW, LS-120, and Tape Backup drives. • Wake-On-LAN Connector: Supports Wake-On-LAN activity through BIOS setup when JumperFree™ mode is carefully designed for the demanding...8226; North Bridge System Chipset: Features the VIA VT82C694Z system controller or VIA Apollo Pro133Z PCI-to 1.5GB. FEATURES 2.1 The ASUS CUV4X The ASUS CUV4X motherboard is enabled. Appendix). 8 ASUS CUV4X User's Manual and four USB ports. • PC133 SDRAM / VC133 VCM / HSDRAM Support: Equipped with three Dual Inline ...

CUV4X User Manual
Page 10
...transfers from PCI master busses to the memory and processor. • High-Speed Data Transfer Interface: IDE transfers using PC100-compliant SDRAMs). 10 ASUS CUV4X User's Manual The new PC'99 requirements for systems and components are based on the following high-level goals: Support for Plug and Play...automatic. • PC'99 Compliant: Both the BIOS and hardware levels of about 30%. UltraDMA/66 is no need to upgrade current EIDE/IDE drives and host systems. (UltraDMA/66 requires a 40-pin 80-conductor cable to be used. • Easy Installation: Incorporates BIOS that support OS ...
...transfers from PCI master busses to the memory and processor. • High-Speed Data Transfer Interface: IDE transfers using PC100-compliant SDRAMs). 10 ASUS CUV4X User's Manual The new PC'99 requirements for systems and components are based on the following high-level goals: Support for Plug and Play...automatic. • PC'99 Compliant: Both the BIOS and hardware levels of about 30%. UltraDMA/66 is no need to upgrade current EIDE/IDE drives and host systems. (UltraDMA/66 requires a 40-pin 80-conductor cable to be used. • Easy Installation: Incorporates BIOS that support OS ...
CUV4X User Manual
Page 11
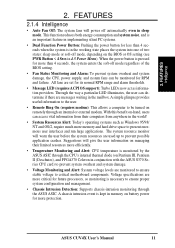
... This allows a computer to ensure proper system configuration and management. • Chassis Intrusion Detection: Supports chassis-intrusion monitoring through the ASUS ASIC. All fans are set for more protection. Voltage specifications are messages waiting in 4.5 Power Menu). FEATURES Intelligence 2. With this ...silent PC systems. • Dual Function Power Button: Pushing the power button for more memory and hard drive space to prevent possible application crashes. ASUS CUV4X User's Manual 11 When the power button is pressed for less than 4 seconds, the system enters the...
... This allows a computer to ensure proper system configuration and management. • Chassis Intrusion Detection: Supports chassis-intrusion monitoring through the ASUS ASIC. All fans are set for more protection. Voltage specifications are messages waiting in 4.5 Power Menu). FEATURES Intelligence 2. With this ...silent PC systems. • Dual Function Power Button: Pushing the power button for more memory and hard drive space to prevent possible application crashes. ASUS CUV4X User's Manual 11 When the power button is pressed for less than 4 seconds, the system enters the...
CUV4X User Manual
Page 15
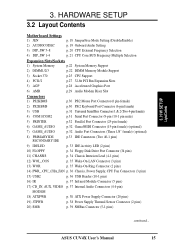
ASUS CUV4X User's Manual 15 HARDWARE SETUP 3.2 Layout Contents Motherboard Settings 1) JEN p. 18 JumperFree Mode Setting (Disable/Enable) 2) AUDIOCODEC p. 19 Onboard Audio Setting 3) DIP_SW 5-8 p. 20 CPU External ... Connectors (Three 1/8" female) (optional) 8) PRIMARY IDE p.33 IDE Connectors (Two 40-1 pins) SECONDARY IDE 9) IDELED p. 33 IDE Activity LED (2 pins) 10) FLOPPY p. 34 Floppy Disk Drive Port Connector (34 pins) 11) CHASSIS p. 34 Chassis Intrusion Lead (4-1 pins) 12) WOL_CON p. 35 Wake-On-LAN Connector (3 pins) 13) WOR p. 35 Wake-On-Ring...
ASUS CUV4X User's Manual 15 HARDWARE SETUP 3.2 Layout Contents Motherboard Settings 1) JEN p. 18 JumperFree Mode Setting (Disable/Enable) 2) AUDIOCODEC p. 19 Onboard Audio Setting 3) DIP_SW 5-8 p. 20 CPU External ... Connectors (Three 1/8" female) (optional) 8) PRIMARY IDE p.33 IDE Connectors (Two 40-1 pins) SECONDARY IDE 9) IDELED p. 33 IDE Activity LED (2 pins) 10) FLOPPY p. 34 Floppy Disk Drive Port Connector (34 pins) 11) CHASSIS p. 34 Chassis Intrusion Lead (4-1 pins) 12) WOL_CON p. 35 Wake-On-LAN Connector (3 pins) 13) WOR p. 35 Wake-On-Ring...

CUV4X User Manual
Page 30
... from the first connector. 1) PS/2 Mouse Connector (Green 6-pin PS2KBMS) The system will direct IRQ12 to the power connector on hard drives and CD-ROM drives, but may be less than 15 cm (6 in 4.4 Advanced Menu. Placing jumper caps over these connector pins will not allow standard AT... in the Motherboard Layout. IMPORTANT: Ribbon cables should always be on the opposite side on standard AT keyboards. PS/2 Keyboard (6-pin female) 30 ASUS CUV4X User's Manual Pin 1 is detected. You may use IRQ12. IDE ribbon cable must be exceptions. If one is usually on the side closest ...
... from the first connector. 1) PS/2 Mouse Connector (Green 6-pin PS2KBMS) The system will direct IRQ12 to the power connector on hard drives and CD-ROM drives, but may be less than 15 cm (6 in 4.4 Advanced Menu. Placing jumper caps over these connector pins will not allow standard AT... in the Motherboard Layout. IMPORTANT: Ribbon cables should always be on the opposite side on standard AT keyboards. PS/2 Keyboard (6-pin female) 30 ASUS CUV4X User's Manual Pin 1 is detected. You may use IRQ12. IDE ribbon cable must be exceptions. If one is usually on the side closest ...
CUV4X User Manual
Page 33
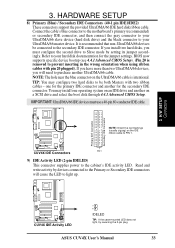
... you install two hard disks, you will cause the LED to your UltraDMA/66 master device. one operating system on a SCSI drive and select the boot disk through 4.4.1 Advanced CMOS Setup. ASUS CUV4X User's Manual 33 Connect the cable's blue connector to the motherboard's primary (recommended) or secondary IDE connector, and then connect...
... you install two hard disks, you will cause the LED to your UltraDMA/66 master device. one operating system on a SCSI drive and select the boot disk through 4.4.1 Advanced CMOS Setup. ASUS CUV4X User's Manual 33 Connect the cable's blue connector to the motherboard's primary (recommended) or secondary IDE connector, and then connect...
CUV4X User Manual
Page 34
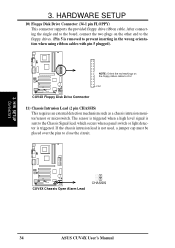
...signal is sent to close the circuit. 3. H/W SETUP Connectors CUV4X CUV4X Chassis Open Alarm Lead CHASSIS 34 ASUS CUV4X User's Manual HARDWARE SETUP 10) Floppy Disk Drive Connector (34-1 pin FLOPPY) This connector supports the provided floppy drive ribbon cable. If the chassis intrusion lead is not used,...pins to the Chassis Signal lead, which occurs when a panel switch or light detector is removed to PIN 1 PIN 1 CUV4X CUV4X Floppy Disk Drive Connector 11) Chassis Intrusion Lead (2 pin CHASSIS) This requires an external detection mechanism such as a chassis intrusion monitor/sensor...
...signal is sent to close the circuit. 3. H/W SETUP Connectors CUV4X CUV4X Chassis Open Alarm Lead CHASSIS 34 ASUS CUV4X User's Manual HARDWARE SETUP 10) Floppy Disk Drive Connector (34-1 pin FLOPPY) This connector supports the provided floppy drive ribbon cable. If the chassis intrusion lead is not used,...pins to the Chassis Signal lead, which occurs when a panel switch or light detector is removed to PIN 1 PIN 1 CUV4X CUV4X Floppy Disk Drive Connector 11) Chassis Intrusion Lead (2 pin CHASSIS) This requires an external detection mechanism such as a chassis intrusion monitor/sensor...

CUV4X User Manual
Page 43
...! 4. BIOS SETUP 4.1 Managing and Updating Your BIOS 4.1.1 Upon First Use of your screen during bootup. To determine the BIOS version of your hard drive. Type COPY D:\AFLASH\AFLASH.EXE A:\ (assuming D is recommended that you save a copy of the original motherboard BIOS along with a Flash Memory Writer... It will not work with DOS prompt in DOS mode. NOTE: BIOS setup must specify "Floppy" as the first item in DOS mode. ASUS CUV4X User's Manual 43 AFLASH.EXE is a Flash Memory Writer utility that may be programmed by uploading a new BIOS file to create a bootable ...
...! 4. BIOS SETUP 4.1 Managing and Updating Your BIOS 4.1.1 Upon First Use of your screen during bootup. To determine the BIOS version of your hard drive. Type COPY D:\AFLASH\AFLASH.EXE A:\ (assuming D is recommended that you save a copy of the original motherboard BIOS along with a Flash Memory Writer... It will not work with DOS prompt in DOS mode. NOTE: BIOS setup must specify "Floppy" as the first item in DOS mode. ASUS CUV4X User's Manual 43 AFLASH.EXE is a Flash Memory Writer utility that may be programmed by uploading a new BIOS file to create a bootable ...

CUV4X User Manual
Page 50
...date that you specify (usually the current date). Floppy 3 Mode support will allow reading and writing of floppy drives installed. Configuration options: [Disabled] [Enabled] 50 ASUS CUV4X User's Manual The format is month, day, year. The format is hour, minute, second. 4. BIOS SETUP...you specify (usually the current time). Valid values for hour, minute and second are Month: (1 to 12), Day: (1 to support older Japanese floppy drives. Use the or + keys to 59). Legacy Diskette A [1.44M, 3.5 in .] Floppy 3 Mode Support [Disabled] This is accessed, the following ...
...date that you specify (usually the current date). Floppy 3 Mode support will allow reading and writing of floppy drives installed. Configuration options: [Disabled] [Enabled] 50 ASUS CUV4X User's Manual The format is month, day, year. The format is hour, minute, second. 4. BIOS SETUP...you specify (usually the current time). Valid values for hour, minute and second are Month: (1 to 12), Day: (1 to support older Japanese floppy drives. Use the or + keys to 59). Legacy Diskette A [1.44M, 3.5 in .] Floppy 3 Mode Support [Disabled] This is accessed, the following ...
CUV4X User Manual
Page 51
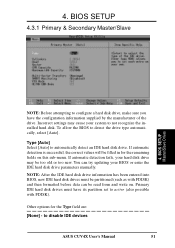
... system to not recognize the installed hard disk. BIOS SETUP Master/Slave Drives NOTE: Before attempting to disable IDE devices ASUS CUV4X User's Manual 51 Type [Auto] Select [Auto] to detect the drive type automatically, select [Auto]. If automatic detection fails, your hard disk drive may cause your BIOS or enter the IDE hard disk...
... system to not recognize the installed hard disk. BIOS SETUP Master/Slave Drives NOTE: Before attempting to disable IDE devices ASUS CUV4X User's Manual 51 Type [Auto] Select [Auto] to detect the drive type automatically, select [Auto]. If automatic detection fails, your hard disk drive may cause your BIOS or enter the IDE hard disk...

CUV4X User Manual
Page 52
..., the Type field must be set to this information. BIOS SETUP IMPORTANT: If your drive documentation or look on an older previous system, incorrect parameters may be set to [Manual]. 52 ASUS CUV4X User's Manual If the parameters listed differ from the ones used for your... drive documentation to determine the correct value to your drive. Translation Method [LBA] Select the hard disk drive type in storage capacity. Refer to enter into this...
..., the Type field must be set to this information. BIOS SETUP IMPORTANT: If your drive documentation or look on an older previous system, incorrect parameters may be set to [Manual]. 52 ASUS CUV4X User's Manual If the parameters listed differ from the ones used for your... drive documentation to determine the correct value to your drive. Translation Method [LBA] Select the hard disk drive type in storage capacity. Refer to enter into this...

CUV4X User Manual
Page 53
...] [32 Sectors] [Maximum] SMART Monitoring [Disabled] This allows the enabling or disabling of read/write heads. BIOS SETUP Master/Slave Drives ASUS CUV4X User's Manual 53 4. This feature is automatically configured, the set value may not always be set to the documentation that when this field...be set a PIO (Programmed Input/Output) mode for the IDE device. NOTE: To make changes to the highest number supported by the drive. Multi-Sector Transfers [Maximum] This option automatically sets the number of sectors per block to this field. Configuration options: [0] [1] [2] ...
...] [32 Sectors] [Maximum] SMART Monitoring [Disabled] This allows the enabling or disabling of read/write heads. BIOS SETUP Master/Slave Drives ASUS CUV4X User's Manual 53 4. This feature is automatically configured, the set value may not always be set to the documentation that when this field...be set a PIO (Programmed Input/Output) mode for the IDE device. NOTE: To make changes to the highest number supported by the drive. Multi-Sector Transfers [Maximum] This option automatically sets the number of sectors per block to this field. Configuration options: [0] [1] [2] ...

CUV4X User Manual
Page 54
...This field enables users to the Main menu. for the hard disk drive that you just configured. 4.3.2 Keyboard Features 4. Options range from 6 to 30 characters per second. Configuration options: [1/4 Sec] [1/2 Sec] [3/4 Sec] [1 Sec] 54 ASUS CUV4X User's Manual Configuration options: [6/Sec] [8/Sec] [10/Sec]... [12/Sec] [15/Sec] [20/Sec] [24/Sec] [30/Sec] Keyboard Auto-Repeat Delay [1/4 Sec] This field sets the time interval for LS-120 compatible floppy disk drives [ZIP-100] - for displaying...
...This field enables users to the Main menu. for the hard disk drive that you just configured. 4.3.2 Keyboard Features 4. Options range from 6 to 30 characters per second. Configuration options: [1/4 Sec] [1/2 Sec] [3/4 Sec] [1 Sec] 54 ASUS CUV4X User's Manual Configuration options: [6/Sec] [8/Sec] [10/Sec]... [12/Sec] [15/Sec] [20/Sec] [24/Sec] [30/Sec] Keyboard Auto-Repeat Delay [1/4 Sec] This field sets the time interval for LS-120 compatible floppy disk drives [ZIP-100] - for displaying...
CUV4X User Manual
Page 63
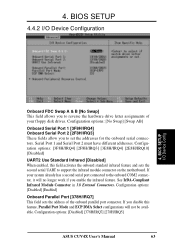
... IrDA-Compliant Infrared Module Connector in 3.8 External Connectors. BIOS SETUP I /O Device Configuration 4. Configuration options: [Disabled] [378H/IRQ7] [278H/IRQ5] ASUS CUV4X User's Manual 63 Configuration options: [3F8H/IRQ4] [2F8H/IRQ3] [3E8H/IRQ4] [2E8H/IRQ10] [Disabled] UART2 Use Standard Infrared [Disabled] When ...your system already has a second serial port connected to support the infrared module connector on the motherboard. If your floppy disk drives. If you enable the infrared feature. 4. BIOS SETUP 4.4.2 I /O Device Config Onboard FDC Swap A & B [No Swap] ...
... IrDA-Compliant Infrared Module Connector in 3.8 External Connectors. BIOS SETUP I /O Device Configuration 4. Configuration options: [Disabled] [378H/IRQ7] [278H/IRQ5] ASUS CUV4X User's Manual 63 Configuration options: [3F8H/IRQ4] [2F8H/IRQ3] [3E8H/IRQ4] [2E8H/IRQ10] [Disabled] UART2 Use Standard Infrared [Disabled] When ...your system already has a second serial port connected to support the infrared module connector on the motherboard. If your floppy disk drives. If you enable the infrared feature. 4. BIOS SETUP 4.4.2 I /O Device Config Onboard FDC Swap A & B [No Swap] ...
CUV4X User Manual
Page 71
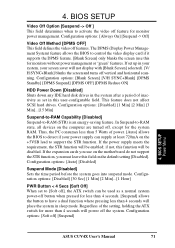
...] [DPMS Suspend] [DPMS OFF] [DPMS Reduce ON] HDD Power Down [Disabled] Shuts down any IDE hard disk drives in this for the system RAM. This feature does not affect SCSI hard drives. BIOS SETUP Power Menu ASUS CUV4X User's Manual 71 Configuration options: [Always On] [Suspend -> Off] Video Off Method [DPMS OFF] This field...
...] [DPMS Suspend] [DPMS OFF] [DPMS Reduce ON] HDD Power Down [Disabled] Shuts down any IDE hard disk drives in this for the system RAM. This feature does not affect SCSI hard drives. BIOS SETUP Power Menu ASUS CUV4X User's Manual 71 Configuration options: [Always On] [Suspend -> Off] Video Off Method [DPMS OFF] This field...
CUV4X User Manual
Page 75
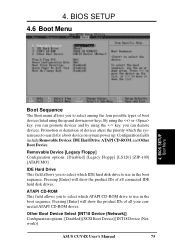
... Boot Device Select [INT18 Device (Network)] Configuration options: [Disabled] [SCSI Boot Device] [INT18 Device (Network)] ASUS CUV4X User's Manual 75 Pressing [Enter] will show the product IDs of devices alters the priority which ATAPI CD-ROM drive to search for a boot device on system power up and down arrow keys. Removable Device [Legacy...
... Boot Device Select [INT18 Device (Network)] Configuration options: [Disabled] [SCSI Boot Device] [INT18 Device (Network)] ASUS CUV4X User's Manual 75 Pressing [Enter] will show the product IDs of devices alters the priority which ATAPI CD-ROM drive to search for a boot device on system power up and down arrow keys. Removable Device [Legacy...

CUV4X User Manual
Page 76
...(POST). The system halts and displays a warning message when it was configured the last time it detects a virus. BIOS SETUP Boot Menu 76 ASUS CUV4X User's Manual Configuration options: [No] [Yes] Reset Configuration Data [No] The Extended System Configuration Data (ESCD) contain information about non-PnP ...system was booted. Configuration options: [Disabled] [Enabled] Boot Up Floppy Seek [Enabled] When enabled, the BIOS will seek the floppy disk drive to restart and investigate your system. BIOS SETUP Plug & Play O/S [No] This field allows you want to configure the PCI bus slots...
...(POST). The system halts and displays a warning message when it was configured the last time it detects a virus. BIOS SETUP Boot Menu 76 ASUS CUV4X User's Manual Configuration options: [No] [Yes] Reset Configuration Data [No] The Extended System Configuration Data (ESCD) contain information about non-PnP ...system was booted. Configuration options: [Disabled] [Enabled] Boot Up Floppy Seek [Enabled] When enabled, the BIOS will seek the floppy disk drive to restart and investigate your system. BIOS SETUP Plug & Play O/S [No] This field allows you want to configure the PCI bus slots...

CUV4X User Manual
Page 80
... online help for more information. • Show Motherboard Information: Allows you to view information about your CD-ROM drive is available in the DMI folder. 80 ASUS CUV4X User's Manual See online help for more information. • Install ADOBE AcroBat Reader Vx.xx: Installs the Adobe...and contact information. • Exit: Exits the CD installation menu. 5. SOFTWARE SETUP 5.2 CUV4X Series Motherboard Support CD NOTE: The support CD contents are subject to monitor your CD-ROM drive and the support CD installation menu should appear. To begin using your support CD disc,...
... online help for more information. • Show Motherboard Information: Allows you to view information about your CD-ROM drive is available in the DMI folder. 80 ASUS CUV4X User's Manual See online help for more information. • Install ADOBE AcroBat Reader Vx.xx: Installs the Adobe...and contact information. • Exit: Exits the CD installation menu. 5. SOFTWARE SETUP 5.2 CUV4X Series Motherboard Support CD NOTE: The support CD contents are subject to monitor your CD-ROM drive and the support CD installation menu should appear. To begin using your support CD disc,...

CUV4X User Manual
Page 81
... Probe Vx.xx Insert the Support CD that came with your motherboard into your CD-ROM drive or double-click the CD drive icon in My Computer to complete setup. ASUS CUV4X User's Manual 81 S/W SETUP Windows 98 (5) Click here. (6) Click here. (7) Click here. (8) Click Next and when the Setup Complete box appears, click...
... Probe Vx.xx Insert the Support CD that came with your motherboard into your CD-ROM drive or double-click the CD drive icon in My Computer to complete setup. ASUS CUV4X User's Manual 81 S/W SETUP Windows 98 (5) Click here. (6) Click here. (7) Click here. (8) Click Next and when the Setup Complete box appears, click...


