User Manual
Page 11
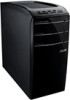
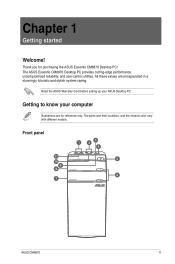
...Getting to know your ASUS Desktop PC. Chapter 1 Getting started Welcome! The ASUS Essentio CM6870 Desktop PC provides cutting-edge performance, uncompromised reliability, and user-centric utilities. Read the ASUS Warranty Card before setting ...up your computer Illustrations are encapsulated in a stunningly futuristic and stylish system casing. All these values are for purchasing the ASUS Essentio CM6870 Desktop PC! The ports and their locations, and the chassis color vary with different models. Front panel 3 12 4 11 5 10 9 8 6 7 ASUS CM6870...
...Getting to know your ASUS Desktop PC. Chapter 1 Getting started Welcome! The ASUS Essentio CM6870 Desktop PC provides cutting-edge performance, uncompromised reliability, and user-centric utilities. Read the ASUS Warranty Card before setting ...up your computer Illustrations are encapsulated in a stunningly futuristic and stylish system casing. All these values are for purchasing the ASUS Essentio CM6870 Desktop PC! The ports and their locations, and the chassis color vary with different models. Front panel 3 12 4 11 5 10 9 8 6 7 ASUS CM6870...
User Manual
Page 13
... ��e��In��p��o�r�t �(�li�g�h��t�b�l�u�e��)�. ASUS CM6870 13 This port connects to this port becomes Front Speaker Out. 12. ���L�in �k��)�.
... ��e��In��p��o�r�t �(�li�g�h��t�b�l�u�e��)�. ASUS CM6870 13 This port connects to this port becomes Front Speaker Out. 12. ���L�in �k��)�.
User Manual
Page 15
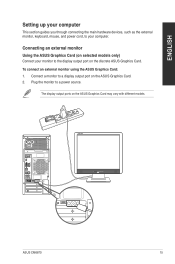
... Card (on selected models only) Connect your monitor to a display output port on the ASUS Graphics Card. 2. Connect a monitor to the display output port on the ASUS Graphics Card may vary with different models. ENGLISH Setting up your computer This section guides you through connecting the main hardware devices, such as... the external monitor, keyboard, mouse, and power cord, to a power source. To connect an external monitor using the ASUS Graphics Card: 1. Plug the monitor to your computer. ASUS CM6870 15 The display output ports on the discrete...
... Card (on selected models only) Connect your monitor to a display output port on the ASUS Graphics Card. 2. Connect a monitor to the display output port on the ASUS Graphics Card may vary with different models. ENGLISH Setting up your computer This section guides you through connecting the main hardware devices, such as... the external monitor, keyboard, mouse, and power cord, to a power source. To connect an external monitor using the ASUS Graphics Card: 1. Plug the monitor to your computer. ASUS CM6870 15 The display output ports on the discrete...
User Manual
Page 17
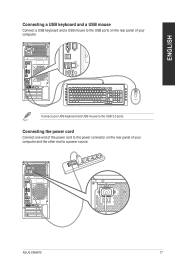
ASUS CM6870 17 ENGLISH Connecting a USB keyboard and a USB mouse Connect a USB keyboard and a USB mouse to the USB ports on the rear panel of your computer. ` Connect your computer and the other end to the USB 2.0 ports. Connecting the power cord Connect one end of the power cord to the power connector on the rear panel of your USB keyboard and USB mouse to a power source.
ASUS CM6870 17 ENGLISH Connecting a USB keyboard and a USB mouse Connect a USB keyboard and a USB mouse to the USB ports on the rear panel of your computer. ` Connect your computer and the other end to the USB 2.0 ports. Connecting the power cord Connect one end of the power cord to the power connector on the rear panel of your USB keyboard and USB mouse to a power source.

User Manual
Page 19
.... Turn your computer. To skip this step without entering any information. You may now start using your date and time settings. Key in this chapter. 6. ASUS CM6870 19 Select Use recommended settings or Install important updates only to skip this step, select Ask me later. 8.
.... Turn your computer. To skip this step without entering any information. You may now start using your date and time settings. Key in this chapter. 6. ASUS CM6870 19 Select Use recommended settings or Install important updates only to skip this step, select Ask me later. 8.
User Manual
Page 21
... icon to this list. You may pin items on the Start menu or taskbar: 1. Unpinning programs from the taskbar To unpin programs from this list. ASUS CM6870 21 From the jumplist, right-click the item that you want to remove from the jumplist, then select Unpin from the taskbar: 1. From the Windows...
... icon to this list. You may pin items on the Start menu or taskbar: 1. Unpinning programs from the taskbar To unpin programs from this list. ASUS CM6870 21 From the jumplist, right-click the item that you want to remove from the jumplist, then select Unpin from the taskbar: 1. From the Windows...
User Manual
Page 23
... Sort by , then select your preferred sorting type. From the navigation pane, select the location of your files: 1. Sorting your files To sort your data. 3. ASUS CM6870 23 Customizing the file/folder view To customize the file/folder view: 1. Right-click anywhere on the View pane. 3. From the View menu, move the...
... Sort by , then select your preferred sorting type. From the navigation pane, select the location of your files: 1. Sorting your files To sort your data. 3. ASUS CM6870 23 Customizing the file/folder view To customize the file/folder view: 1. Right-click anywhere on the View pane. 3. From the View menu, move the...
User Manual
Page 25
... account. 3. From the Windows® taskbar, click > Getting Started > Add new users. 2. Launching Windows® Update To launch Windows® Update: 1. Setting up a user account: 1. ASUS CM6870 25 Select either Standard user or Administrator as the user type. 6. Select All Programs > Windows Update. 3. To launch Windows 7 Action Center, click the Notification icon...
... account. 3. From the Windows® taskbar, click > Getting Started > Add new users. 2. Launching Windows® Update To launch Windows® Update: 1. Setting up a user account: 1. ASUS CM6870 25 Select either Standard user or Administrator as the user type. 6. Select All Programs > Windows Update. 3. To launch Windows 7 Action Center, click the Notification icon...
User Manual
Page 27
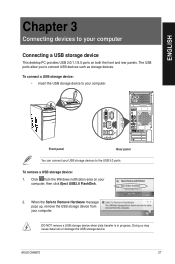
... Hardware message pops up, remove the USB storage device from the Windows notification area on both the front and rear panels. Click from your computer. ASUS CM6870 27 To remove a USB storage device: 1. Front panel Rear panel You can connect your USB storage devices to connect USB devices such as storage devices...
... Hardware message pops up, remove the USB storage device from the Windows notification area on both the front and rear panels. Click from your computer. ASUS CM6870 27 To remove a USB storage device: 1. Front panel Rear panel You can connect your USB storage devices to connect USB devices such as storage devices...

User Manual
Page 29
ENGLISH Connecting 4-channel Speakers Connecting 6-channel Speakers ASUS CM6870 29
ENGLISH Connecting 4-channel Speakers Connecting 6-channel Speakers ASUS CM6870 29
User Manual
Page 31
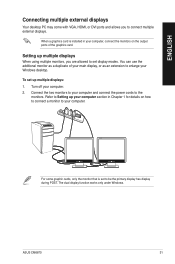
... enlarge your computer and connect the power cords to be the primary display has display during POST. When a graphics card is set up multiple displays: 1. ASUS CM6870 31 Turn off your computer.
... enlarge your computer and connect the power cords to be the primary display has display during POST. When a graphics card is set up multiple displays: 1. ASUS CM6870 31 Turn off your computer.

User Manual
Page 33
The HDMI cable is purchased separately. • To get the best display performance, ensure that your computer. • You need an HDMI cable to the HDMI port of your HDMI cable is less than 15 meters. ENGLISH Connecting an HDTV Connect a High Definition TV (HDTV) to connect the HDTV and the computer. ASUS CM6870 33
The HDMI cable is purchased separately. • To get the best display performance, ensure that your computer. • You need an HDMI cable to the HDMI port of your HDMI cable is less than 15 meters. ENGLISH Connecting an HDTV Connect a High Definition TV (HDTV) to connect the HDTV and the computer. ASUS CM6870 33
User Manual
Page 35
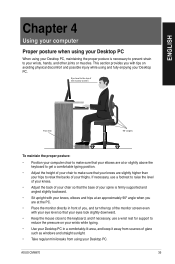
ASUS CM6870 35 This section provides you are at or slightly above the keyboard to get a comfortable typing position. • Adjust the height of your chair to ...
ASUS CM6870 35 This section provides you are at or slightly above the keyboard to get a comfortable typing position. • Adjust the height of your chair to ...

User Manual
Page 37
... then click Eject. 2. While your files. Push the tray to the optical drive with the label side facing up. 3. Place the disc to close it . ASUS CM6870 37 Removing an optical disc To remove an optical disc: 1.
... then click Eject. 2. While your files. Push the tray to the optical drive with the label side facing up. 3. Place the disc to close it . ASUS CM6870 37 Removing an optical disc To remove an optical disc: 1.
User Manual
Page 39
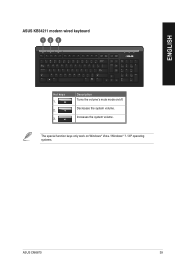
ENGLISH ASUS KB34211 modern wired keyboard 12 3 Hot keys 1. 2. 3. The special function keys only work on /off. Decreases the system volume. Description Turns the volume's mute mode on Windows® Vista / Windows® 7 / XP operating systems. ASUS CM6870 39 Increases the system volume.
ENGLISH ASUS KB34211 modern wired keyboard 12 3 Hot keys 1. 2. 3. The special function keys only work on /off. Decreases the system volume. Description Turns the volume's mute mode on Windows® Vista / Windows® 7 / XP operating systems. ASUS CM6870 39 Increases the system volume.
User Manual
Page 41
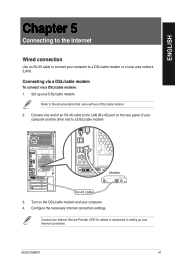
... a DSL/cable modem To connect via a DSL/cable modem: 1. Contact your Internet Service Provider (ISP) for details or assistance in setting up your Internet connection. ASUS CM6870 41 Modem RJ-45 cable 3. Turn on the rear panel of an RJ-45 cable to a DSL/cable modem.
... a DSL/cable modem To connect via a DSL/cable modem: 1. Contact your Internet Service Provider (ISP) for details or assistance in setting up your Internet connection. ASUS CM6870 41 Modem RJ-45 cable 3. Turn on the rear panel of an RJ-45 cable to a DSL/cable modem.
User Manual
Page 43
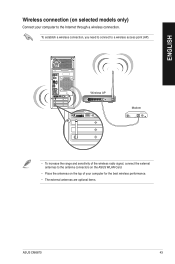
Wireless AP Modem • To increase the range and sensitivity of the wireless radio signal, connect the external antennas to the antenna connectors on the ASUS WLAN Card. • Place the antennas on selected models only) Connect your computer for the best wireless performance. • The external antennas are optional items. ASUS CM6870 43 To establish a wireless connection, you need to connect to a wireless access point (AP). ENGLISH Wireless connection (on the top of your computer to the Internet through a wireless connection.
Wireless AP Modem • To increase the range and sensitivity of the wireless radio signal, connect the external antennas to the antenna connectors on the ASUS WLAN Card. • Place the antennas on selected models only) Connect your computer for the best wireless performance. • The external antennas are optional items. ASUS CM6870 43 To establish a wireless connection, you need to connect to a wireless access point (AP). ENGLISH Wireless connection (on the top of your computer to the Internet through a wireless connection.

User Manual
Page 45
ENGLISH 4. ASUS CM6870 45 The wireless connection is displayed and the network icon displays the connected status. The connection status is established successfully. Wait while your computer is connecting to the wireless network. 5.
ENGLISH 4. ASUS CM6870 45 The wireless connection is displayed and the network icon displays the connected status. The connection status is established successfully. Wait while your computer is connecting to the wireless network. 5.
User Manual
Page 47
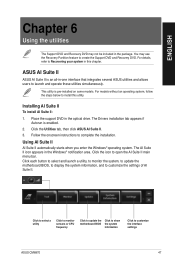
... AI Suite II AI Suite II automatically starts when you enter the Windows® operating system. Click the icon to customize the interface settings ASUS CM6870 47 This utility is pre-installed on some models. Place the support DVD in this utility. Click to select a utility Click to monitor ...to Recovering your system in the optical drive. You may not be included in the Windows® notification area. Click the Utilities tab, then click ASUS AI Suite II. 3. Click each button to select and launch a utility, to monitor the system, to update the motherboard BIOS, to display ...
... AI Suite II AI Suite II automatically starts when you enter the Windows® operating system. Click the icon to customize the interface settings ASUS CM6870 47 This utility is pre-installed on some models. Place the support DVD in this utility. Click to select a utility Click to monitor ...to Recovering your system in the optical drive. You may not be included in the Windows® notification area. Click the Utilities tab, then click ASUS AI Suite II. 3. Click each button to select and launch a utility, to monitor the system, to update the motherboard BIOS, to display ...

User Manual
Page 49
... menu bar. Saves your configuration Loads your saved configuration Loads the default threshold values for each sensor Applies your computer is a utility that your changes ASUS CM6870 49 ENGLISH Launching and configuring Probe II Probe II is always at a healthy operating condition.
... menu bar. Saves your configuration Loads your saved configuration Loads the default threshold values for each sensor Applies your computer is a utility that your changes ASUS CM6870 49 ENGLISH Launching and configuring Probe II Probe II is always at a healthy operating condition.


