
User Manual
Page 2
...identification or explanation and to the owners' benefit, without intent to infringe. ii or (2) the serial number of ASUSTeK Computer Inc. ("ASUS"). ASUS PROVIDES THIS MANUAL "AS IS" WITHOUT WARRANTY OF ANY KIND, EITHER EXPRESS OR IMPLIED, INCLUDING BUT NOT LIMITED TO THE IMPLIED WARRANTIES ... without the express written permission of the product is authorized in any form or by any means, except documentation kept by ASUS; IN NO EVENT SHALL ASUS, ITS DIRECTORS, OFFICERS, EMPLOYEES OR AGENTS BE LIABLE FOR ANY INDIRECT, SPECIAL, INCIDENTAL, OR CONSEQUENTIAL DAMAGES (INCLUDING DAMAGES ...
...identification or explanation and to the owners' benefit, without intent to infringe. ii or (2) the serial number of ASUSTeK Computer Inc. ("ASUS"). ASUS PROVIDES THIS MANUAL "AS IS" WITHOUT WARRANTY OF ANY KIND, EITHER EXPRESS OR IMPLIED, INCLUDING BUT NOT LIMITED TO THE IMPLIED WARRANTIES ... without the express written permission of the product is authorized in any form or by any means, except documentation kept by ASUS; IN NO EVENT SHALL ASUS, ITS DIRECTORS, OFFICERS, EMPLOYEES OR AGENTS BE LIABLE FOR ANY INDIRECT, SPECIAL, INCIDENTAL, OR CONSEQUENTIAL DAMAGES (INCLUDING DAMAGES ...

User Manual
Page 3
Contents Notices ...v Safety information vii Conventions used in this guide viii Where to find more information viii Package contents ix Chapter 1: Getting started Welcome!...1-1 Getting to know your computer 1-1 Setting up your computer 1-5 Turning your computer ON/OFF 1-8 Chapter 2: Using Windows® 7 Starting for the first time 2-1 Using Windows® 7 desktop 2-2 Managing your files and folders 2-7 Restoring your system 2-10 Protecting your computer 2-11 Getting Windows® Help and Support 2-15 Chapter 3: Connecting devices to your computer Connecting a USB storage ...
Contents Notices ...v Safety information vii Conventions used in this guide viii Where to find more information viii Package contents ix Chapter 1: Getting started Welcome!...1-1 Getting to know your computer 1-1 Setting up your computer 1-5 Turning your computer ON/OFF 1-8 Chapter 2: Using Windows® 7 Starting for the first time 2-1 Using Windows® 7 desktop 2-2 Managing your files and folders 2-7 Restoring your system 2-10 Protecting your computer 2-11 Getting Windows® Help and Support 2-15 Chapter 3: Connecting devices to your computer Connecting a USB storage ...

User Manual
Page 4
Contents Chapter 6: Using the Utilities ASUS AI Manager 6-1 ASUS EPU-4 Engine 6-6 ASUS Update 6-10 ASUS MyLogo2 6-11 Nero 9 ...6-12 Recovering your system 6-16 Chapter 7: Troubleshooting iv
Contents Chapter 6: Using the Utilities ASUS AI Manager 6-1 ASUS EPU-4 Engine 6-6 ASUS Update 6-10 ASUS MyLogo2 6-11 Nero 9 ...6-12 Recovering your system 6-16 Chapter 7: Troubleshooting iv

User Manual
Page 5
... Rules. Notices REACH Complying with the REACH (Registration, Evaluation, Authorisation, and Restriction of Chemicals) regulatory framework, we published the chemical substances in our products at ASUS REACH website at http://green.asus.com/english/REACH.htm Federal Communications Commission Statement This device complies with FCC regulations.
... Rules. Notices REACH Complying with the REACH (Registration, Evaluation, Authorisation, and Restriction of Chemicals) regulatory framework, we published the chemical substances in our products at ASUS REACH website at http://green.asus.com/english/REACH.htm Federal Communications Commission Statement This device complies with FCC regulations.

User Manual
Page 6
End-users and installers must be provide with Canadian ICES-003. patents and other rights owners. Reverse engineering or disassembly is protected by method claims of certain U.S. Dispose of used for satisfying RF exposure compliance. Macrovision Corporation Product Notice This product incorporates copyright protection technology that is prohibited. Replace only with the same or equivalent type recommended by Macrovision Corporation and other intellectual property rights owned by the manufacturer. This class B digital apparatus complies with antenna installation instructions and ...
End-users and installers must be provide with Canadian ICES-003. patents and other rights owners. Reverse engineering or disassembly is protected by method claims of certain U.S. Dispose of used for satisfying RF exposure compliance. Macrovision Corporation Product Notice This product incorporates copyright protection technology that is prohibited. Replace only with the same or equivalent type recommended by Macrovision Corporation and other intellectual property rights owned by the manufacturer. This class B digital apparatus complies with antenna installation instructions and ...

User Manual
Page 7
Seek servicing if the casing has been damaged. • DO NOT expose to the correct voltage in your retailer. DO NOT use the modem during a gas leak. • DO NOT place or drop objects on top and do not try to prevent the system from the electrical outlet before relocating the system. • Seek professional assistance before cleaning. These devices could interrupt the grounding circuit. • Ensure that your power supply is broken, do not shove any extra moisture with ambient temperatures between 0˚C (32̊F)and 35˚C (95̊F). • DO NOT cover the vents ...
Seek servicing if the casing has been damaged. • DO NOT expose to the correct voltage in your retailer. DO NOT use the modem during a gas leak. • DO NOT place or drop objects on top and do not try to prevent the system from the electrical outlet before relocating the system. • Seek professional assistance before cleaning. These devices could interrupt the grounding circuit. • Ensure that your power supply is broken, do not shove any extra moisture with ambient temperatures between 0˚C (32̊F)and 35˚C (95̊F). • DO NOT cover the vents ...

User Manual
Page 8
...sources for additional information and for the contact information of local Technical Support Engineer. ASUS websites The ASUS website provides updated information on ASUS hardware and software products. ASUS Local Technical Support Visit ASUS website at http://support.asus.com/contact for product and software updates. CAUTION: Information to prevent damage to ... used in this manual. Refer to complete a task. Conventions used throughout this guide To ensure that you MUST follow to the ASUS website www.asus.com. IMPORTANT: Instructions that you complete a task.
...sources for additional information and for the contact information of local Technical Support Engineer. ASUS websites The ASUS website provides updated information on ASUS hardware and software products. ASUS Local Technical Support Visit ASUS website at http://support.asus.com/contact for product and software updates. CAUTION: Information to prevent damage to ... used in this manual. Refer to complete a task. Conventions used throughout this guide To ensure that you MUST follow to the ASUS website www.asus.com. IMPORTANT: Instructions that you complete a task.

User Manual
Page 9
ix Actual product specifications may vary with different models. Package contents ASUS Essentio Desktop PC Keyboard x1 Mouse x1 Installation Guide Power cord x1 Nero 9 burning software DVD x1 Installation Guide x1 Warranty card x1 Antenna (optional) x2 • If any of the above items is damaged or missing, contact your retailer. • The illustrated items above are for reference only.
ix Actual product specifications may vary with different models. Package contents ASUS Essentio Desktop PC Keyboard x1 Mouse x1 Installation Guide Power cord x1 Nero 9 burning software DVD x1 Installation Guide x1 Warranty card x1 Antenna (optional) x2 • If any of the above items is damaged or missing, contact your retailer. • The illustrated items above are for reference only.

User Manual
Page 10
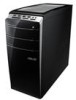
...1 Getting started Welcome! All these values are for purchasing the ASUS Essentio CM5671 Desktop PC! Thank you for reference only. Getting to view its corresponding description. 1-1 The ASUS Essentio CM5671 Desktop PC provides cutting-edge performance, uncompromised reliability, and user-..., and the chassis color vary with different models. Read the ASUS Warranty Card before setting up your computer Illustrations are encapsulated in a stunningly futuristic and stylish system casing. Front panel 1 2 3 10 9 4 8 7 6 5 ASUS CM5671 Click the number to know your...
...1 Getting started Welcome! All these values are for purchasing the ASUS Essentio CM5671 Desktop PC! Thank you for reference only. Getting to view its corresponding description. 1-1 The ASUS Essentio CM5671 Desktop PC provides cutting-edge performance, uncompromised reliability, and user-..., and the chassis color vary with different models. Read the ASUS Warranty Card before setting up your computer Illustrations are encapsulated in a stunningly futuristic and stylish system casing. Front panel 1 2 3 10 9 4 8 7 6 5 ASUS CM5671 Click the number to know your...

User Manual
Page 11
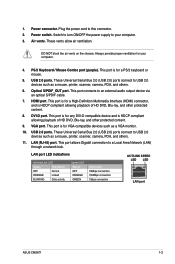
This port connects to a headphone or speaker. 4. This port connects to a microphone. 3. Headphone port (lime). Power button. Memory Stick™ / Memory Stick Pro™ card slot. Insert a Secure Digital™ / MultiMediaCard card into this slot. Rear panel 2 4 5 6 7 8 10 12 13 14 15 1 3 9 11 16 17 18 19 20 Click the number to USB 2.0 devices such as a mouse, printer, scanner, camera, PDA, and others. 2. These Universal Serial Bus 2.0 (USB 2.0) ports connect to view its corresponding description. 1-2 Chapter 1: Getting started Optical disk drive eject button. Press ...
This port connects to a headphone or speaker. 4. This port connects to a microphone. 3. Headphone port (lime). Power button. Memory Stick™ / Memory Stick Pro™ card slot. Insert a Secure Digital™ / MultiMediaCard card into this slot. Rear panel 2 4 5 6 7 8 10 12 13 14 15 1 3 9 11 16 17 18 19 20 Click the number to USB 2.0 devices such as a mouse, printer, scanner, camera, PDA, and others. 2. These Universal Serial Bus 2.0 (USB 2.0) ports connect to view its corresponding description. 1-2 Chapter 1: Getting started Optical disk drive eject button. Press ...
User Manual
Page 12
... ORANGE Linked BLINKING Data activity Speed LED Status OFF ORANGE GREEN Description 10Mbps connection 100Mbps connection 1Gbps connection ACT/LINK SPEED LED LED LAN port ASUS CM5671 1-3
... ORANGE Linked BLINKING Data activity Speed LED Status OFF ORANGE GREEN Description 10Mbps connection 100Mbps connection 1Gbps connection ACT/LINK SPEED LED LED LAN port ASUS CM5671 1-3

User Manual
Page 13
...or 8-channel configuration, the function of the audio ports in a 4, 6, and 8-channel audio configuration. 13. Line In port (light blue). ASUS WLAN Card (on this port becomes Front Speaker Out. 16. Remove the expansion slot bracket when installing an expansion card. 1-4 Chapter 1: Getting .... The display output ports on selected models only). This port connects to the audio configuration table below for the function of this optional ASUS Graphics Card may vary with different models. 20. Center/Subwoofer port (orange). Refer to a microphone. 15. Rear Speaker Out port ...
...or 8-channel configuration, the function of the audio ports in a 4, 6, and 8-channel audio configuration. 13. Line In port (light blue). ASUS WLAN Card (on this port becomes Front Speaker Out. 16. Remove the expansion slot bracket when installing an expansion card. 1-4 Chapter 1: Getting .... The display output ports on selected models only). This port connects to the audio configuration table below for the function of this optional ASUS Graphics Card may vary with different models. 20. Center/Subwoofer port (orange). Refer to a microphone. 15. Rear Speaker Out port ...

User Manual
Page 14
... ASUS CM5671 1-5 Setting up your computer This section guides you through connecting the main hardware devices, such as the external monitor, keyboard, mouse, and power cord, to your monitor to the display output port on the discrete ASUS Graphics Card. Connecting an external monitor Using the ASUS ...Graphics Card (on selected models only) Connect your computer. Plug the monitor to a display output port on the ASUS Graphics Card may vary with different models. The...
... ASUS CM5671 1-5 Setting up your computer This section guides you through connecting the main hardware devices, such as the external monitor, keyboard, mouse, and power cord, to your monitor to the display output port on the discrete ASUS Graphics Card. Connecting an external monitor Using the ASUS ...Graphics Card (on selected models only) Connect your computer. Plug the monitor to a display output port on the ASUS Graphics Card may vary with different models. The...

User Manual
Page 15
... to a power source. • If your monitor to the onboard display output port. Using the onboard display output ports Connect your computer comes with an ASUS Graphics Card, the graphics card is set as the primary display device in Chapter 3 of your computer, refer to Connecting multiple external monitors in the...
... to a power source. • If your monitor to the onboard display output port. Using the onboard display output ports Connect your computer comes with an ASUS Graphics Card, the graphics card is set as the primary display device in Chapter 3 of your computer, refer to Connecting multiple external monitors in the...

User Manual
Page 16
C Connecting the power cord Connect one end of the power cord to the power connector on the rear panel of your computer and the other end to the USB ports on the rear panel of your computer. Connecting a USB keyboard and a USB mouse Connect a USB keyboard and a USB mouse to a power source. ASUS CM5671 1-7
C Connecting the power cord Connect one end of the power cord to the power connector on the rear panel of your computer and the other end to the USB ports on the rear panel of your computer. Connecting a USB keyboard and a USB mouse Connect a USB keyboard and a USB mouse to a power source. ASUS CM5671 1-7

User Manual
Page 17
Turn your computer ON: 1. Power button 4. Close all running applications. 2. Click to turn on/off your computer after setting up your computer OFF: 1. Turning your computer ON To turn your monitor ON. 3. Click on the power switch. 2. Turning your computer ON/OFF This section describes how to shut down the operating system. 1-8 Chapter 1: Getting started Turning your computer OFF To turn your computer. Turn on the Windows® desktop. 3. Press the power button on your computer. Wait until the operating system loads automatically.
Turn your computer ON: 1. Power button 4. Close all running applications. 2. Click to turn on/off your computer after setting up your computer OFF: 1. Turning your computer ON To turn your monitor ON. 3. Click on the power switch. 2. Turning your computer ON/OFF This section describes how to shut down the operating system. 1-8 Chapter 1: Getting started Turning your computer OFF To turn your computer. Turn on the Windows® desktop. 3. Press the power button on your computer. Wait until the operating system loads automatically.
User Manual
Page 18
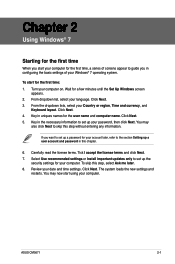
To start using your computer. Click Next. 4. The system loads the new settings and restarts. ASUS CM5671 2-1 From the dropdown lists, select your date and time settings. To skip this chapter. 6. Review your Country or region, Time and currency, and Keyboard layout. ...
To start using your computer. Click Next. 4. The system loads the new settings and restarts. ASUS CM5671 2-1 From the dropdown lists, select your date and time settings. To skip this chapter. 6. Review your Country or region, Time and currency, and Keyboard layout. ...

User Manual
Page 19
Using Windows® 7 desktop Click the Start icon > Help and Support to obtain more information about Windows 7 through its Help and Support feature. From the Windows® taskbar, click the Start icon . 2. Launching items from the Start menu To launch items from the Start menu: 1. From the Start menu, select the item that you access to launch. It also provides you want constantly displayed on this chapter. 2-2 Chapter 2: Using Windows® 7 Start menu Taskbar Notification area Using the Start menu The Start menu gives you want to programs, utilities, and other ...
Using Windows® 7 desktop Click the Start icon > Help and Support to obtain more information about Windows 7 through its Help and Support feature. From the Windows® taskbar, click the Start icon . 2. Launching items from the Start menu To launch items from the Start menu: 1. From the Start menu, select the item that you access to launch. It also provides you want constantly displayed on this chapter. 2-2 Chapter 2: Using Windows® 7 Start menu Taskbar Notification area Using the Start menu The Start menu gives you want to programs, utilities, and other ...

User Manual
Page 20
... launch the Start menu. 2. Using the taskbar The taskbar allows you want constantly displayed on your computer. You may pin programs that you to do. ASUS CM5671 2-3 To use the Getting Started item: 1. Launching a program from the taskbar To launch a program from the taskbar: • From the Windows® taskbar, click an...
... launch the Start menu. 2. Using the taskbar The taskbar allows you want constantly displayed on your computer. You may pin programs that you to do. ASUS CM5671 2-3 To use the Getting Started item: 1. Launching a program from the taskbar To launch a program from the taskbar: • From the Windows® taskbar, click an...

User Manual
Page 21
Right-click the item that you want to taskbar. 2-4 Chapter 2: Using Windows® 7 You may pin items on the jumplist such as favorite websites, often-visited folders or drives, or recently played media files. From the jumplist, right-click the item that you want to pin, then select Pin to Start menu. Pinning programs on the Start menu or taskbar To pin programs on the Start menu or taskbar. 3. Select Pin to Taskbar or Pin to this list. From the Windows® taskbar, click the Start icon to remove from the jumplist, then select Unpin from the jumplist: 1. From ...
Right-click the item that you want to taskbar. 2-4 Chapter 2: Using Windows® 7 You may pin items on the jumplist such as favorite websites, often-visited folders or drives, or recently played media files. From the jumplist, right-click the item that you want to pin, then select Pin to Start menu. Pinning programs on the Start menu or taskbar To pin programs on the Start menu or taskbar. 3. Select Pin to Taskbar or Pin to this list. From the Windows® taskbar, click the Start icon to remove from the jumplist, then select Unpin from the jumplist: 1. From ...