
User Manual
Page 3
... device 3-1 Connecting microphone and speakers 3-2 Connecting multiple external displays 3-5 Connecting an HDTV 3-7 Chapter 4: Using your computer Proper posture when using your Desktop PC 4-1 Using the memory card reader 4-2 Using the optical drive 4-3 Using the multimedia keyboard (on selected models only 4-4 Chapter 5: Connecting to the Internet Wired connection 5-1 Wireless connection (on selected...
... device 3-1 Connecting microphone and speakers 3-2 Connecting multiple external displays 3-5 Connecting an HDTV 3-7 Chapter 4: Using your computer Proper posture when using your Desktop PC 4-1 Using the memory card reader 4-2 Using the optical drive 4-3 Using the multimedia keyboard (on selected models only 4-4 Chapter 5: Connecting to the Internet Wired connection 5-1 Wireless connection (on selected...

User Manual
Page 11
...™ card into this bay. 8. CompactFlash® / Microdrive™ card slot. 1. Optical disk drive eject button. Memory Stick™ / Memory Stick Pro™ card slot. Secure Digital™ / MultiMediaCard slot. Power button. Insert a Memory Stick™ / Memory Stick Pro™ card into this slot. 9. Microphone port (pink). Optical disk drive bay. Insert a Secure Digital...
...™ card into this bay. 8. CompactFlash® / Microdrive™ card slot. 1. Optical disk drive eject button. Memory Stick™ / Memory Stick Pro™ card slot. Secure Digital™ / MultiMediaCard slot. Power button. Insert a Memory Stick™ / Memory Stick Pro™ card into this slot. 9. Microphone port (pink). Optical disk drive bay. Insert a Secure Digital...

User Manual
Page 41
... is keyed so that it fits in your computer, click Windows® 7 Start button on the taskbar, click Computer, and then double-click the memory card icon to access the data on it. • Each card slot has its own drive icon which is displayed on the front panel of ... while or immediately after reading, copying, formatting, or deleting data on the Computer screen, click Eject, and then remove the card. Insert the memory card into a slot to the memory card. 3. Select a program from or written to avoid damaging the card. • You can place media in a slot at one or more...
... is keyed so that it fits in your computer, click Windows® 7 Start button on the taskbar, click Computer, and then double-click the memory card icon to access the data on it. • Each card slot has its own drive icon which is displayed on the front panel of ... while or immediately after reading, copying, formatting, or deleting data on the Computer screen, click Eject, and then remove the card. Insert the memory card into a slot to the memory card. 3. Select a program from or written to avoid damaging the card. • You can place media in a slot at one or more...
User Manual
Page 56
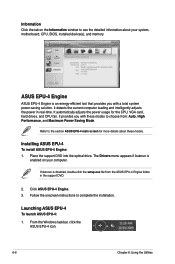
...ASUS EPU-4 Engine. 3. It provides you with these modes. Launching ASUS EPU-4 To launch ASUS EPU-4: 1. From the Windows taskbar, click the ASUS EPU-4 icon. 6-6 Chapter 6: Using the Utilities Place the support DVD into the optical drive. Refer to the section ASUS... EPU-4 main screen for the CPU, VGA card, hard drives, and CPU fan. Installing ASUS EPU-4 To install ASUS EPU... Follow the onscreen instructions to choose from the ASUS EPU-4 Engine folder in real-time. The...a total system power-saving solution. ASUS EPU-4 Engine ASUS EPU-4 Engine is enabled on the...
...ASUS EPU-4 Engine. 3. It provides you with these modes. Launching ASUS EPU-4 To launch ASUS EPU-4: 1. From the Windows taskbar, click the ASUS EPU-4 icon. 6-6 Chapter 6: Using the Utilities Place the support DVD into the optical drive. Refer to the section ASUS... EPU-4 main screen for the CPU, VGA card, hard drives, and CPU fan. Installing ASUS EPU-4 To install ASUS EPU... Follow the onscreen instructions to choose from the ASUS EPU-4 Engine folder in real-time. The...a total system power-saving solution. ASUS EPU-4 Engine ASUS EPU-4 Engine is enabled on the...

