User Manual
Page 13
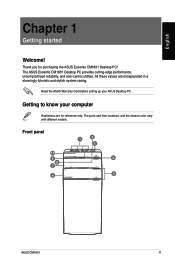
Front panel 10 9 8 7 6 1 2 3 4 5 ASUS CM1831 11 Thank you for reference only. The ports and their locations, and the chassis color vary with different models. Getting to know your ASUS Desktop PC. All these values are for purchasing the ASUS Essentio CM1831 Desktop PC! The ASUS Essentio CM1831 Desktop PC provides cutting-edge performance, uncompromised reliability, and user-centric...
Front panel 10 9 8 7 6 1 2 3 4 5 ASUS CM1831 11 Thank you for reference only. The ports and their locations, and the chassis color vary with different models. Getting to know your ASUS Desktop PC. All these values are for purchasing the ASUS Essentio CM1831 Desktop PC! The ASUS Essentio CM1831 Desktop PC provides cutting-edge performance, uncompromised reliability, and user-centric...
User Manual
Page 15
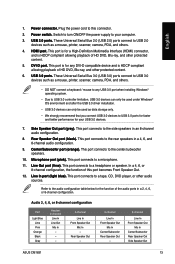
... Speaker Out Mic In Center/Subwoofer Rear Speaker Out - 8-channel Line In Front Speaker Out Mic In Center/Subwoofer Rear Speaker Out Side Speaker Out ASUS CM1831 13 English 1. ���P�o�w��e�r�c�o�n�n��e�c�to the rear speakers in a 4, 6, and 8-channel...
... Speaker Out Mic In Center/Subwoofer Rear Speaker Out - 8-channel Line In Front Speaker Out Mic In Center/Subwoofer Rear Speaker Out Side Speaker Out ASUS CM1831 13 English 1. ���P�o�w��e�r�c�o�n�n��e�c�to the rear speakers in a 4, 6, and 8-channel...
User Manual
Page 17
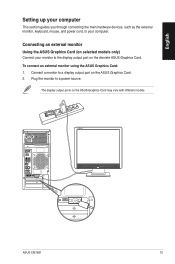
... the monitor to a display output port on the ASUS Graphics Card. 2. To connect an external monitor using the ASUS Graphics Card: 1. Connect a monitor to a power source. Connecting an external monitor Using the ASUS Graphics Card (on the ASUS Graphics Card may vary with different models. ASUS CM1831 15 The display output ports on selected models only...
... the monitor to a display output port on the ASUS Graphics Card. 2. To connect an external monitor using the ASUS Graphics Card: 1. Connect a monitor to a power source. Connecting an external monitor Using the ASUS Graphics Card (on the ASUS Graphics Card may vary with different models. ASUS CM1831 15 The display output ports on selected models only...
User Manual
Page 19
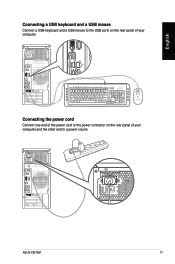
C Connecting the power cord Connect one end of the power cord to the power connector on the rear panel of your computer and the other end to the USB ports on the rear panel of your computer. ASUS CM1831 17 English Connecting a USB keyboard and a USB mouse Connect a USB keyboard and a USB mouse to a power source.
C Connecting the power cord Connect one end of the power cord to the power connector on the rear panel of your computer and the other end to the USB ports on the rear panel of your computer. ASUS CM1831 17 English Connecting a USB keyboard and a USB mouse Connect a USB keyboard and a USB mouse to a power source.
User Manual
Page 21
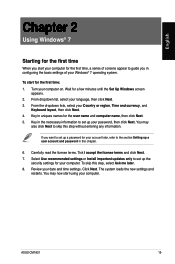
... click Next. 3. If you in uniques names for a few minutes until the Set Up Windows screen appears. 2. Review your date and time settings. Click Next. ASUS CM1831 19 Wait for the user name and computer name, then click Next. 5. To start using your computer.
... click Next. 3. If you in uniques names for a few minutes until the Set Up Windows screen appears. 2. Review your date and time settings. Click Next. ASUS CM1831 19 Wait for the user name and computer name, then click Next. 5. To start using your computer.
User Manual
Page 23
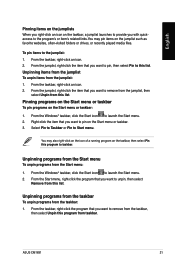
... select Remove from the taskbar: 1. From the Windows® taskbar, click the Start icon to the jumplist: 1. To pin items to launch the Start menu. 2. ASUS CM1831 21 From the taskbar, right-click an icon. 2. Pinning programs on the Start menu or taskbar To pin programs on the jumplist such as favorite...
... select Remove from the taskbar: 1. From the Windows® taskbar, click the Start icon to the jumplist: 1. To pin items to launch the Start menu. 2. ASUS CM1831 21 From the taskbar, right-click an icon. 2. Pinning programs on the Start menu or taskbar To pin programs on the jumplist such as favorite...
User Manual
Page 25
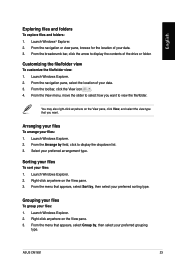
... type that appears, select Group by, then select your preferred sorting type. Launch Windows Explorer. 2. English Exploring files and folders To explore files and folders: 1. ASUS CM1831 23
... type that appears, select Group by, then select your preferred sorting type. Launch Windows Explorer. 2. English Exploring files and folders To explore files and folders: 1. ASUS CM1831 23
User Manual
Page 27
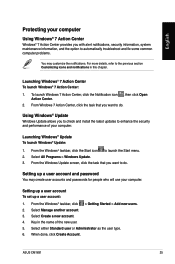
... maintenance information, and the option to launch the Start menu. 2. From the Windows® taskbar, click > Getting Started > Add new users. 2. Key in this chapter. ASUS CM1831 25 Using Windows® Update Windows Update allows you want to do . Select All Programs > Windows Update. 3. Select Manage another account. 3. Select either Standard user...
... maintenance information, and the option to launch the Start menu. 2. From the Windows® taskbar, click > Getting Started > Add new users. 2. Key in this chapter. ASUS CM1831 25 Using Windows® Update Windows Update allows you want to do . Select All Programs > Windows Update. 3. Select Manage another account. 3. Select either Standard user...
User Manual
Page 29
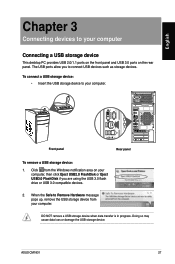
Front panel Rear panel To remove a USB storage device: 1. ASUS CM1831 27 To connect a USB storage device: • Insert the USB storage device to Remove Hardware message pops up, remove the USB storage device from the ...
Front panel Rear panel To remove a USB storage device: 1. ASUS CM1831 27 To connect a USB storage device: • Insert the USB storage device to Remove Hardware message pops up, remove the USB storage device from the ...
User Manual
Page 31
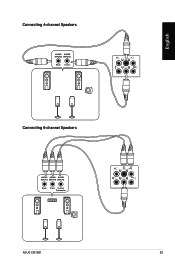
English Connecting 4-channel Speakers Connecting 6-channel Speakers ASUS CM1831 29
English Connecting 4-channel Speakers Connecting 6-channel Speakers ASUS CM1831 29

User Manual
Page 33
Setting up multiple displays When using multiple monitors, you to connect multiple external displays. ASUS CM1831 31 English Connecting multiple external displays Your desktop PC may come with VGA, HDMI, or DVI ports and allows you are allowed to set display ...
Setting up multiple displays When using multiple monitors, you to connect multiple external displays. ASUS CM1831 31 English Connecting multiple external displays Your desktop PC may come with VGA, HDMI, or DVI ports and allows you are allowed to set display ...

User Manual
Page 35
ASUS CM1831 33 The HDMI cable is purchased separately. • To get the best display performance, ensure that your computer. • You need an HDMI cable to the HDMI port of your HDMI cable is less than 15 meters. English Connecting an HDTV Connect a High Definition TV (HDTV) to connect the HDTV and the computer.
ASUS CM1831 33 The HDMI cable is purchased separately. • To get the best display performance, ensure that your computer. • You need an HDMI cable to the HDMI port of your HDMI cable is less than 15 meters. English Connecting an HDTV Connect a High Definition TV (HDTV) to connect the HDTV and the computer.
User Manual
Page 37
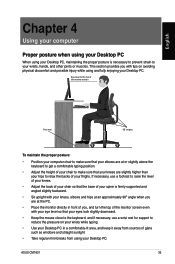
ASUS CM1831 35 If necessary, use a wrist rest for support to reduce the pressure on your wrists while typing. • Use your Desktop PC in front of ...
ASUS CM1831 35 If necessary, use a wrist rest for support to reduce the pressure on your wrists while typing. • Use your Desktop PC in front of ...
User Manual
Page 39
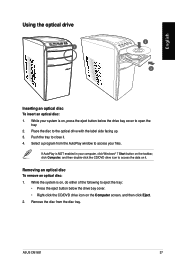
Select a program from the disc tray. Remove the disc from the AutoPlay window to access your files. ASUS CM1831 37 While your computer, click Windows® 7 Start button on the taskbar, click Computer, and then double-click the CD/DVD drive icon to the ...
Select a program from the disc tray. Remove the disc from the AutoPlay window to access your files. ASUS CM1831 37 While your computer, click Windows® 7 Start button on the taskbar, click Computer, and then double-click the CD/DVD drive icon to the ...
User Manual
Page 43
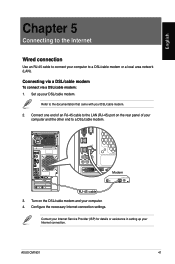
ASUS CM1831 41 English Chapter 5 Connecting to the Internet Wired connection Use an RJ-45 cable to connect your computer to the documentation that came with your ...
ASUS CM1831 41 English Chapter 5 Connecting to the Internet Wired connection Use an RJ-45 cable to connect your computer to the documentation that came with your ...
User Manual
Page 45
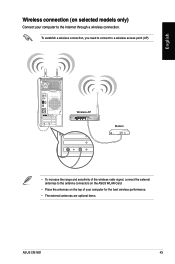
Wireless connection (on the top of the wireless radio signal, connect the external antennas to the antenna connectors on the ASUS WLAN Card. • Place the antennas on selected models only) Connect your computer for the best wireless performance. • The external antennas are optional items. ASUS CM1831 43 To establish a wireless connection, you need to connect to the Internet through a wireless connection. English Wireless AP Modem • To increase the range and sensitivity of your computer to a wireless access point (AP).
Wireless connection (on the top of the wireless radio signal, connect the external antennas to the antenna connectors on the ASUS WLAN Card. • Place the antennas on selected models only) Connect your computer for the best wireless performance. • The external antennas are optional items. ASUS CM1831 43 To establish a wireless connection, you need to connect to the Internet through a wireless connection. English Wireless AP Modem • To increase the range and sensitivity of your computer to a wireless access point (AP).
User Manual
Page 47
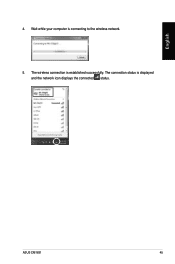
Wait while your computer is displayed and the network icon displays the connected status. The connection status is connecting to the wireless network. 5. ASUS CM1831 45 The wireless connection is established successfully. English 4.
Wait while your computer is displayed and the network icon displays the connected status. The connection status is connecting to the wireless network. 5. ASUS CM1831 45 The wireless connection is established successfully. English 4.
User Manual
Page 49
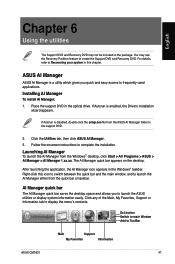
...AI Manager: 1. Click any of the Main, My Favorites, Support or Information tab to frequently-used applications. Click the Utilities tab, then click ASUS AI Manager. 3. Right-click this chapter. For details, refer to launch the AI Manager either from the Windows® desktop, click Start > ...DVD and Recovery DVD may use the Recovery Partition feature to ToolBar Main Support My Favorites Information ASUS CM1831 47 If Autorun is disabled, double-click the setup.exe file from the ASUS AI Manager folder in this icon to switch between the quick bar and the main window, ...
...AI Manager: 1. Click any of the Main, My Favorites, Support or Information tab to frequently-used applications. Click the Utilities tab, then click ASUS AI Manager. 3. Right-click this chapter. For details, refer to launch the AI Manager either from the Windows® desktop, click Start > ...DVD and Recovery DVD may use the Recovery Partition feature to ToolBar Main Support My Favorites Information ASUS CM1831 47 If Autorun is disabled, double-click the setup.exe file from the ASUS AI Manager folder in this icon to switch between the quick bar and the main window, ...

User Manual
Page 51
... to My Favorites list. You can also double click to launch, delete, or rename the selected application. To add an application: 1. ASUS CM1831 49 English My Favorites My Favorites allows you from searching for the applications throughout your system, motherboard, CPU, BIOS, installed device(s), and ... want to add to add applications that you frequently use, saving you to My Favorites. 2. The application is added to the ASUS website, technical support website, download support website, or contact information. Support Click any links on the application icon to launch the selected...
... to My Favorites list. You can also double click to launch, delete, or rename the selected application. To add an application: 1. ASUS CM1831 49 English My Favorites My Favorites allows you from searching for the applications throughout your system, motherboard, CPU, BIOS, installed device(s), and ... want to add to add applications that you frequently use, saving you to My Favorites. 2. The application is added to the ASUS website, technical support website, download support website, or contact information. Support Click any links on the application icon to launch the selected...
User Manual
Page 53
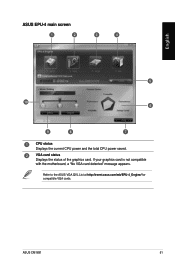
Refer to the ASUS VGA QVL List at http://event.asus.com/mb/EPU-4_Engine/ for compatible VGA cards. ASUS CM1831 51 If your graphics card is not compatible with the motherboard, a "No VGA card detected" message appears. English ASUS EPU-4 main screen 1 2 3 4 5 10 6 9 8 7 1 CPU status Displays the current CPU power and the total CPU power saved. 2 VGA card status Displays the status of the graphics card.
Refer to the ASUS VGA QVL List at http://event.asus.com/mb/EPU-4_Engine/ for compatible VGA cards. ASUS CM1831 51 If your graphics card is not compatible with the motherboard, a "No VGA card detected" message appears. English ASUS EPU-4 main screen 1 2 3 4 5 10 6 9 8 7 1 CPU status Displays the current CPU power and the total CPU power saved. 2 VGA card status Displays the status of the graphics card.


