User Manual
Page 13
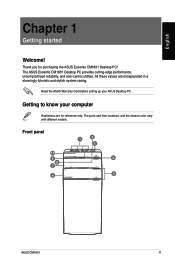
... for purchasing the ASUS Essentio CM1831 Desktop PC! The ports and their locations, and the chassis color vary with different models. The ASUS Essentio CM1831 Desktop PC provides cutting-edge performance, uncompromised reliability, and user-centric utilities. Getting to know your ASUS Desktop PC. Thank you for reference only. Front panel 10 9 8 7 6 1 2 3 4 5 ASUS CM1831 11 English Chapter...
... for purchasing the ASUS Essentio CM1831 Desktop PC! The ports and their locations, and the chassis color vary with different models. The ASUS Essentio CM1831 Desktop PC provides cutting-edge performance, uncompromised reliability, and user-centric utilities. Getting to know your ASUS Desktop PC. Thank you for reference only. Front panel 10 9 8 7 6 1 2 3 4 5 ASUS CM1831 11 English Chapter...
User Manual
Page 15
... Speaker Out Mic In Center/Subwoofer Rear Speaker Out - 8-channel Line In Front Speaker Out Mic In Center/Subwoofer Rear Speaker Out Side Speaker Out ASUS CM1831 13 Plug the power cord to any DVI-D compatible device and is HDCP compliant allowing playback of this connector. 2. ���P�o�w�...
... Speaker Out Mic In Center/Subwoofer Rear Speaker Out - 8-channel Line In Front Speaker Out Mic In Center/Subwoofer Rear Speaker Out Side Speaker Out ASUS CM1831 13 Plug the power cord to any DVI-D compatible device and is HDCP compliant allowing playback of this connector. 2. ���P�o�w�...
User Manual
Page 17
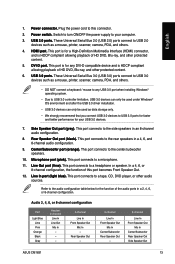
Connect a monitor to your computer. ASUS CM1831 15 English Setting up your computer This section guides you through connecting the main hardware devices, such as the external monitor, keyboard, mouse, and power cord, to a display output port on the ASUS Graphics Card. 2. Connecting an external monitor Using the ASUS Graphics Card (on selected models only...
Connect a monitor to your computer. ASUS CM1831 15 English Setting up your computer This section guides you through connecting the main hardware devices, such as the external monitor, keyboard, mouse, and power cord, to a display output port on the ASUS Graphics Card. 2. Connecting an external monitor Using the ASUS Graphics Card (on selected models only...
User Manual
Page 19
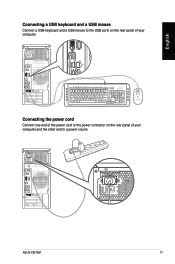
C Connecting the power cord Connect one end of the power cord to the power connector on the rear panel of your computer and the other end to the USB ports on the rear panel of your computer. ASUS CM1831 17 English Connecting a USB keyboard and a USB mouse Connect a USB keyboard and a USB mouse to a power source.
C Connecting the power cord Connect one end of the power cord to the power connector on the rear panel of your computer and the other end to the USB ports on the rear panel of your computer. ASUS CM1831 17 English Connecting a USB keyboard and a USB mouse Connect a USB keyboard and a USB mouse to a power source.
User Manual
Page 21
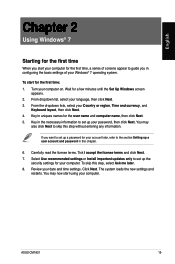
... time When you start your computer for the first time, a series of your Windows® 7 operating system. The system loads the new settings and restarts. ASUS CM1831 19
... time When you start your computer for the first time, a series of your Windows® 7 operating system. The system loads the new settings and restarts. ASUS CM1831 19
User Manual
Page 23
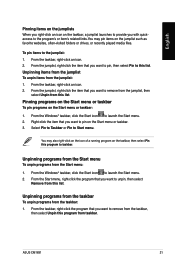
... program on the taskbar, then select Pin this program to taskbar. From the taskbar, right-click an icon. 2. From the taskbar, right-click an icon. 2. ASUS CM1831 21 To pin items to launch the Start menu. 2. Unpinning programs from the Start menu To unpin programs from the taskbar: 1. Unpinning items from the...
... program on the taskbar, then select Pin this program to taskbar. From the taskbar, right-click an icon. 2. From the taskbar, right-click an icon. 2. ASUS CM1831 21 To pin items to launch the Start menu. 2. Unpinning programs from the Start menu To unpin programs from the taskbar: 1. Unpinning items from the...
User Manual
Page 25
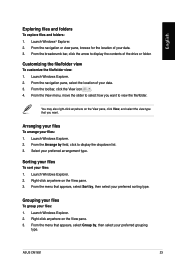
... folder. From the breadcrumb bar, click the arrow to display the contents of your files: 1. Launch Windows Explorer. 2. Grouping your files To group your data. 3. ASUS CM1831 23 Customizing the file/folder view To customize the file/folder view: 1. Right-click anywhere on the View pane. 3. Launch Windows Explorer. 2. From the View...
... folder. From the breadcrumb bar, click the arrow to display the contents of your files: 1. Launch Windows Explorer. 2. Grouping your files To group your data. 3. ASUS CM1831 23 Customizing the file/folder view To customize the file/folder view: 1. Right-click anywhere on the View pane. 3. Launch Windows Explorer. 2. From the View...
User Manual
Page 27
... Center, click the Notification icon , then click Open Action Center. 2. Key in this chapter. From the Windows® taskbar, click > Getting Started > Add new users. 2. ASUS CM1831 25 From Windows 7 Action Center, click the task that you with alert notifications, security information, system maintenance information, and the option to the previous section...
... Center, click the Notification icon , then click Open Action Center. 2. Key in this chapter. From the Windows® taskbar, click > Getting Started > Add new users. 2. ASUS CM1831 25 From Windows 7 Action Center, click the task that you with alert notifications, security information, system maintenance information, and the option to the previous section...
User Manual
Page 29
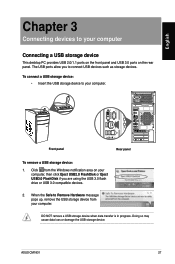
Front panel Rear panel To remove a USB storage device: 1. ASUS CM1831 27 Doing so may cause data loss or damage the USB storage device. To connect a USB storage device: • Insert the USB storage device to ...
Front panel Rear panel To remove a USB storage device: 1. ASUS CM1831 27 Doing so may cause data loss or damage the USB storage device. To connect a USB storage device: • Insert the USB storage device to ...
User Manual
Page 31
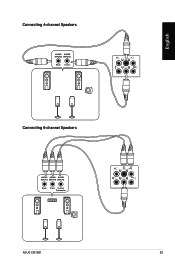
English Connecting 4-channel Speakers Connecting 6-channel Speakers ASUS CM1831 29
English Connecting 4-channel Speakers Connecting 6-channel Speakers ASUS CM1831 29

User Manual
Page 33
... Setting up your computer section in your computer, connect the monitors on how to connect a monitor to be the primary display has display during POST. ASUS CM1831 31 Turn off your computer and connect the power cords to enlarge your computer. The dual display function works only under Windows. You can use...
... Setting up your computer section in your computer, connect the monitors on how to connect a monitor to be the primary display has display during POST. ASUS CM1831 31 Turn off your computer and connect the power cords to enlarge your computer. The dual display function works only under Windows. You can use...

User Manual
Page 35
ASUS CM1831 33 English Connecting an HDTV Connect a High Definition TV (HDTV) to the HDMI port of your HDMI cable is purchased separately. • To get the best display performance, ensure that your computer. • You need an HDMI cable to connect the HDTV and the computer. The HDMI cable is less than 15 meters.
ASUS CM1831 33 English Connecting an HDTV Connect a High Definition TV (HDTV) to the HDMI port of your HDMI cable is purchased separately. • To get the best display performance, ensure that your computer. • You need an HDMI cable to connect the HDTV and the computer. The HDMI cable is less than 15 meters.
User Manual
Page 37
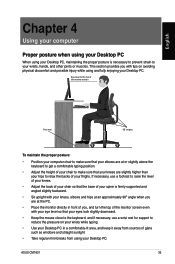
ASUS CM1831 35 Eye level to the top of the monitor screen Foot rest 90˚ angles To maintain the proper posture: • Position your computer chair ...
ASUS CM1831 35 Eye level to the top of the monitor screen Foot rest 90˚ angles To maintain the proper posture: • Position your computer chair ...
User Manual
Page 39
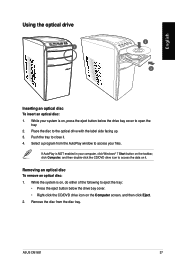
While your files. Push the tray to the optical drive with the label side facing up. 3. ASUS CM1831 37 Place the disc to close it . Select a program from the disc tray. While the system is NOT enabled in your computer, click Windows® 7 ...
While your files. Push the tray to the optical drive with the label side facing up. 3. ASUS CM1831 37 Place the disc to close it . Select a program from the disc tray. While the system is NOT enabled in your computer, click Windows® 7 ...
User Manual
Page 43
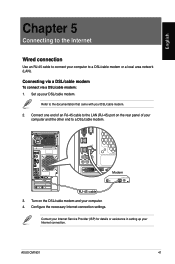
... the necessary Internet connection settings. Connecting via a DSL/cable modem To connect via a DSL/cable modem: 1. Refer to the documentation that came with your computer. 4. ASUS CM1831 41 Modem RJ-45 cable 3.
... the necessary Internet connection settings. Connecting via a DSL/cable modem To connect via a DSL/cable modem: 1. Refer to the documentation that came with your computer. 4. ASUS CM1831 41 Modem RJ-45 cable 3.
User Manual
Page 45
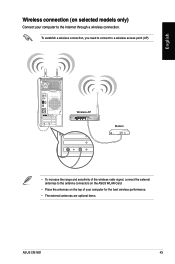
Wireless connection (on the top of the wireless radio signal, connect the external antennas to the antenna connectors on the ASUS WLAN Card. • Place the antennas on selected models only) Connect your computer for the best wireless performance. • The external antennas are optional items. ASUS CM1831 43 English Wireless AP Modem • To increase the range and sensitivity of your computer to a wireless access point (AP). To establish a wireless connection, you need to connect to the Internet through a wireless connection.
Wireless connection (on the top of the wireless radio signal, connect the external antennas to the antenna connectors on the ASUS WLAN Card. • Place the antennas on selected models only) Connect your computer for the best wireless performance. • The external antennas are optional items. ASUS CM1831 43 English Wireless AP Modem • To increase the range and sensitivity of your computer to a wireless access point (AP). To establish a wireless connection, you need to connect to the Internet through a wireless connection.
User Manual
Page 47
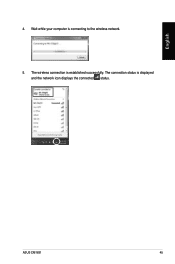
The wireless connection is connecting to the wireless network. 5. ASUS CM1831 45 Wait while your computer is established successfully. The connection status is displayed and the network icon displays the connected status. English 4.
The wireless connection is connecting to the wireless network. 5. ASUS CM1831 45 Wait while your computer is established successfully. The connection status is displayed and the network icon displays the connected status. English 4.
User Manual
Page 49
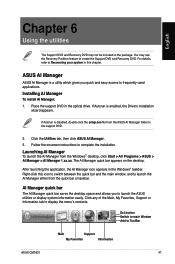
... wizard appears. For details, refer to ToolBar Main Support My Favorites Information ASUS CM1831 47 Click the Utilities tab, then click ASUS AI Manager. 3. Launching AI Manager To launch the AI Manager from the ASUS AI Manager folder in the package. After launching the application, the AI ... disabled, double-click the setup.exe file from the Windows® desktop, click Start > All Programs > ASUS > AI Manager > AI Manager 1.xx.xx. ASUS AI Manager ASUS AI Manager is a utility which gives you to frequently-used applications. AI Manager quick bar The AI Manager quick...
... wizard appears. For details, refer to ToolBar Main Support My Favorites Information ASUS CM1831 47 Click the Utilities tab, then click ASUS AI Manager. 3. Launching AI Manager To launch the AI Manager from the ASUS AI Manager folder in the package. After launching the application, the AI ... disabled, double-click the setup.exe file from the Windows® desktop, click Start > All Programs > ASUS > AI Manager > AI Manager 1.xx.xx. ASUS AI Manager ASUS AI Manager is a utility which gives you to frequently-used applications. AI Manager quick bar The AI Manager quick...

User Manual
Page 51
...selected application. Support Click any links on the application icon to My Favorites. 2. Information Click the tab on the file location window. ASUS CM1831 49 You can also double click to add applications that you frequently use, saving you from searching for the applications throughout your system, ...memory. English My Favorites My Favorites allows you to launch the selected application. Click Open on the Information window to the ASUS website, technical support website, download support website, or contact information. The application is added to My Favorites list.
...selected application. Support Click any links on the application icon to My Favorites. 2. Information Click the tab on the file location window. ASUS CM1831 49 You can also double click to add applications that you frequently use, saving you from searching for the applications throughout your system, ...memory. English My Favorites My Favorites allows you to launch the selected application. Click Open on the Information window to the ASUS website, technical support website, download support website, or contact information. The application is added to My Favorites list.
User Manual
Page 53
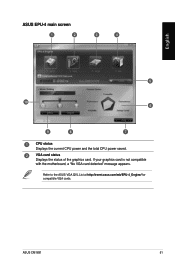
If your graphics card is not compatible with the motherboard, a "No VGA card detected" message appears. English ASUS EPU-4 main screen 1 2 3 4 5 10 6 9 8 7 1 CPU status Displays the current CPU power and the total CPU power saved. 2 VGA card status Displays the status of the graphics card. ASUS CM1831 51 Refer to the ASUS VGA QVL List at http://event.asus.com/mb/EPU-4_Engine/ for compatible VGA cards.
If your graphics card is not compatible with the motherboard, a "No VGA card detected" message appears. English ASUS EPU-4 main screen 1 2 3 4 5 10 6 9 8 7 1 CPU status Displays the current CPU power and the total CPU power saved. 2 VGA card status Displays the status of the graphics card. ASUS CM1831 51 Refer to the ASUS VGA QVL List at http://event.asus.com/mb/EPU-4_Engine/ for compatible VGA cards.


