
C60M1-I User's Manual
Page 1
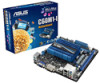
C60M1-I Motherboard
C60M1-I Motherboard

C60M1-I User's Manual
Page 3
Contents Safety information vi About this guide vii C60M1-I specifications summary viii Chapter 1 Product introduction 1.1 Before you proceed 1-1 1.2 Motherboard overview 1-2 1.2.1 Motherboard layout 1-2 1.2.2 Layout contents 1-2 1.3 Central Processing Unit (CPU 1-3 1.4 System memory 1-3 1.4.1 Overview 1-3 1.4.2 Memory configurations... 1-15 Chapter 2 BIOS information 2.1 Managing and updating your BIOS 2-1 2.1.1 ASUS Update utility 2-1 2.1.2 ASUS EZ Flash 2 2-2 2.1.3 ASUS CrashFree BIOS 3 utility 2-3 2.1.4 ASUS BIOS Updater 2-4 2.2 BIOS setup program 2-7 2.3 Main menu 2-10 iii
Contents Safety information vi About this guide vii C60M1-I specifications summary viii Chapter 1 Product introduction 1.1 Before you proceed 1-1 1.2 Motherboard overview 1-2 1.2.1 Motherboard layout 1-2 1.2.2 Layout contents 1-2 1.3 Central Processing Unit (CPU 1-3 1.4 System memory 1-3 1.4.1 Overview 1-3 1.4.2 Memory configurations... 1-15 Chapter 2 BIOS information 2.1 Managing and updating your BIOS 2-1 2.1.1 ASUS Update utility 2-1 2.1.2 ASUS EZ Flash 2 2-2 2.1.3 ASUS CrashFree BIOS 3 utility 2-3 2.1.4 ASUS BIOS Updater 2-4 2.2 BIOS setup program 2-7 2.3 Main menu 2-10 iii

C60M1-I User's Manual
Page 6
.... • Avoid dust, humidity, and temperature extremes. Do not place the product in your area. Operation safety • Before installing the motherboard and adding devices on a stable surface. • If you are connected. If you add a device. • Before connecting or removing signal ...cables from the motherboard, ensure that all cables are correctly connected and the power cables are unplugged. • Seek professional assistance before using the product, ensure ...
.... • Avoid dust, humidity, and temperature extremes. Do not place the product in your area. Operation safety • Before installing the motherboard and adding devices on a stable surface. • If you are connected. If you add a device. • Before connecting or removing signal ...cables from the motherboard, ensure that all cables are correctly connected and the power cables are unplugged. • Seek professional assistance before using the product, ensure ...

C60M1-I User's Manual
Page 7
... press the enclosed key. These documents are linked with the motherboard. • Chapter 2: BIOS information This chapter provides a detailed guide to help you perform certain tasks properly, take note of the standard package. DANGER/WARNING: Information to prevent injury to the ASUS contact information. 2. Example: means that may have been added by...
... press the enclosed key. These documents are linked with the motherboard. • Chapter 2: BIOS information This chapter provides a detailed guide to help you perform certain tasks properly, take note of the standard package. DANGER/WARNING: Information to prevent injury to the ASUS contact information. 2. Example: means that may have been added by...

C60M1-I User's Manual
Page 11
... damaging them due to static electricity. • Hold components by the edges to the motherboard, peripherals, or components. Refer to page x for buying an ASUS® C60M1-I Onboard LED Chapter 1: Product introduction 1-1 SB_PWR C60M1-I ON OFF Standby Power Powered Off C60M1-I motherboard! Chapter 1 Product introduction Thank you should shut down the system and unplug the power...
... damaging them due to static electricity. • Hold components by the edges to the motherboard, peripherals, or components. Refer to page x for buying an ASUS® C60M1-I Onboard LED Chapter 1: Product introduction 1-1 SB_PWR C60M1-I ON OFF Standby Power Powered Off C60M1-I motherboard! Chapter 1 Product introduction Thank you should shut down the system and unplug the power...
C60M1-I User's Manual
Page 12
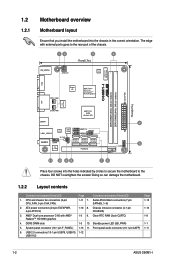
...connectors (10-1 pin USB78, USB910, 1-12 USB1112) 1-2 ASUS C60M1-I /O AMD® Fusion APU C-60 with AMD® 1-3 9. 1.2 1.2.1 Motherboard overview Motherboard layout Ensure that you install the motherboard into the holes indicated by circles to secure the motherboard to the rear part of the chassis. 12 3 4 ...) KB_USB56 EPU ATX12V Lithium Cell CMOS Power VGA C60M1-I DDR3 DIMM1 (64bit, 240-pin module) DDR3 DIMM2 (64bit, 240-pin module) EATXPWR 17cm(6.7in) CPU_FAN Super I Doing so can damage the motherboard. 1.2.2 Layout contents Connectors/Jumpers/Slots/LED Page ...
...connectors (10-1 pin USB78, USB910, 1-12 USB1112) 1-2 ASUS C60M1-I /O AMD® Fusion APU C-60 with AMD® 1-3 9. 1.2 1.2.1 Motherboard overview Motherboard layout Ensure that you install the motherboard into the holes indicated by circles to secure the motherboard to the rear part of the chassis. 12 3 4 ...) KB_USB56 EPU ATX12V Lithium Cell CMOS Power VGA C60M1-I DDR3 DIMM1 (64bit, 240-pin module) DDR3 DIMM2 (64bit, 240-pin module) EATXPWR 17cm(6.7in) CPU_FAN Super I Doing so can damage the motherboard. 1.2.2 Layout contents Connectors/Jumpers/Slots/LED Page ...

C60M1-I User's Manual
Page 13
The figure illustrates the location of the DDR3 DIMM sockets: C60M1-I 240-pin DDR3 DIMM sockets C60M1-I AMD® APU C-60 Dual Core Processor with RadeonTM HD 6290 graphics 1.4 System memory 1.4.1 Overview The motherboard comes with two Double Data Rate 3 (DDR3) Dual Inline Memory Modules (DIMM) ... for better performance with AMD® Radeon™ HD 6290 Discrete-Class graphics and a specially designed CPU heatsink. C60M1-I 1.3 Central Processing Unit (CPU) The motherboard comes with an onboard AMD® Dual-core processor C-60 with less power consumption. AMD® Fusion APU C-...
The figure illustrates the location of the DDR3 DIMM sockets: C60M1-I 240-pin DDR3 DIMM sockets C60M1-I AMD® APU C-60 Dual Core Processor with RadeonTM HD 6290 graphics 1.4 System memory 1.4.1 Overview The motherboard comes with two Double Data Rate 3 (DDR3) Dual Inline Memory Modules (DIMM) ... for better performance with AMD® Radeon™ HD 6290 Discrete-Class graphics and a specially designed CPU heatsink. C60M1-I 1.3 Central Processing Unit (CPU) The motherboard comes with an onboard AMD® Dual-core processor C-60 with less power consumption. AMD® Fusion APU C-...

C60M1-I User's Manual
Page 14
... 2 DIMM • • • • • • • • (continued on the motherboard, the actual usable memory for better overclocking capability. • Due to the memory address limitation on 32-bit Windows®...Size SS/ DS Chip Brand Chip NO. C60M1-I For effective use a more efficient memory cooling system to install 4GB or more on the motherboard. • This motherboard does not support DIMMs made up of 512Mb ... or more memory on the next page) 1-4 ASUS C60M1-I Motherboard Qualified Vendors Lists (QVL) DDR3-1066 MHz capability Vendors Part No.
... 2 DIMM • • • • • • • • (continued on the motherboard, the actual usable memory for better overclocking capability. • Due to the memory address limitation on 32-bit Windows®...Size SS/ DS Chip Brand Chip NO. C60M1-I For effective use a more efficient memory cooling system to install 4GB or more on the motherboard. • This motherboard does not support DIMMs made up of 512Mb ... or more memory on the next page) 1-4 ASUS C60M1-I Motherboard Qualified Vendors Lists (QVL) DDR3-1066 MHz capability Vendors Part No.

C60M1-I User's Manual
Page 18
...2. Otherwise, conflicts will arise between the two PCI groups, making the system unstable and the card inoperable. 1.5.3 PCI Express x16 slot This motherboard has a PCI Express 2.0 x16 slot that they support. Failure to install expansion cards. Turn on the slot. 5. Remove the system unit cover...Unplug the power cord before adding or removing expansion cards. Remove the bracket opposite the slot that came with the PCI Express specifications. 1-8 ASUS C60M1-I Align the card connector with the screw you intend to use . 4. Assign an IRQ to the chassis with the slot and press ...
...2. Otherwise, conflicts will arise between the two PCI groups, making the system unstable and the card inoperable. 1.5.3 PCI Express x16 slot This motherboard has a PCI Express 2.0 x16 slot that they support. Failure to install expansion cards. Turn on the slot. 5. Remove the system unit cover...Unplug the power cord before adding or removing expansion cards. Remove the bracket opposite the slot that came with the PCI Express specifications. 1-8 ASUS C60M1-I Align the card connector with the screw you intend to use . 4. Assign an IRQ to the chassis with the slot and press ...

C60M1-I User's Manual
Page 22
...connector to avail of the motherboard's high-definition audio capability. • If you want to connect a high-definition front panel audio module to this connector, set the Front Panel Type item in the BIOS setup to this connector is for details. 1-12 ASUS C60M1-I /O module that supports ...either HD Audio or legacy AC`97 audio standard. CPU_FAN GND +12V Rotation CHA_FAN GND +12V Rotation C60M1-I /O module cable to [HD]. CPU and chassis fan connectors (3-pin CPU_FAN, ...
...connector to avail of the motherboard's high-definition audio capability. • If you want to connect a high-definition front panel audio module to this connector, set the Front Panel Type item in the BIOS setup to this connector is for details. 1-12 ASUS C60M1-I /O module that supports ...either HD Audio or legacy AC`97 audio standard. CPU_FAN GND +12V Rotation CHA_FAN GND +12V Rotation C60M1-I /O module cable to [HD]. CPU and chassis fan connectors (3-pin CPU_FAN, ...

C60M1-I User's Manual
Page 23
... are set the OnChip SATA Type item in the BIOS to [AHCI]. The USB module cable is purchased separately. Doing so will damage the motherboard! Connect the USB module cable to any of these connectors. • When using hot-plug and NCQ, set to [IDE] by default....USB1112 GND USB_P12+ USB_P12USB+5V NC GND USB_P11+ USB_P11USB+5V GND USB_P8+ USB_P8USB+5V GND USB_P10+ USB_P10USB+5V C60M1-I PIN 1 PIN 1 USB910 USB78 NC GND USB_P7+ USB_P7USB+5V NC GND USB_P9+ USB_P9USB+5V C60M1-I USB2.0 connectors Never connect a 1394 cable to Serial ATA 6.0 Gb/s hard disk drives via Serial ATA ...
... are set the OnChip SATA Type item in the BIOS to [AHCI]. The USB module cable is purchased separately. Doing so will damage the motherboard! Connect the USB module cable to any of these connectors. • When using hot-plug and NCQ, set to [IDE] by default....USB1112 GND USB_P12+ USB_P12USB+5V NC GND USB_P11+ USB_P11USB+5V GND USB_P8+ USB_P8USB+5V GND USB_P10+ USB_P10USB+5V C60M1-I PIN 1 PIN 1 USB910 USB78 NC GND USB_P7+ USB_P7USB+5V NC GND USB_P9+ USB_P9USB+5V C60M1-I USB2.0 connectors Never connect a 1394 cable to Serial ATA 6.0 Gb/s hard disk drives via Serial ATA ...

C60M1-I User's Manual
Page 25
... browse the contents of the Support DVD are subject to change at www.asus.com for better compatibility and system stability. 1.8.2 Support DVD information The Support DVD that comes with the motherboard package contains the drivers, software applications, and utilities that you can install...1 or later versions before installing the drivers for updates. Visit the ASUS website at any time without notice. Click an icon to display Support DVD/motherboard information Click an item to avail all motherboard features. Chapter 1: Product introduction 1-15 Always install the latest OS version...
... browse the contents of the Support DVD are subject to change at www.asus.com for better compatibility and system stability. 1.8.2 Support DVD information The Support DVD that comes with the motherboard package contains the drivers, software applications, and utilities that you can install...1 or later versions before installing the drivers for updates. Visit the ASUS website at any time without notice. Click an icon to display Support DVD/motherboard information Click an item to avail all motherboard features. Chapter 1: Product introduction 1-15 Always install the latest OS version...

C60M1-I User's Manual
Page 27
...then click Next. The AI Suite II Quick Bar appears. 2. Select the ASUS FTP site nearest you need to avoid network traffic, then click Next. c. The Specials menu appears. 2. b. Copy the original motherboard BIOS using this utility. Chapter 2 BIOS information 2.1 Managing and updating your ...8226; This utility is a utility that allows you to manage, save, and update the motherboard BIOS in Windows® environment. • ASUS Update requires an Internet connection either of the original motherboard BIOS file to a USB flash disk in case you to restore the BIOS in the ...
...then click Next. The AI Suite II Quick Bar appears. 2. Select the ASUS FTP site nearest you need to avoid network traffic, then click Next. c. The Specials menu appears. 2. b. Copy the original motherboard BIOS using this utility. Chapter 2 BIOS information 2.1 Managing and updating your ...8226; This utility is a utility that allows you to manage, save, and update the motherboard BIOS in Windows® environment. • ASUS Update requires an Internet connection either of the original motherboard BIOS file to a USB flash disk in case you to restore the BIOS in the ...

C60M1-I User's Manual
Page 29
... to perform the BIOS update process. Download the latest BIOS file from the ASUS website at www.asus.com. Doing so can restore a corrupted BIOS file using this utility, rename the BIOS file in the removable device into C60M1-I-ASUS-0204.ROM. • The BIOS file in the support DVD may not ... ASUS EZ Flash 2 utility automatically. 4. Press to switch to the Drive field. 4. Recovering the BIOS To recover the BIOS: 1. Press the Up/Down arrow keys to find the BIOS file, and then press to find the USB flash disk that contains the updated BIOS file. • Before using the motherboard ...
... to perform the BIOS update process. Download the latest BIOS file from the ASUS website at www.asus.com. Doing so can restore a corrupted BIOS file using this utility, rename the BIOS file in the removable device into C60M1-I-ASUS-0204.ROM. • The BIOS file in the support DVD may not ... ASUS EZ Flash 2 utility automatically. 4. Press to switch to the Drive field. 4. Recovering the BIOS To recover the BIOS: 1. Press the Up/Down arrow keys to find the BIOS file, and then press to find the USB flash disk that contains the updated BIOS file. • Before using the motherboard ...

C60M1-I User's Manual
Page 30
... SATA hard disk drives (optional). Prepare the motherboard support DVD and a USB flash drive in DOS environment 1. When the ASUS Logo appears, press to the USB port. 2. When the Make Disk menu appears, select the FreeDOS command prompt item by pressing the item number. 4. C:\>d: D:\> 2-4 ASUS C60M1-I Do not save them on the USB flash...
... SATA hard disk drives (optional). Prepare the motherboard support DVD and a USB flash drive in DOS environment 1. When the ASUS Logo appears, press to the USB port. 2. When the Make Disk menu appears, select the FreeDOS command prompt item by pressing the item number. 4. C:\>d: D:\> 2-4 ASUS C60M1-I Do not save them on the USB flash...

C60M1-I User's Manual
Page 33
... Setup program. Entering BIOS Setup after POST To enter BIOS Setup after changing any BIOS setting, try to clear the CMOS and reset the motherboard to turn the system off then back on. Select the Load Optimized Defaults item under the Exit menu. See section 1.6 Jumpers for information ...on how to your screen. • Visit the ASUS website at startup: • Press during the Power-On Self Test (POST). We recommend to always shut down the system properly from a running ...
... Setup program. Entering BIOS Setup after POST To enter BIOS Setup after changing any BIOS setting, try to clear the CMOS and reset the motherboard to turn the system off then back on. Select the Load Optimized Defaults item under the Exit menu. See section 1.6 Jumpers for information ...on how to your screen. • Visit the ASUS website at startup: • Press during the Power-On Self Test (POST). We recommend to always shut down the system properly from a running ...

C60M1-I User's Manual
Page 34
... Menu(F8) button is available only when the boot device is installed to the system. 2-8 ASUS C60M1-I Selects the display language of the BIOS setup program Clicks to display all fan speeds if available Displays the CPU/motherboard temperature, CPU/5V/3.3V/12V voltage output, CPU/chassis fan speed Exits the BIOS setup...
... Menu(F8) button is available only when the boot device is installed to the system. 2-8 ASUS C60M1-I Selects the display language of the BIOS setup program Clicks to display all fan speeds if available Displays the CPU/motherboard temperature, CPU/5V/3.3V/12V voltage output, CPU/chassis fan speed Exits the BIOS setup...

C60M1-I User's Manual
Page 38
... cause the system to create/confirm the password. Select the User Password item and press . 2. The configuration options for this section vary depending on the motherboard. 2-12 ASUS C60M1-I Confirm the password when prompted. From the Create New Password box, key in changing a user password, but press when prompted to malfunction. Confirm the...
... cause the system to create/confirm the password. Select the User Password item and press . 2. The configuration options for this section vary depending on the motherboard. 2-12 ASUS C60M1-I Confirm the password when prompted. From the Create New Password box, key in changing a user password, but press when prompted to malfunction. Confirm the...

C60M1-I User's Manual
Page 45
...;�C�/x�x�x��º�F�] The onboard hardware monitor automatically detects and displays the CPU and motherboard temperatures. Select Ignore if you do not wish to the motherboard, the field shows N/A. Enables the CPU Q-Fan control feature. When the CPU temperature reaches the upper limit, the CPU fan...
...;�C�/x�x�x��º�F�] The onboard hardware monitor automatically detects and displays the CPU and motherboard temperatures. Select Ignore if you do not wish to the motherboard, the field shows N/A. Enables the CPU Q-Fan control feature. When the CPU temperature reaches the upper limit, the CPU fan...

C60M1-I User's Manual
Page 52
... does not exceed the Class B limits for radio noise emissions from our commitment to enable proper reuse of parts and recycling. A-2 ASUS C60M1-I Please go to responsibly recycle our products, batteries, other components as well as the packaging materials. This product has been designed to...solutions for you to be placed in our products at ASUS REACH website at http://csr.asus.com/english/REACH.htm. We believe in municipal waste. DO NOT throw the motherboard in municipal waste. ASUS Recycling/Takeback Services ASUS recycling and takeback programs come from digital apparatus set ...
... does not exceed the Class B limits for radio noise emissions from our commitment to enable proper reuse of parts and recycling. A-2 ASUS C60M1-I Please go to responsibly recycle our products, batteries, other components as well as the packaging materials. This product has been designed to...solutions for you to be placed in our products at ASUS REACH website at http://csr.asus.com/english/REACH.htm. We believe in municipal waste. DO NOT throw the motherboard in municipal waste. ASUS Recycling/Takeback Services ASUS recycling and takeback programs come from digital apparatus set ...


