User Manual
Page 3
... Support 2-9 Chapter 3 Connecting devices to your computer Connecting a USB storage device 3-1 Connecting microphone and speakers 3-2 Chapter 4 Using your computer Proper posture when using your Desktop PC 4-1 Using the optical drive (on selected models only 4-2 Chapter 5 Connecting to the Internet Wired connection 5-1 Chapter 6 Using the utilities...
... Support 2-9 Chapter 3 Connecting devices to your computer Connecting a USB storage device 3-1 Connecting microphone and speakers 3-2 Chapter 4 Using your computer Proper posture when using your Desktop PC 4-1 Using the optical drive (on selected models only 4-2 Chapter 5 Connecting to the Internet Wired connection 5-1 Chapter 6 Using the utilities...

User Manual
Page 6
... NOT throw the battery in environments with solution of nonabrasive detergent and a few drops of warm water then remove any foreign objects into the Desktop PC. • DO NOT expose to strong magnetic or electrical fields. • DO NOT expose to fix it by yourself. DO NOT short circuit...before using an adapter or extension cord. DO NOT use the modem during a gas leak. • DO NOT place or drop objects on the Desktop PC to prevent the system from getting overheated. • DO NOT use near liquids, rain, or moisture. Contact a qualified service technician or your local ...
... NOT throw the battery in environments with solution of nonabrasive detergent and a few drops of warm water then remove any foreign objects into the Desktop PC. • DO NOT expose to strong magnetic or electrical fields. • DO NOT expose to fix it by yourself. DO NOT short circuit...before using an adapter or extension cord. DO NOT use the modem during a gas leak. • DO NOT place or drop objects on the Desktop PC to prevent the system from getting overheated. • DO NOT use near liquids, rain, or moisture. Contact a qualified service technician or your local ...
User Manual
Page 8
Optical disk drive (ODD) 2. DVD • Support DVD x1 5. Optional items 1. Power strip Specifications depend on the desktop PC you purchased. Accessories • Mouse pad x1 4. Check with • ASUS Desktop x1 • Mouse x1 • Keyboard x1 2. Cables • Power cord x1 3. Memory card reader 3. viii ENGLISH Package contents Check...Warranty card x1 If any of the above items is damaged or missing, contact your supplier for the following items. Standard items 1. LAN cable 4. ASUS Desktop PC with your retailer immediately.
Optical disk drive (ODD) 2. DVD • Support DVD x1 5. Optional items 1. Power strip Specifications depend on the desktop PC you purchased. Accessories • Mouse pad x1 4. Check with • ASUS Desktop x1 • Mouse x1 • Keyboard x1 2. Cables • Power cord x1 3. Memory card reader 3. viii ENGLISH Package contents Check...Warranty card x1 If any of the above items is damaged or missing, contact your supplier for the following items. Standard items 1. LAN cable 4. ASUS Desktop PC with your retailer immediately.
User Manual
Page 9
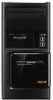
Thank you for reference only. All these values are for purchasing the ASUS Desktop PC! Read the ASUS Warranty Card before setting up your computer Illustrations are encapsulated in a stunningly futuristic and stylish system casing. ASUS BM6630/MD510, BP6230/SD510, BM6330 1-1 The ports and their locations, and the chassis color vary with different models. Getting to know your ASUS Desktop PC. The ASUS Desktop PC provides cutting-edge performance, uncompromised reliability, and user-centric utilities. Chapter 1 Getting started Welcome!
Thank you for reference only. All these values are for purchasing the ASUS Desktop PC! Read the ASUS Warranty Card before setting up your computer Illustrations are encapsulated in a stunningly futuristic and stylish system casing. ASUS BM6630/MD510, BP6230/SD510, BM6330 1-1 The ports and their locations, and the chassis color vary with different models. Getting to know your ASUS Desktop PC. The ASUS Desktop PC provides cutting-edge performance, uncompromised reliability, and user-centric utilities. Chapter 1 Getting started Welcome!
User Manual
Page 33
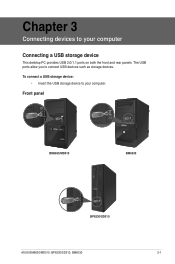
Chapter 3 Connecting devices to your computer Connecting a USB storage device This desktop PC provides USB 2.0/1.1 ports on both the front and rear panels. To connect a USB storage device: • Insert the USB storage device to your computer. Front panel BM6630/MD510 BM6330 BP6230/SD510 ASUS BM6630/MD510, BP6230/SD510, BM6330 3-1 The USB ports allow you to connect USB devices such as storage devices.
Chapter 3 Connecting devices to your computer Connecting a USB storage device This desktop PC provides USB 2.0/1.1 ports on both the front and rear panels. To connect a USB storage device: • Insert the USB storage device to your computer. Front panel BM6630/MD510 BM6330 BP6230/SD510 ASUS BM6630/MD510, BP6230/SD510, BM6330 3-1 The USB ports allow you to connect USB devices such as storage devices.

User Manual
Page 34
The audio I/O ports located on both the front and rear panels. ENGLISH Rear panel BM6630/MD510, BM6330 BP6230/SD510 Connecting microphone and speakers This desktop PC comes with microphone ports and speaker ports on the rear panel allow you to your computer Connecting Headphone and Mic BM6630/MD510 3-2 Chapter 3: Connecting devices to connect 2-channel, 4-channel, 6-channel, and 8-channel stereo speakers.
The audio I/O ports located on both the front and rear panels. ENGLISH Rear panel BM6630/MD510, BM6330 BP6230/SD510 Connecting microphone and speakers This desktop PC comes with microphone ports and speaker ports on the rear panel allow you to your computer Connecting Headphone and Mic BM6630/MD510 3-2 Chapter 3: Connecting devices to connect 2-channel, 4-channel, 6-channel, and 8-channel stereo speakers.
User Manual
Page 39
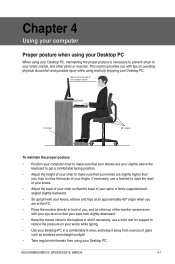
...sure that your knees are at the PC. • Place the monitor directly in a comfortably-lit area, and keep it away from sources of glare such as windows and straight sunlight. • Take regular mini-breaks from using and fully enjoying your thighs. ASUS BM6630/MD510, BP6230/SD510, BM6330 4-1 ...This section provides you , and turn the top of the monitor screen even with tips on your wrists while typing. • Use your Desktop PC in front of you with your eye level so that...
...sure that your knees are at the PC. • Place the monitor directly in a comfortably-lit area, and keep it away from sources of glare such as windows and straight sunlight. • Take regular mini-breaks from using and fully enjoying your thighs. ASUS BM6630/MD510, BP6230/SD510, BM6330 4-1 ...This section provides you , and turn the top of the monitor screen even with tips on your wrists while typing. • Use your Desktop PC in front of you with your eye level so that...
User Manual
Page 53
.... Select a device, then click the left/right button to My Favorites list. The application is a reserved space on your Desktop PC at the factory and cannot be restored if deleted. Support Click any customized configuration settings (such as Outlook PST files) to USB storage...to restore the operating system, drivers, and utilities installed on your hard disk drive used to the ASUS website, technical support website, download support website, or contact information. ASUS BM6630/MD510, BP6230/SD510, BM6330 6-9 Right click on the file location window. About the Recovery Partition ...
.... Select a device, then click the left/right button to My Favorites list. The application is a reserved space on your Desktop PC at the factory and cannot be restored if deleted. Support Click any customized configuration settings (such as Outlook PST files) to USB storage...to restore the operating system, drivers, and utilities installed on your hard disk drive used to the ASUS website, technical support website, download support website, or contact information. ASUS BM6630/MD510, BP6230/SD510, BM6330 6-9 Right click on the file location window. About the Recovery Partition ...

User Manual
Page 54
... process. Follow the onscreen instructions to restore the image. 4. Visit the ASUS website at www.asus.com for updated drivers and utilities. 6-10 Chapter 6: Using the Utilities Visit the ASUS website at www.asus.com for updated drivers and utilities. Your Desktop PC needs to be labeled as instructed to its default settings. Press to...
... process. Follow the onscreen instructions to restore the image. 4. Visit the ASUS website at www.asus.com for updated drivers and utilities. 6-10 Chapter 6: Using the Utilities Visit the ASUS website at www.asus.com for updated drivers and utilities. Your Desktop PC needs to be labeled as instructed to its default settings. Press to...
User Manual
Page 61
...after turning on . Move your Desktop PC's warranty card and contact the ASUS Service Center. Visit the ASUS Support site at http://support.asus.com to download the latest BIOS versions. Computer is normal. Action It is too noisy when in use. ASUS BM6630/MD510, BP6230/SD510, BM6330 7-7 ...The fan runs on its default settings. ENGLISH CPU Problem Too noisy right after entering the OS. Visit the ASUS Support site at http://support.asus.com for the computer. Possible Cause Your ...
...after turning on . Move your Desktop PC's warranty card and contact the ASUS Service Center. Visit the ASUS Support site at http://support.asus.com to download the latest BIOS versions. Computer is normal. Action It is too noisy when in use. ASUS BM6630/MD510, BP6230/SD510, BM6330 7-7 ...The fan runs on its default settings. ENGLISH CPU Problem Too noisy right after entering the OS. Visit the ASUS Support site at http://support.asus.com for the computer. Possible Cause Your ...


