User Manual
Page 7
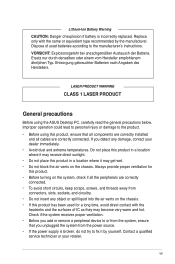
... oder einem vom Hersteller empfohlenem ähnljchen Typ. vii Improper operation could lead to personal injury or damage to the product. • Before using the ASUS Desktop PC, carefully read the general precautions below. Dispose of used for this product. • Before turning on the system, check if all cables are correctly...
... oder einem vom Hersteller empfohlenem ähnljchen Typ. vii Improper operation could lead to personal injury or damage to the product. • Before using the ASUS Desktop PC, carefully read the general precautions below. Dispose of used for this product. • Before turning on the system, check if all cables are correctly...

User Manual
Page 8
...System introduction This chapter gives a general description of time. • Use this guide is left unused for a long period of the ASUS Desktop PC. The chapter lists the system features, including introduction on how to protect users from scratches, be careful with the system package. viii...This chapter helps you remove or replace the system cover. • Unplug this guide Audience This guide provides general information about the ASUS Desktop PC and instructions on the front and rear panels. 2. How this product only with the correct voltage as instructed by the manufacturer....
...System introduction This chapter gives a general description of time. • Use this guide is left unused for a long period of the ASUS Desktop PC. The chapter lists the system features, including introduction on how to protect users from scratches, be careful with the system package. viii...This chapter helps you remove or replace the system cover. • Unplug this guide Audience This guide provides general information about the ASUS Desktop PC and instructions on the front and rear panels. 2. How this product only with the correct voltage as instructed by the manufacturer....
User Manual
Page 10
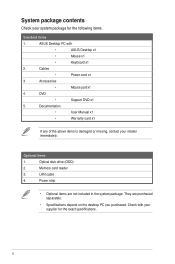
Accessories • Mouse pad x1 4. Check with • ASUS Desktop x1 • Mouse x1 • Keyboard x1 2. Documentation • User Manual x1 • Warranty card x1 If any of ...supplier for the following items. Standard items 1. Memory card reader 3. Power strip • Optional items are purchased separately. • Specifications depend on the desktop PC you purchased. DVD • Support DVD x1 5. Optional items 1. Cables • Power cord x1 3. Optical disk drive (ODD) 2. They are not ...
Accessories • Mouse pad x1 4. Check with • ASUS Desktop x1 • Mouse x1 • Keyboard x1 2. Documentation • User Manual x1 • Warranty card x1 If any of ...supplier for the following items. Standard items 1. Memory card reader 3. Power strip • Optional items are purchased separately. • Specifications depend on the desktop PC you purchased. DVD • Support DVD x1 5. Optional items 1. Cables • Power cord x1 3. Optical disk drive (ODD) 2. They are not ...

User Manual
Page 11
System introduction Chapter 1 This chapter gives a general description of the desktop PC. The chapter lists the system features including introduction on the front and rear panels.
System introduction Chapter 1 This chapter gives a general description of the desktop PC. The chapter lists the system features including introduction on the front and rear panels.
User Manual
Page 15
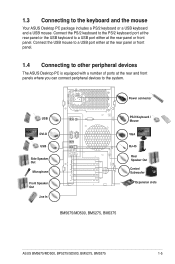
... Rear Speaker Out Center/ Subwoofer Expansion slots BM5675/MD500, BM5275, BM5375 ASUS BM5675/MD500, BP5275/SD500, BM5275, BM5375 1-5 Connect the USB mouse to a USB port either at the rear and front panels where you can connect peripheral devices to the keyboard and the mouse Your ASUS Desktop PC package includes a PS/2 keyboard or a USB keyboard...
... Rear Speaker Out Center/ Subwoofer Expansion slots BM5675/MD500, BM5275, BM5375 ASUS BM5675/MD500, BP5275/SD500, BM5275, BM5375 1-5 Connect the USB mouse to a USB port either at the rear and front panels where you can connect peripheral devices to the keyboard and the mouse Your ASUS Desktop PC package includes a PS/2 keyboard or a USB keyboard...

User Manual
Page 18
... the system for reference only. Use the setup procedures presented in the Support DVD. • Motherboard settings and hardware options vary. Power button Power button BM5675/MD500 BP5275/SD500 Power button BM5275 2-2 Power button BM5375 Chapter 2: Getting started Always install the latest OS version and the corresponding updates to maximize the... time, the system automatically detects the built-in audio and graphics chips and attempts to power up the system. 2.1 Installing an operating system This desktop PC supports Windows® XP / Vista / 7 operating systems (OS).
... the system for reference only. Use the setup procedures presented in the Support DVD. • Motherboard settings and hardware options vary. Power button Power button BM5675/MD500 BP5275/SD500 Power button BM5275 2-2 Power button BM5375 Chapter 2: Getting started Always install the latest OS version and the corresponding updates to maximize the... time, the system automatically detects the built-in audio and graphics chips and attempts to power up the system. 2.1 Installing an operating system This desktop PC supports Windows® XP / Vista / 7 operating systems (OS).

User Manual
Page 20
2.3.2 Drivers menu The Drivers menu shows the available device drivers if the system detects installed devices. ASUS InstAll Installs all of the drivers for your desktop PC. Intel Chipset Driver Installs the Intel® chipset driver. Realtek 10/100/1000 PCI-E LAN Driver Installs the Realtek® 10/100/1000 PCI-E LAN driver. Realtek Audio Driver Installs the Realtek® audio driver. ASUS EPU-4 Engine Installs the ASUS EPU-4 Engine. 2-4 Chapter 2: Getting started Install the necessary drivers to activate the devices.
2.3.2 Drivers menu The Drivers menu shows the available device drivers if the system detects installed devices. ASUS InstAll Installs all of the drivers for your desktop PC. Intel Chipset Driver Installs the Intel® chipset driver. Realtek 10/100/1000 PCI-E LAN Driver Installs the Realtek® 10/100/1000 PCI-E LAN driver. Realtek Audio Driver Installs the Realtek® audio driver. ASUS EPU-4 Engine Installs the ASUS EPU-4 Engine. 2-4 Chapter 2: Getting started Install the necessary drivers to activate the devices.
User Manual
Page 21
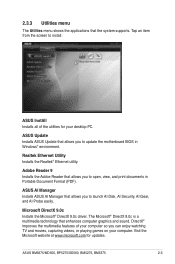
...supports. Realtek Ethernet Utility Installs the Realtek® Ethernet utility. ASUS Update Installs ASUS Update that allows you can enjoy watching TV and movies, capturing videos, or playing games on your desktop PC. Visit the Microsoft website at www.microsoft.com for your ...menu The Utilities menu shows the applications that enhances computer graphics and sound. ASUS AI Manager Installs ASUS AI Manager that allows you to update the motherboard BIOS in Portable Document Format (PDF). ASUS BM5675/MD500, BP5275/SD500, BM5275, BM5375 2-5 Microsoft DirectX 9.0c Installs the ...
...supports. Realtek Ethernet Utility Installs the Realtek® Ethernet utility. ASUS Update Installs ASUS Update that allows you can enjoy watching TV and movies, capturing videos, or playing games on your desktop PC. Visit the Microsoft website at www.microsoft.com for your ...menu The Utilities menu shows the applications that enhances computer graphics and sound. ASUS AI Manager Installs ASUS AI Manager that allows you to update the motherboard BIOS in Portable Document Format (PDF). ASUS BM5675/MD500, BP5275/SD500, BM5275, BM5375 2-5 Microsoft DirectX 9.0c Installs the ...

User Manual
Page 32
... Check I accept from your system, press during the Power-On Self-Test (POST). 2.6 Recovery DVD The ASUS PC Recovery DVD assists you in reinstalling the OS and restoring it to its system configurations. The recovery process starts....as drive "C". 4. Insert the Recovery DVD into the optical disk drive. 2. Restart the system and press when the ASUS logo appears. Turn on other partitions, and creates a new system partition as the boot device. 3. A list ... onscreen instructions to complete the process, then the system restarts. The ASUS PC Recovery DVD is for ASUS Desktop PC only.
... Check I accept from your system, press during the Power-On Self-Test (POST). 2.6 Recovery DVD The ASUS PC Recovery DVD assists you in reinstalling the OS and restoring it to its system configurations. The recovery process starts....as drive "C". 4. Insert the Recovery DVD into the optical disk drive. 2. Restart the system and press when the ASUS logo appears. Turn on other partitions, and creates a new system partition as the boot device. 3. A list ... onscreen instructions to complete the process, then the system restarts. The ASUS PC Recovery DVD is for ASUS Desktop PC only.

User Manual
Page 33
...data in the first partition. The new system is installed in the second partition. 5. ASUS BM5675/MD500, BP5275/SD500, BM5275, BM5375 2-17 The system restarts. After the system reboots, an ASUS Preload window appears. Recover Windows to complete the system configurations. The process percentage is for ...install a new system. Press Next to recover now, click Finish. Select where to keep other systems. Visit the ASUS website at www.asus.com for ASUS Desktop PC only. You can back up 40%. Options are: Recover Windows to first partition only: This option deletes only the...
...data in the first partition. The new system is installed in the second partition. 5. ASUS BM5675/MD500, BP5275/SD500, BM5275, BM5375 2-17 The system restarts. After the system reboots, an ASUS Preload window appears. Recover Windows to complete the system configurations. The process percentage is for ...install a new system. Press Next to recover now, click Finish. Select where to keep other systems. Visit the ASUS website at www.asus.com for ASUS Desktop PC only. You can back up 40%. Options are: Recover Windows to first partition only: This option deletes only the...

User Manual
Page 34
... restarts. Follow the onscreen instructions to complete the recovery process. 6. If you to keep other systems. Visit the ASUS website at www.asus.com for ASUS Desktop PC only. Insert the recovery DVD into the optical drive and select the optical drive (CDROM:XXX) as drive "C." Select... 3. Select this option and click Yes. 4. Click OK on the confirmation message to entire HD This option deletes all partitions from your ASUS Desktop PC. After the system restarts, Windows® 7 begins its system configurations. Turn on other partitions, and creates a new system partition as drive...
... restarts. Follow the onscreen instructions to complete the recovery process. 6. If you to keep other systems. Visit the ASUS website at www.asus.com for ASUS Desktop PC only. Insert the recovery DVD into the optical drive and select the optical drive (CDROM:XXX) as drive "C." Select... 3. Select this option and click Yes. 4. Click OK on the confirmation message to entire HD This option deletes all partitions from your ASUS Desktop PC. After the system restarts, Windows® 7 begins its system configurations. Turn on other partitions, and creates a new system partition as drive...


