
User Guide
Page 11
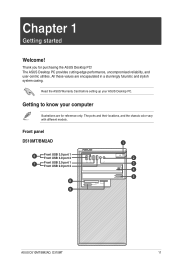
... cutting-edge performance, uncompromised reliability, and user-centric utilities. Getting to know your ASUS Desktop PC. Front panel D510MT/BM2AD 6 Front USB 3.0 port 1 Front USB 3.0 port 2 7 Front USB 2.0 port 1 Front USB 2.0 port 2 8 9 SM.SD.MS-PRO SM.SD.MS-PRO 1 2 3 4 5 ASUS D510MT/BM2AD, D310MT 11 Thank you for reference only. All these values are for purchasing the...
... cutting-edge performance, uncompromised reliability, and user-centric utilities. Getting to know your ASUS Desktop PC. Front panel D510MT/BM2AD 6 Front USB 3.0 port 1 Front USB 3.0 port 2 7 Front USB 2.0 port 1 Front USB 2.0 port 2 8 9 SM.SD.MS-PRO SM.SD.MS-PRO 1 2 3 4 5 ASUS D510MT/BM2AD, D310MT 11 Thank you for reference only. All these values are for purchasing the...
User Guide
Page 13
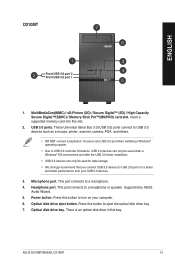
...™(MS/PRO) card slot. This port connects to a headphone or speaker. Headphone port. Supported by ASUS Audio Wizard. 5. Microphone port. ASUS D510MT/BM2AD, D310MT 13 USB 3.0 ports. Press this slot. 2. This port connects to a microphone. 4. Optical disk drive bay. D310MT ENGLISH Front USB 3.0 port 2 Front USB 3.0 port 1 1. Insert a supported memory card into this button to...
...™(MS/PRO) card slot. This port connects to a headphone or speaker. Headphone port. Supported by ASUS Audio Wizard. 5. Microphone port. ASUS D510MT/BM2AD, D310MT 13 USB 3.0 ports. Press this slot. 2. This port connects to a microphone. 4. Optical disk drive bay. D310MT ENGLISH Front USB 3.0 port 2 Front USB 3.0 port 1 1. Insert a supported memory card into this button to...
User Guide
Page 15
... Out Mic In - 4.1-channel 5.1-channel 7.1-channel Rear Speaker Out Front Speaker Out Mic In - Rear Speaker Out Front Speaker Out Bass/Center Side Speaker Out ASUS D510MT/BM2AD, D310MT 15
... Out Mic In - 4.1-channel 5.1-channel 7.1-channel Rear Speaker Out Front Speaker Out Mic In - Rear Speaker Out Front Speaker Out Bass/Center Side Speaker Out ASUS D510MT/BM2AD, D310MT 15
User Guide
Page 17
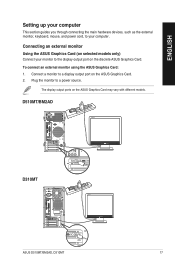
... external monitor using the ASUS Graphics Card: 1. D510MT/BM2AD DVI D310MT DVI ASUS D510MT/BM2AD, D310MT 17 The display output ports on the discrete ASUS Graphics Card. Connecting an external monitor Using the ASUS Graphics Card (on selected models only) Connect your computer. Connect a monitor to a power source. Plug the monitor to a display output port on the ASUS Graphics Card. 2. ENGLISH...
... external monitor using the ASUS Graphics Card: 1. D510MT/BM2AD DVI D310MT DVI ASUS D510MT/BM2AD, D310MT 17 The display output ports on the discrete ASUS Graphics Card. Connecting an external monitor Using the ASUS Graphics Card (on selected models only) Connect your computer. Connect a monitor to a power source. Plug the monitor to a display output port on the ASUS Graphics Card. 2. ENGLISH...

User Guide
Page 18
Connect a VGA monitor to the VGA port or a DVI-D monitor to the DVI-D port on the rear panel of your monitor to a display output port on the graphics card. 18 Chapter 1: Getting started Plug the monitor to the onboard display output port. Hence, connect your computer. 2. To connect an external monitor using the onboard display output ports: 1. ENGLISH Using the onboard display output ports Connect your computer comes with an ASUS Graphics Card, the graphics card is set as the primary display device in the BIOS. D510MT/BM2AD DVI D310MT If your monitor to a power source.
Connect a VGA monitor to the VGA port or a DVI-D monitor to the DVI-D port on the rear panel of your monitor to a display output port on the graphics card. 18 Chapter 1: Getting started Plug the monitor to the onboard display output port. Hence, connect your computer. 2. To connect an external monitor using the onboard display output ports: 1. ENGLISH Using the onboard display output ports Connect your computer comes with an ASUS Graphics Card, the graphics card is set as the primary display device in the BIOS. D510MT/BM2AD DVI D310MT If your monitor to a power source.

User Guide
Page 19
ENGLISH Connecting a USB keyboard and a USB mouse Connect a USB keyboard and a USB mouse to the USB ports on the rear panel of your computer. D510MT/BM2AD DVI ` D310MT DVI ` ASUS D510MT/BM2AD, D310MT 19
ENGLISH Connecting a USB keyboard and a USB mouse Connect a USB keyboard and a USB mouse to the USB ports on the rear panel of your computer. D510MT/BM2AD DVI ` D310MT DVI ` ASUS D510MT/BM2AD, D310MT 19

User Guide
Page 20
D510MT/BM2AD DVI D310MT DVI 20 Chapter 1: Getting started ENGLISH Connecting the power cord Connect one end of the power cord to the power connector on the rear panel of your computer and the other end to a power source.
D510MT/BM2AD DVI D310MT DVI 20 Chapter 1: Getting started ENGLISH Connecting the power cord Connect one end of the power cord to the power connector on the rear panel of your computer and the other end to a power source.

User Guide
Page 21
Turn your computer. Press the power button on shutting down your Desktop PC, refer to turn your computer. For details on your computer ON: 1. ENGLISH Turning your computer ON/OFF This section describes how to the Windows® 7 / Windows® 8.1 User Guide, which can be found in this guide. Power button SM.SD.MS-PRO SM.SD.MS-PRO Power button D510MT/BM2AD D310MT 3. Wait until the operating system loads automatically. ASUS D510MT/BM2AD, D310MT 21 Turning your computer ON To turn on/off your computer after setting up your monitor ON. 2.
Turn your computer. Press the power button on shutting down your Desktop PC, refer to turn your computer. For details on your computer ON: 1. ENGLISH Turning your computer ON/OFF This section describes how to the Windows® 7 / Windows® 8.1 User Guide, which can be found in this guide. Power button SM.SD.MS-PRO SM.SD.MS-PRO Power button D510MT/BM2AD D310MT 3. Wait until the operating system loads automatically. ASUS D510MT/BM2AD, D310MT 21 Turning your computer ON To turn on/off your computer after setting up your monitor ON. 2.

User Guide
Page 23
... the Configuring the USB ports using the BIOS section in Chapter 3 of this guide. ASUS D510MT/BM2AD, D310MT 23 ENGLISH Chapter 2 Connecting devices to your computer. Front panel SM.SD.MS-PRO SM.SD.MS-PRO Rear panel D510MT/BM2AD DVI D310MT DVI D510MT/BM2AD D310MT For details, refer to connect USB devices such as storage devices. The USB ports...
... the Configuring the USB ports using the BIOS section in Chapter 3 of this guide. ASUS D510MT/BM2AD, D310MT 23 ENGLISH Chapter 2 Connecting devices to your computer. Front panel SM.SD.MS-PRO SM.SD.MS-PRO Rear panel D510MT/BM2AD DVI D310MT DVI D510MT/BM2AD D310MT For details, refer to connect USB devices such as storage devices. The USB ports...

User Guide
Page 24
ENGLISH Connecting microphone and speakers This desktop PC comes with microphone ports and speaker ports on the rear panel allow you to your computer The audio I/O ports located on both the front and rear panels. Connecting Headphone and Mic D510MT/BM2AD SM.SD.MS-PRO SM.SD.MS-PRO D310MT 24 Chapter 2: Connecting devices to connect 2-channel, 4-channel, 6-channel, and 8-channel stereo speakers.
ENGLISH Connecting microphone and speakers This desktop PC comes with microphone ports and speaker ports on the rear panel allow you to your computer The audio I/O ports located on both the front and rear panels. Connecting Headphone and Mic D510MT/BM2AD SM.SD.MS-PRO SM.SD.MS-PRO D310MT 24 Chapter 2: Connecting devices to connect 2-channel, 4-channel, 6-channel, and 8-channel stereo speakers.

User Guide
Page 25
ENGLISH LINE OUT Connecting 2.1-channel Speakers Connecting 4.1-channel Speakers LINE OUT ASUS D510MT/BM2AD, D310MT 25
ENGLISH LINE OUT Connecting 2.1-channel Speakers Connecting 4.1-channel Speakers LINE OUT ASUS D510MT/BM2AD, D310MT 25

User Guide
Page 27
... on your wrists while typing. • Use your Desktop PC in front of you with your eye level so that the base of your thighs. ASUS D510MT/BM2AD, D310MT 27 ENGLISH Chapter 3 Using your computer Proper posture when using your Desktop PC When using and fully enjoying your Desktop PC. If necessary, use a footrest...
... on your wrists while typing. • Use your Desktop PC in front of you with your eye level so that the base of your thighs. ASUS D510MT/BM2AD, D310MT 27 ENGLISH Chapter 3 Using your computer Proper posture when using your Desktop PC When using and fully enjoying your Desktop PC. If necessary, use a footrest...

User Guide
Page 29
... the popup menu, click File Explorer, and then double-click the CD/DVD drive icon. ENGLISH Using the optical drive (on the Start screen's thumbnail. ASUS D510MT/BM2AD, D310MT 29 From the popup menu, click File Explorer to the optical drive with the label side facing up. 3. Place the disc to open the tray...
... the popup menu, click File Explorer, and then double-click the CD/DVD drive icon. ENGLISH Using the optical drive (on the Start screen's thumbnail. ASUS D510MT/BM2AD, D310MT 29 From the popup menu, click File Explorer to the optical drive with the label side facing up. 3. Place the disc to open the tray...

User Guide
Page 31
... password, then press . 5. From the Create New Password box, key in the current password, then press . 4. After you would need to create/confirm the password. ASUS D510MT/BM2AD, D310MT 31 From the BIOS Setup EZ Mode screen, click Exit > Advanced Mode. Select the Set User Password item and press . 4. Take note of this password...
... password, then press . 5. From the Create New Password box, key in the current password, then press . 4. After you would need to create/confirm the password. ASUS D510MT/BM2AD, D310MT 31 From the BIOS Setup EZ Mode screen, click Exit > Advanced Mode. Select the Set User Password item and press . 4. Take note of this password...

User Guide
Page 33
ENGLISH Chapter 4 Connecting to the Internet Wired connection Use an RJ-45 cable to connect your computer to a DSL/cable modem. Connecting via a DSL/cable modem To connect via a DSL/cable modem: 1. Connect one end of an RJ-45 cable to the LAN (RJ-45) port on the rear panel of your computer and the other end to a DSL/cable modem or a local area network (LAN). D510MT/BM2AD DVI D310MT RJ-45 cable Modem DVI ASUS D510MT/BM2AD, D310MT Modem RJ-45 cable 33 Refer to the documentation that came with your DSL/cable modem. Set up your DSL/cable modem. 2.
ENGLISH Chapter 4 Connecting to the Internet Wired connection Use an RJ-45 cable to connect your computer to a DSL/cable modem. Connecting via a DSL/cable modem To connect via a DSL/cable modem: 1. Connect one end of an RJ-45 cable to the LAN (RJ-45) port on the rear panel of your computer and the other end to a DSL/cable modem or a local area network (LAN). D510MT/BM2AD DVI D310MT RJ-45 cable Modem DVI ASUS D510MT/BM2AD, D310MT Modem RJ-45 cable 33 Refer to the documentation that came with your DSL/cable modem. Set up your DSL/cable modem. 2.

User Guide
Page 34
Turn on the rear panel of your computer and the other end to the Internet D510MT/BM2AD DVI D310MT DVI RJ-45 cable LAN RJ-45 cable LAN 2. Configure the necessary Internet connection settings. • For more details, refer to the section Configuring the ...
Turn on the rear panel of your computer and the other end to the Internet D510MT/BM2AD DVI D310MT DVI RJ-45 cable LAN RJ-45 cable LAN 2. Configure the necessary Internet connection settings. • For more details, refer to the section Configuring the ...
User Guide
Page 35
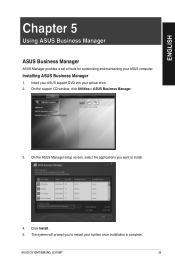
Installing ASUS Business Manager 1. ASUS D510MT/BM2AD, D310MT 35 On the ASUS Manager setup screen, select the applications you to install. 4. The system will prompt you want to reboot your system once installation is complete. On the support CD window, click Utilities > ASUS Business Manager. 3. ENGLISH Chapter 5 Using ASUS Business Manager ASUS Business Manager ASUS Manager provides a set of tools for customizing and maintaining your optical drive. 2. Click Install. 5. Insert your ASUS support DVD into your ASUS computer.
Installing ASUS Business Manager 1. ASUS D510MT/BM2AD, D310MT 35 On the ASUS Manager setup screen, select the applications you to install. 4. The system will prompt you want to reboot your system once installation is complete. On the support CD window, click Utilities > ASUS Business Manager. 3. ENGLISH Chapter 5 Using ASUS Business Manager ASUS Business Manager ASUS Manager provides a set of tools for customizing and maintaining your optical drive. 2. Click Install. 5. Insert your ASUS support DVD into your ASUS computer.
User Guide
Page 37
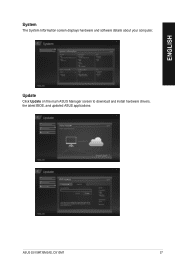
Update Click Update on the main ASUS Manager screen to download and install hardware drivers, the latest BIOS, and updated ASUS applications. ASUS D510MT/BM2AD, D310MT 37 ENGLISH System The System Information screen displays hardware and software details about your computer.
Update Click Update on the main ASUS Manager screen to download and install hardware drivers, the latest BIOS, and updated ASUS applications. ASUS D510MT/BM2AD, D310MT 37 ENGLISH System The System Information screen displays hardware and software details about your computer.

User Guide
Page 39
Once ASUS Secure Delete is launched, do any of the following to add files to the deletion box: • Drag and drop the files to permanently delete ... OK on the confirmation message to permanently delete all the files in step 3). To remove a file from the deletion list, select the file, then click . 3. ASUS D510MT/BM2AD, D310MT 39 Tick Delete the files listed in the recycle bin if you want to the deletion box. • Right-click the file then select...
Once ASUS Secure Delete is launched, do any of the following to add files to the deletion box: • Drag and drop the files to permanently delete ... OK on the confirmation message to permanently delete all the files in step 3). To remove a file from the deletion list, select the file, then click . 3. ASUS D510MT/BM2AD, D310MT 39 Tick Delete the files listed in the recycle bin if you want to the deletion box. • Right-click the file then select...

User Guide
Page 41
ENGLISH Power Click Power on the main ASUS Manager screen to access the Support screen, Ai Booting or MyLogo. Tool Click Tool on the main ASUS Manager screen to ASUS support web sites and contact information. ASUS D510MT/BM2AD, D310MT 41 Support Support lists links to configure power management. With Power Manager, you can specity time settings for system hibernation, sleep, display and hard drive activity.
ENGLISH Power Click Power on the main ASUS Manager screen to access the Support screen, Ai Booting or MyLogo. Tool Click Tool on the main ASUS Manager screen to ASUS support web sites and contact information. ASUS D510MT/BM2AD, D310MT 41 Support Support lists links to configure power management. With Power Manager, you can specity time settings for system hibernation, sleep, display and hard drive activity.