
BM1845_BM1645 User's Manual
Page 11
Read the ASUS Warranty Card before setting up your computer Illustrations are encapsulated in a stunningly futuristic and stylish system casing. ASUS BM1845, BM1645/MD250 11 Thank you for reference only. All these values are for purchasing the ASUS Desktop PC! The ports and their locations, and the chassis color vary with different models. Chapter 1 Getting started Welcome! The ASUS Desktop PC provides cutting-edge performance, uncompromised reliability, and user-centric utilities. Getting to know your ASUS Desktop PC.
Read the ASUS Warranty Card before setting up your computer Illustrations are encapsulated in a stunningly futuristic and stylish system casing. ASUS BM1845, BM1645/MD250 11 Thank you for reference only. All these values are for purchasing the ASUS Desktop PC! The ports and their locations, and the chassis color vary with different models. Chapter 1 Getting started Welcome! The ASUS Desktop PC provides cutting-edge performance, uncompromised reliability, and user-centric utilities. Getting to know your ASUS Desktop PC.

BM1845_BM1645 User's Manual
Page 12
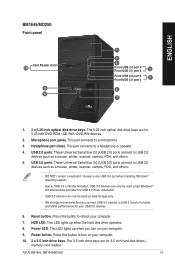
... NOT connect a keyboard / mouse to any USB 3.0 port when installing Windows® operating system. • Due to eject the optical disk drive tray. 3. Microphone. ENGLISH BM1845 Front panel 1 2 3 2 9 Front USB 2.0 port 6 Front USB 2.0 port 5 4 8 Front USB 3.0 port 4 Front USB 3.0 port 3 5 7 6 1. Optical disk drive. The optical disk drive supports DVD-RW / CD...
... NOT connect a keyboard / mouse to any USB 3.0 port when installing Windows® operating system. • Due to eject the optical disk drive tray. 3. Microphone. ENGLISH BM1845 Front panel 1 2 3 2 9 Front USB 2.0 port 6 Front USB 2.0 port 5 4 8 Front USB 3.0 port 4 Front USB 3.0 port 3 5 7 6 1. Optical disk drive. The optical disk drive supports DVD-RW / CD...
BM1845_BM1645 User's Manual
Page 13
... this button to turn on your USB 3.0 devices. 6. USB 2.0 ports. This LED lights up when the hard disk drive operates. 8. ASUS BM1845, BM1645/MD250 13 The 5.25 inch optical disk drive bays are for 5.25 inch DVD-ROM / CD-RW / DVD-RW devices.� 2. ...174; OS environment and after the USB 3.0 driver installation. • USB 3.0 devices can only be used as a mouse, printer, scanner, camera, PDA, and others. 5. ENGLISH BM1645/MD250 Front panel Card Reader slots 10 9 8 1 2 3 Front USB 2.0 port 5 Front USB 2.0 port 6 4 Front USB 3.0 port 3 Front USB 3.0 port 4 ...
... this button to turn on your USB 3.0 devices. 6. USB 2.0 ports. This LED lights up when the hard disk drive operates. 8. ASUS BM1845, BM1645/MD250 13 The 5.25 inch optical disk drive bays are for 5.25 inch DVD-ROM / CD-RW / DVD-RW devices.� 2. ...174; OS environment and after the USB 3.0 driver installation. • USB 3.0 devices can only be used as a mouse, printer, scanner, camera, PDA, and others. 5. ENGLISH BM1645/MD250 Front panel Card Reader slots 10 9 8 1 2 3 Front USB 2.0 port 5 Front USB 2.0 port 6 4 Front USB 3.0 port 3 Front USB 3.0 port 4 ...

BM1845_BM1645 User's Manual
Page 15
... Speaker Out Mic In Center/Subwoofer Rear Speaker Out - 8-channel Line In Front Speaker Out Mic In Center/Subwoofer Rear Speaker Out Side Speaker Out ASUS BM1845, BM1645/MD250 15 This port connects to a Local Area Network (LAN) through a network hub. ENGLISH • DO NOT connect a keyboard / mouse to any USB 3.0 port when...
... Speaker Out Mic In Center/Subwoofer Rear Speaker Out - 8-channel Line In Front Speaker Out Mic In Center/Subwoofer Rear Speaker Out Side Speaker Out ASUS BM1845, BM1645/MD250 15 This port connects to a Local Area Network (LAN) through a network hub. ENGLISH • DO NOT connect a keyboard / mouse to any USB 3.0 port when...

BM1845_BM1645 User's Manual
Page 17
... guides you through connecting the main hardware devices, such as the primary display device in the BIOS. DVI HDMI If your computer comes with an ASUS Graphics Card, the graphics card is set as the external monitor, keyboard, mouse, and power cord, to a power source. ASUS BM1845, BM1645/MD250 17
... guides you through connecting the main hardware devices, such as the primary display device in the BIOS. DVI HDMI If your computer comes with an ASUS Graphics Card, the graphics card is set as the external monitor, keyboard, mouse, and power cord, to a power source. ASUS BM1845, BM1645/MD250 17
BM1845_BM1645 User's Manual
Page 19
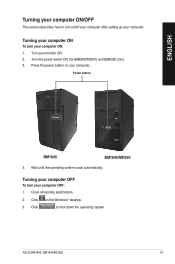
... OFF To turn your computer ON: 1. Click to turn on/off your computer after setting up your computer OFF: 1. ASUS BM1845, BM1645/MD250 19 Turning your computer ON To turn your computer. Power button BM1845 BM1645/MD250 3. Press the power button on the Windows® desktop. 3. Turn your computer. Click on your monitor ON. 2. Close...
... OFF To turn your computer ON: 1. Click to turn on/off your computer after setting up your computer OFF: 1. ASUS BM1845, BM1645/MD250 19 Turning your computer ON To turn your computer. Power button BM1845 BM1645/MD250 3. Press the power button on the Windows® desktop. 3. Turn your computer. Click on your monitor ON. 2. Close...

BM1845_BM1645 User's Manual
Page 21
..., select your date and time settings. Carefully read the license terms. Tick I accept the license terms and click Next. 7. Review your language, then click Next. 3. ASUS BM1845, BM1645/MD250 21 From the dropdown lists, select your computer on. Key in the necessary information to set up your computer. To skip this step without...
..., select your date and time settings. Carefully read the license terms. Tick I accept the license terms and click Next. 7. Review your language, then click Next. 3. ASUS BM1845, BM1645/MD250 21 From the dropdown lists, select your computer on. Key in the necessary information to set up your computer. To skip this step without...
BM1845_BM1645 User's Manual
Page 23
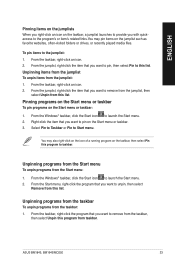
... pin items on the Start menu or taskbar: 1. From the taskbar, right-click the program that you want to unpin, then select Remove from taskbar. ASUS BM1845, BM1645/MD250 23 Unpinning items from the jumplist To unpin items from the taskbar: 1. From the jumplist, right-click the item that you want to pin...
... pin items on the Start menu or taskbar: 1. From the taskbar, right-click the program that you want to unpin, then select Remove from taskbar. ASUS BM1845, BM1645/MD250 23 Unpinning items from the jumplist To unpin items from the taskbar: 1. From the jumplist, right-click the item that you want to pin...

BM1845_BM1645 User's Manual
Page 25
... of your preferred grouping type. Launch Windows Explorer. 2. Launch Windows Explorer. 2. Sorting your files To sort your files: 1. Grouping your files To group your files: 1. ASUS BM1845, BM1645/MD250 25 From the Arrange by field, click to display the contents of the drive or folder. Right-click anywhere on the View pane, click...
... of your preferred grouping type. Launch Windows Explorer. 2. Launch Windows Explorer. 2. Sorting your files To sort your files: 1. Grouping your files To group your files: 1. ASUS BM1845, BM1645/MD250 25 From the Arrange by field, click to display the contents of the drive or folder. Right-click anywhere on the View pane, click...
BM1845_BM1645 User's Manual
Page 27
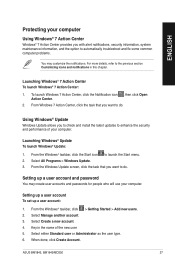
..., click the task that you want to the previous section Customizing icons and notifications in the name of your computer. Select All Programs > Windows Update. 3. ASUS BM1845, BM1645/MD250 27 Select Manage another account. 3. For more details, refer to do . When done, click Create Account. ENGLISH Protecting your computer Using Windows® 7 Action...
..., click the task that you want to the previous section Customizing icons and notifications in the name of your computer. Select All Programs > Windows Update. 3. ASUS BM1845, BM1645/MD250 27 Select Manage another account. 3. For more details, refer to do . When done, click Create Account. ENGLISH Protecting your computer Using Windows® 7 Action...

BM1845_BM1645 User's Manual
Page 29
Front panel Rear panel BM1845 BM1645/MD250 DVI HDMI To remove a USB storage device: 1. ASUS BM1845, BM1645/MD250 29 Click from your computer. DO NOT remove a USB storage device when data transfer is in progress. The USB ports allow you to Remove ...
Front panel Rear panel BM1845 BM1645/MD250 DVI HDMI To remove a USB storage device: 1. ASUS BM1845, BM1645/MD250 29 Click from your computer. DO NOT remove a USB storage device when data transfer is in progress. The USB ports allow you to Remove ...

BM1845_BM1645 User's Manual
Page 30
Connecting Headphone and Mic BM1845 BM1645/MD250 30 Chapter 3: Connecting devices to connect 2-channel, 4-channel, 6-channel, and 8-channel stereo speakers. The audio I/O ports located on both the front and rear panels. ENGLISH Connecting microphone and speakers This desktop PC comes with microphone ports and speaker ports on the rear panel allow you to your computer
Connecting Headphone and Mic BM1845 BM1645/MD250 30 Chapter 3: Connecting devices to connect 2-channel, 4-channel, 6-channel, and 8-channel stereo speakers. The audio I/O ports located on both the front and rear panels. ENGLISH Connecting microphone and speakers This desktop PC comes with microphone ports and speaker ports on the rear panel allow you to your computer
BM1845_BM1645 User's Manual
Page 31
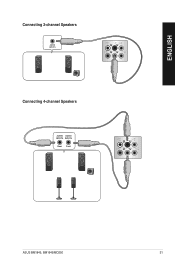
ENGLISH Connecting 2-channel Speakers Connecting 4-channel Speakers ASUS BM1845, BM1645/MD250 31
ENGLISH Connecting 2-channel Speakers Connecting 4-channel Speakers ASUS BM1845, BM1645/MD250 31

BM1845_BM1645 User's Manual
Page 33
ASUS BM1845, BM1645/MD250 33 Eye level to the top of the monitor screen Foot rest 90˚ angles To maintain the proper posture: • Position your computer ...
ASUS BM1845, BM1645/MD250 33 Eye level to the top of the monitor screen Foot rest 90˚ angles To maintain the proper posture: • Position your computer ...
BM1845_BM1645 User's Manual
Page 35
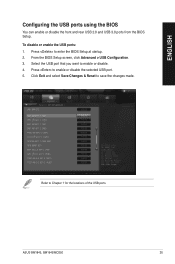
Select the USB port that you want to enable or disable the selected USB port. 5. To disable or enable the USB ports: 1. Press to enable or disable. 4. Refer to enter the BIOS Setup at startup. 2. From the BIOS Setup screen, click Advanced > USB Configuration. 3. Press to Chapter 1 for the locations of the USB ports. Click Exit and select Save Changes & Reset to save the changes made. ASUS BM1845, BM1645/MD250 35 ENGLISH Configuring the USB ports using the BIOS You can enable or disable the front and rear USB 2.0 and USB 3.0 ports from the BIOS Setup.
Select the USB port that you want to enable or disable the selected USB port. 5. To disable or enable the USB ports: 1. Press to enable or disable. 4. Refer to enter the BIOS Setup at startup. 2. From the BIOS Setup screen, click Advanced > USB Configuration. 3. Press to Chapter 1 for the locations of the USB ports. Click Exit and select Save Changes & Reset to save the changes made. ASUS BM1845, BM1645/MD250 35 ENGLISH Configuring the USB ports using the BIOS You can enable or disable the front and rear USB 2.0 and USB 3.0 ports from the BIOS Setup.
BM1845_BM1645 User's Manual
Page 37
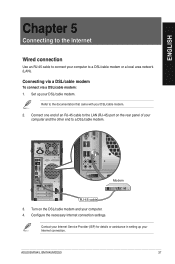
...). Turn on the rear panel of an RJ-45 cable to the LAN (RJ-45) port on the DSL/cable modem and your Internet connection. ASUS BM1845, BM1645/MD250 37 ENGLISH Chapter 5 Connecting to the Internet Wired connection Use an RJ-45 cable to connect your DSL/cable modem. 2. Set up your computer...
...). Turn on the rear panel of an RJ-45 cable to the LAN (RJ-45) port on the DSL/cable modem and your Internet connection. ASUS BM1845, BM1645/MD250 37 ENGLISH Chapter 5 Connecting to the Internet Wired connection Use an RJ-45 cable to connect your DSL/cable modem. 2. Set up your computer...

BM1845_BM1645 User's Manual
Page 39
..., and to Recovering your system in this chapter. The actual screenshots vary with models. • The screenshots of AI Suite II. ASUS BM1845, BM1645/MD250 39 ENGLISH Chapter 6 Using the utilities The Support DVD and Recovery DVD may use the Recovery Partition feature to open the AI ...support DVD in the Windows® notification area. Click to select a utility Click to update the motherboard BIOS Click to show the ASUS support information Click to monitor sensors or CPU frequency Click to show the system information Click to launch and operate these utilities simultaneously....
..., and to Recovering your system in this chapter. The actual screenshots vary with models. • The screenshots of AI Suite II. ASUS BM1845, BM1645/MD250 39 ENGLISH Chapter 6 Using the utilities The Support DVD and Recovery DVD may use the Recovery Partition feature to open the AI ...support DVD in the Windows® notification area. Click to select a utility Click to update the motherboard BIOS Click to show the ASUS support information Click to monitor sensors or CPU frequency Click to show the system information Click to launch and operate these utilities simultaneously....
BM1845_BM1645 User's Manual
Page 41
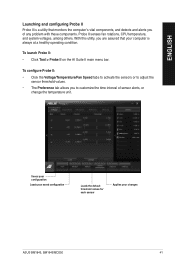
With this utility, you are assured that your changes ASUS BM1845, BM1645/MD250 41 To launch Probe II: • Click� Tool > Probe II on the AI Suite II main menu bar. To configure Probe II: • ...
With this utility, you are assured that your changes ASUS BM1845, BM1645/MD250 41 To launch Probe II: • Click� Tool > Probe II on the AI Suite II main menu bar. To configure Probe II: • ...
BM1845_BM1645 User's Manual
Page 43
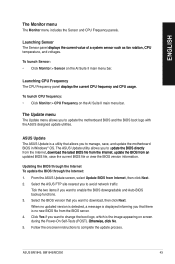
... version is detected, a message is displayed informing you want to update the motherboard BIOS and the BIOS boot logo with the ASUS designed update utilities. Follow the onscreen instructions to u�p�d�a�t�e��t�h�e��B�I �..., and voltages. Click Yes if you want to manage, save the current BIOS file or view the BIOS version information. ASUS BM1845, BM1645/MD250 43 Select the BIOS version that allows you to complete the update process. Launching CPU Frequency The CPU Frequency panel �...
... version is detected, a message is displayed informing you want to update the motherboard BIOS and the BIOS boot logo with the ASUS designed update utilities. Follow the onscreen instructions to u�p�d�a�t�e��t�h�e��B�I �..., and voltages. Click Yes if you want to manage, save the current BIOS file or view the BIOS version information. ASUS BM1845, BM1645/MD250 43 Select the BIOS version that allows you to complete the update process. Launching CPU Frequency The CPU Frequency panel �...

BM1845_BM1645 User's Manual
Page 45
ENGLISH The System Information screen The System Information screen displays the information about the ASUS website, technical support website, download support website, or contact information. The Support screen The Support screen displays the information about the motherboard, CPU, and memory ... enable. • Bar allows you to modify the bar setting, • Skin allows you to see the details on the memory module installed on it. ASUS BM1845, BM1645/MD250 45
ENGLISH The System Information screen The System Information screen displays the information about the ASUS website, technical support website, download support website, or contact information. The Support screen The Support screen displays the information about the motherboard, CPU, and memory ... enable. • Bar allows you to modify the bar setting, • Skin allows you to see the details on the memory module installed on it. ASUS BM1845, BM1645/MD250 45