
User Guide
Page 3
... the arm/base (for VESA wall mount 2-2 2.3 Attaching/Removing the MiniPC Kit 2-3 2.4 Adjusting the monitor 2-4 2.5 Adjusting the webcam 2-5 2.6 Connecting the cables 2-6 2.7 Turning on the monitor 2-7 2.8 Setting up the monitor webcam as default setting 2-7 2.9 Setting up the monitor speaker as default setting 2-10 Chapter 3: General instructions 3.1 OSD (On-Screen Display) menu 3-1 3.1.1 How to reconfigure 3-1 3.1.2 OSD function introduction 3-2 3.2 Specifications summary 3-9 3.3 Outline dimensions 3-11 3.4 Troubleshooting (FAQ 3-12 3.5 Supported operating modes 3-13 iii
... the arm/base (for VESA wall mount 2-2 2.3 Attaching/Removing the MiniPC Kit 2-3 2.4 Adjusting the monitor 2-4 2.5 Adjusting the webcam 2-5 2.6 Connecting the cables 2-6 2.7 Turning on the monitor 2-7 2.8 Setting up the monitor webcam as default setting 2-7 2.9 Setting up the monitor speaker as default setting 2-10 Chapter 3: General instructions 3.1 OSD (On-Screen Display) menu 3-1 3.1.1 How to reconfigure 3-1 3.1.2 OSD function introduction 3-2 3.2 Specifications summary 3-9 3.3 Outline dimensions 3-11 3.4 Troubleshooting (FAQ 3-12 3.5 Supported operating modes 3-13 iii

User Guide
Page 4
The use of shielded cables for a Class B digital device, pursuant to assure compliance with Part 15 of the FCC Rules. All ASUS products with the ENERGY STAR logo comply with the ENERGY STAR standard, and the power management feature is required to Part 15 of ...environment. Changes or modifications to sleep after 10 and 30 minutes of Energy helping us all save money and protect the environment through energy efficient products and practices. Department of user inactivity. The monitor and computer are designed to the graphics card is enabled by default. ...
The use of shielded cables for a Class B digital device, pursuant to assure compliance with Part 15 of the FCC Rules. All ASUS products with the ENERGY STAR logo comply with the ENERGY STAR standard, and the power management feature is required to Part 15 of ...environment. Changes or modifications to sleep after 10 and 30 minutes of Energy helping us all save money and protect the environment through energy efficient products and practices. Department of user inactivity. The monitor and computer are designed to the graphics card is enabled by default. ...
User Guide
Page 7
... the ear-/headphones output voltage and therefore the sound pressure level. Safety information • Before setting up the monitor, carefully read all cables are correctly connected and the power cables are not sure of the type of power supply to your home, consult your dealer or local power company. • Use the appropriate power plug which have appropriate configured receptacles marked between 100...
... the ear-/headphones output voltage and therefore the sound pressure level. Safety information • Before setting up the monitor, carefully read all cables are correctly connected and the power cables are not sure of the type of power supply to your home, consult your dealer or local power company. • Use the appropriate power plug which have appropriate configured receptacles marked between 100...

User Guide
Page 8
... screen, as it is displayed for hours. • When the screen becomes black or flashes, or cannot work anymore, contact your monitor, it may drip inside the monitor and cause an electric shock. Do not repair the screen by the stand or the cord. • Cleaning. Conventions used in completing a task. Stubborn stains may remain after switching the image. Follow the correct lifting techniques when positioning the monitor...
... screen, as it is displayed for hours. • When the screen becomes black or flashes, or cannot work anymore, contact your monitor, it may drip inside the monitor and cause an electric shock. Do not repair the screen by the stand or the cord. • Cleaning. Conventions used in completing a task. Stubborn stains may remain after switching the image. Follow the correct lifting techniques when positioning the monitor...

User Guide
Page 11
... delightful visual experience that enhance your viewing experience. Thank you ! 1.2 Package contents Check your retailer immediately. ASUS BE24ECSNK Series LCD Monitor 1-1 With these features, you need to C cable (optional) MiniPC Kit (optional) If any of features that the monitor brings to you for the following items: LCD monitor Monitor base Quick start guide Warranty card Power cord HDMI cable (optional) DisplayPort cable (optional) USB C to A cable (optional) USB C to replace the power cord or the connection cable(s), please contact ASUS customer service. 1.1 Welcome!
... delightful visual experience that enhance your viewing experience. Thank you ! 1.2 Package contents Check your retailer immediately. ASUS BE24ECSNK Series LCD Monitor 1-1 With these features, you need to C cable (optional) MiniPC Kit (optional) If any of features that the monitor brings to you for the following items: LCD monitor Monitor base Quick start guide Warranty card Power cord HDMI cable (optional) DisplayPort cable (optional) USB C to A cable (optional) USB C to replace the power cord or the connection cable(s), please contact ASUS customer service. 1.1 Welcome!

User Guide
Page 13
• To change the hotkey function, go to make adjustments. • Toggle the Key Lock function between on and off with a long push downwards for 5 seconds. Webcam ASUS BE24ECSNK Series LCD Monitor 1-3 Volume button: • To display the volume bar. • Use the 5-way button to the Shortcut > Shortcut menu. 4. Microphone 8. Hook button: • To answer or end a voice/video call. 5. Mircrosoft Teams - Skype for video conferencing softwares: Software Monitor hotkey ZOOM - Microphone Mute...
• To change the hotkey function, go to make adjustments. • Toggle the Key Lock function between on and off with a long push downwards for 5 seconds. Webcam ASUS BE24ECSNK Series LCD Monitor 1-3 Volume button: • To display the volume bar. • Use the 5-way button to the Shortcut > Shortcut menu. 4. Microphone 8. Hook button: • To answer or end a voice/video call. 5. Mircrosoft Teams - Skype for video conferencing softwares: Software Monitor hotkey ZOOM - Microphone Mute...
User Guide
Page 14
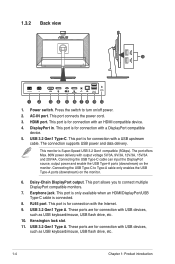
... compatible device. 5. This port is connected. 8. USB 3.2 Gen1 Type A. Power switch. Press the switch to connect multiple DisplayPort compatible monitors. 7. This port is Super-Speed USB 3.2 Gen1 compatible (5Gbps). USB 3.2 Gen1 Type A. Kensington lock slot. 11. HDMI port. This monitor is for connection with USB devices, such as USB keyboard/mouse, USB flash drive, etc. 10. Connecting the USB Type-C to Type-A cable only enables the USB Type-A ports (downstream) on the monitor. RJ45 port. This port connects the power cord. 3. These ports are for connection...
... compatible device. 5. This port is connected. 8. USB 3.2 Gen1 Type A. Power switch. Press the switch to connect multiple DisplayPort compatible monitors. 7. This port is Super-Speed USB 3.2 Gen1 compatible (5Gbps). USB 3.2 Gen1 Type A. Kensington lock slot. 11. HDMI port. This monitor is for connection with USB devices, such as USB keyboard/mouse, USB flash drive, etc. 10. Connecting the USB Type-C to Type-A cable only enables the USB Type-A ports (downstream) on the monitor. RJ45 port. This port connects the power cord. 3. These ports are for connection...
User Guide
Page 15
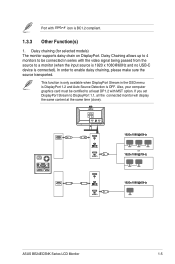
... 1920x1080@60Hz ASUS BE24ECSNK Series LCD Monitor 1-5 Also, your computer graphics card must be connected in the OSD menu is DisplayPort 1.2 and Auto Source Detection is BC1.2 compliant. 1.3.3 Other Function(s) 1. Daisy Chaining allows up to 4 monitors to be certified to a monitor (when the input source is 1920 x 1080@60Hz and no USB-C device is connected). Daisy chaining (for selected models) The monitor supports daisy chain on DisplayPort. If you set DisplayPort...
... 1920x1080@60Hz ASUS BE24ECSNK Series LCD Monitor 1-5 Also, your computer graphics card must be connected in the OSD menu is DisplayPort 1.2 and Auto Source Detection is BC1.2 compliant. 1.3.3 Other Function(s) 1. Daisy Chaining allows up to 4 monitors to be certified to a monitor (when the input source is 1920 x 1080@60Hz and no USB-C device is connected). Daisy chaining (for selected models) The monitor supports daisy chain on DisplayPort. If you set DisplayPort...

User Guide
Page 22
... DisplayPort/HDMI/USB Type-C* cable to the monitor's DisplayPort/HDMI/USB Type-C jack. Make sure your device with the monitor's USB Type A jack. • To use the RJ45 port: » After USB upstream connection is installed with an AP/ router. If the signal source supports DP Alt mode, all video, audio and data signal can now access the Internet. 2-6 Chapter 2: Setup You can be transmitted. • To use the earphone: connect the end with plug...
... DisplayPort/HDMI/USB Type-C* cable to the monitor's DisplayPort/HDMI/USB Type-C jack. Make sure your device with the monitor's USB Type A jack. • To use the RJ45 port: » After USB upstream connection is installed with an AP/ router. If the signal source supports DP Alt mode, all video, audio and data signal can now access the Internet. 2-6 Chapter 2: Setup You can be transmitted. • To use the earphone: connect the end with plug...
User Guide
Page 23
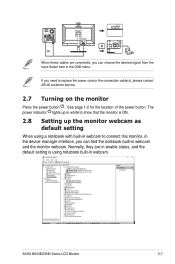
The power indicator lights up in white to show that the monitor is using a notebook with built-in webcam to replace the power cord or the connection cable(s), please contact ASUS customer service. 2.7 Turning on the monitor Press the power button . Normally, they are connected, you can choose the desired signal from the Input Select item in the OSD menu. See page 1-2 for the location of the power button. ASUS BE24ECSNK Series LCD Monitor 2-7 If you need to connect this monitor, in...
The power indicator lights up in white to show that the monitor is using a notebook with built-in webcam to replace the power cord or the connection cable(s), please contact ASUS customer service. 2.7 Turning on the monitor Press the power button . Normally, they are connected, you can choose the desired signal from the Input Select item in the OSD menu. See page 1-2 for the location of the power button. ASUS BE24ECSNK Series LCD Monitor 2-7 If you need to connect this monitor, in...
User Guide
Page 26
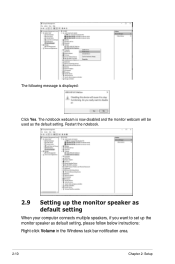
The notebook webcam is displayed: Click Yes. Restart the notebook. 2.9 Setting up the monitor speaker as default setting When your computer connects multiple speakers, if you want to set up the monitor speaker as the default setting. The following message is now disabled and the monitor webcam will be used as default setting, please follow below instructions: Right-click Volume in the Windows task bar notification area. 2-10 Chapter 2: Setup
The notebook webcam is displayed: Click Yes. Restart the notebook. 2.9 Setting up the monitor speaker as default setting When your computer connects multiple speakers, if you want to set up the monitor speaker as the default setting. The following message is now disabled and the monitor webcam will be used as default setting, please follow below instructions: Right-click Volume in the Windows task bar notification area. 2-10 Chapter 2: Setup
User Guide
Page 27
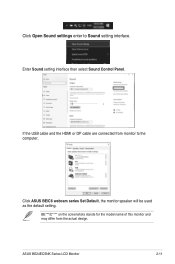
If the USB cable and the HDMI or DP cable are connected from the actual design. ASUS BE24ECSNK Series LCD Monitor 2-11 BE***/C**** on the screenshots stands for the model name of this monitor and may differ from monitor to Sound setting interface. Click Open Sound settings enter to the computer, Click ASUS BE/C6 webcam series Set Default, the monitor speaker will be used as the default setting. Enter Sound setting interface then select Sound Control Panel.
If the USB cable and the HDMI or DP cable are connected from the actual design. ASUS BE24ECSNK Series LCD Monitor 2-11 BE***/C**** on the screenshots stands for the model name of this monitor and may differ from monitor to Sound setting interface. Click Open Sound settings enter to the computer, Click ASUS BE/C6 webcam series Set Default, the monitor speaker will be used as the default setting. Enter Sound setting interface then select Sound Control Panel.
User Guide
Page 28
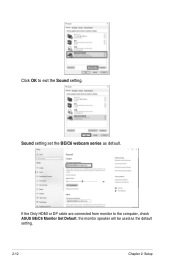
Sound setting set the BE/C6 webcam series as the default setting. 2-12 Chapter 2: Setup Click OK to the computer, check ASUS BE/C6 Monitor Set Default, the monitor speaker will be used as default. If the Only HDMI or DP cable are connected from monitor to exit the Sound setting.
Sound setting set the BE/C6 webcam series as the default setting. 2-12 Chapter 2: Setup Click OK to the computer, check ASUS BE/C6 Monitor Set Default, the monitor speaker will be used as default. If the Only HDMI or DP cable are connected from monitor to exit the Sound setting.

User Guide
Page 31
... settings of OSD menu. ASUS BE24ECSNK Series LCD Monitor 3-1 Highlight the desired sub-menu function and press the 5-way button or move the 5-way left /right to navigate through the sub-menu functions. To exit and save the OSD menu, press the button or move the 5-way button to navigate through the functions. 3.1 OSD (On-Screen Display) menu 3.1.1 How to activate the OSD menu. 2. Press the 5-way button to reconfigure Splendid Scenery Mode Standard Mode...
... settings of OSD menu. ASUS BE24ECSNK Series LCD Monitor 3-1 Highlight the desired sub-menu function and press the 5-way button or move the 5-way left /right to navigate through the sub-menu functions. To exit and save the OSD menu, press the button or move the 5-way button to navigate through the functions. 3.1 OSD (On-Screen Display) menu 3.1.1 How to activate the OSD menu. 2. Press the 5-way button to reconfigure Splendid Scenery Mode Standard Mode...

User Guide
Page 33
Between Level 1 to Level 3, the Brightness function is optimized setting. Level 4 is user-configurable. Taking short and frequent breaks is advised to take some time away from the display if working at the computer. ASUS BE24ECSNK Series LCD Monitor 3-3 It is scattered. Blue Light Filter Level 0 Level 1 Level 2 Level 3 Level 4 ASUS BE24ECSNK Standard Mode DisplayPort 1920 x 1080 @ 60Hz 80W • Level 0: No change. • Level 1~4: The higher the...
Between Level 1 to Level 3, the Brightness function is optimized setting. Level 4 is user-configurable. Taking short and frequent breaks is advised to take some time away from the display if working at the computer. ASUS BE24ECSNK Series LCD Monitor 3-3 It is scattered. Blue Light Filter Level 0 Level 1 Level 2 Level 3 Level 4 ASUS BE24ECSNK Standard Mode DisplayPort 1920 x 1080 @ 60Hz 80W • Level 0: No change. • Level 1~4: The higher the...

User Guide
Page 35
... Free: Adjusts the response time of the monitor. • Aspect Control: Adjusts the aspect ratio to full, 4:3, 1:1 (optional) or OverScan (optional). 4:3 is only available when input source is only available for the HDMI input source. • VividPixel: Enhances the outline of the displayed picture and generates high-quality images on screen. • ASCR: Turns on/off the ASCR (ASUS Smart Contrast Ratio) function. 5. Image Set the image related setting from this menu...
... Free: Adjusts the response time of the monitor. • Aspect Control: Adjusts the aspect ratio to full, 4:3, 1:1 (optional) or OverScan (optional). 4:3 is only available when input source is only available for the HDMI input source. • VividPixel: Enhances the outline of the displayed picture and generates high-quality images on screen. • ASCR: Turns on/off the ASCR (ASUS Smart Contrast Ratio) function. 5. Image Set the image related setting from this menu...
User Guide
Page 36
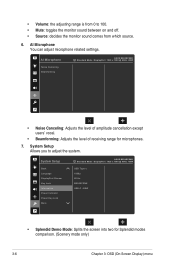
... of amplitude cancellation except users' vocal. • Beamforming: Adjusts the level of receiving range for Splendid modes comparison. (Scenery mode only) 3-6 Chapter 3: OSD (On-Screen Display) menu System Setup Allows you to 100. • Mute: toggles the monitor sound between on and off. • Source: decides the monitor sound comes from which source. 6. System Setup Back Language DisplayPort Stream Key Lock Information Power Indicator Power Key Lock More ASUS BE24ECSNK Standard Mode DisplayPort 1920 x 1080...
... of amplitude cancellation except users' vocal. • Beamforming: Adjusts the level of receiving range for Splendid modes comparison. (Scenery mode only) 3-6 Chapter 3: OSD (On-Screen Display) menu System Setup Allows you to 100. • Mute: toggles the monitor sound between on and off. • Source: decides the monitor sound comes from which source. 6. System Setup Back Language DisplayPort Stream Key Lock Information Power Indicator Power Key Lock More ASUS BE24ECSNK Standard Mode DisplayPort 1920 x 1080...
User Guide
Page 38
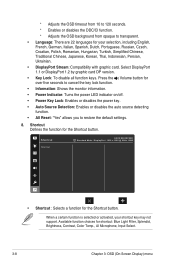
... key lock function. • Information: Shows the monitor information. • Power Indicator: Turns the power LED indicator on/off. • Power Key Lock: Enables or disables the power key. • Auto Source Detection: Enables or disables the auto source detecting function. • All Reset: "Yes" allows you to restore the default settings. 8. Shortcut Shortcut ASUS BE24ECSNK Standard Mode DisplayPort 1920 x 1080 @ 60Hz 80W • Shortcut : Selects a function for the Shortcut button. Select...
... key lock function. • Information: Shows the monitor information. • Power Indicator: Turns the power LED indicator on/off. • Power Key Lock: Enables or disables the power key. • Auto Source Detection: Enables or disables the auto source detecting function. • All Reset: "Yes" allows you to restore the default settings. 8. Shortcut Shortcut ASUS BE24ECSNK Standard Mode DisplayPort 1920 x 1080 @ 60Hz 80W • Shortcut : Selects a function for the Shortcut button. Select...

User Guide
Page 39
Resolution Pixel pitch Brightness (Typ.) Contrast Ratio (Typ.) Contrast Ratio (Max.) Viewing angle (H/V) CR>10 Display colors Response time Splendid Video Enhancement Splendid selection Color temperature selection Signal input Signal Output Earphone jack Audio input Speaker (Built-in) USB 3.2 Gen1 port Ethernet port Colors Power LED Tilt Pivot Swivel Height Adjustment Kensington lock AC input voltage Power consumption Temperature (Operating) Temperature (Non-operating) Dimension (W x H x D) without stand Dimension (W x H x D) with stand Weight (Esti.) Multi-languages TFT LCD 23.8" (16:9, 60....
Resolution Pixel pitch Brightness (Typ.) Contrast Ratio (Typ.) Contrast Ratio (Max.) Viewing angle (H/V) CR>10 Display colors Response time Splendid Video Enhancement Splendid selection Color temperature selection Signal input Signal Output Earphone jack Audio input Speaker (Built-in) USB 3.2 Gen1 port Ethernet port Colors Power LED Tilt Pivot Swivel Height Adjustment Kensington lock AC input voltage Power consumption Temperature (Operating) Temperature (Non-operating) Dimension (W x H x D) without stand Dimension (W x H x D) with stand Weight (Esti.) Multi-languages TFT LCD 23.8" (16:9, 60....
User Guide
Page 42
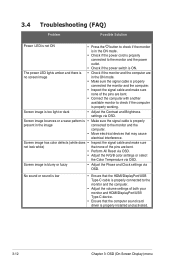
... the computer sound card driver is properly installed and activated. 3-12 Chapter 3: OSD (On-Screen Display) menu 3.4 Troubleshooting (FAQ) Problem Possible Solution Power LED is not ON • Press the button to check if the monitor is in the ON mode. • Check if the power cord is properly connected to the monitor and the computer. • Adjust the volume settings of the pins are bent. • Perform All Reset via OSD. • Adjust the R/G/B color settings or select...
... the computer sound card driver is properly installed and activated. 3-12 Chapter 3: OSD (On-Screen Display) menu 3.4 Troubleshooting (FAQ) Problem Possible Solution Power LED is not ON • Press the button to check if the monitor is in the ON mode. • Check if the power cord is properly connected to the monitor and the computer. • Adjust the volume settings of the pins are bent. • Perform All Reset via OSD. • Adjust the R/G/B color settings or select...


