
User Manual
Page 20
...Teaming Utility Installs the Realtek® Teaming Utility. ASUS A500/AS-D920, BA5190 A500 AS-D920.indb 5 2-5 4/12/10 5:52:55 PM Before using the installation wizard. Adobe Reader 8 Installs the Adobe Acrobat Reader that allows you to install. ASUS InstAll - 2.3.3 Utilities menu The Utilities menu ...AI Probe easily. Tap an item from the screen to download the latest version of the BIOS from the ASUS website. ASUS Update Allows you to the ASUS website. ASUS AI Manager Installs ASUS AI Manager where you have an Internet connection to connect to open, view, and print ...
...Teaming Utility Installs the Realtek® Teaming Utility. ASUS A500/AS-D920, BA5190 A500 AS-D920.indb 5 2-5 4/12/10 5:52:55 PM Before using the installation wizard. Adobe Reader 8 Installs the Adobe Acrobat Reader that allows you to install. ASUS InstAll - 2.3.3 Utilities menu The Utilities menu ...AI Probe easily. Tap an item from the screen to download the latest version of the BIOS from the ASUS website. ASUS Update Allows you to the ASUS website. ASUS AI Manager Installs ASUS AI Manager where you have an Internet connection to connect to open, view, and print ...
User Manual
Page 31
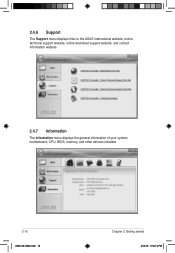
2.4.6 Support The Support menu displays links to the ASUS international website, online technical support website, online download support website, and contact information website. 2.4.7 Information The Information menu displays the general information of your system, motherboard, CPU, BIOS, memory, and other devices installed. 2-16 A500 AS-D920.indb 16 Chapter 2: Getting started 4/12/10 5:53:13 PM
2.4.6 Support The Support menu displays links to the ASUS international website, online technical support website, online download support website, and contact information website. 2.4.7 Information The Information menu displays the general information of your system, motherboard, CPU, BIOS, memory, and other devices installed. 2-16 A500 AS-D920.indb 16 Chapter 2: Getting started 4/12/10 5:53:13 PM

User Manual
Page 32
... or obtain the latest BIOS version from the Support DVD. Select Update BIOS from a file from the drop-down menu, and then click Next. 5. From the left window pane, select the folder that appears on the screen during the Power‑On Self-Test (POST). ASUS A500/AS-D920, BA5190 A500 AS-D920.indb... 17 2-17 4/12/10 5:53:14 PM Select Options from the drop-down menu, and then click Next. 3. Locate the new BIOS file, and then click Next.
... or obtain the latest BIOS version from the Support DVD. Select Update BIOS from a file from the drop-down menu, and then click Next. 5. From the left window pane, select the folder that appears on the screen during the Power‑On Self-Test (POST). ASUS A500/AS-D920, BA5190 A500 AS-D920.indb... 17 2-17 4/12/10 5:53:14 PM Select Options from the drop-down menu, and then click Next. 3. Locate the new BIOS file, and then click Next.

User Manual
Page 33
When the screen returns to the ASUS Update utility, flash the BIOS to your desired size by clicking on the right window pane, select an image to display the new boot logo during POST. 2-18 A500 AS-D920.indb 18 Chapter 2: Getting started 4/12/10 5:53:15 PM Adjust the boot image to load the new boot logo. 10. After flashing the BIOS, restart the computer to enlarge by selecting a value on the Ratio box. When the logo images appear on it. 8. 7. Click Next. 9.
When the screen returns to the ASUS Update utility, flash the BIOS to your desired size by clicking on the right window pane, select an image to display the new boot logo during POST. 2-18 A500 AS-D920.indb 18 Chapter 2: Getting started 4/12/10 5:53:15 PM Adjust the boot image to load the new boot logo. 10. After flashing the BIOS, restart the computer to enlarge by selecting a value on the Ratio box. When the logo images appear on it. 8. 7. Click Next. 9.

User Manual
Page 37
.../After 3 mins-After 5 hours N/A N/A Never/After 3 mins-After 5 hours Never/After 3 mins-After 5 hours Light/Heavy Keep Bios Setting/Slow Never/After 3 mins-After 5 hours Never/After 3 mins-After 5 hours Light/Heavy Keep Bios Setting/Quiet Never/After 3 mins-After 5 hours The values in the table above are subject to reduce noise... CPU fan and two chassis fan speeds. • AI Nap Idle Time: Enters AI Nap mode after a certain time during system idle process. Visit the ASUS website at any time without notice. • Fan Control: Adjusts fan speeds to change at www...
.../After 3 mins-After 5 hours N/A N/A Never/After 3 mins-After 5 hours Never/After 3 mins-After 5 hours Light/Heavy Keep Bios Setting/Slow Never/After 3 mins-After 5 hours Never/After 3 mins-After 5 hours Light/Heavy Keep Bios Setting/Quiet Never/After 3 mins-After 5 hours The values in the table above are subject to reduce noise... CPU fan and two chassis fan speeds. • AI Nap Idle Time: Enters AI Nap mode after a certain time during system idle process. Visit the ASUS website at any time without notice. • Fan Control: Adjusts fan speeds to change at www...

User Manual
Page 39
... A500 AS-D920.indb 24 Chapter 2: Getting started 4/12/10 5:53:27 PM click to immediately enter the existing OS • To enter the motherboard BIOS Setup program, click Exit on the system configuration. 5. Splash screen hot-keys Key ESC Function Power off the computer Continue booting to install Express Gate...
... A500 AS-D920.indb 24 Chapter 2: Getting started 4/12/10 5:53:27 PM click to immediately enter the existing OS • To enter the motherboard BIOS Setup program, click Exit on the system configuration. 5. Splash screen hot-keys Key ESC Function Power off the computer Continue booting to install Express Gate...

User Manual
Page 44
...normally, reinstall the software or use the repair utility to select and update BIOS. ASUS A500/AS-D920, BA5190 A500 AS-D920.indb 29 2-29 4/12/10 5:53:38 PM Configuring Express Gate in BIOS Setup To enter the motherboard BIOS Setup program, click Exit on the splash screen and then hold down ...during POST. Main Advanced Power BIOS SETUP UTILITY Boot Tools Exit ASUS EZ Flash 2 Express Gate...
...normally, reinstall the software or use the repair utility to select and update BIOS. ASUS A500/AS-D920, BA5190 A500 AS-D920.indb 29 2-29 4/12/10 5:53:38 PM Configuring Express Gate in BIOS Setup To enter the motherboard BIOS Setup program, click Exit on the splash screen and then hold down ...during POST. Main Advanced Power BIOS SETUP UTILITY Boot Tools Exit ASUS EZ Flash 2 Express Gate...
User Manual
Page 50
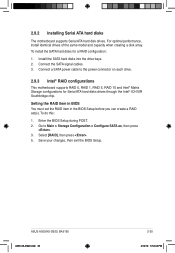
...Intel® Matrix Storage configurations for a RAID configuration: 1. Setting the RAID item in BIOS You must set the RAID item in the BIOS Setup before you can create a RAID set(s). To do this: 1. Save your changes, then exit ...the BIOS Setup. Enter the BIOS Setup during POST. 2. Select [RAID], then press . 5. For optimal performance, install identical... cable to Main > Storage Configuration > Configure SATA as, then press . 3. ASUS A500/AS-D920, BA5190 A500 AS-D920.indb 35 2-35 4/12/10 5:53:43 PM
...Intel® Matrix Storage configurations for a RAID configuration: 1. Setting the RAID item in BIOS You must set the RAID item in the BIOS Setup before you can create a RAID set(s). To do this: 1. Save your changes, then exit ...the BIOS Setup. Enter the BIOS Setup during POST. 2. Select [RAID], then press . 5. For optimal performance, install identical... cable to Main > Storage Configuration > Configure SATA as, then press . 3. ASUS A500/AS-D920, BA5190 A500 AS-D920.indb 35 2-35 4/12/10 5:53:43 PM

User Manual
Page 51
... move through the menus and select the menu options. Reset Disks to display the utility main menu. Create RAID Volume 2. Delete RAID Volume 3. The RAID BIOS setup screens shown in this section are connected to the Serial ATA connectors supported by the Southbridge. Install all the Serial ATA hard disk drives...
... move through the menus and select the menu options. Reset Disks to display the utility main menu. Create RAID Volume 2. Delete RAID Volume 3. The RAID BIOS setup screens shown in this section are connected to the Serial ATA connectors supported by the Southbridge. Install all the Serial ATA hard disk drives...

User Manual
Page 58
...American Megatrends, Inc. 2.9.4 Marvell® SAS RAID configurations The Marvell® 88SE6320 SAS controller allows you can create a RAID set. ASUS A500/AS-D920, BA5190 A500 AS-D920.indb 43 2-43 4/12/10 5:53:52 PM To do this section are for reference only, and may not ... Front Panel Type Marvell Storage Controller Marvell Storage Boot Rom Marvell SAS SAS Boot ROM Marvell LAN1 Marvell LAN2 LAN Boot ROM Onboard 1394 Controller BIOS SETUP UTILITY [Enabled] [HD Audio] [Enabled] [Enabled] [Enabled] [Enabled] [Enabled] [Enabled] [Disabled] [Enabled] Enable or Disable High ...
...American Megatrends, Inc. 2.9.4 Marvell® SAS RAID configurations The Marvell® 88SE6320 SAS controller allows you can create a RAID set. ASUS A500/AS-D920, BA5190 A500 AS-D920.indb 43 2-43 4/12/10 5:53:52 PM To do this section are for reference only, and may not ... Front Panel Type Marvell Storage Controller Marvell Storage Boot Rom Marvell SAS SAS Boot ROM Marvell LAN1 Marvell LAN2 LAN Boot ROM Onboard 1394 Controller BIOS SETUP UTILITY [Enabled] [HD Audio] [Enabled] [Enabled] [Enabled] [Enabled] [Enabled] [Enabled] [Disabled] [Enabled] Enable or Disable High ...

User Manual
Page 59
Press and select a desired adapter for RAID configuration. During POST, press + to enter the utility main menu. Marvell BIOS Setup (c) 2007 Marvell Technology Group Ltd. [Selection] [Controller] [ Devices ] [ RAID ] Select Adapter Adapter 1 ENTER/...53 PM Boot up your computer. 2. Marvell® RAID BIOS Configuration utility To enter the Marvell® RAID BIOS setup utility 1. Marvell BIOS Setup (c) 2007 Marvell Technology Group Ltd. [Selection] Adapter 1 [Controller] [ Devices ] [ RAID ] VendorID:DeviceID: BIOS Version: PCI Slot: Adapter Serial Number: IRQ Number: Port ...
Press and select a desired adapter for RAID configuration. During POST, press + to enter the utility main menu. Marvell BIOS Setup (c) 2007 Marvell Technology Group Ltd. [Selection] [Controller] [ Devices ] [ RAID ] Select Adapter Adapter 1 ENTER/...53 PM Boot up your computer. 2. Marvell® RAID BIOS Configuration utility To enter the Marvell® RAID BIOS setup utility 1. Marvell BIOS Setup (c) 2007 Marvell Technology Group Ltd. [Selection] Adapter 1 [Controller] [ Devices ] [ RAID ] VendorID:DeviceID: BIOS Version: PCI Slot: Adapter Serial Number: IRQ Number: Port ...

User Manual
Page 60
... have selected the desired disks, select NEXT to make up the RAID set : 1. ASUS A500/AS-D920, BA5190 A500 AS-D920.indb 45 2-45 4/12/10 5:53:54 PM From the utility menu bar, select RAID > Create array. Marvell BIOS Setup (c) 2007 Marvell Technology Group Ltd. [Selection] [Controller] [ Devices ] [ RAID ] RAID Config Select...
... have selected the desired disks, select NEXT to make up the RAID set : 1. ASUS A500/AS-D920, BA5190 A500 AS-D920.indb 45 2-45 4/12/10 5:53:54 PM From the utility menu bar, select RAID > Create array. Marvell BIOS Setup (c) 2007 Marvell Technology Group Ltd. [Selection] [Controller] [ Devices ] [ RAID ] RAID Config Select...

User Manual
Page 61
... (c) 2007 Marvell Technology Group Ltd. [Selection] [Controller] [ Devices ] [ RAID ] Select free disks to create array. Select a RAID set . The Create Array screen appears. Marvell BIOS Setup (c) 2007 Marvell Technology Group Ltd. [Selection] [Controller] [ Devices ] [ RAID ] Select free disks to create **I01NCDErXeRMCSP01TaaaatotixprredaitScpALiiereztrveySDSSae((iiAAylMMzsSSBBek))::N::::aSSmTTR116e33A444I66K33*D44B66RRR088AAA7700III55DDD44011SS0SS Quick Init : No Cache Mode : WriteBack ...
... (c) 2007 Marvell Technology Group Ltd. [Selection] [Controller] [ Devices ] [ RAID ] Select free disks to create array. Select a RAID set . The Create Array screen appears. Marvell BIOS Setup (c) 2007 Marvell Technology Group Ltd. [Selection] [Controller] [ Devices ] [ RAID ] Select free disks to create **I01NCDErXeRMCSP01TaaaatotixprredaitScpALiiereztrveySDSSae((iiAAylMMzsSSBBek))::N::::aSSmTTR116e33A444I66K33*D44B66RRR088AAA7700III55DDD44011SS0SS Quick Init : No Cache Mode : WriteBack ...

User Manual
Page 62
...Status 0 0 SAS : ST336754SS 36.7GB SAS 3.0 FULLASSIGN 1 1 SAS : ST336754SS 36.7GB SAS 3.0 FULLASSIGN ENTER/SPACE:Select, ESC:Back/Exit ASUS A500/AS-D920, BA5190 A500 AS-D920.indb 47 2-47 4/12/10 5:53:57 PM 6. Press to create ICDrePaotretArrDaiysk Name *0 R0aid LevSeAlS : :STR3AI3D60754SS *1 M1ax SizeS(....6GB SAS 3.0 Status FREE FREE Create the array?[Y] 7. The newly created array appears in the RAID menu. Marvell BIOS Setup (c) 2007 Marvell Technology Group Ltd. [Selection] [Controller] [ Devices ] [ RAID ] RAID Config Select free disks to confirm the array creation.
...Status 0 0 SAS : ST336754SS 36.7GB SAS 3.0 FULLASSIGN 1 1 SAS : ST336754SS 36.7GB SAS 3.0 FULLASSIGN ENTER/SPACE:Select, ESC:Back/Exit ASUS A500/AS-D920, BA5190 A500 AS-D920.indb 47 2-47 4/12/10 5:53:57 PM 6. Press to create ICDrePaotretArrDaiysk Name *0 R0aid LevSeAlS : :STR3AI3D60754SS *1 M1ax SizeS(....6GB SAS 3.0 Status FREE FREE Create the array?[Y] 7. The newly created array appears in the RAID menu. Marvell BIOS Setup (c) 2007 Marvell Technology Group Ltd. [Selection] [Controller] [ Devices ] [ RAID ] RAID Config Select free disks to confirm the array creation.

User Manual
Page 63
... 4/12/10 5:53:58 PM Select a desired array to confirm and delete the selected array. Deleting an array To delete a RAID set 1. Marvell BIOS Setup (c) 2007 Marvell Technology Group Ltd. [Selection] [Controller] Delete array [ Devices ] [ RAID ] RAID Config ID Name 0 NEXT Size Level ...RAID0 ONLINE 64KB WriteBack 0,1 ENTER/SPACE:Select, ESC:Back/Exit 2. From the utility menu bar, select RAID > Delete array, and then press . Marvell BIOS Setup (c) 2007 Marvell Technology Group Ltd. [Selection] [Controller] [ Devices ] [ RAID ] Delete array RAID Config ID Name *0 NEXT Size Level ...
... 4/12/10 5:53:58 PM Select a desired array to confirm and delete the selected array. Deleting an array To delete a RAID set 1. Marvell BIOS Setup (c) 2007 Marvell Technology Group Ltd. [Selection] [Controller] Delete array [ Devices ] [ RAID ] RAID Config ID Name 0 NEXT Size Level ...RAID0 ONLINE 64KB WriteBack 0,1 ENTER/SPACE:Select, ESC:Back/Exit 2. From the utility menu bar, select RAID > Delete array, and then press . Marvell BIOS Setup (c) 2007 Marvell Technology Group Ltd. [Selection] [Controller] [ Devices ] [ RAID ] Delete array RAID Config ID Name *0 NEXT Size Level ...

User Manual
Page 64
ASUS A500/AS-D920, BA5190 A500 AS-D920.indb 49 2-49 4/12/10 5:53:59 PM The utility verifies the selected disk. Marvell BIOS Setup (c) 2007 Marvell Technology Group Ltd. [Selection] [Controller] [ Devices ] Select Device For Advanced Operation [ RAID ] [Physical Disks... the Advanced Operation screen. Press after the confirmation screen appears. 3. When completed, press to return to select a disk and press or . Marvell BIOS Setup (c) 2007 Marvell Technology Group Ltd. [Selection] [Controller] [ Devices ] Select Device For Advanced Operation [ RAID ] [Physical Disks] ID ...
ASUS A500/AS-D920, BA5190 A500 AS-D920.indb 49 2-49 4/12/10 5:53:59 PM The utility verifies the selected disk. Marvell BIOS Setup (c) 2007 Marvell Technology Group Ltd. [Selection] [Controller] [ Devices ] Select Device For Advanced Operation [ RAID ] [Physical Disks... the Advanced Operation screen. Press after the confirmation screen appears. 3. When completed, press to return to select a disk and press or . Marvell BIOS Setup (c) 2007 Marvell Technology Group Ltd. [Selection] [Controller] [ Devices ] Select Device For Advanced Operation [ RAID ] [Physical Disks] ID ...

User Manual
Page 65
Marvell BIOS Setup (c) 2007 Marvell Technology Group Ltd. [Selection] [Controller] [ Devices ] Select Device For Advanced Operation [ RAID ] [Physical Disks] ID Port Disk Name 0 0 SAS : ST336754SS 1 1 SAS : ST336754SS... or . The Advanced Menu appears. Press after the confirmation screen appears. DO NOT reset the computer or shut down the power during the operation. Marvell BIOS Setup (c) 2007 Marvell Technology Group Ltd. [Selection] [Controller] [ Devices ] [ RAID ] Select Device For Advanced Operation [Physical Disks] ID Port Disk Name 0 0 SAS : ST336754SS 1 1 SAS : ...
Marvell BIOS Setup (c) 2007 Marvell Technology Group Ltd. [Selection] [Controller] [ Devices ] Select Device For Advanced Operation [ RAID ] [Physical Disks] ID Port Disk Name 0 0 SAS : ST336754SS 1 1 SAS : ST336754SS... or . The Advanced Menu appears. Press after the confirmation screen appears. DO NOT reset the computer or shut down the power during the operation. Marvell BIOS Setup (c) 2007 Marvell Technology Group Ltd. [Selection] [Controller] [ Devices ] [ RAID ] Select Device For Advanced Operation [Physical Disks] ID Port Disk Name 0 0 SAS : ST336754SS 1 1 SAS : ...

User Manual
Page 66
Controller Configuration From the utility menu bar, select Controller, and then press . Marvell BIOS Setup (c) 2007 Marvell Technology Group Ltd. [Selection] [Controller] [ Devices ] [ RAID ] [Controller Config] INT 13h [Enable] Silent Mode [Disable] Halt On ...to change controller settings. When enabled, the BIOS POST will be hidden during system POST. Configuration options: [Disable] [Enable] Silent Mode [Disable] Allows you to enable or disable the BIOS POST silent mode. Configuration options: [Disable] [Enable] ASUS A500/AS-D920, BA5190 A500 AS-D920.indb 51 2-51 4/12...
Controller Configuration From the utility menu bar, select Controller, and then press . Marvell BIOS Setup (c) 2007 Marvell Technology Group Ltd. [Selection] [Controller] [ Devices ] [ RAID ] [Controller Config] INT 13h [Enable] Silent Mode [Disable] Halt On ...to change controller settings. When enabled, the BIOS POST will be hidden during system POST. Configuration options: [Disable] [Enable] Silent Mode [Disable] Allows you to enable or disable the BIOS POST silent mode. Configuration options: [Disable] [Enable] ASUS A500/AS-D920, BA5190 A500 AS-D920.indb 51 2-51 4/12...

User Manual
Page 67
... user, you are using Windows Vista OS. 5. Press any key when the system prompts "Press any key to complete the process. Save changes and exit BIOS. 6. Insert the support DVD into the floppy disk drive or connect a USB flash disk if you can create a RAID driver disk with the RAID driver... installing Windows® XP/Vista and later operating system on a hard disk drive that is included in Windows®: 1. Press during POST to enter the BIOS setup utility. 3.
... user, you are using Windows Vista OS. 5. Press any key when the system prompts "Press any key to complete the process. Save changes and exit BIOS. 6. Insert the support DVD into the floppy disk drive or connect a USB flash disk if you can create a RAID driver disk with the RAID driver... installing Windows® XP/Vista and later operating system on a hard disk drive that is included in Windows®: 1. Press during POST to enter the BIOS setup utility. 3.


