B85-A User's Manual
Page 6
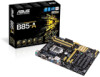
... * Due to Intel® chipsest limitation, DDR3 1600MHz and higher memory modules on the CPU types. ** Refer to www.asus.com for the following items. Motherboard Cables Accessories Application DVD Documentation ASUS B85-A motherboard 2 x Serial ATA 6.0 Gb/s cables 1 x I/O Shield Support DVD User Guide If any of 1920 x 1200... CODEC - We recommend a maximum of 3GB system memory if you are using a Windows® 32-bit operating system. *** Refer to www.asus.com for Intel® 4th Generation Core™ i7 / i5 / i3, Pentium®, and Celeron® processors Supports Intel® 22nm ...
... * Due to Intel® chipsest limitation, DDR3 1600MHz and higher memory modules on the CPU types. ** Refer to www.asus.com for the following items. Motherboard Cables Accessories Application DVD Documentation ASUS B85-A motherboard 2 x Serial ATA 6.0 Gb/s cables 1 x I/O Shield Support DVD User Guide If any of 1920 x 1200... CODEC - We recommend a maximum of 3GB system memory if you are using a Windows® 32-bit operating system. *** Refer to www.asus.com for Intel® 4th Generation Core™ i7 / i5 / i3, Pentium®, and Celeron® processors Supports Intel® 22nm ...

B85-A User's Manual
Page 9
... bag that the ATX power supply is switched off or the power cord is detached from the wall socket before installing or removing the motherboard. ASUS B85-A 1-1 Product introduction 1 1.1 Before you proceed Take note of the following precautions before you install motherboard components or change any motherboard settings. • Unplug the power...
... bag that the ATX power supply is switched off or the power cord is detached from the wall socket before installing or removing the motherboard. ASUS B85-A 1-1 Product introduction 1 1.1 Before you proceed Take note of the following precautions before you install motherboard components or change any motherboard settings. • Unplug the power...

B85-A User's Manual
Page 11
... connectors (24-pin EATXPWR, 8-pin EATX12V) 3. Intel® B85 Serial ATA 3.0Gb/s connectors (7-pin SATA_5~6 [dark brown]) 11. Intel® B85 Serial ATA 6.0Gb/s connector (7-pin SATA6G_1~4 [yellow]) 7. USB 2.0 connectors (10-1 pin USB11~14) 13. Digital audio connector (4-1 pin SPDIF_OUT) 14. B85-A B85-A CPU socket LGA1150 ASUS B85-A 1-3 Serial port connectors (10-1 pin COM) 2. 1.2.4 Layout contents...
... connectors (24-pin EATXPWR, 8-pin EATX12V) 3. Intel® B85 Serial ATA 3.0Gb/s connectors (7-pin SATA_5~6 [dark brown]) 11. Intel® B85 Serial ATA 6.0Gb/s connector (7-pin SATA6G_1~4 [yellow]) 7. USB 2.0 connectors (10-1 pin USB11~14) 13. Digital audio connector (4-1 pin SPDIF_OUT) 14. B85-A B85-A CPU socket LGA1150 ASUS B85-A 1-3 Serial port connectors (10-1 pin COM) 2. 1.2.4 Layout contents...

B85-A User's Manual
Page 13
ASUS B85-A 1-5 4 C 5 A B 1.3.2 CPU heatsink and fan assembly installation Apply the Thermal Interface Material to the CPU heatsink and CPU before you install the heatsink and fan if necessary.
ASUS B85-A 1-5 4 C 5 A B 1.3.2 CPU heatsink and fan assembly installation Apply the Thermal Interface Material to the CPU heatsink and CPU before you install the heatsink and fan if necessary.

B85-A User's Manual
Page 15
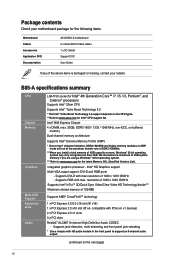
... you install memory modules of the following: - DIMM_A1 DIMM_A2 DIMM_B1 DIMM_B2 Channel Channel A Channel B Sockets DIMM_A1 & DIMM_A2 DIMM_B1 & DIMM_B2 B85-A B85-A 240-pin DDR3 DIMM sockets 1.4.2 Memory configurations You may install 1GB, 2GB, 4GB, and 8GB unbuffered non-ECC DDR3 DIMMs into the...recommended to Intel® CPU spec, DIMM voltage below 1.65V is notched differently from the same vendor. According to protect the CPU. ASUS B85-A 1-7 1.4 System memory 1.4.1 Overview This motherboard comes with the same CAS latency. DO NOT install a DDR or DDR2 memory module to...
... you install memory modules of the following: - DIMM_A1 DIMM_A2 DIMM_B1 DIMM_B2 Channel Channel A Channel B Sockets DIMM_A1 & DIMM_A2 DIMM_B1 & DIMM_B2 B85-A B85-A 240-pin DDR3 DIMM sockets 1.4.2 Memory configurations You may install 1GB, 2GB, 4GB, and 8GB unbuffered non-ECC DDR3 DIMMs into the...recommended to Intel® CPU spec, DIMM voltage below 1.65V is notched differently from the same vendor. According to protect the CPU. ASUS B85-A 1-7 1.4 System memory 1.4.1 Overview This motherboard comes with the same CAS latency. DO NOT install a DDR or DDR2 memory module to...
B85-A User's Manual
Page 17
... the system unstable and the card inoperable. Secure the card to the chassis with it and make the necessary hardware settings for the expansion card. ASUS B85-A 1-9 Keep the screw for information on BIOS setup. 2. Align the card connector with your motherboard is completely seated on the slot. 5. Support the DIMM lightly...
... the system unstable and the card inoperable. Secure the card to the chassis with it and make the necessary hardware settings for the expansion card. ASUS B85-A 1-9 Keep the screw for information on BIOS setup. 2. Align the card connector with your motherboard is completely seated on the slot. 5. Support the DIMM lightly...

B85-A User's Manual
Page 19
... boot failure! • If the steps above do not need to clear the RTC when the system hangs due to re- B85-A CLRTC 12 23 Normal (Default) B85-A Clear RTC RAM Clear RTC To erase the RTC RAM: 1. After clearing the CMOS, reinstall the battery. • You ...do not help, remove the onboard battery and move the cap back to default values. 1.7 1.7.1 1 Connectors Rear panel connectors 2 3 45 11 ASUS B85-A 10 9 8 7 6 1-11 Hold down and reboot the system, then the BIOS automatically resets parameter settings to pins 1-2. 3. Move the jumper cap from pins 1-2...
... boot failure! • If the steps above do not need to clear the RTC when the system hangs due to re- B85-A CLRTC 12 23 Normal (Default) B85-A Clear RTC RAM Clear RTC To erase the RTC RAM: 1. After clearing the CMOS, reinstall the battery. • You ...do not help, remove the onboard battery and move the cap back to default values. 1.7 1.7.1 1 Connectors Rear panel connectors 2 3 45 11 ASUS B85-A 10 9 8 7 6 1-11 Hold down and reboot the system, then the BIOS automatically resets parameter settings to pins 1-2. 3. Move the jumper cap from pins 1-2...
B85-A User's Manual
Page 21
USB 2.0 ports 9 and 10. These two 4-pin Universal Serial Bus (USB) ports are controlled by the xHCI controller. ASUS B85-A 1-13 DVI-D can only be used under a Windows® OS environment and after USB 3.0 driver installation. • The plugged USB 3.0 device may run on xHCI ... connector, then install the module to CRT and is not compatible with DVI-I. 11. COM PIN 1 RXD DTR DSR CTS DCD TXD GND RTS RI B85-A B85-A Serial port (COM) connector The COM module is for any DVI-D compatible device. DVI-D port. Serial port connector (10-1 pin COM) This connector is for...
USB 2.0 ports 9 and 10. These two 4-pin Universal Serial Bus (USB) ports are controlled by the xHCI controller. ASUS B85-A 1-13 DVI-D can only be used under a Windows® OS environment and after USB 3.0 driver installation. • The plugged USB 3.0 device may run on xHCI ... connector, then install the module to CRT and is not compatible with DVI-I. 11. COM PIN 1 RXD DTR DSR CTS DCD TXD GND RTS RI B85-A B85-A Serial port (COM) connector The COM module is for any DVI-D compatible device. DVI-D port. Serial port connector (10-1 pin COM) This connector is for...
B85-A User's Manual
Page 23
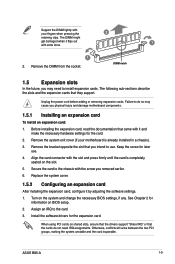
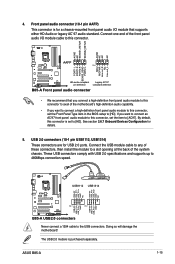
... to the USB connectors. USB1112 USB1314 USB+5V USB_P11USB_P11+ GND NC USB+5V USB_P13USB_P13+ GND NC B85-A PIN 1 PIN 1 USB+5V USB_P12USB_P12+ GND USB+5V USB_P14USB_P14+ GND B85-A USB2.0 connectors Never connect a 1394 cable to [HD]. AGND NC SENSE1_RETUR SENSE2_RETUR AGND NC NC... R SENSE_SEND PORT2 L HD-audio-compliant Legacy AC'97 pin definition compliant definition B85-A Front panel audio connector • We recommend that supports either HD Audio or legacy AC`97 audio standard. ASUS B85-A 1-15 These USB connectors comply with USB 2.0 specifications and supports up to ...
... to the USB connectors. USB1112 USB1314 USB+5V USB_P11USB_P11+ GND NC USB+5V USB_P13USB_P13+ GND NC B85-A PIN 1 PIN 1 USB+5V USB_P12USB_P12+ GND USB+5V USB_P14USB_P14+ GND B85-A USB2.0 connectors Never connect a 1394 cable to [HD]. AGND NC SENSE1_RETUR SENSE2_RETUR AGND NC NC... R SENSE_SEND PORT2 L HD-audio-compliant Legacy AC'97 pin definition compliant definition B85-A Front panel audio connector • We recommend that supports either HD Audio or legacy AC`97 audio standard. ASUS B85-A 1-15 These USB connectors comply with USB 2.0 specifications and supports up to ...
B85-A User's Manual
Page 25
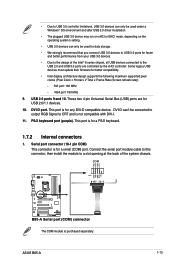
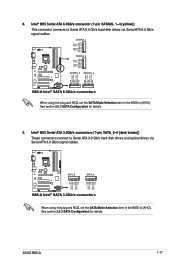
... to Serial ATA 6.0 Gb/s hard disk drives via Serial ATA 3.0 Gb/s signal cables. ASUS B85-A 1-17 See section 2.6.3 SATA Configuration for details. B85-A SATA_6 SATA_5 GND RSATA_TXP1 RSATA_TXN1 GND RSATA_RXN1 RSATA_RXP1 GND GND RSATA_TXP2 RSATA_TXN2 GND RSATA_RXN2 RSATA_RXP2 GND B85-A Intel® SATA 3.0Gb/s connectors When using hot-plug and NCQ, set the SATA...
... to Serial ATA 6.0 Gb/s hard disk drives via Serial ATA 3.0 Gb/s signal cables. ASUS B85-A 1-17 See section 2.6.3 SATA Configuration for details. B85-A SATA_6 SATA_5 GND RSATA_TXP1 RSATA_TXN1 GND RSATA_RXN1 RSATA_RXP1 GND GND RSATA_TXP2 RSATA_TXN2 GND RSATA_RXN2 RSATA_RXP2 GND B85-A Intel® SATA 3.0Gb/s connectors When using hot-plug and NCQ, set the SATA...
B85-A User's Manual
Page 27
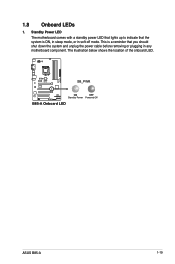
The illustration below shows the location of the onboard LED. B85-A SB_PWR ON OFF Standby Power Powered Off B85-A Onboard LED ASUS B85-A 1-19 This is a reminder that the system is ON, in sleep mode, or in any motherboard component. Standby Power LED The motherboard comes with a standby power LED that lights up to indicate that you should shut down the system and unplug the power cable before removing or plugging in soft-off mode. 1.8 Onboard LEDs 1.
The illustration below shows the location of the onboard LED. B85-A SB_PWR ON OFF Standby Power Powered Off B85-A Onboard LED ASUS B85-A 1-19 This is a reminder that the system is ON, in sleep mode, or in any motherboard component. Standby Power LED The motherboard comes with a standby power LED that lights up to indicate that you should shut down the system and unplug the power cable before removing or plugging in soft-off mode. 1.8 Onboard LEDs 1.
B85-A User's Manual
Page 29
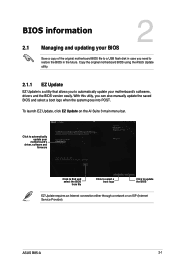
...need to restore the BIOS in case you can also manually update the saved BIOS and select a boot logo when the system goes into POST. ASUS B85-A 2-1 Click to update the BIOS EZ Update requires an Internet connection either through a network or an ISP (Internet Service Provider). To launch EZ... Update, click EZ Update on the AI Suite 3 main menu bar. Copy the original motherboard BIOS using the ASUS Update utility. 2.1.1 EZ Update EZ Update is a utility that allows you to automatically update your motherboard's driver, software and firmware Model Name...
...need to restore the BIOS in case you can also manually update the saved BIOS and select a boot logo when the system goes into POST. ASUS B85-A 2-1 Click to update the BIOS EZ Update requires an Internet connection either through a network or an ISP (Internet Service Provider). To launch EZ... Update, click EZ Update on the AI Suite 3 main menu bar. Copy the original motherboard BIOS using the ASUS Update utility. 2.1.1 EZ Update EZ Update is a utility that allows you to automatically update your motherboard's driver, software and firmware Model Name...
B85-A User's Manual
Page 31
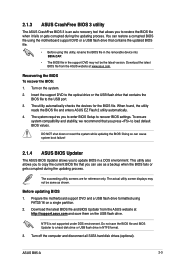
... DO NOT shut down or reset the system while updating the BIOS! Before updating BIOS 1. ASUS B85-A 2-3 Recovering the BIOS To recover the BIOS: 1. When found, the utility reads the BIOS file and enters ASUS EZ Flash 2 utility automatically. 4. The actual utility screen displays may not be same as ...not be the latest version. The succeeding utility screens are for the BIOS file. Download the latest BIOS file from the ASUS website at www.asus.com. Turn off the computer and disconnect all SATA hard disk drives (optional). Insert the support DVD to load default BIOS...
... DO NOT shut down or reset the system while updating the BIOS! Before updating BIOS 1. ASUS B85-A 2-3 Recovering the BIOS To recover the BIOS: 1. When found, the utility reads the BIOS file and enters ASUS EZ Flash 2 utility automatically. 4. The actual utility screen displays may not be same as ...not be the latest version. The succeeding utility screens are for the BIOS file. Download the latest BIOS file from the ASUS website at www.asus.com. Turn off the computer and disconnect all SATA hard disk drives (optional). Insert the support DVD to load default BIOS...
B85-A User's Manual
Page 33
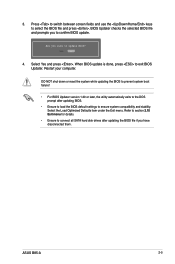
ASUS B85-A 2-5 3. Select Yes and press . When BIOS update is done, press to confirm BIOS update. 4. BIOS Updater checks the selected BIOS file and prompts you have ...
ASUS B85-A 2-5 3. Select Yes and press . When BIOS update is done, press to confirm BIOS update. 4. BIOS Updater checks the selected BIOS file and prompts you have ...
B85-A User's Manual
Page 35
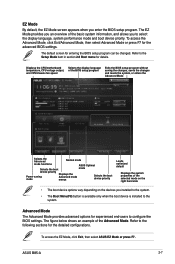
...installed to the system. • The Boot Menu(F8) button is available only when the boot device is installed to the system. ASUS B85-A 2-7 The default screen for the advanced BIOS settings. Advanced Mode The Advanced Mode provides advanced options for experienced end-users to the ...saving the changes, saves the changes and resets the system, or enters the Advanced Mode Selects the Advanced Normal mode mode functions ASUS Optimal Selects the boot mode device priority Power saving mode Displays the Advanced mode menus Selects the boot device priority Loads optimized ...
...installed to the system. • The Boot Menu(F8) button is available only when the boot device is installed to the system. ASUS B85-A 2-7 The default screen for the advanced BIOS settings. Advanced Mode The Advanced Mode provides advanced options for experienced end-users to the ...saving the changes, saves the changes and resets the system, or enters the Advanced Mode Selects the Advanced Normal mode mode functions ASUS Optimal Selects the boot mode device priority Power saving mode Displays the Advanced mode menus Selects the boot device priority Loads optimized ...
B85-A User's Manual
Page 37
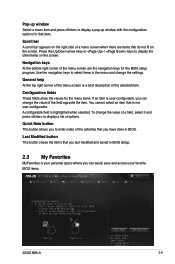
.... Last Modified button This button shows the items that you last modified and saved in BIOS Setup. 2.3 My Favorites MyFavorites is your favorite BIOS items. ASUS B85-A 2-9 Quick Note button This button allows you to enter notes of options. A configurable field is a brief description of a menu screen when there are the navigation...
.... Last Modified button This button shows the items that you last modified and saved in BIOS Setup. 2.3 My Favorites MyFavorites is your favorite BIOS items. ASUS B85-A 2-9 Quick Note button This button allows you to enter notes of options. A configurable field is a brief description of a menu screen when there are the navigation...
B85-A User's Manual
Page 39
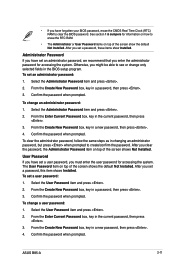
... User Password item and press . 2. Select the Administrator Password item and press . 2. From the Enter Current Password box, key in the current password, then press . 3. ASUS B85-A 2-11 Administrator Password If you have set an administrator password, we recommend that you might be able to clear the BIOS password. From the Enter...
... User Password item and press . 2. Select the Administrator Password item and press . 2. From the Enter Current Password box, key in the current password, then press . 3. ASUS B85-A 2-11 Administrator Password If you have set an administrator password, we recommend that you might be able to clear the BIOS password. From the Enter...

B85-A User's Manual
Page 41
...[Auto] Allows you to automatically optimize the CPU ratio and BCLK frequency. [X.M.P.] Allows your memory modules for optimizing the system performance. 2.5.2 ASUS MultiCore Enhancement [Enabled] [Enabled] [Disabled] Default set to [Enabled] for the system. [Manual] Allows you to select the CPU ...overclocking options to achieve the desired CPU internal frequency. If you to set to default core ratio settings. ASUS B85-A 2-13 Allows you install memory modules supporting the eXtreme Memory Profile (X.M.P.) Technology, select this item to set the profiles ...
...[Auto] Allows you to automatically optimize the CPU ratio and BCLK frequency. [X.M.P.] Allows your memory modules for optimizing the system performance. 2.5.2 ASUS MultiCore Enhancement [Enabled] [Enabled] [Disabled] Default set to [Enabled] for the system. [Manual] Allows you to select the CPU ...overclocking options to achieve the desired CPU internal frequency. If you to set to default core ratio settings. ASUS B85-A 2-13 Allows you install memory modules supporting the eXtreme Memory Profile (X.M.P.) Technology, select this item to set the profiles ...
B85-A User's Manual
Page 43
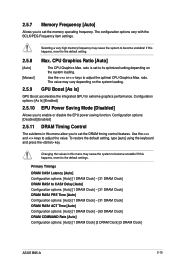
... RAS# ACT Time [Auto] Configuration options: [Auto] [1 DRAM Clock] - [63 DRAM Clock] DRAM COMMAND Rate [Auto] Configuration options: [Auto] [1 DRAM Clock] [2 DRAM Clock] [3 DRAM Clock] ASUS B85-A 2-15 Use the and keys to become unstable! CPU Graphics Ratio [Auto] [Auto] [Manaul] The CPU Graphics Max. ratio. The value may cause the system...
... RAS# ACT Time [Auto] Configuration options: [Auto] [1 DRAM Clock] - [63 DRAM Clock] DRAM COMMAND Rate [Auto] Configuration options: [Auto] [1 DRAM Clock] [2 DRAM Clock] [3 DRAM Clock] ASUS B85-A 2-15 Use the and keys to become unstable! CPU Graphics Ratio [Auto] [Auto] [Manaul] The CPU Graphics Max. ratio. The value may cause the system...

B85-A User's Manual
Page 45
... Both DIMMS] Channel B DIMM Control [Enable Bot...] Configuration options: [Enable Both DIMMS] [Disable DIMM0] [Disable DIMM1] [Disable Both DIMMS] Scrambler Setting [Optimized ...] Configuration options: [Optimized (ASUS)] [Default (MRC)] ASUS B85-A 2-17
... Both DIMMS] Channel B DIMM Control [Enable Bot...] Configuration options: [Enable Both DIMMS] [Disable DIMM0] [Disable DIMM1] [Disable Both DIMMS] Scrambler Setting [Optimized ...] Configuration options: [Optimized (ASUS)] [Default (MRC)] ASUS B85-A 2-17


