User Guide
Page 3
... information iv About this guide iv Package contents vi B150M-A D3 specifications summary vi Chapter 1: Product introduction 1.1 Before you proceed 1-1 1.2 Motherboard overview 1-1 1.3 Central Processing Unit (CPU 1-3 1.4 System memory 1-7 1.5 Expansion slots 1-10 1.6 Headers 1-11 1.7 Connectors 1-12 1.8 Software support 1-22 Chapter 2: BIOS information 2.1 Managing and updating your BIOS 2-1 2.2 BIOS setup program 2-6 2.3 My Favorites 2-9 2.4 Main menu 2-10 2.5 Ai...
... information iv About this guide iv Package contents vi B150M-A D3 specifications summary vi Chapter 1: Product introduction 1.1 Before you proceed 1-1 1.2 Motherboard overview 1-1 1.3 Central Processing Unit (CPU 1-3 1.4 System memory 1-7 1.5 Expansion slots 1-10 1.6 Headers 1-11 1.7 Connectors 1-12 1.8 Software support 1-22 Chapter 2: BIOS information 2.1 Managing and updating your BIOS 2-1 2.2 BIOS setup program 2-6 2.3 My Favorites 2-9 2.4 Main menu 2-10 2.5 Ai...
User Guide
Page 4
... before relocating the system. • When adding or removing devices to or from the system, ensure that the power cables for the BIOS parameters are also provided. If possible, disconnect all the manuals that came with the product, contact a qualified service technician or your power...guide is broken, do not try to moisture. • Place the product on the motherboard. • Chapter 2: BIOS information This chapter discusses changing system settings through the BIOS Setup menus. Do not place the product in your local power company. • If the power supply is organized...
... before relocating the system. • When adding or removing devices to or from the system, ensure that the power cables for the BIOS parameters are also provided. If possible, disconnect all the manuals that came with the product, contact a qualified service technician or your power...guide is broken, do not try to moisture. • Place the product on the motherboard. • Chapter 2: BIOS information This chapter discusses changing system settings through the BIOS Setup menus. Do not place the product in your local power company. • If the power supply is organized...

User Guide
Page 7
..., natural and immersive sound with the most fun gaming platform under Windows® system Media Streamer - ASUS Stainless Steel Back I/O - 3x more durable corrosion-resistant coating UEFI BIOS - B150M-A D3 specifications summary Audio LAN USB ASUS special features Realtek® ALC887 8-channel High Definition Audio CODEC - ASUS Anti Surge (continued on the battlefield Steam OS Support -
..., natural and immersive sound with the most fun gaming platform under Windows® system Media Streamer - ASUS Stainless Steel Back I/O - 3x more durable corrosion-resistant coating UEFI BIOS - B150M-A D3 specifications summary Audio LAN USB ASUS special features Realtek® ALC887 8-channel High Definition Audio CODEC - ASUS Anti Surge (continued on the battlefield Steam OS Support -

User Guide
Page 8
B150M-A D3 specifications summary ASUS special features ASUS quiet thermal solution Rear panel I /O ports * Use a chassis with smart devices in the front panel to support an 8-channel audio output. 1 x USB 3.0/2.0 ... CMOS header 1 x S/PDIF Out header 1 x TPM connector 1 x LPT connector 1 x 24-pin EATX power connector 1 x 4-pin EATX 12V power connector (continued on the next page) viii ASUS CrashFree BIOS 3 - ASUS Q-Slot Quiet Thermal Design - Stylish Fanless Design: PCH heatsink 1 x PS/2 keyboard port (purple) 1 x PS/2 mouse port (green) 1 x DVI-D port 1 x RGB port 1 x HDMI...
B150M-A D3 specifications summary ASUS special features ASUS quiet thermal solution Rear panel I /O ports * Use a chassis with smart devices in the front panel to support an 8-channel audio output. 1 x USB 3.0/2.0 ... CMOS header 1 x S/PDIF Out header 1 x TPM connector 1 x LPT connector 1 x 24-pin EATX power connector 1 x 4-pin EATX 12V power connector (continued on the next page) viii ASUS CrashFree BIOS 3 - ASUS Q-Slot Quiet Thermal Design - Stylish Fanless Design: PCH heatsink 1 x PS/2 keyboard port (purple) 1 x PS/2 mouse port (green) 1 x DVI-D port 1 x RGB port 1 x HDMI...

User Guide
Page 9
ix B150M-A D3 specifications summary BIOS features Manageability Support DVD Operating System Support Form factor 128Mb Flash ROM, UEFI AMI BIOS, PnP, DMI 3.0, WfM2.0, SM BIOS 3.0, ACPI 5.0, Multi-language BIOS, ASUS EZ Flash 3, CrashFree BIOS 3, F6 Qfan Control, F3 My Favorites, Quick Note, Last Modified log, F12 PrintScreen, and ASUS DRAM SPD (Serial Presence Detect) memory information WfM 2.0, DMI 3.0, WOL...
ix B150M-A D3 specifications summary BIOS features Manageability Support DVD Operating System Support Form factor 128Mb Flash ROM, UEFI AMI BIOS, PnP, DMI 3.0, WfM2.0, SM BIOS 3.0, ACPI 5.0, Multi-language BIOS, ASUS EZ Flash 3, CrashFree BIOS 3, F6 Qfan Control, F3 My Favorites, Quick Note, Last Modified log, F12 PrintScreen, and ASUS DRAM SPD (Serial Presence Detect) memory information WfM 2.0, DMI 3.0, WOL...

User Guide
Page 12
Place this side towards the rear of the chassis B150M-A D3 1.2.3 Motherboard layout 12 3 20.1cm(7.9in) 2 4 KBMS HDMI ASM 1442K ATX12V CPU_FAN DIGI +VRM CHA_FAN2 DDR3 DIMM_A1 (64bit, 240-pin module) DDR3 DIMM_A2 (64bit... DIMM_B1 (64bit, 240-pin module) DDR3 DIMM_B2 (64bit, 240-pin module) EATXPWR 23.4cm(9.2in) DVI VGA USB78 LGA1151 USB3_56 LAN_USB3_34 BATTERY 1 AUDIO CHA_FAN1 B150M-A D3 PCIEX16 Realtek 8111H ALC 887 PCIEX1_1 PCIEX1_2 Super I/O Intel® B150 SATA6G_5 SATA6G_6 SATA6G_3 SATA6G_4 5 SATA6G_2 AAFP COM SPDIF_OUT LPT USB910 USB1112 USB3_12 TPM CLRTC...
Place this side towards the rear of the chassis B150M-A D3 1.2.3 Motherboard layout 12 3 20.1cm(7.9in) 2 4 KBMS HDMI ASM 1442K ATX12V CPU_FAN DIGI +VRM CHA_FAN2 DDR3 DIMM_A1 (64bit, 240-pin module) DDR3 DIMM_A2 (64bit... DIMM_B1 (64bit, 240-pin module) DDR3 DIMM_B2 (64bit, 240-pin module) EATXPWR 23.4cm(9.2in) DVI VGA USB78 LGA1151 USB3_56 LAN_USB3_34 BATTERY 1 AUDIO CHA_FAN1 B150M-A D3 PCIEX16 Realtek 8111H ALC 887 PCIEX1_1 PCIEX1_2 Super I/O Intel® B150 SATA6G_5 SATA6G_6 SATA6G_3 SATA6G_4 5 SATA6G_2 AAFP COM SPDIF_OUT LPT USB910 USB1112 USB3_12 TPM CLRTC...
User Guide
Page 20
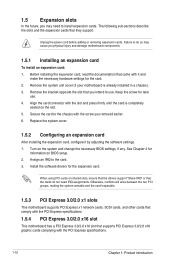
...x16 graphic cards complying with the screw you intend to use . 4. Remove the system unit cover (if your motherboard is completely seated on BIOS setup. 2. Replace the system cover. 1.5.2 Configuring an expansion card After installing the expansion card, configure it and make the necessary hardware ...slot and press firmly until the card is already installed in a chassis). 3. When using PCI cards on the system and change the necessary BIOS settings, if any. Turn on shared slots, ensure that the drivers support "Share IRQ" or that you removed earlier. 6. 1.5 Expansion slots...
...x16 graphic cards complying with the screw you intend to use . 4. Remove the system unit cover (if your motherboard is completely seated on BIOS setup. 2. Replace the system cover. 1.5.2 Configuring an expansion card After installing the expansion card, configure it and make the necessary hardware ...slot and press firmly until the card is already installed in a chassis). 3. When using PCI cards on the system and change the necessary BIOS settings, if any. Turn on shared slots, ensure that the drivers support "Share IRQ" or that you removed earlier. 6. 1.5 Expansion slots...
User Guide
Page 21
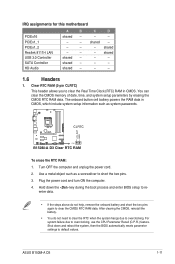
... boot process and enter BIOS setup to overclocking, use the CPU Parameter Recall (C.P.R.) feature. IRQ assignments for this motherboard PCIEx16 PCIEx1_1 PCIEx1_2 Realtek 8111H LAN USB 3.0 Controller SATA Controller HD Audio A B C D shared - - - - - shared shared - - - shared - - - Plug the power cord and turn ON the computer. 4. For system failure due to re- ASUS B150M-A D3 1-11
... boot process and enter BIOS setup to overclocking, use the CPU Parameter Recall (C.P.R.) feature. IRQ assignments for this motherboard PCIEx16 PCIEx1_1 PCIEx1_2 Realtek 8111H LAN USB 3.0 Controller SATA Controller HD Audio A B C D shared - - - - - shared shared - - - shared - - - Plug the power cord and turn ON the computer. 4. For system failure due to re- ASUS B150M-A D3 1-11

User Guide
Page 23
... and isn't compatible with HD audio module in the front panel to three displays under Windows® OS environment, two displays under BIOS, and one display under DOS. • Intel® display architecture design supports the following maximum supported pixel clocks (Pixel Clock ...USB devices must update their firmware for USB 2.0/1.1 devices. 9. These 4-pin Universal Serial Bus (USB) ports are controlled by the xHCI controller. ASUS B150M-A D3 1-13 VGA port: 180 MHz - Audio 2.1, 4.1, 5.1, or 7.1-channel configuration Port Light Blue (Rear panel) Lime (Rear panel) Pink (Rear...
... and isn't compatible with HD audio module in the front panel to three displays under Windows® OS environment, two displays under BIOS, and one display under DOS. • Intel® display architecture design supports the following maximum supported pixel clocks (Pixel Clock ...USB devices must update their firmware for USB 2.0/1.1 devices. 9. These 4-pin Universal Serial Bus (USB) ports are controlled by the xHCI controller. ASUS B150M-A D3 1-13 VGA port: 180 MHz - Audio 2.1, 4.1, 5.1, or 7.1-channel configuration Port Light Blue (Rear panel) Lime (Rear panel) Pink (Rear...
User Guide
Page 27
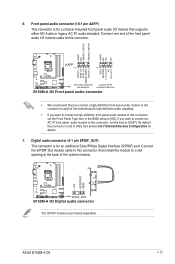
...AC97]. If you want to connect an AC'97 front panel audio module to this connector, set the Front Panel Type item in the BIOS setup to [HD]. Front panel audio connector (10-1 pin AAFP) This connector is for an additional Sony/Philips Digital Interface (S/PDIF) ... AAFP PIN 1 PIN 1 MIC2 MICPWR Line out_R NC Line out_L PORT1 L PORT1 R PORT2 R SENSE_SEND PORT2 L B150M-A D3 HD-audio-compliant Legacy AC'97 pin definition compliant definition B150M-A D3 Front panel audio connector • We recommend that supports either HD Audio or legacy AC`97 audio standard. ASUS B150M-A D3 1-17
...AC97]. If you want to connect an AC'97 front panel audio module to this connector, set the Front Panel Type item in the BIOS setup to [HD]. Front panel audio connector (10-1 pin AAFP) This connector is for an additional Sony/Philips Digital Interface (S/PDIF) ... AAFP PIN 1 PIN 1 MIC2 MICPWR Line out_R NC Line out_L PORT1 L PORT1 R PORT2 R SENSE_SEND PORT2 L B150M-A D3 HD-audio-compliant Legacy AC'97 pin definition compliant definition B150M-A D3 Front panel audio connector • We recommend that supports either HD Audio or legacy AC`97 audio standard. ASUS B150M-A D3 1-17

User Guide
Page 29
...+5V GND GND Speaker Out SPEAKER B150M-A D3 PIN 1 B150M-A D3 Speaker Out connector ASUS B150M-A D3 1-19 XP Service Pack 3 or later version before using Serial ATA hard disk drives. • When using hot-plug and NCQ, set the SATA Mode Selection item in the BIOS to Serial ATA 6.0 Gb/s hard ... RSATA_TXP6 GND SATA6G_3 SATA6G_4 GND RSATA_TXP3 RSATA_TXN3 GND RSATA_RXN3 RSATA_RXP3 GND GND RSATA_TXP4 RSATA_TXN4 GND RSATA_RXN4 RSATA_RXP4 GND B150M-A D3 SATA6G_1 SATA6G_2 GND RSATA_RXP1 RSATA_RXN1 GND RSATA_TXN1 RSATA_TXP1 GND GND RSATA_RXP2 RSATA_RXN2 GND RSATA_TXN2 RSATA_TXP2 GND...
...+5V GND GND Speaker Out SPEAKER B150M-A D3 PIN 1 B150M-A D3 Speaker Out connector ASUS B150M-A D3 1-19 XP Service Pack 3 or later version before using Serial ATA hard disk drives. • When using hot-plug and NCQ, set the SATA Mode Selection item in the BIOS to Serial ATA 6.0 Gb/s hard ... RSATA_TXP6 GND SATA6G_3 SATA6G_4 GND RSATA_TXP3 RSATA_TXN3 GND RSATA_RXN3 RSATA_RXP3 GND GND RSATA_TXP4 RSATA_TXN4 GND RSATA_RXN4 RSATA_RXP4 GND B150M-A D3 SATA6G_1 SATA6G_2 GND RSATA_RXP1 RSATA_RXN1 GND RSATA_TXN1 RSATA_TXP1 GND GND RSATA_RXP2 RSATA_RXN2 GND RSATA_TXN2 RSATA_TXP2 GND...
User Guide
Page 33
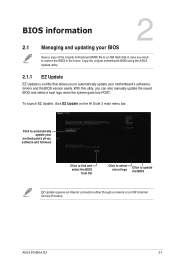
...ASUS B150M-A D3 2-1 Click to automatically update your BIOS Save a copy of the original motherboard BIOS file to a USB flash disk in case you need to restore the BIOS in the future. Copy the original motherboard BIOS using the ASUS Update utility. 2.1.1 EZ Update EZ Update is a utility that allows you can also manually update the saved BIOS.... With this utlity, you to automatically update your motherboard's softwares, drivers and the BIOS version easily. BIOS information 2 2.1 Managing and updating your motherboard's driver, software and firmware Click to find and select the...
...ASUS B150M-A D3 2-1 Click to automatically update your BIOS Save a copy of the original motherboard BIOS file to a USB flash disk in case you need to restore the BIOS in the future. Copy the original motherboard BIOS using the ASUS Update utility. 2.1.1 EZ Update EZ Update is a utility that allows you can also manually update the saved BIOS.... With this utlity, you to automatically update your motherboard's softwares, drivers and the BIOS version easily. BIOS information 2 2.1 Managing and updating your motherboard's driver, software and firmware Click to find and select the...
User Guide
Page 34
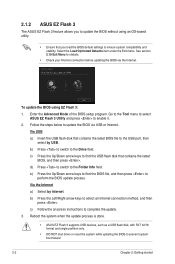
... then press . Via the Internet a) Select by USB. c) Follow the onscreen instructions to perform the BIOS update process. Reboot the system when the update process is done. • ASUS EZ Flash 3 supports USB devices, such as a USB flash disk, with FAT 32/16 format and single partition only...below to update the BIOS via the Internet. To update the BIOS using an OS‑based utility. • Ensure that contains the latest BIOS file to the USB port, then select by Internet. 2.1.2 ASUS EZ Flash 3 The ASUS EZ Flash 3 feature allows you load the BIOS default settings to ...
... then press . Via the Internet a) Select by USB. c) Follow the onscreen instructions to perform the BIOS update process. Reboot the system when the update process is done. • ASUS EZ Flash 3 supports USB devices, such as a USB flash disk, with FAT 32/16 format and single partition only...below to update the BIOS via the Internet. To update the BIOS using an OS‑based utility. • Ensure that contains the latest BIOS file to the USB port, then select by Internet. 2.1.2 ASUS EZ Flash 3 The ASUS EZ Flash 3 feature allows you load the BIOS default settings to ...
User Guide
Page 35
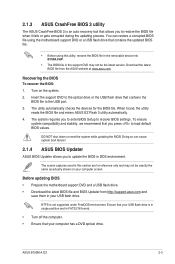
... as actually shown on the system. 2. ASUS B150M-A D3 2-3 The system requires you press to load default BIOS values. To ensure system compatibility and stability, we recommend that you to enter BIOS Setup to recover BIOS settings. Ensure that your computer screen. Download the latest BIOS file from http://support.asus.com and save them in your computer...
... as actually shown on the system. 2. ASUS B150M-A D3 2-3 The system requires you press to load default BIOS values. To ensure system compatibility and stability, we recommend that you to enter BIOS Setup to recover BIOS settings. Ensure that your computer screen. Download the latest BIOS file from http://support.asus.com and save them in your computer...

User Guide
Page 36
... defaults P2: ST3808110AS (76319MB) aigo miniking (250MB) UEFI: (FAT) ASUS DRW-2014L1T(4458MB) P1: ASUS DRW-2014L1T(4458MB) UEFI: (FAT) aigo miniking (250MB) Enter Setup 4. C:/> d: D:/> Updating the BIOS file To update the BIOS file: 1. On the BIOS Updater screen, press to switch from the DVD/CD. Please select boot...priority device automatically. On the FreeDOS prompt, type bupdater /pc /g and press . Insert the USB flash drive with the latest BIOS file and BIOS Updater to launch the select boot device screen. 3. When the select boot device screen appears, insert the Support DVD into the ...
... defaults P2: ST3808110AS (76319MB) aigo miniking (250MB) UEFI: (FAT) ASUS DRW-2014L1T(4458MB) P1: ASUS DRW-2014L1T(4458MB) UEFI: (FAT) aigo miniking (250MB) Enter Setup 4. C:/> d: D:/> Updating the BIOS file To update the BIOS file: 1. On the BIOS Updater screen, press to switch from the DVD/CD. Please select boot...priority device automatically. On the FreeDOS prompt, type bupdater /pc /g and press . Insert the USB flash drive with the latest BIOS file and BIOS Updater to launch the select boot device screen. 3. When the select boot device screen appears, insert the Support DVD into the ...

User Guide
Page 37
... the system while updating the BIOS to update the BIOS? After the BIOS Updater checks the selected BIOS file, select Yes to ensure system compatibility and stability. Ensure to load the BIOS default settings to confirm the BIOS update. When BIOS update is not supported due to select the BIOS file and press . 4. ASUS B150M-A D3 2-5 Press to switch from Drives...
... the system while updating the BIOS to update the BIOS? After the BIOS Updater checks the selected BIOS file, select Yes to ensure system compatibility and stability. Ensure to load the BIOS default settings to confirm the BIOS update. When BIOS update is not supported due to select the BIOS file and press . 4. ASUS B150M-A D3 2-5 Press to switch from Drives...

User Guide
Page 38
...only if you always shut down the system properly from a running operating system can cause damage to enter BIOS Setup using the BIOS Setup program. We recommend you failed to your screen. • Visit the ASUS website at startup: Press or during the Power-On Self Test (POST). Entering... BIOS Setup at startup To enter BIOS Setup at www.asus.com to download the latest BIOS file for information on your data or system. Using the ...
...only if you always shut down the system properly from a running operating system can cause damage to enter BIOS Setup using the BIOS Setup program. We recommend you failed to your screen. • Visit the ASUS website at startup: Press or during the Power-On Self Test (POST). Entering... BIOS Setup at startup To enter BIOS Setup at www.asus.com to download the latest BIOS file for information on your data or system. Using the ...
User Guide
Page 39
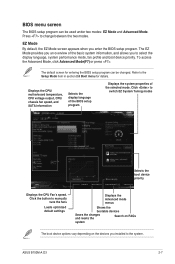
...fan speed, and SATA information Selects the display language of the BIOS setup program Displays the system properties of the basic system information, and allows you an overview of the selected mode. Click to change between the two modes. ASUS B150M-A D3 2-7 To access the Advanced Mode, click Advanced Mode(F7) ...bootable devices Saves the changes and resets the Search on FAQs system The boot device options vary depending on the devices you enter the BIOS setup program. Refer to the system. EZ Mode By default, the EZ Mode screen appears when you installed to the Setup Mode item...
...fan speed, and SATA information Selects the display language of the BIOS setup program Displays the system properties of the basic system information, and allows you an overview of the selected mode. Click to change between the two modes. ASUS B150M-A D3 2-7 To access the Advanced Mode, click Advanced Mode(F7) ...bootable devices Saves the changes and resets the Search on FAQs system The boot device options vary depending on the devices you enter the BIOS setup program. Refer to the system. EZ Mode By default, the EZ Mode screen appears when you installed to the Setup Mode item...

User Guide
Page 40
... Displays the CPU/motherboard temperature, CPU and memory voltage output Menu bar The menu bar on top of the Advanced Mode. Refer to configure the BIOS settings. To access the EZ Mode, click EzMode(F7) or press . The figure below shows an example of the screen has the following sections for...
... Displays the CPU/motherboard temperature, CPU and memory voltage output Menu bar The menu bar on top of the Advanced Mode. Refer to configure the BIOS settings. To access the EZ Mode, click EzMode(F7) or press . The figure below shows an example of the screen has the following sections for...

User Guide
Page 41
You can easily save in MyFavorites screen. from the BIOS screen to open 2. On the Setup Tree Map screen, select the BIOS items that you can personalize this screen by default. Press on your favorite BIOS items. My Favorites comes with several performance, power saving, and fast... boot related items by adding or removing items. Adding items to My Favorites To add BIOS items: 1. Main menu panel Submenu panel Selected shortcut items ASUS B150M-A D3 2-9 2.3 My Favorites MyFavorites is your personal space where you want to save and access your keyboard or...
You can easily save in MyFavorites screen. from the BIOS screen to open 2. On the Setup Tree Map screen, select the BIOS items that you can personalize this screen by default. Press on your favorite BIOS items. My Favorites comes with several performance, power saving, and fast... boot related items by adding or removing items. Adding items to My Favorites To add BIOS items: 1. Main menu panel Submenu panel Selected shortcut items ASUS B150M-A D3 2-9 2.3 My Favorites MyFavorites is your personal space where you want to save and access your keyboard or...


