User Manual
Page 3
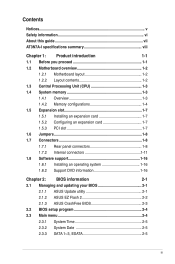
Contents Notices...v Safety information vi About this guide vii AT3N7A-I specifications summary viii Chapter 1: Product introduction 1-1 1.1 Before you proceed 1-1 1.2 Motherboard overview 1-2 1.2.1 Motherboard layout 1-2 1.2.2 Layout contents 1-2 1.3 Central Processing Unit ... 1-16 1.8.2 Support DVD information 1-16 Chapter 2: BIOS information 2-1 2.1 Managing and updating your BIOS 2-1 2.1.1 ASUS Update utility 2-1 2.1.2 ASUS EZ Flash 2 2-2 2.1.3 ASUS CrashFree BIOS 2-3 2.2 BIOS setup program 2-4 2.3 Main menu 2-4 2.3.1 System Time 2-5 2.3.2 System Date 2-5 ...
Contents Notices...v Safety information vi About this guide vii AT3N7A-I specifications summary viii Chapter 1: Product introduction 1-1 1.1 Before you proceed 1-1 1.2 Motherboard overview 1-2 1.2.1 Motherboard layout 1-2 1.2.2 Layout contents 1-2 1.3 Central Processing Unit ... 1-16 1.8.2 Support DVD information 1-16 Chapter 2: BIOS information 2-1 2.1 Managing and updating your BIOS 2-1 2.1.1 ASUS Update utility 2-1 2.1.2 ASUS EZ Flash 2 2-2 2.1.3 ASUS CrashFree BIOS 2-3 2.2 BIOS setup program 2-4 2.3 Main menu 2-4 2.3.1 System Time 2-5 2.3.2 System Date 2-5 ...
User Manual
Page 7
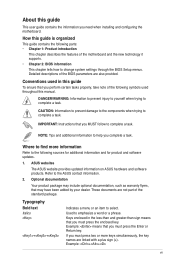
...ASUS websites The ASUS website provides updated information on ASUS hardware and software products. Example: ++ vii IMPORTANT: Instructions that you must press two or more information Refer to the following parts: • Chapter 1: Product introduction This chapter describes the features of the motherboard and the new technology it supports. • Chapter 2: BIOS...that you need when installing and configuring the motherboard. DANGER/WARNING: Information to prevent injury to yourself when trying to change system settings through the BIOS Setup menus. Where to find more keys ...
...ASUS websites The ASUS website provides updated information on ASUS hardware and software products. Example: ++ vii IMPORTANT: Instructions that you must press two or more information Refer to the following parts: • Chapter 1: Product introduction This chapter describes the features of the motherboard and the new technology it supports. • Chapter 2: BIOS...that you need when installing and configuring the motherboard. DANGER/WARNING: Information to prevent injury to yourself when trying to change system settings through the BIOS Setup menus. Where to find more keys ...
User Manual
Page 8
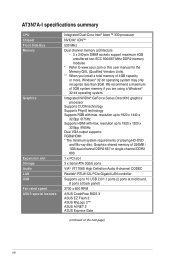
...ports at mid-board, 8 ports at back panel) 3700 ± 600 RPM ASUS CrashFree BIOS 3 ASUS EZ Flash 2 ASUS MyLogo 2™ ASUS AI NET 2 ASUS Express Gate (continued on the next page) viii AT3N7A-I specifications summary CPU Chipset Front Side Bus Memory Graphics Expansion slot Storage Audio LAN... USB Fan rated speed ASUS special features Integrated Dual-Core Intel® Atom...
...ports at mid-board, 8 ports at back panel) 3700 ± 600 RPM ASUS CrashFree BIOS 3 ASUS EZ Flash 2 ASUS MyLogo 2™ ASUS AI NET 2 ASUS Express Gate (continued on the next page) viii AT3N7A-I specifications summary CPU Chipset Front Side Bus Memory Graphics Expansion slot Storage Audio LAN... USB Fan rated speed ASUS special features Integrated Dual-Core Intel® Atom...
User Manual
Page 9
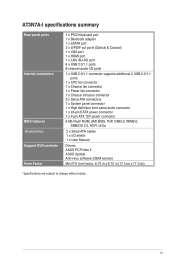
ix AT3N7A-I specifications summary Rear panel ports Internal connectors BIOS features Accessories Support DVD contents Form Factor 1 x PS/2 Keyboard port 1 x Bluetooth adapter 1 x eSATA port 2 x S/PDIF out ports (Optical & Coaxial) 1 x VGA port 1 x HDMI port 1 ...-pin EATX power connector 1 x 4-pin ATX 12V power connector 8 Mb Flash ROM, AMI BIOS, PnP, DMI2.0, WfM2.0, SMBIOS 2.5, ACPI v2.0a 2 x Serial ATA cables 1 x I/O shield 1 x User Manual Drivers ASUS PC Probe II ASUS Update Anti-virus software (OEM version) Mini ITX form factor: 6.75 in x 6.75 in (17.1cm x 17.1cm) *Specifications are ...
ix AT3N7A-I specifications summary Rear panel ports Internal connectors BIOS features Accessories Support DVD contents Form Factor 1 x PS/2 Keyboard port 1 x Bluetooth adapter 1 x eSATA port 2 x S/PDIF out ports (Optical & Coaxial) 1 x VGA port 1 x HDMI port 1 ...-pin EATX power connector 1 x 4-pin ATX 12V power connector 8 Mb Flash ROM, AMI BIOS, PnP, DMI2.0, WfM2.0, SMBIOS 2.5, ACPI v2.0a 2 x Serial ATA cables 1 x I/O shield 1 x User Manual Drivers ASUS PC Probe II ASUS Update Anti-virus software (OEM version) Mini ITX form factor: 6.75 in x 6.75 in (17.1cm x 17.1cm) *Specifications are ...

User Manual
Page 16
...installing the expansion card, read the documentation that it and make the necessary hardware settings for information on the slot. 5. ASUS AT3N7A-I 1-7 The following sub‑sections describe the slot and the expansion cards that came with the slot and press firmly ...settings. 1. See Chapter 2 for the card. 2. Install the software drivers for later use . Remove the system unit cover (if your motherboard is completely seated on BIOS setup. 2. Failure to do so may need to the card. 3. Align the card connector with it supports. 1.5 Expansion slot In the...
...installing the expansion card, read the documentation that it and make the necessary hardware settings for information on the slot. 5. ASUS AT3N7A-I 1-7 The following sub‑sections describe the slot and the expansion cards that came with the slot and press firmly ...settings. 1. See Chapter 2 for the card. 2. Install the software drivers for later use . Remove the system unit cover (if your motherboard is completely seated on BIOS setup. 2. Failure to do so may need to the card. 3. Align the card connector with it supports. 1.5 Expansion slot In the...
User Manual
Page 17
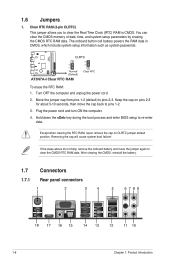
... cord and turn ON the computer. 4. Turn OFF the computer and unplug the power cord. 2. Hold down the key during the boot process and enter BIOS setup to pins 2-3. If the steps above do not help, remove the onboard battery and move the cap back to clear the Real Time Clock...
... cord and turn ON the computer. 4. Turn OFF the computer and unplug the power cord. 2. Hold down the key during the boot process and enter BIOS setup to pins 2-3. If the steps above do not help, remove the onboard battery and move the cap back to clear the Real Time Clock...
User Manual
Page 19
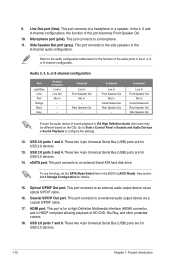
... > Sound Playback to an external Serial ATA hard disk drive. USB 2.0 ports 7 and 8. To use hot-plug, set the SATA Mode Select item in the BIOS to an external audio output device via an optical S/PDIF cable. 16. In the 4, 6 and 8-channel configurations, the function of sound playback is HDCP compliant...
... > Sound Playback to an external Serial ATA hard disk drive. USB 2.0 ports 7 and 8. To use hot-plug, set the SATA Mode Select item in the BIOS to an external audio output device via an optical S/PDIF cable. 16. In the 4, 6 and 8-channel configurations, the function of sound playback is HDCP compliant...
User Manual
Page 21
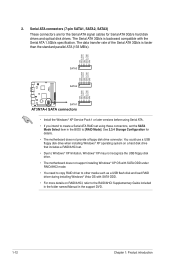
... when installing Windows® XP operating system on RAID/AHCI, refer to the RAID/AHCI Supplementary Guide included in the folder named Manual in the BIOS to other media such as a USB flash disk and load RAID driver during installing Windows® Vista OS with the Serial ATA 1.5Gb/s specification.... using these connectors, set . • Due to Windows® XP limitation, Windows® XP may not recognize the USB floppy disk drive. • The motherboard does not support installing Windows® XP OS with SATA ODD under RAID/AHCI mode. • You need to copy RAID driver to [RAID Mode...
... when installing Windows® XP operating system on RAID/AHCI, refer to the RAID/AHCI Supplementary Guide included in the folder named Manual in the BIOS to other media such as a USB flash disk and load RAID driver during installing Windows® Vista OS with the Serial ATA 1.5Gb/s specification.... using these connectors, set . • Due to Windows® XP limitation, Windows® XP may not recognize the USB floppy disk drive. • The motherboard does not support installing Windows® XP OS with SATA ODD under RAID/AHCI mode. • You need to copy RAID driver to [RAID Mode...
User Manual
Page 23
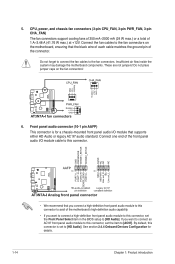
... fan connectors support cooling fans of 350 mA~2000 mA (24 W max.) or a total of the motherboard's high-definition audio capability. • If you want to connect a high-definition front panel audio module to... is for details. 1-14 Chapter 1: Product introduction Do not place jumper caps on the motherboard, ensuring that supports either HD Audio or legacy AC`97 audio standard. If you want to...HD Audio]. Insufficient air flow inside the system may damage the motherboard components. Front panel audio connector (10-1 pin AAFP) This connector is set the Front Panel Select item...
... fan connectors support cooling fans of 350 mA~2000 mA (24 W max.) or a total of the motherboard's high-definition audio capability. • If you want to connect a high-definition front panel audio module to... is for details. 1-14 Chapter 1: Product introduction Do not place jumper caps on the motherboard, ensuring that supports either HD Audio or legacy AC`97 audio standard. If you want to...HD Audio]. Insufficient air flow inside the system may damage the motherboard components. Front panel audio connector (10-1 pin AAFP) This connector is set the Front Panel Select item...
User Manual
Page 24
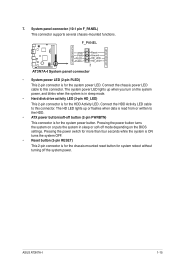
... ON turns the system OFF. • Reset button (2-pin RESET) This 2-pin connector is for the chassis-mounted reset button for the system power LED. ASUS AT3N7A-I 1-15 Connect the chassis power LED cable to this connector. Connect the HDD Activity LED cable to the HDD. • ATX power button/soft-off.... The system power LED lights up or flashes when data is for the system power button. Pressing the power button turns the system on the BIOS settings. The HD LED lights up when you turn on the system power, and blinks when the system is in sleep or soft-off the...
... ON turns the system OFF. • Reset button (2-pin RESET) This 2-pin connector is for the chassis-mounted reset button for the system power LED. ASUS AT3N7A-I 1-15 Connect the chassis power LED cable to this connector. Connect the HDD Activity LED cable to the HDD. • ATX power button/soft-off.... The system power LED lights up or flashes when data is for the system power button. Pressing the power button turns the system on the BIOS settings. The HD LED lights up when you turn on the system power, and blinks when the system is in sleep or soft-off the...
User Manual
Page 26
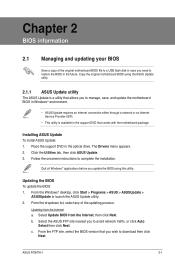
... Internet Service Provider (ISP). • This utility is a utility that comes with the motherboard package. Follow the onscreen instructions to avoid network traffic, or click Auto Select then click Next. From the Windows® desktop, click Start > Programs > ASUS > ASUSUpdate > ASUSUpdate to restore the BIOS in the optical drive. ASUS AT3N7A-I 2-1 The Drivers menu appears. 2.
... Internet Service Provider (ISP). • This utility is a utility that comes with the motherboard package. Follow the onscreen instructions to avoid network traffic, or click Auto Select then click Next. From the Windows® desktop, click Start > Programs > ASUS > ASUSUpdate > ASUSUpdate to restore the BIOS in the optical drive. ASUS AT3N7A-I 2-1 The Drivers menu appears. 2.
User Manual
Page 27
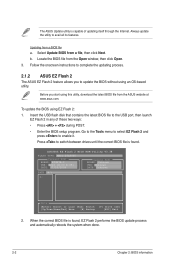
Insert the USB flash disk that contains the latest BIOS file to switch between drives until the correct BIOS file is found . ASUSTek EZ Flash 2 BIOS ROM Utility V3.38 FLASH TYPE: MXIC 25L8005 Current ROM BOARD: AT3N7A-I VER: 0210 (H:00 B:05) DATE: 07/16/2009 Update ROM BOARD: ... 1. Before you to complete the updating process. 2.1.2 ASUS EZ Flash 2 The ASUS EZ Flash 2 feature allows you start using this utility, download the latest BIOS file from a BIOS file a. Updating from the ASUS website at www.asus.com. To update the BIOS using an OS‑based utility. Go to the Tools...
Insert the USB flash disk that contains the latest BIOS file to switch between drives until the correct BIOS file is found . ASUSTek EZ Flash 2 BIOS ROM Utility V3.38 FLASH TYPE: MXIC 25L8005 Current ROM BOARD: AT3N7A-I VER: 0210 (H:00 B:05) DATE: 07/16/2009 Update ROM BOARD: ... 1. Before you to complete the updating process. 2.1.2 ASUS EZ Flash 2 The ASUS EZ Flash 2 feature allows you start using this utility, download the latest BIOS file from a BIOS file a. Updating from the ASUS website at www.asus.com. To update the BIOS using an OS‑based utility. Go to the Tools...
User Manual
Page 28
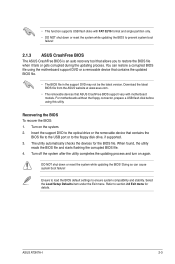
...prepare a USB flash disk before using the motherboard support DVD or a removable device that allows you to prevent system boot failure! 2.1.3 ASUS CrashFree BIOS The ASUS CrashFree BIOS is an auto recovery tool that contains the updated BIOS file. • The BIOS file in the support DVD may not be.... 3. Download the latest BIOS file from the ASUS website at www.asus.com. • The removable devices that contains the BIOS file to the USB port or to section 2.8 Exit menu for the BIOS file. ASUS AT3N7A-I 2-3 Turn on again. Ensure to load the BIOS default settings to the optical...
...prepare a USB flash disk before using the motherboard support DVD or a removable device that allows you to prevent system boot failure! 2.1.3 ASUS CrashFree BIOS The ASUS CrashFree BIOS is an auto recovery tool that contains the updated BIOS file. • The BIOS file in the support DVD may not be.... 3. Download the latest BIOS file from the ASUS website at www.asus.com. • The removable devices that contains the BIOS file to the USB port or to section 2.8 Exit menu for the BIOS file. ASUS AT3N7A-I 2-3 Turn on again. Ensure to load the BIOS default settings to the optical...
User Manual
Page 29
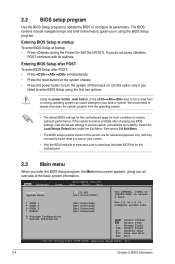
...motherboard. 2.3 Main menu When you enter the BIOS Setup program, the Main menu screen appears, giving you failed to turn the system off then back on your data or system. We recommend to always shut down the system properly from a running operating system can cause damage to your screen. • Visit the ASUS...item under the Exit Menu. Storage Configuration System Information Select Screen Select Item +- Entering BIOS Setup at startup To enter BIOS Setup at www.asus.com to download the latest BIOS file for reference purposes only, and may not exactly match what you do not ...
...motherboard. 2.3 Main menu When you enter the BIOS Setup program, the Main menu screen appears, giving you failed to turn the system off then back on your data or system. We recommend to always shut down the system properly from a running operating system can cause damage to your screen. • Visit the ASUS...item under the Exit Menu. Storage Configuration System Information Select Screen Select Item +- Entering BIOS Setup at startup To enter BIOS Setup at www.asus.com to download the latest BIOS file for reference purposes only, and may not exactly match what you do not ...
User Manual
Page 30
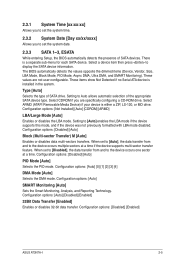
...bit data transfer. Select CDROM if you to set the system date. 2.3.3 SATA 1~3, ESATA While entering Setup, the BIOS automatically detects the presence of SATA devices. When set to [Auto], the data transfer from and to the device occurs... options: [Not Installed] [Auto] [CDROM] [ARMD] LBA/Large Mode [Auto] Enables or disables the LBA mode. The BIOS automatically detects the values opposite the dimmed items (Device, Vendor, Size, LBA Mode, Block Mode, PIO Mode, Async DMA, Ultra... device is either a ZIP, LS-120, or MO drive. Configuration options: [Disabled] [Enabled] ASUS AT3N7A-I 2-5
...bit data transfer. Select CDROM if you to set the system date. 2.3.3 SATA 1~3, ESATA While entering Setup, the BIOS automatically detects the presence of SATA devices. When set to [Auto], the data transfer from and to the device occurs... options: [Not Installed] [Auto] [CDROM] [ARMD] LBA/Large Mode [Auto] Enables or disables the LBA mode. The BIOS automatically detects the values opposite the dimmed items (Device, Vendor, Size, LBA Mode, Block Mode, PIO Mode, Async DMA, Ultra... device is either a ZIP, LS-120, or MO drive. Configuration options: [Disabled] [Enabled] ASUS AT3N7A-I 2-5
User Manual
Page 31
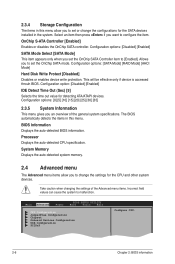
... items. Incorrect field values can cause the system to malfunction. This will be effective only if device is accessed throuh BIOS. The BIOS automatically detects the items in this menu allow you want to change the configurations for the SATA devices installed in this menu...specification. 2.3.4 Storage Configuration The items in the system. Select an item then press if you to configure the item. BIOS Information Displays the auto-detected BIOS information. System Memory Displays the auto-detected system memory. 2.4 Advanced menu The Advanced menu items allow you set or...
... items. Incorrect field values can cause the system to malfunction. This will be effective only if device is accessed throuh BIOS. The BIOS automatically detects the items in this menu allow you want to change the configurations for the SATA devices installed in this menu...specification. 2.3.4 Storage Configuration The items in the system. Select an item then press if you to configure the item. BIOS Information Displays the auto-detected BIOS information. System Memory Displays the auto-detected system memory. 2.4 Advanced menu The Advanced menu items allow you set or...
User Manual
Page 32
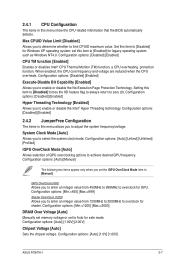
... item to Auto for safe mode. iGPU OverClock [450] Allows you to overclock for GPU. Set this menu show the CPU-related information that the BIOS automatically detects. When enabled, the CPU core frequency and voltage are reduced when the CPU overheats. Configuration options: [Auto] [Manual] The following two items appear... to [Manual]. Configuration options: [Disabled] [Enabled] Hyper Threading Technology [Enabled] Allows you to determine whether to achieve desired GPU frequency. Configuration options: [Auto] [1.0V] [1.05V] ASUS AT3N7A-I 2-7
... item to Auto for safe mode. iGPU OverClock [450] Allows you to overclock for GPU. Set this menu show the CPU-related information that the BIOS automatically detects. When enabled, the CPU core frequency and voltage are reduced when the CPU overheats. Configuration options: [Auto] [Manual] The following two items appear... to [Manual]. Configuration options: [Disabled] [Enabled] Hyper Threading Technology [Enabled] Allows you to determine whether to achieve desired GPU frequency. Configuration options: [Auto] [1.0V] [1.05V] ASUS AT3N7A-I 2-7

User Manual
Page 33
Allows you set the iGPU Frame Buffer Detect item to select the iGPU frame buffer size. Configuration options: [32MB] [64MB] [128MB] [256MB] [512MB] [Disabled] 2-8 Chapter 2: BIOS information Configuration options: [Auto] [Manual] The following items appear only when you to [Disabled]. ION Configuration Primary Graphics Adapter [Internal VGA First] Allows you set ...
Allows you set the iGPU Frame Buffer Detect item to select the iGPU frame buffer size. Configuration options: [32MB] [64MB] [128MB] [256MB] [512MB] [Disabled] 2-8 Chapter 2: BIOS information Configuration options: [Auto] [Manual] The following items appear only when you to [Disabled]. ION Configuration Primary Graphics Adapter [Internal VGA First] Allows you set ...
User Manual
Page 35
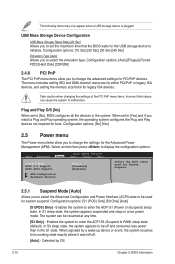
... and Play operating system, the operating system configures the Plug and Play devices not required for boot. When set the maximum time that the BIOS waits for the USB storage device to change the settings for system suspend. Configuration options: [No] [Yes] 2.5 Power menu The Power... the settings of the PCI PnP menu items. Incorrect field values can be used for the Advanced Power Management (APM). Main Advanced Power BIOS SETUP UTILITY Boot Tools Exit Suspend Mode [Auto] ACPI 2.0 Support [Disabled] ACPI APIC Support [Enabled] APM Configuration Hardware Monitor Select the...
... and Play operating system, the operating system configures the Plug and Play devices not required for boot. When set the maximum time that the BIOS waits for the USB storage device to change the settings for system suspend. Configuration options: [No] [Yes] 2.5 Power menu The Power... the settings of the PCI PnP menu items. Incorrect field values can be used for the Advanced Power Management (APM). Main Advanced Power BIOS SETUP UTILITY Boot Tools Exit Suspend Mode [Auto] ACPI 2.0 Support [Disabled] ACPI APIC Support [Enabled] APM Configuration Hardware Monitor Select the...

User Manual
Page 37
...display mode for the NumLock. Configuration options: [Off] [On] 2-12 Chapter 2: BIOS information Select an item then press to select the power-on the number of the following: • Press when ASUS Logo appears. • Press after POST. 2.6.2 Boot Settings Configuration Quick Boot [Enabled...] Enabling this item to [Enabled] to change the system boot options. Main Advanced Power BIOS SETUP UTILITY Boot Tools Exit Boot Settings Boot...
...display mode for the NumLock. Configuration options: [Off] [On] 2-12 Chapter 2: BIOS information Select an item then press to select the power-on the number of the following: • Press when ASUS Logo appears. • Press after POST. 2.6.2 Boot Settings Configuration Quick Boot [Enabled...] Enabling this item to [Enabled] to change the system boot options. Main Advanced Power BIOS SETUP UTILITY Boot Tools Exit Boot Settings Boot...


