
User Manual
Page 3
Contents Notices...v Safety information vi About this guide vi AT3GC-I specifications summary viii Chapter 1: Product introduction 1.1 Before you proceed 1-1 1.2 Motherboard overview 1-2 1.2.1 Motherboard layout 1-2 1.2.2 Layout contents 1-2 1.3 Central Processing Unit (CPU 1-3 1.4 System memory 1-3 1.4.1 Overview 1-3 1.4.2 Memory configurations 1-3 1.5 Expansion slots 1-4 1.5.1 Installing an expansion card 1-4 1.5.2 Configuring an expansion card 1-4 1.5.3 PCI slot 1-4 1.6 Jumpers 1-5 1.7 Connectors 1-7 1.7.1 Rear panel ports 1-7 1.7.2 Internal connectors 1-8 1.8 Software ...
Contents Notices...v Safety information vi About this guide vi AT3GC-I specifications summary viii Chapter 1: Product introduction 1.1 Before you proceed 1-1 1.2 Motherboard overview 1-2 1.2.1 Motherboard layout 1-2 1.2.2 Layout contents 1-2 1.3 Central Processing Unit (CPU 1-3 1.4 System memory 1-3 1.4.1 Overview 1-3 1.4.2 Memory configurations 1-3 1.5 Expansion slots 1-4 1.5.1 Installing an expansion card 1-4 1.5.2 Configuring an expansion card 1-4 1.5.3 PCI slot 1-4 1.6 Jumpers 1-5 1.7 Connectors 1-7 1.7.1 Rear panel ports 1-7 1.7.2 Internal connectors 1-8 1.8 Software ...

User Manual
Page 8
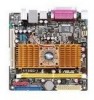
... 1 x 240-pin DIMM slot supports unbuffered non-ECC DDR2 533 MHz memory module Supports up to 8 USB 2.0/1.1 ports (4 ports at mid-board, 4 ports at the back panel) Realtek® PCIe Gb LAN ASUS CrashFree BIOS 3 ASUS EZ Flash 2 ASUS MyLogo 2 1 x PS/2 Keyboard port 1 x PS/2 Mouse port 1...audio I /O ports * Refer to 2GB system memory Graphics Expansion slots Storage Audio USB LAN ASUS special features Back panel I /O ports (continued on the next page) viii AT3GC-I specifications summary CPU Chipset North Bridge Fan Front Side Bus Memory Integrated dual-core Intel® Atom™ processor...
... 1 x 240-pin DIMM slot supports unbuffered non-ECC DDR2 533 MHz memory module Supports up to 8 USB 2.0/1.1 ports (4 ports at mid-board, 4 ports at the back panel) Realtek® PCIe Gb LAN ASUS CrashFree BIOS 3 ASUS EZ Flash 2 ASUS MyLogo 2 1 x PS/2 Keyboard port 1 x PS/2 Mouse port 1...audio I /O ports * Refer to 2GB system memory Graphics Expansion slots Storage Audio USB LAN ASUS special features Back panel I /O ports (continued on the next page) viii AT3GC-I specifications summary CPU Chipset North Bridge Fan Front Side Bus Memory Integrated dual-core Intel® Atom™ processor...
User Manual
Page 12
The figure illustrates the location of the DDR2 DIMM socket: AT3GC-I DIMM1 AT3GC-I Motherboard Qualified Vendors List (QVL) DDR2-533MHz capability Vendor Part No. Visit the ASUS website at www.asus.com for the latest QVL. 1-3 Chapter 1: Product introduction AT3GC-I 240-pin DDR2 DIMM socket 1.4.2 Memory configurations You may install a 256MB, 512MB, 1GB, and 2GB unbuffered non-ECC...
The figure illustrates the location of the DDR2 DIMM socket: AT3GC-I DIMM1 AT3GC-I Motherboard Qualified Vendors List (QVL) DDR2-533MHz capability Vendor Part No. Visit the ASUS website at www.asus.com for the latest QVL. 1-3 Chapter 1: Product introduction AT3GC-I 240-pin DDR2 DIMM socket 1.4.2 Memory configurations You may install a 256MB, 512MB, 1GB, and 2GB unbuffered non-ECC...

User Manual
Page 14
You can clear the CMOS memory of date, time, and system setup parameters by erasing the CMOS RTC RAM data. Turn OFF the computer and unplug the power cord. 2. Move the ... the key during the boot process and enter BIOS setup to overclocking. Keep the cap on CLRTC jumper default position. 1.6 Jumpers 1. CLRTC AT3GC-I 12 23 Normal (Default) Clear RTC AT3GC-I Clear RTC RAM To erase the RTC RAM: 1. Hold down and reboot the system, then the BIOS automatically resets parameter settings to...
You can clear the CMOS memory of date, time, and system setup parameters by erasing the CMOS RTC RAM data. Turn OFF the computer and unplug the power cord. 2. Move the ... the key during the boot process and enter BIOS setup to overclocking. Keep the cap on CLRTC jumper default position. 1.6 Jumpers 1. CLRTC AT3GC-I 12 23 Normal (Default) Clear RTC AT3GC-I Clear RTC RAM To erase the RTC RAM: 1. Hold down and reboot the system, then the BIOS automatically resets parameter settings to...

User Manual
Page 29
... OS, such as Windows® XP/Vista. AMI BIOS Displays the auto-detected BIOS information Processor Displays the auto-detected CPU specification System Memory Displays the auto-detected system memory Chapter 2: BIOS information 2-6 Configuration options: [Disabled] [Auto] Block (Multi-Sector Transfer) M [Auto] Enables or disables data multi-sectors transfers. When set to...
... OS, such as Windows® XP/Vista. AMI BIOS Displays the auto-detected BIOS information Processor Displays the auto-detected CPU specification System Memory Displays the auto-detected system memory Chapter 2: BIOS information 2-6 Configuration options: [Disabled] [Auto] Block (Multi-Sector Transfer) M [Auto] Enables or disables data multi-sectors transfers. When set to...
User Manual
Page 31
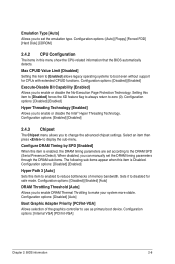
...] When this item to [Enabled] allows legacy operating systems to zero (0). Configuration options: [Disabled] [Auto] Boot Graphic Adapter Priority [PCI/Int-VGA] Allows selection of memory bandwidth. Emulation Type [Auto] Allows you to use as primary boot device. Max CPUID Value Limit [Disabled] Setting this item is Disabled. Setting this item...
...] When this item to [Enabled] allows legacy operating systems to zero (0). Configuration options: [Disabled] [Auto] Boot Graphic Adapter Priority [PCI/Int-VGA] Allows selection of memory bandwidth. Emulation Type [Auto] Allows you to use as primary boot device. Max CPUID Value Limit [Disabled] Setting this item is Disabled. Setting this item...

User Manual
Page 32
...[SPP] Allows you to Enabled. Configuration options: [DMA0] [DMA1] [DMA3] Parallel Port IRQ [IRQ7] Configuration options: [IRQ5] [IRQ7] 2-9 ASUS AT3GC-I Internal Graphics Mode Select [Enabled, 8MB] Sets the internal graphics mode. Configuration options: [AC97] [HD Audio] Onboard PCIEX LAN [Enabled] Allows ...Address [378] Allows you to [ECP]. Configuration options: [Enabled] [Disabled] LAN Option ROM [Disabled] Allows you to select the graphics memory type. Configuration options: [Disabled] [Enabled, 1MB] [Enabled, 8MB] DVMT Mode Select [DVMT Mode] Allows you to select the Parallel...
...[SPP] Allows you to Enabled. Configuration options: [DMA0] [DMA1] [DMA3] Parallel Port IRQ [IRQ7] Configuration options: [IRQ5] [IRQ7] 2-9 ASUS AT3GC-I Internal Graphics Mode Select [Enabled, 8MB] Sets the internal graphics mode. Configuration options: [AC97] [HD Audio] Onboard PCIEX LAN [Enabled] Allows ...Address [378] Allows you to [ECP]. Configuration options: [Enabled] [Disabled] LAN Option ROM [Disabled] Allows you to select the graphics memory type. Configuration options: [Disabled] [Enabled, 1MB] [Enabled, 8MB] DVMT Mode Select [DVMT Mode] Allows you to select the Parallel...

User Manual
Page 33
... reserved for legacy ISA devices. The menu includes setting IRQ and DMA channel resources for either PCI/PnP or legacy ISA devices, and setting the memory size block for System Suspend. 2.4.5 PCI PnP The PCI PnP menu items allow you to change the advanced settings for PCI/PnP devices. Select an...
... reserved for legacy ISA devices. The menu includes setting IRQ and DMA channel resources for either PCI/PnP or legacy ISA devices, and setting the memory size block for System Suspend. 2.4.5 PCI PnP The PCI PnP menu items allow you to change the advanced settings for PCI/PnP devices. Select an...


