User Manual
Page 6
... supports. • Chapter 2: BIOS information This chapter tells how to change system settings through the BIOS setup menus. Detailed descriptions of the motherboard and the new technology it may become wet. • Place the product on it by yourself. Do not place the product in your ... system. • When adding or removing devices to or from the system, ensure that the power cables for the devices are unplugged before using , contact your local power company. • If the power supply is set to the correct voltage in any damage, contact your dealer immediately. • To ...
... supports. • Chapter 2: BIOS information This chapter tells how to change system settings through the BIOS setup menus. Detailed descriptions of the motherboard and the new technology it may become wet. • Place the product on it by yourself. Do not place the product in your ... system. • When adding or removing devices to or from the system, ensure that the power cables for the devices are unplugged before using , contact your local power company. • If the power supply is set to the correct voltage in any damage, contact your dealer immediately. • To ...
User Manual
Page 10
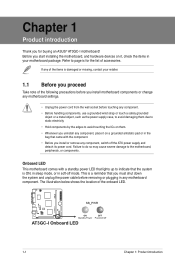
...ASUS® AT3GC-I Onboard LED 1-1 Chapter 1: Product introduction AT3GC-I AT3GC-I motherboard! Before you start installing the motherboard, and hardware devices on a grounded antistatic pad or in any component, place it on it, check the items in soft-off the ATX power supply and detach its power cord. Onboard LED This motherboard... object, such as the power supply case, to avoid damaging them due to static electricity • Hold components by the edges to avoid touching the ICs on them. • Whenever you uninstall any motherboard component. The illustration below shows...
...ASUS® AT3GC-I Onboard LED 1-1 Chapter 1: Product introduction AT3GC-I AT3GC-I motherboard! Before you start installing the motherboard, and hardware devices on a grounded antistatic pad or in any component, place it on it, check the items in soft-off the ATX power supply and detach its power cord. Onboard LED This motherboard... object, such as the power supply case, to avoid damaging them due to static electricity • Hold components by the edges to avoid touching the ICs on them. • Whenever you uninstall any motherboard component. The illustration below shows...

User Manual
Page 15
... 23 +5V +5VSB (Default) AT3GC-I USB Device Wake Up ASUS AT3GC-I Keyboard Power Setting 3. This feature requires an ATX power supply that can wake up feature. Set to +5VSB to wake up the computer from S3 and S4 sleep modes (no power to CPU, DRAM in slow refresh, power supply in reduced power mode). Keyboard power (3-pin KBPWR) This jumper allows...
... 23 +5V +5VSB (Default) AT3GC-I USB Device Wake Up ASUS AT3GC-I Keyboard Power Setting 3. This feature requires an ATX power supply that can wake up feature. Set to +5VSB to wake up the computer from S3 and S4 sleep modes (no power to CPU, DRAM in slow refresh, power supply in reduced power mode). Keyboard power (3-pin KBPWR) This jumper allows...

User Manual
Page 20
...connectors are designed to use an ATX 12V Specification 2.0‑compliant power supply unit (PSU) with 20-pin and 4-pin power plugs, make sure that the 20-pin power plug can provide at http://support.asus. Find the proper orientation and push down firmly until the ...on +12 V and that the PSU has a minimum power rating of 300W power rating. Speaker connector (4- The speaker allows you are uncertain about the minimum power supply requirement for an ATX power supply. SPEAKER AT3GC-I +5V GND GND Speaker Out PIN 1 AT3GC-I ATX power connectors GND +5 Volts +5 Volts +5 Volts -5 Volts ...
...connectors are designed to use an ATX 12V Specification 2.0‑compliant power supply unit (PSU) with 20-pin and 4-pin power plugs, make sure that the 20-pin power plug can provide at http://support.asus. Find the proper orientation and push down firmly until the ...on +12 V and that the PSU has a minimum power rating of 300W power rating. Speaker connector (4- The speaker allows you are uncertain about the minimum power supply requirement for an ATX power supply. SPEAKER AT3GC-I +5V GND GND Speaker Out PIN 1 AT3GC-I ATX power connectors GND +5 Volts +5 Volts +5 Volts -5 Volts ...

User Manual
Page 34
...Enabled] 2.5.3 ACPI APIC Support [Enabled] Allows you to Power On, the system goes on after an AC power loss. When set to Enabled, the ACPI APIC table pointer is in a low power mode. This feature requires an ATX power supply that turns the system power on. Configuration options: [S1 (POS) Only] [...Advanced Configuration and Power Interface (ACPI) state to be made on the first try. In S1 sleep state, the system appears suspended and stays in Soft-off and then back on while the computer is set values. Configuration options: [Disabled] [Enabled] 2-11 ASUS AT3GC-I Turning an...
...Enabled] 2.5.3 ACPI APIC Support [Enabled] Allows you to Power On, the system goes on after an AC power loss. When set to Enabled, the ACPI APIC table pointer is in a low power mode. This feature requires an ATX power supply that turns the system power on. Configuration options: [S1 (POS) Only] [...Advanced Configuration and Power Interface (ACPI) state to be made on the first try. In S1 sleep state, the system appears suspended and stays in Soft-off and then back on while the computer is set values. Configuration options: [Disabled] [Enabled] 2-11 ASUS AT3GC-I Turning an...

User Manual
Page 35
... B:) may appear when you set to [Enabled], this parameter allows you to display the detected temperatures. This feature requires an ATX power supply that provides at least 1A on the system. Configuration options: [Disabled] [Enabled] 2.5.5 HW Monitor Configuration CPU Temperature [xxxºC/...SETUP UTILITY Boot Tools Exit Boot Settings Configuration Security Specifies the Boot Device Priority sequence. Select an item then press to the motherboard, the field shows N/A. Chassis Fan Speed (RPM) [xxxxRPM] or [Ignored] The onboard hardware monitor automatically detects and displays...
... B:) may appear when you set to [Enabled], this parameter allows you to display the detected temperatures. This feature requires an ATX power supply that provides at least 1A on the system. Configuration options: [Disabled] [Enabled] 2.5.5 HW Monitor Configuration CPU Temperature [xxxºC/...SETUP UTILITY Boot Tools Exit Boot Settings Configuration Security Specifies the Boot Device Priority sequence. Select an item then press to the motherboard, the field shows N/A. Chassis Fan Speed (RPM) [xxxxRPM] or [Ignored] The onboard hardware monitor automatically detects and displays...


