

User Manual
Page 2
... and its suppliers, and your reseller are collectively responsible. SERVICE AND SUPPORT Visit our multi-language web site at http://support.asus.com 2 ASUS Tablet E-Manual ASUS ASSUMES NO RESPONSIBILITY OR LIABILITY FOR ANY ERRORS OR INACCURACIES THAT MAY APPEAR IN THIS MANUAL, INCLUDING THE PRODUCTS AND SOFTWARE DESCRIBED IN IT. This ...
... and its suppliers, and your reseller are collectively responsible. SERVICE AND SUPPORT Visit our multi-language web site at http://support.asus.com 2 ASUS Tablet E-Manual ASUS ASSUMES NO RESPONSIBILITY OR LIABILITY FOR ANY ERRORS OR INACCURACIES THAT MAY APPEAR IN THIS MANUAL, INCLUDING THE PRODUCTS AND SOFTWARE DESCRIBED IN IT. This ...

User Manual
Page 3
... Front view...12 Rear view ...14 Inside the side compartment 17 Chapter 2: Using your ASUS Tablet Setting up your ASUS Tablet 20 Installing a micro SIM card 20 Installing a microSD card 23 Charging your ASUS Tablet 26 Turning your ASUS Tablet on 28 Gestures for the ASUS Tablet 29 Chapter 3: Working with Android™ Starting up for the first time 36 Android...
... Front view...12 Rear view ...14 Inside the side compartment 17 Chapter 2: Using your ASUS Tablet Setting up your ASUS Tablet 20 Installing a micro SIM card 20 Installing a microSD card 23 Charging your ASUS Tablet 26 Turning your ASUS Tablet on 28 Gestures for the ASUS Tablet 29 Chapter 3: Working with Android™ Starting up for the first time 36 Android...

User Manual
Page 4
... the screen orientation 43 Using the call and text features 44 Making calls...44 Setting up your contacts 44 Sending a text message 45 Managing your SIM card settings 46 Connecting to the world 47 Connecting to mobile networks 47 Connecting to Wi-Fi networks 47 Using Bluetooth...48 Managing Apps...51... apps under the Recents screen 54 Task Manager ...56 File Manager ...58 Accessing the internal storage 58 Accessing the external storage device 58 Settings...60 ASUS Quick Setting...60 Turning your ASUS Tablet off 62 Putting your ASUS Tablet to sleep 62 4 ASUS Tablet E-Manual
... the screen orientation 43 Using the call and text features 44 Making calls...44 Setting up your contacts 44 Sending a text message 45 Managing your SIM card settings 46 Connecting to the world 47 Connecting to mobile networks 47 Connecting to Wi-Fi networks 47 Using Bluetooth...48 Managing Apps...51... apps under the Recents screen 54 Task Manager ...56 File Manager ...58 Accessing the internal storage 58 Accessing the external storage device 58 Settings...60 ASUS Quick Setting...60 Turning your ASUS Tablet off 62 Putting your ASUS Tablet to sleep 62 4 ASUS Tablet E-Manual
User Manual
Page 6
... This manual provides information about the hardware and software features of your ASUS Tablet, organized through the following chapters: Chapter 1: Hardware Setup This chapter details the hardware components of your ASUS Tablet. 6 ASUS Tablet E-Manual Appendices This section includes notices and safety statements for your ASUS Tablet. Chapter 4: Pre-installed Apps This chapter features the pre-installed applications...
... This manual provides information about the hardware and software features of your ASUS Tablet, organized through the following chapters: Chapter 1: Hardware Setup This chapter details the hardware components of your ASUS Tablet. 6 ASUS Tablet E-Manual Appendices This section includes notices and safety statements for your ASUS Tablet. Chapter 4: Pre-installed Apps This chapter features the pre-installed applications...
User Manual
Page 7
WARNING! K00Z 7 This message contains important information that you safe while performing tasks and prevent damage to your ASUS Tablet's data and components. Italic = This indicates sections that must be followed to keep you can help complete tasks. This message contains vital information that must ...
WARNING! K00Z 7 This message contains important information that you safe while performing tasks and prevent damage to your ASUS Tablet's data and components. Italic = This indicates sections that must be followed to keep you can help complete tasks. This message contains vital information that must ...

User Manual
Page 8
... IMPORTANT! To ensure the battery's optimal performance, ensure that it is plugged into an AC power source. Do not leave the ASUS Tablet connected to the power supply once it is in enviroments with ambient temperatures between 0°C (32°F) and 35°C (...to charge the battery pack when the ASUS Tablet is exposed within the recommended environment temperature. ASUS Tablet is fully charged. Airplane Precautions Contact your airline provider to learn about related inflight services that can send your ASUS Tablet This ASUS Tablet should only be left connected to extremely...
... IMPORTANT! To ensure the battery's optimal performance, ensure that it is plugged into an AC power source. Do not leave the ASUS Tablet connected to the power supply once it is in enviroments with ambient temperatures between 0°C (32°F) and 35°C (...to charge the battery pack when the ASUS Tablet is exposed within the recommended environment temperature. ASUS Tablet is fully charged. Airplane Precautions Contact your airline provider to learn about related inflight services that can send your ASUS Tablet This ASUS Tablet should only be left connected to extremely...
User Manual
Page 9
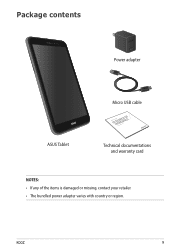
Package contents Power adapter ASUS Tablet Micro USB cable ASUS Tablet Technical documentations and warranty card NOTES: • If any of the items is damaged or missing, contact your retailer. • The bundled power adapter varies with country or region. K00Z 9
Package contents Power adapter ASUS Tablet Micro USB cable ASUS Tablet Technical documentations and warranty card NOTES: • If any of the items is damaged or missing, contact your retailer. • The bundled power adapter varies with country or region. K00Z 9
User Manual
Page 12
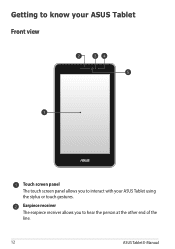
Earpiece receiver The earpiece receiver allows you to hear the person at the other end of the line. 12 ASUS Tablet E-Manual Getting to know your ASUS Tablet Front view Touch screen panel The touch screen panel allows you to interact with your ASUS Tablet using the stylus or touch gestures.
Earpiece receiver The earpiece receiver allows you to hear the person at the other end of the line. 12 ASUS Tablet E-Manual Getting to know your ASUS Tablet Front view Touch screen panel The touch screen panel allows you to interact with your ASUS Tablet using the stylus or touch gestures.

User Manual
Page 13
Proximity sensor The proximity sensor disables the touch function and switches off the backlight when you use your ASUS Tablet. K00Z 13 Front camera This built-in front camera allows you and your ASUS Tablet. Proximity sensor LED The proximity sensor LED (light emitting diode) emits dim Infrared rays that lets the proximity sensor detect the distance between you to take pictures or record videos using your ASUS Tablet to make or receive a call.
Proximity sensor The proximity sensor disables the touch function and switches off the backlight when you use your ASUS Tablet. K00Z 13 Front camera This built-in front camera allows you and your ASUS Tablet. Proximity sensor LED The proximity sensor LED (light emitting diode) emits dim Infrared rays that lets the proximity sensor detect the distance between you to take pictures or record videos using your ASUS Tablet to make or receive a call.
User Manual
Page 14
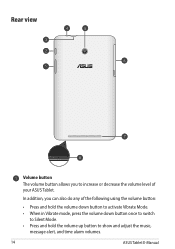
In addition, you to show and adjust the music, message alert, and time alarm volumes. 14 ASUS Tablet E-Manual Rear view Volume button The volume button allows you can also do any of the following using the volume button: • Press and hold the volume down button to activate Vibrate Mode. • When in Vibrate mode, press the volume down button once to switch to Silent Mode. • Press and hold the volume up button to increase or decrease the volume level of your ASUS Tablet.
In addition, you to show and adjust the music, message alert, and time alarm volumes. 14 ASUS Tablet E-Manual Rear view Volume button The volume button allows you can also do any of the following using the volume button: • Press and hold the volume down button to activate Vibrate Mode. • When in Vibrate mode, press the volume down button once to switch to Silent Mode. • Press and hold the volume up button to increase or decrease the volume level of your ASUS Tablet.

User Manual
Page 15
...when it to standby mode, press and quickly release the power button. We strongly recommend that you connect your ASUS Tablet off . This port also allows you to connect your ASUS Tablet becomes unresponsive, press and hold the power button for about (2) seconds and when prompted, tap Power Off then... an external microphone. Speaker/Headset port This port allows you to transfer data from standby mode. K00Z 15 If your ASUS Tablet to data loss. IMPORTANT! • When your ASUS Tablet is in sleep mode (screen off) or turned off , press the power button for fifteen (15) seconds, it...
...when it to standby mode, press and quickly release the power button. We strongly recommend that you connect your ASUS Tablet off . This port also allows you to connect your ASUS Tablet becomes unresponsive, press and hold the power button for about (2) seconds and when prompted, tap Power Off then... an external microphone. Speaker/Headset port This port allows you to transfer data from standby mode. K00Z 15 If your ASUS Tablet to data loss. IMPORTANT! • When your ASUS Tablet is in sleep mode (screen off) or turned off , press the power button for fifteen (15) seconds, it...

User Manual
Page 16
... camera This built-in rear camera allows you to take high-definition pictures or videos using your ASUS Tablet. Side compartment The side compartment contains the micro SIM (Subscriber Identity Module) card slots and microSD card slot. Microphone The built-in microphone can be used for more information. NOTE: Refer to section Inside...
... camera This built-in rear camera allows you to take high-definition pictures or videos using your ASUS Tablet. Side compartment The side compartment contains the micro SIM (Subscriber Identity Module) card slots and microSD card slot. Microphone The built-in microphone can be used for more information. NOTE: Refer to section Inside...
User Manual
Page 17
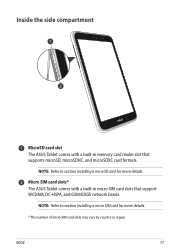
Micro SIM card slots* The ASUS Tablet comes with a built-in micro SIM card slots that supports microSD, microSDHC, and microSDXC card formats. NOTE: Refer to section Installing a micro SIM card for more details. * The number of micro SIM card slots may vary by country or region. K00Z 17 NOTE: Refer to section Installing a microSD card for more details. Inside the side compartment MicroSD card slot The ASUS Tablet comes with a built-in memory card reader slot that support WCDMA, DC-HSPA, and GSM/EDGE network bands.
Micro SIM card slots* The ASUS Tablet comes with a built-in micro SIM card slots that supports microSD, microSDHC, and microSDXC card formats. NOTE: Refer to section Installing a micro SIM card for more details. * The number of micro SIM card slots may vary by country or region. K00Z 17 NOTE: Refer to section Installing a microSD card for more details. Inside the side compartment MicroSD card slot The ASUS Tablet comes with a built-in memory card reader slot that support WCDMA, DC-HSPA, and GSM/EDGE network bands.

User Manual
Page 20
Setting up your ASUS Tablet Installing a micro SIM card Before you can make calls, send text messages, or connect to install a micro SIM cards. To install a micro SIM card: 1. For Dual SIM model For Single SIM model 20 ASUS Tablet E-Manual Open the side compartment cover of your ASUS Tablet, you need to a mobile broadband network using your ASUS Tablet.
Setting up your ASUS Tablet Installing a micro SIM card Before you can make calls, send text messages, or connect to install a micro SIM cards. To install a micro SIM card: 1. For Dual SIM model For Single SIM model 20 ASUS Tablet E-Manual Open the side compartment cover of your ASUS Tablet, you need to a mobile broadband network using your ASUS Tablet.

User Manual
Page 22
Close the side compartment cover securely in place. 3. For Dual SIM model For Single SIM model 22 ASUS Tablet E-Manual
Close the side compartment cover securely in place. 3. For Dual SIM model For Single SIM model 22 ASUS Tablet E-Manual

User Manual
Page 23
For Dual SIM model For Single SIM model K00Z 23 Open the side compartment cover of your ASUS Tablet. Installing a microSD card To install a microSD card: 1.
For Dual SIM model For Single SIM model K00Z 23 Open the side compartment cover of your ASUS Tablet. Installing a microSD card To install a microSD card: 1.

User Manual
Page 24
For Dual SIM model Metal contacts For Single SIM model Metal contacts 24 ASUS Tablet E-Manual 2. Insert the microSD card to the microSD card slot with its metal contacts facing up.
For Dual SIM model Metal contacts For Single SIM model Metal contacts 24 ASUS Tablet E-Manual 2. Insert the microSD card to the microSD card slot with its metal contacts facing up.
User Manual
Page 26
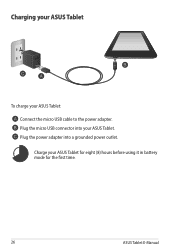
Charge your ASUS Tablet: Connect the micro USB cable to the power adapter. Plug the micro USB connector into a grounded power outlet. Plug the power adapter into your ASUS Tablet. Charging your ASUS Tablet To charge your ASUS Tablet for eight (8) hours before using it in battery mode for the first time. 26 ASUS Tablet E-Manual
Charge your ASUS Tablet: Connect the micro USB cable to the power adapter. Plug the micro USB connector into a grounded power outlet. Plug the power adapter into your ASUS Tablet. Charging your ASUS Tablet To charge your ASUS Tablet for eight (8) hours before using it in battery mode for the first time. 26 ASUS Tablet E-Manual

User Manual
Page 27
...complete. • If your computer does not provide enough power for charging your ASUS Tablet, charge your ASUS Tablet via the USB port on the computer only when it is DC 5.2V, 1.35A. • When using your ASUS Tablet while plugged-in to a power outlet, the grounded power outlet must be ... the bundled power adapter and micro USB cable to the correct power outlet with the correct input rating. Using a different power adapter may damage your ASUS Tablet. • Peel the protective film off . • Charging through a USB port of a computer may take a longer time to the unit and easily...
...complete. • If your computer does not provide enough power for charging your ASUS Tablet, charge your ASUS Tablet via the USB port on the computer only when it is DC 5.2V, 1.35A. • When using your ASUS Tablet while plugged-in to a power outlet, the grounded power outlet must be ... the bundled power adapter and micro USB cable to the correct power outlet with the correct input rating. Using a different power adapter may damage your ASUS Tablet. • Peel the protective film off . • Charging through a USB port of a computer may take a longer time to the unit and easily...
User Manual
Page 28
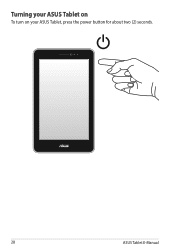
Turning your ASUS Tablet on To turn on your ASUS Tablet, press the power button for about two (2) seconds. 28 ASUS Tablet E-Manual
Turning your ASUS Tablet on To turn on your ASUS Tablet, press the power button for about two (2) seconds. 28 ASUS Tablet E-Manual


