
User Manual
Page 7
... system and install drivers and utilities from the support CD. How this guide Audience This guide provides general information and installation instructions about the ASUS BA5120/AS-D672 PC system. vii This guide is organized This guide contains the following parts: 1. Chapter 2: Basic installation This chapter provides step-by-step instructions on...
... system and install drivers and utilities from the support CD. How this guide Audience This guide provides general information and installation instructions about the ASUS BA5120/AS-D672 PC system. vii This guide is organized This guide contains the following parts: 1. Chapter 2: Basic installation This chapter provides step-by-step instructions on...
User Manual
Page 9
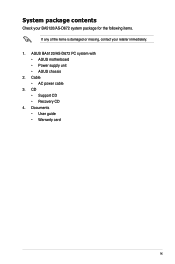
CD • Support CD • Recovery CD 4. Cable • AC power cable 3. System package contents Check your BA5120/AS-D672 system package for the following items. If any of the items is damaged or missing, contact your retailer immediately. 1. Documents • User guide • Warranty card ix ASUS BA5120/AS-D672 PC system with • ASUS motherboard • Power supply unit • ASUS chassis 2.
CD • Support CD • Recovery CD 4. Cable • AC power cable 3. System package contents Check your BA5120/AS-D672 system package for the following items. If any of the items is damaged or missing, contact your retailer immediately. 1. Documents • User guide • Warranty card ix ASUS BA5120/AS-D672 PC system with • ASUS motherboard • Power supply unit • ASUS chassis 2.
User Manual
Page 12
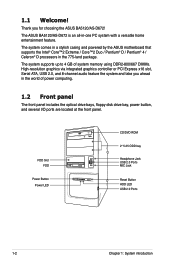
The ASUS BA5120/AS-D672 is an all-in the 775-land package. Thank you ahead in the world of system memory using DDR2-800/667 DIMMs. High-resolution graphics ... PCI Express x16 slot, Serial ATA, USB 2.0, and 8-channel audio feature the system and take you for choosing the ASUS BA5120/AS-D672! The system comes in a stylish casing and powered by the ASUS motherboard that supports the Intel® Core™2 Extreme / Core™2 Duo / Pentium® D / Pentium® 4 / Celeron® D processors...
The ASUS BA5120/AS-D672 is an all-in the 775-land package. Thank you ahead in the world of system memory using DDR2-800/667 DIMMs. High-resolution graphics ... PCI Express x16 slot, Serial ATA, USB 2.0, and 8-channel audio feature the system and take you for choosing the ASUS BA5120/AS-D672! The system comes in a stylish casing and powered by the ASUS motherboard that supports the Intel® Core™2 Extreme / Core™2 Duo / Pentium® D / Pentium® 4 / Celeron® D processors...

User Manual
Page 13
... COM1 Port VGA Port USB 2.0 Ports Audio I /O ports that allow convenient connection of devices. Use this switch to the voltage supply in your area. ASUS BA5120/AS-D672 1-3 If the voltage supply in your area is 200V‑240V, set this switch to select the appropriate system input voltage according to 115V...
... COM1 Port VGA Port USB 2.0 Ports Audio I /O ports that allow convenient connection of devices. Use this switch to the voltage supply in your area. ASUS BA5120/AS-D672 1-3 If the voltage supply in your area is 200V‑240V, set this switch to select the appropriate system input voltage according to 115V...
User Manual
Page 17
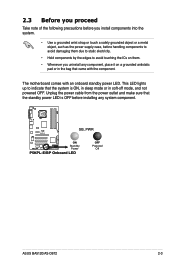
... on a grounded antistatic pad or in soft-off mode, and not powered OFF. P5KPL-E SB_PWR ON Standby Power P5KPL-E/BP Onboard LED OFF Powered Off ASUS BA5120/AS-D672 2-3
... on a grounded antistatic pad or in soft-off mode, and not powered OFF. P5KPL-E SB_PWR ON Standby Power P5KPL-E/BP Onboard LED OFF Powered Off ASUS BA5120/AS-D672 2-3
User Manual
Page 19
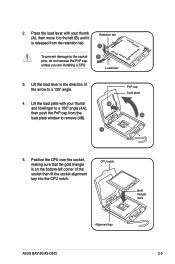
CPU notch Gold triangle mark Alignment key ASUS BA5120/AS-D672 2-5 Lift the load plate with your thumb and forefinger to remove (4B). 4B 3 PnP cap Load plate 4A 5. Retention tab A To prevent damage to a 135&#...
CPU notch Gold triangle mark Alignment key ASUS BA5120/AS-D672 2-5 Lift the load plate with your thumb and forefinger to remove (4B). 4B 3 PnP cap Load plate 4A 5. Retention tab A To prevent damage to a 135&#...

User Manual
Page 21
... on the motherboard. When the fan and heatsink assembly is for reference only. 3. Hardware monitoring errors occurs if you install the heatsink and fan assembly. ASUS BA5120/AS-D672 2-7 The illustration above is in place. To install the CPU heatsink and fan: 1.
... on the motherboard. When the fan and heatsink assembly is for reference only. 3. Hardware monitoring errors occurs if you install the heatsink and fan assembly. ASUS BA5120/AS-D672 2-7 The illustration above is in place. To install the CPU heatsink and fan: 1.
User Manual
Page 23
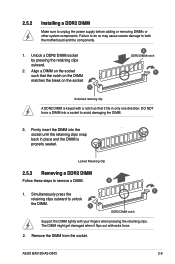
... damage to unplug the power supply before adding or removing DIMMs or other system components. Firmly insert the DIMM into a socket to remove a DIMM. 2 1 1. ASUS BA5120/AS-D672 2-9 2.5.2 Installing a DDR2 DIMM Make sure to both the motherboard and the components. 1. Unlock a DDR2 DIMM socket by pressing the retaining clips outward. 2. Align a DIMM...
... damage to unplug the power supply before adding or removing DIMMs or other system components. Firmly insert the DIMM into a socket to remove a DIMM. 2 1 1. ASUS BA5120/AS-D672 2-9 2.5.2 Installing a DDR2 DIMM Make sure to both the motherboard and the components. 1. Unlock a DDR2 DIMM socket by pressing the retaining clips outward. 2. Align a DIMM...
User Manual
Page 25
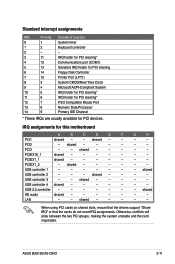
... audio shared - - - - - - - Otherwise, conflicts will arise between the two PCI groups, making the system unstable and the card inoperable. shared - - - - PCI2 - shared - - - - - - shared - - - - LAN - - ASUS BA5120/AS-D672 2-11 shared - - - - - - USB 2.0 controller - - - - - - - When using PCI cards on shared slots, ensure that the drivers support "Share IRQ" or that the cards do not...
... audio shared - - - - - - - Otherwise, conflicts will arise between the two PCI groups, making the system unstable and the card inoperable. shared - - - - PCI2 - shared - - - - - - shared - - - - LAN - - ASUS BA5120/AS-D672 2-11 shared - - - - - - USB 2.0 controller - - - - - - - When using PCI cards on shared slots, ensure that the drivers support "Share IRQ" or that the cards do not...
User Manual
Page 27
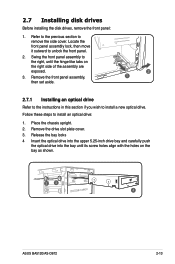
... 5.25-inch drive bay and carefully push the optical drive into the bay until the hinge-like tabs on the bay as shown. 33 4 ASUS BA5120/AS-D672 2-13 Locate the front panel assembly lock, then move it outward to remove the side cover. Place the chassis upright. 2. 2.7 Installing disk drives Before...
... 5.25-inch drive bay and carefully push the optical drive into the bay until the hinge-like tabs on the bay as shown. 33 4 ASUS BA5120/AS-D672 2-13 Locate the front panel assembly lock, then move it outward to remove the side cover. Place the chassis upright. 2. 2.7 Installing disk drives Before...
User Manual
Page 29
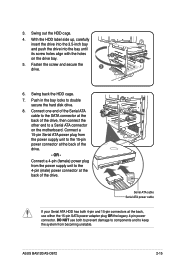
... the drive. Connect a 4-pin (female) power plug from the power supply unit to double secure the hard disk drive. 8. 3. Swing back the HDD cage. 7. OR - ASUS BA5120/AS-D672 2-15
... the drive. Connect a 4-pin (female) power plug from the power supply unit to double secure the hard disk drive. 8. 3. Swing back the HDD cage. 7. OR - ASUS BA5120/AS-D672 2-15
User Manual
Page 31
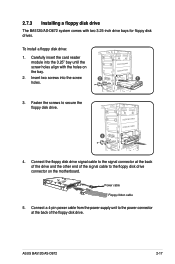
... at the back of the signal cable to secure the floppy disk drive. 3 4. Power cable Floppy ribbon cable 5. To install a floppy disk drive: 1. ASUS BA5120/AS-D672 2-17 Carefully insert the card reader module into the screw 2 1 holes. 3. Insert two screws into the 3.25" bay until the screw holes align with... power connector at the back of the drive and the other end of the floppy disk drive. 2.7.3 Installing a floppy disk drive The BA5120/AS-D672 system comes with the holes on the motherboard. Fasten the screws to the floppy disk drive connector on the bay. 2.
... at the back of the signal cable to secure the floppy disk drive. 3 4. Power cable Floppy ribbon cable 5. To install a floppy disk drive: 1. ASUS BA5120/AS-D672 2-17 Carefully insert the card reader module into the screw 2 1 holes. 3. Insert two screws into the 3.25" bay until the screw holes align with... power connector at the back of the drive and the other end of the floppy disk drive. 2.7.3 Installing a floppy disk drive The BA5120/AS-D672 system comes with the holes on the motherboard. Fasten the screws to the floppy disk drive connector on the bay. 2.
User Manual
Page 35
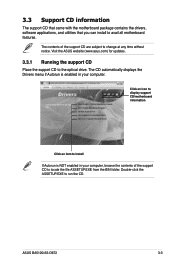
... drivers, software applications, and utilities that you can install to change at any time without notice. Double-click the ASSETUP.EXE to the optical drive. ASUS BA5120/AS-D672 3-3 Visit the ASUS website (www.asus.com) for updates. 3.3.1 Running the support CD Place the support CD to run the CD.
... drivers, software applications, and utilities that you can install to change at any time without notice. Double-click the ASSETUP.EXE to the optical drive. ASUS BA5120/AS-D672 3-3 Visit the ASUS website (www.asus.com) for updates. 3.3.1 Running the support CD Place the support CD to run the CD.
User Manual
Page 37
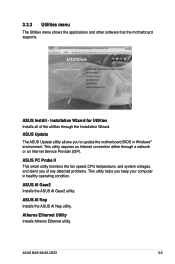
... Nap utility. This utility requires an Internet connection either through the Installation Wizard. ASUS Update The ASUS Update utility allows you keep your computer in Windows® environment. Atheros Ethernet Utility Installs Atheros Ethernet utility. ASUS BA5120/AS-D672 3-5 Installation Wizard for Utilities Installs all of any detected problems. This utility helps you to...
... Nap utility. This utility requires an Internet connection either through the Installation Wizard. ASUS Update The ASUS Update utility allows you keep your computer in Windows® environment. Atheros Ethernet Utility Installs Atheros Ethernet utility. ASUS BA5120/AS-D672 3-5 Installation Wizard for Utilities Installs all of any detected problems. This utility helps you to...
User Manual
Page 39
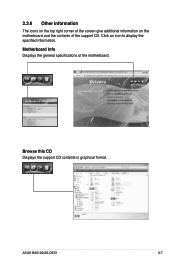
Browse this CD Displays the support CD contents in graphical format. ASUS BA5120/AS-D672 3-7 3.3.6 Other information The icons on the top right corner of the screen give additional information on the motherboard and the contents of the motherboard. Click an icon to display the specified information. Motherboard Info Displays the general specifications of the support CD.
Browse this CD Displays the support CD contents in graphical format. ASUS BA5120/AS-D672 3-7 3.3.6 Other information The icons on the top right corner of the screen give additional information on the motherboard and the contents of the motherboard. Click an icon to display the specified information. Motherboard Info Displays the general specifications of the support CD.
User Manual
Page 41
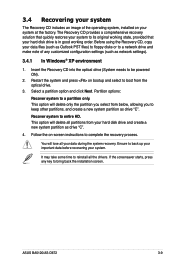
... the system recovery. This option will delete all the drivers. Restart the system and press on -screen instructions to bring back the installation screen. ASUS BA5120/AS-D672 3-9 Select a partition option and click Next. Recover system to a partition only. Partition options: Recover system to entire HD. Ensure to its original working order...
... the system recovery. This option will delete all the drivers. Restart the system and press on -screen instructions to bring back the installation screen. ASUS BA5120/AS-D672 3-9 Select a partition option and click Next. Recover system to a partition only. Partition options: Recover system to entire HD. Ensure to its original working order...


