A8V-E SE User's Manual for English Edition
Page 3
... guide ix Typography ix A8V-E SE specifications summary x Chapter 1: Product introduction 1.1 Welcome 1-2 1.2 Package contents 1-2 1.3 Special features 1-3 1.3.1 Product highlights 1-3 1.3.2 Innovative ASUS features 1-5 1.4 Before you proceed 1-6 1.5 Motherboard overview 1-7 1.5.1 Placement direction 1-7 1.5.2 Screw holes 1-7 1.5.3 Motherboard layout 1-8 1.6 Central Processing Unit (CPU 1-9 1.6.1 Overview 1-9 1.6.2 Installling the CPU 1-9 1.6.3 Installing the heatsink and fan 1-11 1.7 System memory 1-13 1.7.1 Overview 1-13 1.7.2 Memory Configurations 1-13 1.7.3 Installing...
... guide ix Typography ix A8V-E SE specifications summary x Chapter 1: Product introduction 1.1 Welcome 1-2 1.2 Package contents 1-2 1.3 Special features 1-3 1.3.1 Product highlights 1-3 1.3.2 Innovative ASUS features 1-5 1.4 Before you proceed 1-6 1.5 Motherboard overview 1-7 1.5.1 Placement direction 1-7 1.5.2 Screw holes 1-7 1.5.3 Motherboard layout 1-8 1.6 Central Processing Unit (CPU 1-9 1.6.1 Overview 1-9 1.6.2 Installling the CPU 1-9 1.6.3 Installing the heatsink and fan 1-11 1.7 System memory 1-13 1.7.1 Overview 1-13 1.7.2 Memory Configurations 1-13 1.7.3 Installing...
A8V-E SE User's Manual for English Edition
Page 4
...your BIOS 2-2 2.1.1 Creating a bootable floppy disk 2-2 2.1.2 Updating the BIOS 2-3 2.1.3 Saving the current BIOS file 2-5 2.1.4 ASUS CrashFree BIOS 2 utility 2-6 2.1.5 ASUS EZ Flash utility 2-8 2.1.6 ASUS Update utility 2-9 2.2 BIOS setup program 2-12 2.2.1 BIOS menu screen 2-13 2.2.2 Menu bar 2-13 2.2.3 Legend bar 2-14...2-16 2.3.4 Primary and Secondary IDE Master/Slave 2-17 2.3.5 HDD SMART Monitoring 2-18 2.3.6 Installed Memory 2-18 2.4 Advanced menu 2-19 2.4.1 JumperFree Configuration 2-19 2.4.2 LAN Cable Status 2-21 2.4.3 PEG Link Mode 2-22 2.4.4 CPU Configuration 2-22 ...
...your BIOS 2-2 2.1.1 Creating a bootable floppy disk 2-2 2.1.2 Updating the BIOS 2-3 2.1.3 Saving the current BIOS file 2-5 2.1.4 ASUS CrashFree BIOS 2 utility 2-6 2.1.5 ASUS EZ Flash utility 2-8 2.1.6 ASUS Update utility 2-9 2.2 BIOS setup program 2-12 2.2.1 BIOS menu screen 2-13 2.2.2 Menu bar 2-13 2.2.3 Legend bar 2-14...2-16 2.3.4 Primary and Secondary IDE Master/Slave 2-17 2.3.5 HDD SMART Monitoring 2-18 2.3.6 Installed Memory 2-18 2.4 Advanced menu 2-19 2.4.1 JumperFree Configuration 2-19 2.4.2 LAN Cable Status 2-21 2.4.3 PEG Link Mode 2-22 2.4.4 CPU Configuration 2-22 ...
A8V-E SE User's Manual for English Edition
Page 10
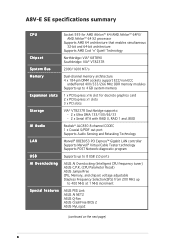
A8V-E SE specifications summary CPU Socket 939 for discrete graphics card 2 x PCI Express x1 slots 3 x PCI slots Storage VIA® VT8237R Southbridge supports: - 2 x Ultra DMA 133/100/...™ Gigabit LAN controller Supports Marvell® Virtual Cable Tester technology Supports POST Network-diagnostic program USB Supports up to 8 USB 2.0 ports AI Overclocking ASUS AI Overclocking (Intelligent CPU frequency tuner) ASUS C.P.R. (CPU Parameter Recall) ASUS JumperFree CPU, Memory, and chipset voltage adjustable Stepless Frequency Selection(SFS) from 200 MHz up to 4 GB system...
A8V-E SE specifications summary CPU Socket 939 for discrete graphics card 2 x PCI Express x1 slots 3 x PCI slots Storage VIA® VT8237R Southbridge supports: - 2 x Ultra DMA 133/100/...™ Gigabit LAN controller Supports Marvell® Virtual Cable Tester technology Supports POST Network-diagnostic program USB Supports up to 8 USB 2.0 ports AI Overclocking ASUS AI Overclocking (Intelligent CPU frequency tuner) ASUS C.P.R. (CPU Parameter Recall) ASUS JumperFree CPU, Memory, and chipset voltage adjustable Stepless Frequency Selection(SFS) from 200 MHz up to 4 GB system...
A8V-E SE User's Manual for English Edition
Page 15
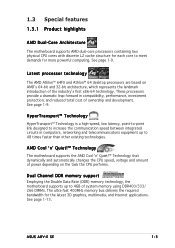
ASUS A8V-E SE 1-3 AMD Cool 'n' Quiet!™ Technology The motherboard supports the AMD Cool 'n' Quiet!™ Technology that dynamically and automatically changes the CPU speed, voltage and amount ... The AMD Athlon™ 64FX and Athlon™ 64 desktop processors are based on the task the CPU performs. Dual Channel DDR memory support Employing the Double Data Rate (DDR) memory technology, the motherboard supports up to increase the communication speed between integrated circuits in compatibility, performance, investment protection, and reduced total...
ASUS A8V-E SE 1-3 AMD Cool 'n' Quiet!™ Technology The motherboard supports the AMD Cool 'n' Quiet!™ Technology that dynamically and automatically changes the CPU speed, voltage and amount ... The AMD Athlon™ 64FX and Athlon™ 64 desktop processors are based on the task the CPU performs. Dual Channel DDR memory support Employing the Double Data Rate (DDR) memory technology, the motherboard supports up to increase the communication speed between integrated circuits in compatibility, performance, investment protection, and reduced total...

A8V-E SE User's Manual for English Edition
Page 17
... eliminates the need to ensure quiet, cool, and efficient operation. ASUS Q-Fan technology The ASUS Q-Fan technology smartly adjusts the fan speeds according to the system loading to buy a replacement ROM chip. ASUS MyLogo2™ This new feature present in case when the BIOS codes... gradually increase the CPU and memory voltage to restore the original BIOS data from the support CD in the motherboard allows you to personalize and add style to your system with customizable boot logos. See page 2-22 for details. ASUS A8V-E SE 1-5 1.3.2 Innovative ASUS features AI NET 2 AI ...
... eliminates the need to ensure quiet, cool, and efficient operation. ASUS Q-Fan technology The ASUS Q-Fan technology smartly adjusts the fan speeds according to the system loading to buy a replacement ROM chip. ASUS MyLogo2™ This new feature present in case when the BIOS codes... gradually increase the CPU and memory voltage to restore the original BIOS data from the support CD in the motherboard allows you to personalize and add style to your system with customizable boot logos. See page 2-22 for details. ASUS A8V-E SE 1-5 1.3.2 Innovative ASUS features AI NET 2 AI ...

A8V-E SE User's Manual for English Edition
Page 25
...Rate (DDR) Dual Inline Memory Modules (DIMM) sockets. ASUS A8V-E SE 1-13 For optimum compatibility, it is recommended that you installed four 1 GB DDR memory modules. • Due to chipset limitation, DIMM modules with 128 Mb memory chips or double-sided x16 memory chips are not supported in...; For dual-channel configuration, the total size of system memory when you obtain memory modules from the same vendor. The following figure illustrates the location of the sockets: DIMM_A1 DIMM_A2 DIMM_B1 DIMM_B2 A8V-E SE ® A8V-E SE 184-pin DDR DIMM sockets Channel Channel A Channel B ...
...Rate (DDR) Dual Inline Memory Modules (DIMM) sockets. ASUS A8V-E SE 1-13 For optimum compatibility, it is recommended that you installed four 1 GB DDR memory modules. • Due to chipset limitation, DIMM modules with 128 Mb memory chips or double-sided x16 memory chips are not supported in...; For dual-channel configuration, the total size of system memory when you obtain memory modules from the same vendor. The following figure illustrates the location of the sockets: DIMM_A1 DIMM_A2 DIMM_B1 DIMM_B2 A8V-E SE ® A8V-E SE 184-pin DDR DIMM sockets Channel Channel A Channel B ...
A8V-E SE User's Manual for English Edition
Page 26
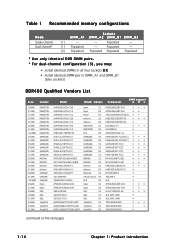
Populated - (1) Populated - Table 1 Recommended memory configurations Mode Single-channel Dual-channel* Sockets DIMM_A1 DIMM_A2 DIMM_B1 DIMM_B2 (1) - - Populated - (2) Populated Populated Populated Populated * Use only identical DDR DIMM pairs. * For dual-channel ...
Populated - (1) Populated - Table 1 Recommended memory configurations Mode Single-channel Dual-channel* Sockets DIMM_A1 DIMM_A2 DIMM_B1 DIMM_B2 (1) - - Populated - (2) Populated Populated Populated Populated * Use only identical DDR DIMM pairs. * For dual-channel ...

A8V-E SE User's Manual for English Edition
Page 27
... either the yellow slots or the black slots as one module inserted into the yellow and black slots as two pairs of Dual-channel memory configuration. supports one pair of modules inserted into either slot, in a Single-channel memory configuration. C - ASUS A8V-E SE 1-15 supports on pair of Dual-channel memory configuration. Double Sided DIMM Support: A -
... either the yellow slots or the black slots as one module inserted into the yellow and black slots as two pairs of Dual-channel memory configuration. supports one pair of modules inserted into either slot, in a Single-channel memory configuration. C - ASUS A8V-E SE 1-15 supports on pair of Dual-channel memory configuration. Double Sided DIMM Support: A -
A8V-E SE User's Manual for English Edition
Page 29
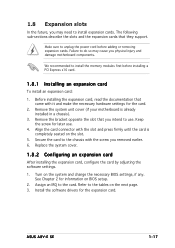
... the memory modules first before adding or removing expansion cards. See Chapter 2 for later use . Assign an IRQ to the chassis with the slot and press firmly until the card is already installed in a chassis). 3. Make sure to install expansion cards. Align the card connector with the screw you removed earlier. 6. ASUS A8V-E SE...
... the memory modules first before adding or removing expansion cards. See Chapter 2 for later use . Assign an IRQ to the chassis with the slot and press firmly until the card is already installed in a chassis). 3. Make sure to install expansion cards. Align the card connector with the screw you removed earlier. 6. ASUS A8V-E SE...
A8V-E SE User's Manual for English Edition
Page 32
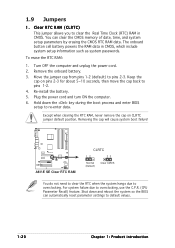
...from pins 1-2 (default) to overclocking, use the C.P.R. (CPU Parameter Recall) feature. Hold down and reboot the system so the BIOS can clear the CMOS memory of date, time, and system setup parameters by erasing the CMOS RTC RAM data. Removing the cap will cause system boot failure! Clear RTC RAM...Time Clock (RTC) RAM in CMOS, which include system setup information such as system passwords. Keep the cap on CLRTC jumper default position. A8V-E SE ® A8V-E SE Clear RTC RAM CLRTC 12 23 Normal (Default) Clear CMOS You do not need to clear the RTC when the system hangs due to re...
...from pins 1-2 (default) to overclocking, use the C.P.R. (CPU Parameter Recall) feature. Hold down and reboot the system so the BIOS can clear the CMOS memory of date, time, and system setup parameters by erasing the CMOS RTC RAM data. Removing the cap will cause system boot failure! Clear RTC RAM...Time Clock (RTC) RAM in CMOS, which include system setup information such as system passwords. Keep the cap on CLRTC jumper default position. A8V-E SE ® A8V-E SE Clear RTC RAM CLRTC 12 23 Normal (Default) Clear CMOS You do not need to clear the RTC when the system hangs due to re...
A8V-E SE User's Manual for English Edition
Page 55
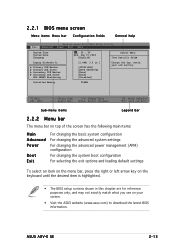
... chapter are for reference purposes only, and may not exactly match what you see on your screen. • Visit the ASUS website (www.asus.com) to download the latest BIOS information. Installed Memory 256MB F1:Help ESC: Exit ↑↓ : Select Item →←: Select Menu -/+: Change Value Enter: Select ... the right or left arrow key on the keyboard until the desired item is highlighted. • The BIOS setup screens shown in .] [ST321122A] [ASUS CDS520/A] [None] [None] [Disabled] Select Menu Item Specific Help Change the day, month, year and century. ASUS A8V-E SE 2-13
... chapter are for reference purposes only, and may not exactly match what you see on your screen. • Visit the ASUS website (www.asus.com) to download the latest BIOS information. Installed Memory 256MB F1:Help ESC: Exit ↑↓ : Select Item →←: Select Menu -/+: Change Value Enter: Select ... the right or left arrow key on the keyboard until the desired item is highlighted. • The BIOS setup screens shown in .] [ST321122A] [ASUS CDS520/A] [None] [None] [Disabled] Select Menu Item Specific Help Change the day, month, year and century. ASUS A8V-E SE 2-13
A8V-E SE User's Manual for English Edition
Page 57
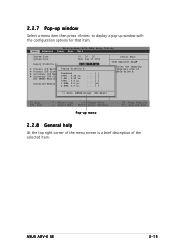
ASUS A8V-E SE 2-15 2.2.7 Pop-up window Select a ... : 36 Wed, Sep 15 2004 Legacy Diskette A: [1.44M, 3.5 in.] Primary IDE Master Legacy Disket[tSeT3A2:1122A] Primary IDE Slave [ASUS CDS520/A] Secondary IDE Master Disabled [None] ..... [ ] Secondary IDE Slave 360K , 5.25 i[nN.one] ..... [ ] HDD SMART Monitoring 1.2M... , 5.25 i[nD.isabl.e.d.].. [ ] 720K , 3.5 in. ..... [ ] Installed Memory 1.44M, 3.5 in. 256MB..... [ ] 2.88M, 3.5 in. ..... [ ] Select Menu Item Specific Help Specifies the capacity and physical size of diskette drive...
ASUS A8V-E SE 2-15 2.2.7 Pop-up window Select a ... : 36 Wed, Sep 15 2004 Legacy Diskette A: [1.44M, 3.5 in.] Primary IDE Master Legacy Disket[tSeT3A2:1122A] Primary IDE Slave [ASUS CDS520/A] Secondary IDE Master Disabled [None] ..... [ ] Secondary IDE Slave 360K , 5.25 i[nN.one] ..... [ ] HDD SMART Monitoring 1.2M... , 5.25 i[nD.isabl.e.d.].. [ ] 720K , 3.5 in. ..... [ ] Installed Memory 1.44M, 3.5 in. 256MB..... [ ] 2.88M, 3.5 in. ..... [ ] Select Menu Item Specific Help Specifies the capacity and physical size of diskette drive...

A8V-E SE User's Manual for English Edition
Page 58
.... Configuration options: [Disabled] [360K, 5.25 in.] [1.2M , 5.25 in.] [720K , 3.5 in.] [1.44M, 3.5 in.] [2.88M, 3.5 in .] [ST321122A] [ASUS CDS520/A] [None] [None] [Disabled] Select Menu Item Specific Help Change the day, month, year and century. Refer to section "2.2.1 BIOS menu screen" for information on...items and how to set the system date. 2.3.3 Legacy Diskette A [1.44M, 3.5 in.] Sets the type of the basic system information. Installed Memory 256MB F1:Help ESC: Exit ↑↓ : Select Item →←: Select Menu -/+: Change Value Enter: Select Sub-menu F5: Setup...
.... Configuration options: [Disabled] [360K, 5.25 in.] [1.2M , 5.25 in.] [720K , 3.5 in.] [1.44M, 3.5 in.] [2.88M, 3.5 in .] [ST321122A] [ASUS CDS520/A] [None] [None] [Disabled] Select Menu Item Specific Help Change the day, month, year and century. Refer to section "2.2.1 BIOS menu screen" for information on...items and how to set the system date. 2.3.3 Legacy Diskette A [1.44M, 3.5 in.] Sets the type of the basic system information. Installed Memory 256MB F1:Help ESC: Exit ↑↓ : Select Item →←: Select Menu -/+: Change Value Enter: Select Sub-menu F5: Setup...
A8V-E SE User's Manual for English Edition
Page 60
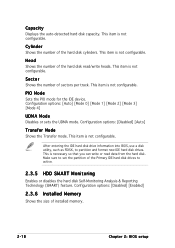
... IDE device. This item is necessary so that you can write or read /write heads. Configuration options: [Disabled] [Enabled] 2.3.6 Installed Memory Shows the size of the Primary IDE hard disk drives to partition and format new IDE hard disk drives. This item is not configurable....not configurable. Configuration options: [Disabled] [Auto] Transfer Mode Shows the Transfer mode. Make sure to set the partition of installed memory. 2-18 Chapter 2: BIOS setup This item is not configurable. Capacity Displays the auto-detected hard disk capacity. This item is not configurable.
... IDE device. This item is necessary so that you can write or read /write heads. Configuration options: [Disabled] [Enabled] 2.3.6 Installed Memory Shows the size of the Primary IDE hard disk drives to partition and format new IDE hard disk drives. This item is not configurable....not configurable. Configuration options: [Disabled] [Auto] Transfer Mode Shows the Transfer mode. Make sure to set the partition of installed memory. 2-18 Chapter 2: BIOS setup This item is not configurable. Capacity Displays the auto-detected hard disk capacity. This item is not configurable.

A8V-E SE User's Manual for English Edition
Page 61
...CPU x PCI Clock CPU Clock [Auto] [Enable] 100MHz [Enabled] 33.0 MHz [200MHz] Select Menu Item Specific Help ASUS A8V-E SE 2-19 to malfunction. Phoenix-Award BIOS CMOS Setup Utility Main Advanced Power Boot Exit JumperFree Configuration LAN Cable Status PEG Link Mode... Save and Exit 2.4.1 JumperFree Configuration Advanced Phoenix-Award BIOS CMOS Setup Utility JumperFree Configuration Frequency Configuration CPU Multiplier Hammer Vid control Memory Voltage Adjustment CPU Vcore Offset [Auto] [Startup] [2.75 V] [+100 mv] Select Menu Item Specific Help Frequency Configuration The...
...CPU x PCI Clock CPU Clock [Auto] [Enable] 100MHz [Enabled] 33.0 MHz [200MHz] Select Menu Item Specific Help ASUS A8V-E SE 2-19 to malfunction. Phoenix-Award BIOS CMOS Setup Utility Main Advanced Power Boot Exit JumperFree Configuration LAN Cable Status PEG Link Mode... Save and Exit 2.4.1 JumperFree Configuration Advanced Phoenix-Award BIOS CMOS Setup Utility JumperFree Configuration Frequency Configuration CPU Multiplier Hammer Vid control Memory Voltage Adjustment CPU Vcore Offset [Auto] [Startup] [2.75 V] [+100 mv] Select Menu Item Specific Help Frequency Configuration The...

A8V-E SE User's Manual for English Edition
Page 63
...] [1.100 v] [1.0875v] [1.075 v] [1.0625v] [1.050 v] [1.0375v] [1.025 v] [1.0125v] [1.000 v] [0.9875v] [0.975 v] [0.9625v] [0.950 v] [0.9375v] [0.925 v] [0.9125v] [0.900 v] [0.8875v] [0.875 v] [0.8625v] [0.850 v] [0.8375v] [0.825 v] [0.8125v] [0.800 v] Memory Voltage Adjustment [2.75 V] Sets the memory adjustment voltage. Configuration options: [Disabled] [Enabled] ASUS A8V-E SE 2-21 Hammer Vid control [Startup] Sets the Hammer Voltage ID control.
...] [1.100 v] [1.0875v] [1.075 v] [1.0625v] [1.050 v] [1.0375v] [1.025 v] [1.0125v] [1.000 v] [0.9875v] [0.975 v] [0.9625v] [0.950 v] [0.9375v] [0.925 v] [0.9125v] [0.900 v] [0.8875v] [0.875 v] [0.8625v] [0.850 v] [0.8375v] [0.825 v] [0.8125v] [0.800 v] Memory Voltage Adjustment [2.75 V] Sets the memory adjustment voltage. Configuration options: [Disabled] [Enabled] ASUS A8V-E SE 2-21 Hammer Vid control [Startup] Sets the Hammer Voltage ID control.
A8V-E SE User's Manual for English Edition
Page 65
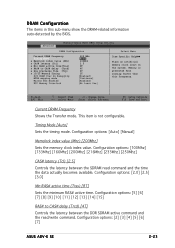
... the Transfer mode. Configuration options: [Auto] [Manual] Memclock index value (Mhz) [200Mhz] Sets the memory clock index value. Configuration options: [2] [3] [4] [5] [6] [7] ASUS A8V-E SE 2-23 Timing Mode [Auto] Sets the timing mode. Advanced Phoenix-Award BIOS CMOS Setup Utility DRAM Configuration Current...] 200Mhz 2.5 8T 4T 4T 2T [Enabled] [Continous] [Enabled] [At least One] Select Menu Item Specific Help Place an artificial memory clock limit on the system. DRAM Configuration The items in this frequency. Configuration options: [100Mhz] [133Mhz] [166Mhz] [200Mhz] [216Mhz...
... the Transfer mode. Configuration options: [Auto] [Manual] Memclock index value (Mhz) [200Mhz] Sets the memory clock index value. Configuration options: [2] [3] [4] [5] [6] [7] ASUS A8V-E SE 2-23 Timing Mode [Auto] Sets the timing mode. Advanced Phoenix-Award BIOS CMOS Setup Utility DRAM Configuration Current...] 200Mhz 2.5 8T 4T 4T 2T [Enabled] [Continous] [Enabled] [At least One] Select Menu Item Specific Help Place an artificial memory clock limit on the system. DRAM Configuration The items in this frequency. Configuration options: [100Mhz] [133Mhz] [166Mhz] [200Mhz] [216Mhz...
A8V-E SE User's Manual for English Edition
Page 66
...Master ECC Enable [Enable] Enables or disables the master ECC. Configuration options: [Disable] [Enable] ECC Memory Interlock [At Least One] Sets the ECC memory interlock. Configuration options: [Disabled] [Enabled] MTRR mapping mode [Continous] Sets the MTRR mapping mode. ...[2T] H/W DRAM Over 4G Remapping [Enabled] Enables or disables the hardware DRAM remapping when using 4G of system memory. Configuration options: [2] [3] [4] [5] [6] [7] 1T/2T Memory Timing [2T] Sets the memory timing. Configuration options: [By Auto] [Mode 0] [Mode 1] [Mode 2] [Mode 3] [Mode 4] 2-24...
...Master ECC Enable [Enable] Enables or disables the master ECC. Configuration options: [Disable] [Enable] ECC Memory Interlock [At Least One] Sets the ECC memory interlock. Configuration options: [Disabled] [Enabled] MTRR mapping mode [Continous] Sets the MTRR mapping mode. ...[2T] H/W DRAM Over 4G Remapping [Enabled] Enables or disables the hardware DRAM remapping when using 4G of system memory. Configuration options: [2] [3] [4] [5] [6] [7] 1T/2T Memory Timing [2T] Sets the memory timing. Configuration options: [By Auto] [Mode 0] [Mode 1] [Mode 2] [Mode 3] [Mode 4] 2-24...
A8V-E SE User's Manual for English Edition
Page 67
... system configures the Plug and Play devices not required for information on how to PCI Express™ 3 data scrambling. ASUS A8V-E SE 2-25 Plug & Play O/S [No] When set to assign the IRQ DMA and memory base address fields. PEG Data Scrambling [Auto] Disables or enables the PCI Express™ graphics data scrambling. Configuration options...
... system configures the Plug and Play devices not required for information on how to PCI Express™ 3 data scrambling. ASUS A8V-E SE 2-25 Plug & Play O/S [No] When set to assign the IRQ DMA and memory base address fields. PEG Data Scrambling [Auto] Disables or enables the PCI Express™ graphics data scrambling. Configuration options...


