
A8V-E Deluxe user's manual English Version E1781
Page 6
Contents 5.2.1 Running the support CD 5-1 5.2.2 Drivers menu 5-2 5.2.3 Utilities menu 5-4 5.2.4 ASUS Contact information 5-6 5.2.5 Other information 5-6 5.3 Software information 5-9 5.3.1 ASUS MyLogo2 5-9 5.3.2 AI NET 2 5-11 Using the Virtual Cable Tester 5-11 5.3.3 Audio configurations 5-12 5.4 RAID configurations 5-18 5.4.1 Installing hard disks 5-18 5.4.2 VIA RAID configurations 5-19 5.5 Creating a RAID driver disk 5-26 5.6 Cool 'n' Quiet!™ Technology 5-27 5.6.1 Enabling Cool 'n' Quiet!™ Technology 5-27 5.6.2 Launching the Cool 'n' Quiet!™ software 5-28 vi
Contents 5.2.1 Running the support CD 5-1 5.2.2 Drivers menu 5-2 5.2.3 Utilities menu 5-4 5.2.4 ASUS Contact information 5-6 5.2.5 Other information 5-6 5.3 Software information 5-9 5.3.1 ASUS MyLogo2 5-9 5.3.2 AI NET 2 5-11 Using the Virtual Cable Tester 5-11 5.3.3 Audio configurations 5-12 5.4 RAID configurations 5-18 5.4.1 Installing hard disks 5-18 5.4.2 VIA RAID configurations 5-19 5.5 Creating a RAID driver disk 5-26 5.6 Cool 'n' Quiet!™ Technology 5-27 5.6.1 Enabling Cool 'n' Quiet!™ Technology 5-27 5.6.2 Launching the Cool 'n' Quiet!™ software 5-28 vi
A8V-E Deluxe user's manual English Version E1781
Page 11
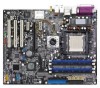
...; VT8237R Southbridge supports: - 2 x Ultra DMA 133/100/66/33 - 2 x Serial ATA with RAID 0 and RAID 1 Realtek® ALC850 8-channel CODEC 1 x Coaxial S/PDIF out port 1 x Optical S/PDIF out port Supports Audio Sensing and Enumeration Technology WiFi-g™ wireless solution provides: - A8V-E Deluxe specifications summary CPU Chipset System Bus Memory Expansion slots Storage AI Audio Wireless...
...; VT8237R Southbridge supports: - 2 x Ultra DMA 133/100/66/33 - 2 x Serial ATA with RAID 0 and RAID 1 Realtek® ALC850 8-channel CODEC 1 x Coaxial S/PDIF out port 1 x Optical S/PDIF out port Supports Audio Sensing and Enumeration Technology WiFi-g™ wireless solution provides: - A8V-E Deluxe specifications summary CPU Chipset System Bus Memory Expansion slots Storage AI Audio Wireless...
A8V-E Deluxe user's manual English Version E1781
Page 18
... lower pin count, reduced voltage requirement, and up to 4GB of the industry's first x86-64 technology. With the VIA VT8237R RAID controller onboard, the motherboard supports RAID 0 and RAID 1 configuration using DDR400/333/ 266 DIMMs. The ultra-fast 400MHz memory bus delivers the required bandwidth for the latest 3D graphics,... computers, networking and telecommunicatons equipment up to 150 MB/s data transfer rate. See pages 2-25 and 5-18 for thinner, more flexible cables with RAID 0/1 support The motherboard supports the Serial ATA technology through the Serial ATA interfaces.
... lower pin count, reduced voltage requirement, and up to 4GB of the industry's first x86-64 technology. With the VIA VT8237R RAID controller onboard, the motherboard supports RAID 0 and RAID 1 configuration using DDR400/333/ 266 DIMMs. The ultra-fast 400MHz memory bus delivers the required bandwidth for the latest 3D graphics,... computers, networking and telecommunicatons equipment up to 150 MB/s data transfer rate. See pages 2-25 and 5-18 for thinner, more flexible cables with RAID 0/1 support The motherboard supports the Serial ATA technology through the Serial ATA interfaces.

A8V-E Deluxe user's manual English Version E1781
Page 47
ASUS A8V-E Deluxe 2-25 Serial ATA connectors (7-pin SATA1, SATA2) These connectors are using Windows® 2000/XP. • Install the Windows® 2000 Service Pack 4 or the Windows® XP Service Pack1 when using Serial ATA. GND RSATA_RXN2 RSATA_RXP2 GND RSATA_TXN2 RSATA_TXP2 GND A8V-E DELUXE R SATA2 SATA1 A8V-E DELUXE SATA connectors GND RSATA_TXP1 RSATA_TXN1 GND RSATA_RXP1 RSATA_RXN1 GND Important notes on Serial ATA • The Serial ATA RAID feature (RAID 0, RAID 1) is available only if you are for the Serial ATA signal cables for Serial ATA hard disk drives. 3 .
ASUS A8V-E Deluxe 2-25 Serial ATA connectors (7-pin SATA1, SATA2) These connectors are using Windows® 2000/XP. • Install the Windows® 2000 Service Pack 4 or the Windows® XP Service Pack1 when using Serial ATA. GND RSATA_RXN2 RSATA_RXP2 GND RSATA_TXN2 RSATA_TXP2 GND A8V-E DELUXE R SATA2 SATA1 A8V-E DELUXE SATA connectors GND RSATA_TXP1 RSATA_TXN1 GND RSATA_RXP1 RSATA_RXN1 GND Important notes on Serial ATA • The Serial ATA RAID feature (RAID 0, RAID 1) is available only if you are for the Serial ATA signal cables for Serial ATA hard disk drives. 3 .
A8V-E Deluxe user's manual English Version E1781
Page 89
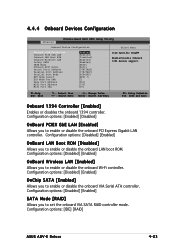
...OnBoard Wireless LAN [Enabled] Allows you to set the onboard VIA SATA RAID controller mode. Configuration options: [Disabled] [Enabled] SATA Mode [RAID] Allows you to enable or disable the onboard LAN boot ROM. Configuration options: [IDE] [RAID] ASUS A8V-E Deluxe 4-23 F1:Help ESC: Exit ↑↓ : Select Item →... Mode EPP Mode Select ECP MOde Use DMA Game Port Address Midi Port Address Midi Port IRQ [Enabled] [Enabled] [Disabled] [Enabled] [Enabled] [RAID] [Auto] [3F8/IRQ4] [378/IRQ7] [ECP+EPP] [EPP1.7] [3] [201] [330] [10] Select Menu Item Specific Help Enable/Disable ...
...OnBoard Wireless LAN [Enabled] Allows you to set the onboard VIA SATA RAID controller mode. Configuration options: [Disabled] [Enabled] SATA Mode [RAID] Allows you to enable or disable the onboard LAN boot ROM. Configuration options: [IDE] [RAID] ASUS A8V-E Deluxe 4-23 F1:Help ESC: Exit ↑↓ : Select Item →... Mode EPP Mode Select ECP MOde Use DMA Game Port Address Midi Port Address Midi Port IRQ [Enabled] [Enabled] [Disabled] [Enabled] [Enabled] [RAID] [Auto] [3F8/IRQ4] [378/IRQ7] [ECP+EPP] [EPP1.7] [3] [201] [330] [10] Select Menu Item Specific Help Enable/Disable ...

A8V-E Deluxe user's manual English Version E1781
Page 114
Chapter summary 5.1 Installing an operating system 5-1 5.2 Support CD information 5-1 5.3 Software information 5-9 5.4 RAID configurations 5-18 5.5 Creating a RAID driver disk 5-26 5.6 Cool 'n' Quiet!™ Technology 5-27 ASUS A8V-E Deluxe
Chapter summary 5.1 Installing an operating system 5-1 5.2 Support CD information 5-1 5.3 Software information 5-9 5.4 RAID configurations 5-18 5.5 Creating a RAID driver disk 5-26 5.6 Cool 'n' Quiet!™ Technology 5-27 ASUS A8V-E Deluxe

A8V-E Deluxe user's manual English Version E1781
Page 116
... you to activate the devices. ALC850 Audio Driver Installs the Realtek® ALC850 audio controller and application. 5-2 Chapter 5: Software support VIA IDE RAID Controller driver Installs the VIA 6420 RAID controller driver and application. VIA 4 in 1 drivers This item installs the following drivers: - 5.2.2 Drivers menu The drivers menu shows the available device...
... you to activate the devices. ALC850 Audio Driver Installs the Realtek® ALC850 audio controller and application. 5-2 Chapter 5: Software support VIA IDE RAID Controller driver Installs the VIA 6420 RAID controller driver and application. VIA 4 in 1 drivers This item installs the following drivers: - 5.2.2 Drivers menu The drivers menu shows the available device...

A8V-E Deluxe user's manual English Version E1781
Page 132
...disk drive. Connect the SATA signal cables. 3. 5.4 RAID configurations The motherboard comes with the VIA VT8237R Southbridge RAID controller that of a single disk alone, thus improving data access and storage. This RAID configuration provides data protection and increases fault tolerance to ... new identical hard disk drives is required for this setup. Install the SATA hard disks into the drive bays. 2. The motherboard supports the following RAID configurations. R A I D 1 (Data mirroring) copies and maintains an identical image of the same size or larger than the existing drive. ...
...disk drive. Connect the SATA signal cables. 3. 5.4 RAID configurations The motherboard comes with the VIA VT8237R Southbridge RAID controller that of a single disk alone, thus improving data access and storage. This RAID configuration provides data protection and increases fault tolerance to ... new identical hard disk drives is required for this setup. Install the SATA hard disks into the drive bays. 2. The motherboard supports the following RAID configurations. R A I D 1 (Data mirroring) copies and maintains an identical image of the same size or larger than the existing drive. ...

A8V-E Deluxe user's manual English Version E1781
Page 133
... the function of the screen is for reference only. Boot-up your screen may not exactly match what is shown here. The RAID BIOS information on your computer. 2. VIA Tech. During POST, press to next item Enter : Confirm the selection ESC : Exit...Status Move to navigate through the setup menu options. What you to the next item Confirm the selection Exit ASUS A8V-E Deluxe 5-19 5.4.2 VIA RAID configurations The motherboard includes a high performance IDE RAID controller integrated in the legend box with two independent Serial ATA channels. The following menu options will appear...
... the function of the screen is for reference only. Boot-up your screen may not exactly match what is shown here. The RAID BIOS information on your computer. 2. VIA Tech. During POST, press to next item Enter : Confirm the selection ESC : Exit...Status Move to navigate through the setup menu options. What you to the next item Confirm the selection Exit ASUS A8V-E Deluxe 5-19 5.4.2 VIA RAID configurations The motherboard includes a high performance IDE RAID controller integrated in the legend box with two independent Serial ATA channels. The following menu options will appear...

A8V-E Deluxe user's manual English Version E1781
Page 134
... XXXXXXXXXXX ARRAY 0 SATA 999.99 XXXXXXX Serial_Ch1 Master XXXXXXXXXXX ARRAY 0 SATA 999.99 XXXXXXX RAID 0 for performance 1. Select A u t o S e t u p f o r P e r f o r m a n c e and press . Auto create array will destroy all data on disks, Continue? (Y/N) 5-20 Chapter 5: Software support RAID 0 for performance RAID 1 for data protection RAID 0/1 RAID SPAN for stripped sets. The following confirmation message appears. From the VIA...
... XXXXXXXXXXX ARRAY 0 SATA 999.99 XXXXXXX Serial_Ch1 Master XXXXXXXXXXX ARRAY 0 SATA 999.99 XXXXXXX RAID 0 for performance 1. Select A u t o S e t u p f o r P e r f o r m a n c e and press . Auto create array will destroy all data on disks, Continue? (Y/N) 5-20 Chapter 5: Software support RAID 0 for performance RAID 1 for data protection RAID 0/1 RAID SPAN for stripped sets. The following confirmation message appears. From the VIA...

A8V-E Deluxe user's manual English Version E1781
Page 135
...8K block size is 64K recommended for optimum performance. Press to go back to mark selected drive. RAID 0 for performance RRAAIIDD 11 ffoorr ddaattaa pprrootteeccttiioonn RAID 0/1 RAID SPAN for RAID system. For multimedia 16K computer systems used mainly for data protection 1. Press to confirm or to return... r t C r e a t e P r o c e s s and press to the configuration options. The following confirmation message appears: The data on a pop-up hard disk for capacity 2. RAID 1 for audio and 32K video editing, a higher array block size is recommended. ASUS A8V-E Deluxe 5-21
...8K block size is 64K recommended for optimum performance. Press to go back to mark selected drive. RAID 0 for performance RRAAIIDD 11 ffoorr ddaattaa pprrootteeccttiioonn RAID 0/1 RAID SPAN for RAID system. For multimedia 16K computer systems used mainly for data protection 1. Press to confirm or to return... r t C r e a t e P r o c e s s and press to the configuration options. The following confirmation message appears: The data on a pop-up hard disk for capacity 2. RAID 1 for audio and 32K video editing, a higher array block size is recommended. ASUS A8V-E Deluxe 5-21

A8V-E Deluxe user's manual English Version E1781
Page 136
... r D a t a S e c u r i t y and press . 3. From this point, you selected , proceed to the configuration options. If you can auto-configure the RAID array by selecting A u t o S e t u p f o r D a t a S e c u r i t y or manually configure the RAID array for data protection Press Yes(Y) to exit the duplication process. Select S t a r t C r e a t e P r o c e s s and press to mirror after...Save the data on source disk to setup hard disk for RAID system. Press anytime if you select , the following confirmation message appears. RAID 1 for mirrored sets. If you want to auto-configure,...
... r D a t a S e c u r i t y and press . 3. From this point, you selected , proceed to the configuration options. If you can auto-configure the RAID array by selecting A u t o S e t u p f o r D a t a S e c u r i t y or manually configure the RAID array for data protection Press Yes(Y) to exit the duplication process. Select S t a r t C r e a t e P r o c e s s and press to mirror after...Save the data on source disk to setup hard disk for RAID system. Press anytime if you select , the following confirmation message appears. RAID 1 for mirrored sets. If you want to auto-configure,...

A8V-E Deluxe user's manual English Version E1781
Page 137
... before a selected drive. 7. The following confirmation message appears. Continue? (Y/N) ASUS A8V-E Deluxe 5-23 Auto create array will be destroyed. Use arrow keys to the configuration options. Select S e l e c t D i s k D r i v e s, then press . If you selected , proceed to step 11. 9. Proceed to step 11. 6. Select A u t o S e t u p f o r C a p a c i t y and press . RAID Span for capacity 2. The following inquiry appears: Save the data...
... before a selected drive. 7. The following confirmation message appears. Continue? (Y/N) ASUS A8V-E Deluxe 5-23 Auto create array will be destroyed. Use arrow keys to the configuration options. Select S e l e c t D i s k D r i v e s, then press . If you selected , proceed to step 11. 9. Proceed to step 11. 6. Select A u t o S e t u p f o r C a p a c i t y and press . RAID Span for capacity 2. The following inquiry appears: Save the data...

A8V-E Deluxe user's manual English Version E1781
Page 138
...menu, select D e l e t e A r r a y then press . From the list of channel used for IDE RAID arrays, press to select a RAID array for IDE RAID arrays, press < E n t e r > to select a RAID array to main menu. Select Boot Array 1. Continue? Press to return to the menu items. Follow the same procedure to next item... Ver 1.xx Create Array Delete Array Create/Delete Spare Select Boot Array Serial Number View Create a RAID array with the hard disks attached to VIA RAID controller F1 : View Array/Disk Status ↑,↓ : Move to deselect the the boot array. 5-24 Chapter 5: Software ...
...menu, select D e l e t e A r r a y then press . From the list of channel used for IDE RAID arrays, press to select a RAID array for IDE RAID arrays, press < E n t e r > to select a RAID array to main menu. Select Boot Array 1. Continue? Press to return to the menu items. Follow the same procedure to next item... Ver 1.xx Create Array Delete Array Create/Delete Spare Select Boot Array Serial Number View Create a RAID array with the hard disks attached to VIA RAID controller F1 : View Array/Disk Status ↑,↓ : Move to deselect the the boot array. 5-24 Chapter 5: Software ...

A8V-E Deluxe user's manual English Version E1781
Page 139
...; : Move to move the selection bar on each item. From the VIA RAID BIOS utility main menu, select S e r i a l N u m b e r V i e w then press . 2. The serial number for the selected drive is useful for IDE RAID arrays, use the arrow keys to next item Enter : Confirm the selection ESC... : Exit Channel Drive Name Array Name Mode Size(GB) Status Serial_Ch0 Master XXXXXXXXXXX ARRAY 0 SATA 999.99 XXXXXXX Serial_Ch1 Master XXXXXXXXXXX ARRAY 0 SATA 999.99 XXXXXXX Serial Number: XXXXXXXX ASUS A8V-E Deluxe ...
...; : Move to move the selection bar on each item. From the VIA RAID BIOS utility main menu, select S e r i a l N u m b e r V i e w then press . 2. The serial number for the selected drive is useful for IDE RAID arrays, use the arrow keys to next item Enter : Confirm the selection ESC... : Exit Channel Drive Name Array Name Mode Size(GB) Status Serial_Ch0 Master XXXXXXXXXXX ARRAY 0 SATA 999.99 XXXXXXX Serial_Ch1 Master XXXXXXXXXXX ARRAY 0 SATA 999.99 XXXXXXX Serial Number: XXXXXXXX ASUS A8V-E Deluxe ...

A8V-E Deluxe user's manual English Version E1781
Page 140
... disk: 1. Write-protect the floppy disk to complete the installation. 5-26 Chapter 5: Software support To install the RAID driver: 1. Follow the succeeding screen instructions to avoid computer virus infection. During the OS installation, the system prompts you to press the ... 6. Place the motherboard support CD into the floppy disk drive. 3. Follow succeeding screen information to install third-party SCSI or RAID driver. 2. Press then insert the floppy disk with the RAID driver is required when installing Windows® 2000/XP operating system on a hard disk drive that is included in...
... disk: 1. Write-protect the floppy disk to complete the installation. 5-26 Chapter 5: Software support To install the RAID driver: 1. Follow the succeeding screen instructions to avoid computer virus infection. During the OS installation, the system prompts you to press the ... 6. Place the motherboard support CD into the floppy disk drive. 3. Follow succeeding screen information to install third-party SCSI or RAID driver. 2. Press then insert the floppy disk with the RAID driver is required when installing Windows® 2000/XP operating system on a hard disk drive that is included in...


