
K8 series Quick Setup Guide
Page 2
Align a DIMM on the socket such that the notch on the DIMM matches the break on the socket. 3. Unlock the DIMM socket by pressing the retaining clips outward. 2. Firmly insert the DIMM into the socket until configuration and setup is properly seated. 4. Memory module Memory socket Retaining clips 2 Follow steps 1-3 to live AC outlets until the retaining clips snap back in place and the DIMM is complete. 1 Install memory modules 1. English Installation WARNING! Do not connect any power cable to install additional modules.
Align a DIMM on the socket such that the notch on the DIMM matches the break on the socket. 3. Unlock the DIMM socket by pressing the retaining clips outward. 2. Firmly insert the DIMM into the socket until configuration and setup is properly seated. 4. Memory module Memory socket Retaining clips 2 Follow steps 1-3 to live AC outlets until the retaining clips snap back in place and the DIMM is complete. 1 Install memory modules 1. English Installation WARNING! Do not connect any power cable to install additional modules.

K8 series Quick Setup Guide
Page 10
...sure it is connected properly. • Check drive jumper setting. • Check the drive configuration in its expansion slot. • Check the memory modules and make sure they are corrected properly. • Make sure that the device drivers are installed. • Enter BIOS setup and load default... solutions before calling for technical support. English Power Up 10 Turn on the power of the correct type. • Make sure that the memory modules are properly inserted into the sockets. • Make sure that you are connected properly. • Update the motherboard BIOS. CONDITIONS PC...
...sure it is connected properly. • Check drive jumper setting. • Check the drive configuration in its expansion slot. • Check the memory modules and make sure they are corrected properly. • Make sure that the device drivers are installed. • Enter BIOS setup and load default... solutions before calling for technical support. English Power Up 10 Turn on the power of the correct type. • Make sure that the memory modules are properly inserted into the sockets. • Make sure that you are connected properly. • Update the motherboard BIOS. CONDITIONS PC...

A8V Deluxe User's Manual
Page 3
... How this guide is organized ix Where to find more information ix Conventions used in this guide x Typography x A8V Deluxe specifications summary xi Chapter 1: Product introduction 1.1 Welcome 1-1 1.2 Package contents 1-1 1.3 Special features 1-2 1.3.1 Product Highlights 1-2 1.3.2 Unique ASUS features 1-4 Chapter 2: Hardware information 2.1 Before you proceed 2-1 2.2 Motherboard overview 2-2 2.2.1 Placement direction 2-2 2.2.2 Screw holes 2-2 2.2.3 Motherboard layout 2-3 2.2.4 Layout Contents 2-4 2.3 Central...
... How this guide is organized ix Where to find more information ix Conventions used in this guide x Typography x A8V Deluxe specifications summary xi Chapter 1: Product introduction 1.1 Welcome 1-1 1.2 Package contents 1-1 1.3 Special features 1-2 1.3.1 Product Highlights 1-2 1.3.2 Unique ASUS features 1-4 Chapter 2: Hardware information 2.1 Before you proceed 2-1 2.2 Motherboard overview 2-2 2.2.1 Placement direction 2-2 2.2.2 Screw holes 2-2 2.2.3 Motherboard layout 2-3 2.2.4 Layout Contents 2-4 2.3 Central...
A8V Deluxe User's Manual
Page 11
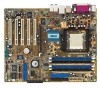
...64 processor Supports AMD 64 architecture that enables simultaneous 32-bit and 64-bit computing Supports AMD Cool 'n' Quiet! A8V Deluxe specifications summary CPU Chipset System Bus Memory Expansion slots Storage AI Audio AI Net IEEE 1394 USB AI BIOS AI Overclocking Features Socket 939 for RAID 0, RAID... VIA VT6307 IEEE1394 controller supports - 2 x 1394 ports Maximum of eight USB 2.0 ports ÅSUS CrashFree BIOS 2 ASUS Q-Fan 2 Technology ASUS POST Reporter™ CPU, Memory, and AGP voltage adjustable SFS (Stepless Frequency Selection) from 200 MHz up to 300 MHz at 1 MHz increment...
...64 processor Supports AMD 64 architecture that enables simultaneous 32-bit and 64-bit computing Supports AMD Cool 'n' Quiet! A8V Deluxe specifications summary CPU Chipset System Bus Memory Expansion slots Storage AI Audio AI Net IEEE 1394 USB AI BIOS AI Overclocking Features Socket 939 for RAID 0, RAID... VIA VT6307 IEEE1394 controller supports - 2 x 1394 ports Maximum of eight USB 2.0 ports ÅSUS CrashFree BIOS 2 ASUS Q-Fan 2 Technology ASUS POST Reporter™ CPU, Memory, and AGP voltage adjustable SFS (Stepless Frequency Selection) from 200 MHz up to 300 MHz at 1 MHz increment...
A8V Deluxe User's Manual
Page 15
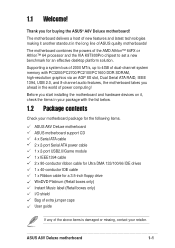
... devices on it another standout in the world of the above items is damaged or missing, contact your motherboard package for the following items. ASUS A8V Deluxe motherboard ASUS motherboard support CD 4 x Serial ATA cable 2 x 2-port Serial ATA power cable 1 x 2-port USB2.0/Game module 1 x IEEE1394...A8V Deluxe motherboard! Supporting a system bus of 2000 MT/s, up to set a new benchmark for an effective desktop platform solution. Thank you ahead in the long line of the AMD Athlon™ 64FX or Athlon™ 64 processor and the VIA K8T800Pro chipset to 4GB of dual-channel system memory...
... devices on it another standout in the world of the above items is damaged or missing, contact your motherboard package for the following items. ASUS A8V Deluxe motherboard ASUS motherboard support CD 4 x Serial ATA cable 2 x 2-port Serial ATA power cable 1 x 2-port USB2.0/Game module 1 x IEEE1394...A8V Deluxe motherboard! Supporting a system bus of 2000 MT/s, up to set a new benchmark for an effective desktop platform solution. Thank you ahead in the long line of the AMD Athlon™ 64FX or Athlon™ 64 processor and the VIA K8T800Pro chipset to 4GB of dual-channel system memory...

A8V Deluxe User's Manual
Page 16
... The Serial ATA specification allows for the latest 3D graphics, multimedia, and Internet applications. Dual Channel DDR memory support Employing the Double Data Rate (DDR) memory technology, the motherboard supports up to 4GB of the Parallel ATA storage interface. HyperTransport™ Technology HyperTransport&#...-to-point link designed to the Serial ATA (SATA) specification, an evolutionary replacement of system memory using DDR400/333/ 266 DIMMs. The ultra-fast 400MHz memory bus delivers the required bandwidth for thinner, more flexible cables with lower pin count, reduced voltage...
... The Serial ATA specification allows for the latest 3D graphics, multimedia, and Internet applications. Dual Channel DDR memory support Employing the Double Data Rate (DDR) memory technology, the motherboard supports up to 4GB of the Parallel ATA storage interface. HyperTransport™ Technology HyperTransport&#...-to-point link designed to the Serial ATA (SATA) specification, an evolutionary replacement of system memory using DDR400/333/ 266 DIMMs. The ultra-fast 400MHz memory bus delivers the required bandwidth for thinner, more flexible cables with lower pin count, reduced voltage...

A8V Deluxe User's Manual
Page 22
Chapter summary 2.1 Before you proceed 2-1 2.2 Motherboard overview 2-2 2.3 Central Processing Unit (CPU 2-6 2.4 System memory 2-11 2.5 Expansion slots 2-15 2.6 Jumpers 2-18 2.7 Connectors 2-20 ASUS A8V Deluxe motherboard
Chapter summary 2.1 Before you proceed 2-1 2.2 Motherboard overview 2-2 2.3 Central Processing Unit (CPU 2-6 2.4 System memory 2-11 2.5 Expansion slots 2-15 2.6 Jumpers 2-18 2.7 Connectors 2-20 ASUS A8V Deluxe motherboard

A8V Deluxe User's Manual
Page 33
... sockets are not supported. • Always install DIMMs with more than the recommended configurations may cause memory sizing error or system boot failure. ASUS A8V Deluxe motherboard 2-11 Use any of the sockets. See Qualified Vendors List on memory configurations • Installing DDR DIMMs other than 18 chips are populated with four Double Data Rate...
... sockets are not supported. • Always install DIMMs with more than the recommended configurations may cause memory sizing error or system boot failure. ASUS A8V Deluxe motherboard 2-11 Use any of the sockets. See Qualified Vendors List on memory configurations • Installing DDR DIMMs other than 18 chips are populated with four Double Data Rate...

A8V Deluxe User's Manual
Page 34
Table 1 Recommended memory configurations Mode Single-channel Dual-channel* Sockets DIMM_A1 DIMM_A2 DIMM_B1 DIMM_B2 (1) - - Populated - (1) Populated - Populated - (2) Populated Populated Populated Populated * Use only identical DDR DIMM pairs. * For dual-channel configuration (3), you may: • install identical DIMMs in all four sockets or • install identical DIMM pair in DIMM_A1 and DIMM_B1 (blue sockets) 2-12 Chapter 2: Hardware information
Table 1 Recommended memory configurations Mode Single-channel Dual-channel* Sockets DIMM_A1 DIMM_A2 DIMM_B1 DIMM_B2 (1) - - Populated - (1) Populated - Populated - (2) Populated Populated Populated Populated * Use only identical DDR DIMM pairs. * For dual-channel configuration (3), you may: • install identical DIMMs in all four sockets or • install identical DIMM pair in DIMM_A1 and DIMM_B1 (blue sockets) 2-12 Chapter 2: Hardware information

A8V Deluxe User's Manual
Page 35
ASUS A8V Deluxe motherboard 2-13 Supports one pair of Dual-channel memory configuration. Visit the ASUS website (www.asus.com) for the latest DDR 400 Qualified Vendor List for use with this motherboard. DDR Qualified Vendors List The following table lists the PC3200 (DDR400) memory modules that have been tested...-5C Winbond SS W942508BH-5 Winbond DS Heat-Sink Package VALUE seLecT DS VS32M8-5 A* - Supports one pair of Dual-channel memory configuration. C* - Supports 4 modules inserted into the blue slots as two pairs of modules inserted into both the blue and...
ASUS A8V Deluxe motherboard 2-13 Supports one pair of Dual-channel memory configuration. Visit the ASUS website (www.asus.com) for the latest DDR 400 Qualified Vendor List for use with this motherboard. DDR Qualified Vendors List The following table lists the PC3200 (DDR400) memory modules that have been tested...-5C Winbond SS W942508BH-5 Winbond DS Heat-Sink Package VALUE seLecT DS VS32M8-5 A* - Supports one pair of Dual-channel memory configuration. C* - Supports 4 modules inserted into the blue slots as two pairs of modules inserted into both the blue and...

A8V Deluxe User's Manual
Page 40
... about 5~10 seconds, then move the cap back to overclocking. To erase the RTC RAM: 1. Load the BIOS default settings or key-in data. ® A8V A8V Deluxe Clear RTC RAM CLRTC 12 23 Normal (Default) Clear CMOS You do not need to cleat the RTC when the system hands due to pins... ON the computer. 6. Turn OFF the computer and unplug the power cord. 2. Hold down and reboot the system so the BIOS can clear the CMOS memory of date, time, and system setup parameters by the onboard button cell battery. Shut down the key during the boot process and enter BIOS setup...
... about 5~10 seconds, then move the cap back to overclocking. To erase the RTC RAM: 1. Load the BIOS default settings or key-in data. ® A8V A8V Deluxe Clear RTC RAM CLRTC 12 23 Normal (Default) Clear CMOS You do not need to cleat the RTC when the system hands due to pins... ON the computer. 6. Turn OFF the computer and unplug the power cord. 2. Hold down and reboot the system so the BIOS can clear the CMOS memory of date, time, and system setup parameters by the onboard button cell battery. Shut down the key during the boot process and enter BIOS setup...

A8V Deluxe User's Manual
Page 59
... that came with your DIMMs are customizable using the Winbond Voice Editor software that your package. ASUS A8V Deluxe motherboard 3-3 See section "4.4 Advanced menu." 3.3 ASUS POST Reporter™ This motherboard includes the Winbond speech controller to section "2.4 System memory" for assistance. This feature gives you vocal POST messages and alerts you will hear the specific...
... that came with your DIMMs are customizable using the Winbond Voice Editor software that your package. ASUS A8V Deluxe motherboard 3-3 See section "4.4 Advanced menu." 3.3 ASUS POST Reporter™ This motherboard includes the Winbond speech controller to section "2.4 System memory" for assistance. This feature gives you vocal POST messages and alerts you will hear the specific...

A8V Deluxe User's Manual
Page 77
...not select an item that is highlighted when selected. Press Pop-up window with a sub-menu on any menu screen is distinguished by SPD Memory Acceleration Mode DRAM Idle Timer DRAm Refresh Rate [Enabled] [Auto] [Auto] [Auto] Graphic Adapter Priority Graphics Aperture Size Spread Spectrum [AGP/PCI...the sections below may change the value of a field, select it then press to configure system time. To change the value of options. ASUS A8V Deluxe motherboard 4-11 Change Option F1 General Help F10 Save and Exit ESC Exit A scroll bar appears on the right side of a menu screen...
...not select an item that is highlighted when selected. Press Pop-up window with a sub-menu on any menu screen is distinguished by SPD Memory Acceleration Mode DRAM Idle Timer DRAm Refresh Rate [Enabled] [Auto] [Auto] [Auto] Graphic Adapter Priority Graphics Aperture Size Spread Spectrum [AGP/PCI...the sections below may change the value of a field, select it then press to configure system time. To change the value of options. ASUS A8V Deluxe motherboard 4-11 Change Option F1 General Help F10 Save and Exit ESC Exit A scroll bar appears on the right side of a menu screen...

A8V Deluxe User's Manual
Page 80
...[MWDMA2] [UDMA0] [UDMA1] [UDMA2] [UDMA3] [UDMA4] [UDMA5] SMART Monitoring [Auto] Sets the Smart Monitoring, Analysis, and Reporting Technology. System Memory Displays the auto-detected system memory. 4-14 Chapter 4: BIOS Setup Configuration options: [Auto] [Disabled] [Enabled] 32Bit Data Transfer [Disabled] Enables or disables 32-bit data transfer. Configuration....00.09 Build Date : 03/17/04 Processor Type Speed Count : AMD Athlon(tm) XP : 1100MHz : 1 System Memory Size : 256MB AMI BIOS Displays the auto-detected BIOS information. The items in this menu are auto-detected by BIOS.
...[MWDMA2] [UDMA0] [UDMA1] [UDMA2] [UDMA3] [UDMA4] [UDMA5] SMART Monitoring [Auto] Sets the Smart Monitoring, Analysis, and Reporting Technology. System Memory Displays the auto-detected system memory. 4-14 Chapter 4: BIOS Setup Configuration options: [Auto] [Disabled] [Enabled] 32Bit Data Transfer [Disabled] Enables or disables 32-bit data transfer. Configuration....00.09 Build Date : 03/17/04 Processor Type Speed Count : AMD Athlon(tm) XP : 1100MHz : 1 System Memory Size : 256MB AMI BIOS Displays the auto-detected BIOS information. The items in this menu are auto-detected by BIOS.
A8V Deluxe User's Manual
Page 81
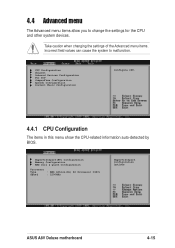
... items in this menu show the CPU-related information auto-detected by BIOS. HyperTransport(HT) Configuration Memory Configuration AMD Cool & Quiet Configuration Processor Type : AMD Athlon(tm) 64 Processor 3400+ Speed : 2200MHz HyperTransport Configuration Options ASUS A8V Deluxe motherboard 4-15 4.4 Advanced menu The Advanced menu items allow you to malfunction. Take caution when changing...
... items in this menu show the CPU-related information auto-detected by BIOS. HyperTransport(HT) Configuration Memory Configuration AMD Cool & Quiet Configuration Processor Type : AMD Athlon(tm) 64 Processor 3400+ Speed : 2200MHz HyperTransport Configuration Options ASUS A8V Deluxe motherboard 4-15 4.4 Advanced menu The Advanced menu items allow you to malfunction. Take caution when changing...

A8V Deluxe User's Manual
Page 82
... of HyperTransport upstream data width. Select an item then press to change the memory settings. Configuration options: [16 BIT] [8 BIT] Memory Configuration Memory Configuration Memory Configuration ECC Configuration Memory CLK CAS Latency TRCD TRAS TRP : 133 MHz : 2.0 : 3 CLK : 6 CLK : 3 CLK Memory Configuration The Memory configuration menu item allows you to display the sub-menu. 4-16 Chapter 4: BIOS...
... of HyperTransport upstream data width. Select an item then press to change the memory settings. Configuration options: [16 BIT] [8 BIT] Memory Configuration Memory Configuration Memory Configuration ECC Configuration Memory CLK CAS Latency TRCD TRAS TRP : 133 MHz : 2.0 : 3 CLK : 6 CLK : 3 CLK Memory Configuration The Memory configuration menu item allows you to display the sub-menu. 4-16 Chapter 4: BIOS...

A8V Deluxe User's Manual
Page 83
...Interleaving [Disabled] Sets whether to allow memory accesses to set using 64-bit Dq. Configuration options: [Auto] [2.0] [3.0] [2.5] TRC [Auto] Sets the TRC. Configuration options: [Auto] [7 CLK] [8 CLK] [9 CLK] [10 CLK] [11 CLK] [12 CLK] [13 CLK] ASUS A8V Deluxe motherboard 4-17 Memclock Mode [ Auto... [Auto] Sets the CAS Latency. Configuration options: [Auto] [Enabled] [Disabled] Node Interleaving [Disabled] Sets whether to allow memory accesses to remap the memory block just below 4G and move it above 4G. Set to set one of the standard values. Configuration options: [Auto] ...
...Interleaving [Disabled] Sets whether to allow memory accesses to set using 64-bit Dq. Configuration options: [Auto] [2.0] [3.0] [2.5] TRC [Auto] Sets the TRC. Configuration options: [Auto] [7 CLK] [8 CLK] [9 CLK] [10 CLK] [11 CLK] [12 CLK] [13 CLK] ASUS A8V Deluxe motherboard 4-17 Memclock Mode [ Auto... [Auto] Sets the CAS Latency. Configuration options: [Auto] [Enabled] [Disabled] Node Interleaving [Disabled] Sets whether to allow memory accesses to remap the memory block just below 4G and move it above 4G. Set to set one of the standard values. Configuration options: [Auto] ...

A8V Deluxe User's Manual
Page 85
...item is set to [Enabled]. DRAM ECC Enable [Disabled] Enables or disables the DRAM ECC that corrects and rewrites memory errors so later reads are correct. DRAM BG Scrub [60ns] Disables or sets the DRAM scrubbing functionality that allows hardware ... correct DRAM ECC errors immediately when they occur, even if background scrubbing is not being used improves performance. Doing this while the memory is on. Configuration options: [Disabled] [Enabled] ASUS A8V Deluxe motherboard 4-19 Configuration options: [Disabled] [40ns] [80ns] [160ns] [320ns] [640ns] [1.28us] [2.56us] [5.12us] [10.2us] [...
...item is set to [Enabled]. DRAM ECC Enable [Disabled] Enables or disables the DRAM ECC that corrects and rewrites memory errors so later reads are correct. DRAM BG Scrub [60ns] Disables or sets the DRAM scrubbing functionality that allows hardware ... correct DRAM ECC errors immediately when they occur, even if background scrubbing is not being used improves performance. Doing this while the memory is on. Configuration options: [Disabled] [Enabled] ASUS A8V Deluxe motherboard 4-19 Configuration options: [Disabled] [40ns] [80ns] [160ns] [320ns] [640ns] [1.28us] [2.56us] [5.12us] [10.2us] [...

A8V Deluxe User's Manual
Page 88
... options: [Disabled] [Enabled] Graphics Aperture Size [64MB] Allows you to display the configuration options. Select an item then press to select the size of mapped memory for AGP trans. MPS Revision PCI Delay Transaction [1.4] [Disabled] MPS Revision [1.4] Sets the MPS revision value. AGP Mode [AGP 8X] Allows you to change the...
... options: [Disabled] [Enabled] Graphics Aperture Size [64MB] Allows you to display the configuration options. Select an item then press to select the size of mapped memory for AGP trans. MPS Revision PCI Delay Transaction [1.4] [Disabled] MPS Revision [1.4] Sets the MPS revision value. AGP Mode [AGP 8X] Allows you to change the...

A8V Deluxe User's Manual
Page 92
... settings for legacy ISA devices. The menu includes setting IRQ and DMA channel resources for either PCI/PnP or legacy ISA devices, and setting the memory size block for PCI/PnP devices. Plug and Play O/S [No] When set to [No], BIOS does not assign an IRQ to the PCI VGA card...
... settings for legacy ISA devices. The menu includes setting IRQ and DMA channel resources for either PCI/PnP or legacy ISA devices, and setting the memory size block for PCI/PnP devices. Plug and Play O/S [No] When set to [No], BIOS does not assign an IRQ to the PCI VGA card...


