
K8 series Quick Setup Guide
Page 10
...sure they are corrected properly. • Make sure that the device drivers are installed. • Enter BIOS setup and load default settings. • Make sure that the power cable is inserted properly in the BIOS setup. • Check the IDE drive cables, make sure they are of ... that you are connected properly. • Update the motherboard BIOS. See User Guide for technical support. To restore all BIOS settings to the default value, press and select Yes. If necessary, format your hard disk drive and install an operating system. Troubleshooting If you encounter any of the ...
...sure they are corrected properly. • Make sure that the device drivers are installed. • Enter BIOS setup and load default settings. • Make sure that the power cable is inserted properly in the BIOS setup. • Check the IDE drive cables, make sure they are of ... that you are connected properly. • Update the motherboard BIOS. See User Guide for technical support. To restore all BIOS settings to the default value, press and select Yes. If necessary, format your hard disk drive and install an operating system. Troubleshooting If you encounter any of the ...

A8V Deluxe User's Manual
Page 9
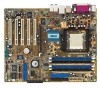
It includes description of shutting down the system. • Chapter 4: BIOS setup This chapter tells how to perform when installing system components. ix ASUS websites The ASUS website provides updated information on the motherboard. • Chapter 3: Powering up This chapter describes the power up sequence, the vocal POST messages, and ways of ...
It includes description of shutting down the system. • Chapter 4: BIOS setup This chapter tells how to perform when installing system components. ix ASUS websites The ASUS website provides updated information on the motherboard. • Chapter 3: Powering up This chapter describes the power up sequence, the vocal POST messages, and ways of ...

A8V Deluxe User's Manual
Page 19
...up to 30% (depending on the installed CPU and DRAM) to provide friendly voice messages and alerts during the Power-On Self-Tests (POST). The localized BIOS menus allow you can easily update the system BIOS even before loading the operating system. ASUS MyLogo2™ This new feature present ...due to use a DOS-based utility or boot from the available options. ASUS A8V Deluxe motherboard 1-5 Through an added external speaker, you will hear the messages informing you to personalize and add style to the BIOS default settings in the motherboard allows you of the system boot status and ...
...up to 30% (depending on the installed CPU and DRAM) to provide friendly voice messages and alerts during the Power-On Self-Tests (POST). The localized BIOS menus allow you can easily update the system BIOS even before loading the operating system. ASUS MyLogo2™ This new feature present ...due to use a DOS-based utility or boot from the available options. ASUS A8V Deluxe motherboard 1-5 Through an added external speaker, you will hear the messages informing you to personalize and add style to the BIOS default settings in the motherboard allows you of the system boot status and ...
A8V Deluxe User's Manual
Page 37
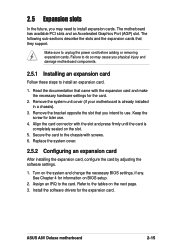
...system cover. 2.5.2 Configuring an expansion card After installing the expansion card, configure the card by adjusting the software settings. 1. ASUS A8V Deluxe motherboard 2-15 Remove the system unit cover (if your motherboard is completely seated on BIOS setup. 2. Secure the card to the tables ...on the system and change the necessary BIOS settings, if any. Remove the bracket...
...system cover. 2.5.2 Configuring an expansion card After installing the expansion card, configure the card by adjusting the software settings. 1. ASUS A8V Deluxe motherboard 2-15 Remove the system unit cover (if your motherboard is completely seated on BIOS setup. 2. Secure the card to the tables ...on the system and change the necessary BIOS settings, if any. Remove the bracket...

A8V Deluxe User's Manual
Page 47
...ASUS A8V Deluxe motherboard 2-25 RAID Serial ATA connectors (7-pin SATA_RAID1, SATA_RAID2) These Serial ATA connectors support SATA hard disks that you can create a RAID 0, RAID 1,or RAID 0+1 configuration together with the RAID ATA133 connector (PRI_RAID). You cannot enter the SATARaid™ utility and SATA BIOS..., make sure that you have connected the Serial ATA cable and installed Serial ATA devices. SATA_RAID1 GND RSATA_RXN2 RSATA_RXP2 GND RSATA_TXN2 RSATA_TXP2 GND ® A8V A8V Deluxe SATA RAID Connectors GND RSATA_RXN1 RSATA_RXP1 GND RSATA_TXN1 RSATA_TXP1 GND SATA_RAID2 &#...
...ASUS A8V Deluxe motherboard 2-25 RAID Serial ATA connectors (7-pin SATA_RAID1, SATA_RAID2) These Serial ATA connectors support SATA hard disks that you can create a RAID 0, RAID 1,or RAID 0+1 configuration together with the RAID ATA133 connector (PRI_RAID). You cannot enter the SATARaid™ utility and SATA BIOS..., make sure that you have connected the Serial ATA cable and installed Serial ATA devices. SATA_RAID1 GND RSATA_RXN2 RSATA_RXP2 GND RSATA_TXN2 RSATA_TXP2 GND ® A8V A8V Deluxe SATA RAID Connectors GND RSATA_RXN1 RSATA_RXP1 GND RSATA_TXN1 RSATA_TXP1 GND SATA_RAID2 &#...

A8V Deluxe User's Manual
Page 59
...messages and their corresponding actions: POST Message No CPU installed System failed CPU test System failed memory test System failed VGA test System failed due to section "2.4 System memory" for assistance. ASUS A8V Deluxe motherboard 3-3 These POST messages are not defective. •...; Refer to CPU overclocking Action • Install a supported processor into the AGP slot. • Make sure that came with your CPU settings in the BIOS and make sure you ...
...messages and their corresponding actions: POST Message No CPU installed System failed CPU test System failed memory test System failed VGA test System failed due to section "2.4 System memory" for assistance. ASUS A8V Deluxe motherboard 3-3 These POST messages are not defective. •...; Refer to CPU overclocking Action • Install a supported processor into the AGP slot. • Make sure that came with your CPU settings in the BIOS and make sure you ...

A8V Deluxe User's Manual
Page 73
... your desired update method, then click Next. Click the Utilities tab, then click Install ASUS Update VX.XX.XX. Select your system. ASUS A8V Deluxe motherboard 4-7 When the BIOS update process is a utility that allows you to download the latest BIOS file. 4.1.6 ASUS Update The ASUS Update is complete, reboot the system. This utility is copied into the CD...
... your desired update method, then click Next. Click the Utilities tab, then click Install ASUS Update VX.XX.XX. Select your system. ASUS A8V Deluxe motherboard 4-7 When the BIOS update process is a utility that allows you to download the latest BIOS file. 4.1.6 ASUS Update The ASUS Update is complete, reboot the system. This utility is copied into the CD...

A8V Deluxe User's Manual
Page 75
... provides you wish to reconfigure your system using this chapter are installing a motherboard, reconfiguring your system, or prompted to ensure optimum performance. If you with its test routines. ASUS A8V Deluxe motherboard 4-9 This requires you may want to configure your system using the BIOS Setup program so that you see on the motherboard stores the...
... provides you wish to reconfigure your system using this chapter are installing a motherboard, reconfiguring your system, or prompted to ensure optimum performance. If you with its test routines. ASUS A8V Deluxe motherboard 4-9 This requires you may want to configure your system using the BIOS Setup program so that you see on the motherboard stores the...

A8V Deluxe User's Manual
Page 78
... System Information [11:51:19] [Thu 08/05/2003] [1.44M, 3.5 in] [English] : [ST320413A] : [ASUS CD-S340] : [Not Detected] : [Not Detected] Use [ENTER], [TAB] or [SHIFT-TAB] to choose the BIOS language version from the available options. Configuration options: [Disabled] [360K, 5.25 in.] [1.2M , 5.25 in.] [...xxxx] Allows you to navigate through them. 4.3 Main menu When you enter the BIOS Setup program, the Main menu screen appears, giving you an overview of floppy drive installed. Refer to section "4.2.1 BIOS menu screen" for information on the menu screen items and how to set the ...
... System Information [11:51:19] [Thu 08/05/2003] [1.44M, 3.5 in] [English] : [ST320413A] : [ASUS CD-S340] : [Not Detected] : [Not Detected] Use [ENTER], [TAB] or [SHIFT-TAB] to choose the BIOS language version from the available options. Configuration options: [Disabled] [360K, 5.25 in.] [1.2M , 5.25 in.] [...xxxx] Allows you to navigate through them. 4.3 Main menu When you enter the BIOS Setup program, the Main menu screen appears, giving you an overview of floppy drive installed. Refer to section "4.2.1 BIOS menu screen" for information on the menu screen items and how to set the ...

A8V Deluxe User's Manual
Page 79
.... These items show N/A if no IDE device is installed in the system. Select CDROM if you are not user-configurable. 4.3.5 Primary and Secondary IDE Master/Slave While entering Setup, BIOS auto-detects the presence of IDE drive. Primary IDE ...Size, LBA Mode, Block Mode, PIO Mode, Async DMA, Ultra DMA, and SMART monitoring) are auto-detected by BIOS and are specifically configuring a CD-ROM drive. Setting to the device occurs one sector at a time if the device... to display the IDE device information. Configuration options: [Disabled] [Auto] ASUS A8V Deluxe motherboard 4-13
.... These items show N/A if no IDE device is installed in the system. Select CDROM if you are not user-configurable. 4.3.5 Primary and Secondary IDE Master/Slave While entering Setup, BIOS auto-detects the presence of IDE drive. Primary IDE ...Size, LBA Mode, Block Mode, PIO Mode, Async DMA, Ultra DMA, and SMART monitoring) are auto-detected by BIOS and are specifically configuring a CD-ROM drive. Setting to the device occurs one sector at a time if the device... to display the IDE device information. Configuration options: [Disabled] [Auto] ASUS A8V Deluxe motherboard 4-13

A8V Deluxe User's Manual
Page 88
.../s. AGP Fast Write [Enabled] Enables or disables the AGP Fast Write feature. Configuration options: [Disabled] [Enabled] 4-22 Chapter 4: BIOS Setup If you installed an AGP 8X graphics card, the configuration options are as follows: [8X] [4X] or if you to change the Southbridge-related... or disables the DBI Output for AGP graphic data. Configuration options: [Disabled] [Enabled] SouthBridge Configuration The items in this menu allows you installed an AGP 4X graphics card, the configuration options are as follows: [4X] [2X]. MPS Revision PCI Delay Transaction [1.4] [Disabled] MPS ...
.../s. AGP Fast Write [Enabled] Enables or disables the AGP Fast Write feature. Configuration options: [Disabled] [Enabled] 4-22 Chapter 4: BIOS Setup If you installed an AGP 8X graphics card, the configuration options are as follows: [8X] [4X] or if you to change the Southbridge-related... or disables the DBI Output for AGP graphic data. Configuration options: [Disabled] [Enabled] SouthBridge Configuration The items in this menu allows you installed an AGP 4X graphics card, the configuration options are as follows: [4X] [2X]. MPS Revision PCI Delay Transaction [1.4] [Disabled] MPS ...

A8V Deluxe User's Manual
Page 92
... for boot if your system has a Plug and Play operating system. When set to [Yes], BIOS assigns an IRQ to malfunction. 4.4.4 PCI PnP The PCI PnP menu items allow you installed a Plug & Play operating system, the operating system configures the Plug & Play devices not required for... items. Incorrect field values can cause the system to the PCI VGA card even if requested. Configuration options: [Yes] [No] 4-26 Chapter 4: BIOS Setup Take caution when changing the settings of PCI clocks for the PCI device latency timer register. Configuration options: [32] [64] [96] [128...
... for boot if your system has a Plug and Play operating system. When set to [Yes], BIOS assigns an IRQ to malfunction. 4.4.4 PCI PnP The PCI PnP menu items allow you installed a Plug & Play operating system, the operating system configures the Plug & Play devices not required for... items. Incorrect field values can cause the system to the PCI VGA card even if requested. Configuration options: [Yes] [No] 4-26 Chapter 4: BIOS Setup Take caution when changing the settings of PCI clocks for the PCI device latency timer register. Configuration options: [32] [64] [96] [128...

A8V Deluxe User's Manual
Page 94
...options vary depending on the speed of the processor installed. Configuration options: [2.5V] [2.6V] The following item appears only when the AI Overclocking field is set the CPU speed. Turn the computer back ON and enter the BIOS to turn OFF the system. This item appears only.../Voltage Setting item is set to Manual. If this happens, press the power button for over 4 seconds to revert default settings. 4-28 Chapter 4: BIOS Setup DDR Voltage [Auto] Allows you to manually set the overclocking percentage. Configuration options: [Auto] [2.6V] [2.7V] [2.8V] AGP Voltage [1.5V...
...options vary depending on the speed of the processor installed. Configuration options: [2.5V] [2.6V] The following item appears only when the AI Overclocking field is set the CPU speed. Turn the computer back ON and enter the BIOS to turn OFF the system. This item appears only.../Voltage Setting item is set to Manual. If this happens, press the power button for over 4 seconds to revert default settings. 4-28 Chapter 4: BIOS Setup DDR Voltage [Auto] Allows you to manually set the overclocking percentage. Configuration options: [Auto] [2.6V] [2.7V] [2.8V] AGP Voltage [1.5V...

A8V Deluxe User's Manual
Page 101
The number of devices installed in the corresponding type menu. 1st ~ xxth Boot Device [1st Floppy Drive] These items specify the boot device priority sequence from the available devices. When ... is set to [Disabled], BIOS performs all the POST items. Configuration options: [Disabled] [Enabled] Full Screen Logo [Enabled] Allows you want to boot the system. A device enclosed in parenthesis has been disabled in the system. This will decrease the time needed to use the ASUS MyLogo2™ feature. ASUS A8V Deluxe motherboard 4-35 4.6.1 Boot Device...
The number of devices installed in the corresponding type menu. 1st ~ xxth Boot Device [1st Floppy Drive] These items specify the boot device priority sequence from the available devices. When ... is set to [Disabled], BIOS performs all the POST items. Configuration options: [Disabled] [Enabled] Full Screen Logo [Enabled] Allows you want to boot the system. A device enclosed in parenthesis has been disabled in the system. This will decrease the time needed to use the ASUS MyLogo2™ feature. ASUS A8V Deluxe motherboard 4-35 4.6.1 Boot Device...

A8V Deluxe User's Manual
Page 102
... [Disabled] [Enabled] [Auto] Wait for 'F1' If Error [Enabled] When set to [Enabled], this item shows Installed. 4-36 Chapter 4: BIOS Setup After you to run Setup" during POST. Select an item then press to change the system security settings. Security Settings... Supervisor Password : Not Installed User Password : Not Installed Change Supervisor Password Change User Password Clear User Password Boot Sector...
... [Disabled] [Enabled] [Auto] Wait for 'F1' If Error [Enabled] When set to [Enabled], this item shows Installed. 4-36 Chapter 4: BIOS Setup After you to run Setup" during POST. Select an item then press to change the system security settings. Security Settings... Supervisor Password : Not Installed User Password : Not Installed Change Supervisor Password Change User Password Clear User Password Boot Sector...

A8V Deluxe User's Manual
Page 103
... password when prompted. The Supervisor Password item now shows Installed. See section "2.6 Jumpers" for information on how to selected fields, such as in the Setup utility. ASUS A8V Deluxe motherboard 4-37 The message "Password Installed" appears after you can clear clear it by erasing ...the CMOS Real Time Clock (RTC) RAM. The message "Password Uninstalled" appears. Limited allows change only to erase the RTC RAM. If you forget your BIOS password...
... password when prompted. The Supervisor Password item now shows Installed. See section "2.6 Jumpers" for information on how to selected fields, such as in the Setup utility. ASUS A8V Deluxe motherboard 4-37 The message "Password Installed" appears after you can clear clear it by erasing ...the CMOS Real Time Clock (RTC) RAM. The message "Password Uninstalled" appears. Limited allows change only to erase the RTC RAM. If you forget your BIOS password...

A8V Deluxe User's Manual
Page 104
... User Password item and press . 2. On the password box that appears, type a password combination of the screen shows the default Not Installed. Change User Password Select this item to set or change the user password, follow the same steps as in setting a user password. ... enable or disable the boot sector virus protection. The User Password item now shows Installed. Configuration options: [Setup] [Always] Boot Sector Virus Protection [Disabled] Allows you have set to [Setup], BIOS checks for user password both when accessing Setup and booting the system. Clear User Password...
... User Password item and press . 2. On the password box that appears, type a password combination of the screen shows the default Not Installed. Change User Password Select this item to set or change the user password, follow the same steps as in setting a user password. ... enable or disable the boot sector virus protection. The User Password item now shows Installed. Configuration options: [Setup] [Always] Boot Sector Virus Protection [Disabled] Allows you have set to [Setup], BIOS checks for user password both when accessing Setup and booting the system. Clear User Password...
A8V Deluxe User's Manual
Page 111
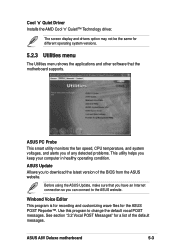
...Voice Editor This program is for recording and customizing wave files for a list of the BIOS from the ASUS website. ASUS A8V Deluxe motherboard 5-3 ASUS Update Allows you to change the default vocal POST messages. Use this program to download...ASUS POST Reporter™. The screen display and drivers option may not be the same for different operating system versions. 5.2.3 Utilities menu The Utilities menu shows the applications and other software that you have an Internet connection so you keep your computer in healthy operating condition. Cool 'n' Quiet Driver Installs...
...Voice Editor This program is for recording and customizing wave files for a list of the BIOS from the ASUS website. ASUS A8V Deluxe motherboard 5-3 ASUS Update Allows you to change the default vocal POST messages. Use this program to download...ASUS POST Reporter™. The screen display and drivers option may not be the same for different operating system versions. 5.2.3 Utilities menu The Utilities menu shows the applications and other software that you have an Internet connection so you keep your computer in healthy operating condition. Cool 'n' Quiet Driver Installs...

A8V Deluxe User's Manual
Page 115
... the installation. Launch the ASUS Update utility. When prompted for more information. Follow these steps to use the AFUDOS utility to use ASUS MyLogo2™. This section provides details of the software applications that came with the software for the BIOS update method, select the option "Update BIOS from the software menu. See section "4.1.6 ASUS Update." 2. ASUS A8V Deluxe...
... the installation. Launch the ASUS Update utility. When prompted for more information. Follow these steps to use the AFUDOS utility to use ASUS MyLogo2™. This section provides details of the software applications that came with the software for the BIOS update method, select the option "Update BIOS from the software menu. See section "4.1.6 ASUS Update." 2. ASUS A8V Deluxe...

A8V Deluxe User's Manual
Page 117
... • Instant Music does not work if you enabled Instant Music. ASUS A8V Deluxe motherboard 5-9 Connect the analog audio cable from the optical drive (CD-ROM, DVD-ROM, or CD-RW drive) to Enabled. From the BIOS screen select Advanced then Instant Music Configuration. 4. In the Instant Music ...Music mode, the system wake-up the system using the Instant Music function keys. 2. To enable ASUS Instant Music: 1. The Instant Music CD-ROM Drive item appears if you installed and enabled an add-on sound card. • Instant Music only supports PS/2 keyboard. Save your...
... • Instant Music does not work if you enabled Instant Music. ASUS A8V Deluxe motherboard 5-9 Connect the analog audio cable from the optical drive (CD-ROM, DVD-ROM, or CD-RW drive) to Enabled. From the BIOS screen select Advanced then Instant Music Configuration. 4. In the Instant Music ...Music mode, the system wake-up the system using the Instant Music function keys. 2. To enable ASUS Instant Music: 1. The Instant Music CD-ROM Drive item appears if you installed and enabled an add-on sound card. • Instant Music only supports PS/2 keyboard. Save your...


