
K8 series Quick Setup Guide
Page 10
...; Make sure that you are connected properly. • Update the motherboard BIOS. See User Guide for technical support. CONDITIONS PC won't start up PC starts up, but no display Memory error Floppy disk error Hard disk ... the graphics port. • Check the brightness and contract controls of the monitor, make sure they are corrected properly. • Make sure that the device drivers are installed. • Enter BIOS setup and load default settings. • Make sure that the power cable is connected properly to the default value, press...
...; Make sure that you are connected properly. • Update the motherboard BIOS. See User Guide for technical support. CONDITIONS PC won't start up PC starts up, but no display Memory error Floppy disk error Hard disk ... the graphics port. • Check the brightness and contract controls of the monitor, make sure they are corrected properly. • Make sure that the device drivers are installed. • Enter BIOS setup and load default settings. • Make sure that the power cable is connected properly to the default value, press...
A8V Deluxe User's Manual
Page 37
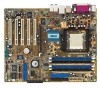
...cover (if your motherboard is completely seated on BIOS setup. 2. ASUS A8V Deluxe motherboard 2-15 The following sub-sections describe the slots and the expansion cards that came with screws. 6. Keep the screw for the card. 2. Turn on the next page. 3. Install the software drivers for information on ... card and make the necessary hardware settings for later use . 2.5 Expansion slots In the future, you physical injury and damage motherboard components. 2.5.1 Installing an expansion card Follow these steps to install an expansion card. 1. Refer to the tables on the system...
...cover (if your motherboard is completely seated on BIOS setup. 2. ASUS A8V Deluxe motherboard 2-15 The following sub-sections describe the slots and the expansion cards that came with screws. 6. Keep the screw for the card. 2. Turn on the next page. 3. Install the software drivers for information on ... card and make the necessary hardware settings for later use . 2.5 Expansion slots In the future, you physical injury and damage motherboard components. 2.5.1 Installing an expansion card Follow these steps to install an expansion card. 1. Refer to the tables on the system...
A8V Deluxe User's Manual
Page 38
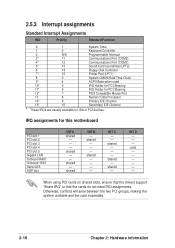
... CMOS/Real Time Clock 9* 4 ACPI Mode when used - - - - - - INT C - - When using PCI cards on shared slots, ensure that the drivers support "Share IRQ" or that the cards do not need IRQ assignments. used 10* 5 IRQ Holder for PCI Steering 11* 6 IRQ Holder for PCI Steering... 7 PS/2 Compatible Mouse Port 13 8 Numeric Data Processor 14* 9 Primary IDE Channel 15* 10 Secondary IDE Channel * These IRQs are usually available for this motherboard PCI slot 1 PCI slot 2 PCI slot 3 PCI slot 4 PCI slot 5 Gigabit LAN Onboard RAID Onboard 1394 Serial ATA AGP slot INT A shared - -...
... CMOS/Real Time Clock 9* 4 ACPI Mode when used - - - - - - INT C - - When using PCI cards on shared slots, ensure that the drivers support "Share IRQ" or that the cards do not need IRQ assignments. used 10* 5 IRQ Holder for PCI Steering 11* 6 IRQ Holder for PCI Steering... 7 PS/2 Compatible Mouse Port 13 8 Numeric Data Processor 14* 9 Primary IDE Channel 15* 10 Secondary IDE Channel * These IRQs are usually available for this motherboard PCI slot 1 PCI slot 2 PCI slot 3 PCI slot 4 PCI slot 5 Gigabit LAN Onboard RAID Onboard 1394 Serial ATA AGP slot INT A shared - -...

A8V Deluxe User's Manual
Page 50
..., and simultaneous running of the USB (blue) connectors. 9. You must install the driver before you can use the USB 2.0 capability. Doing so will damage the motherboard! 2-28 Chapter 2: Hardware information USB+5V USB_P6USB_P6+ GND NC USB+5V USB_P8USB_P8+ GND NC ® A8V A8V Deluxe USB 2.0 Header USB78 1 USB56 1 USB+5V USB_P5USB_P5+ GND USB+5V USB_P7USB_P7...
..., and simultaneous running of the USB (blue) connectors. 9. You must install the driver before you can use the USB 2.0 capability. Doing so will damage the motherboard! 2-28 Chapter 2: Hardware information USB+5V USB_P6USB_P6+ GND NC USB+5V USB_P8USB_P8+ GND NC ® A8V A8V Deluxe USB 2.0 Header USB78 1 USB56 1 USB+5V USB_P5USB_P5+ GND USB+5V USB_P7USB_P7...

A8V Deluxe User's Manual
Page 73
... available in the support CD that allows you to download the latest BIOS file. 4.1.6 ASUS Update The ASUS Update is a utility that comes with the motherboard package. The Drivers menu appears. 2. The ASUS Update utility is complete, reboot the system. See page 5-3 for this motherboard. ASUS A8V Deluxe motherboard 4-7 Launch the utility from the Windows desktop by clicking Start > Programs...
... available in the support CD that allows you to download the latest BIOS file. 4.1.6 ASUS Update The ASUS Update is a utility that comes with the motherboard package. The Drivers menu appears. 2. The ASUS Update utility is complete, reboot the system. See page 5-3 for this motherboard. ASUS A8V Deluxe motherboard 4-7 Launch the utility from the Windows desktop by clicking Start > Programs...

A8V Deluxe User's Manual
Page 108
Chapter summary 5.1 Installing an operating system 5-1 5.2 Support CD information 5-1 5.3 Software Information 5-7 5.4 AI Net feature 5-11 5.5 Audio configurations 5-12 5.6 RAID configurations 5-18 5.7 Creating a RAID driver disk 5-33 5.8 Cool 'n' Quiet!™ Technology 5-34 ASUS A8V Deluxe motherboard
Chapter summary 5.1 Installing an operating system 5-1 5.2 Support CD information 5-1 5.3 Software Information 5-7 5.4 AI Net feature 5-11 5.5 Audio configurations 5-12 5.6 RAID configurations 5-18 5.7 Creating a RAID driver disk 5-33 5.8 Cool 'n' Quiet!™ Technology 5-34 ASUS A8V Deluxe motherboard

A8V Deluxe User's Manual
Page 109
...; 98SE/ME/2000/XP/2003 Server operating systems (OS). ASUS A8V Deluxe motherboard 5-1 Click an item to install Click an icon to display more information. 5.2 Support CD information The support CD that came with the motherboard contains useful software and several utility drivers that enhance the motherboard features. Double-click the ASSETUP.EXE to locate the file...
...; 98SE/ME/2000/XP/2003 Server operating systems (OS). ASUS A8V Deluxe motherboard 5-1 Click an item to install Click an icon to display more information. 5.2 Support CD information The support CD that came with the motherboard contains useful software and several utility drivers that enhance the motherboard features. Double-click the ASSETUP.EXE to locate the file...
A8V Deluxe User's Manual
Page 111
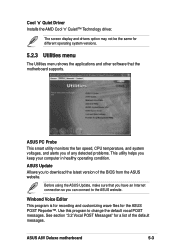
...problems. This utility helps you to change the default vocal POST messages. Cool 'n' Quiet Driver Installs the AMD Cool 'n' Quiet!™ Technology driver. The screen display and drivers option may not be the same for different operating system versions. 5.2.3 Utilities menu The... have an Internet connection so you can connect to the ASUS website. See section "3.2 Vocal POST Messages" for the ASUS POST Reporter™. Before using the ASUS Update, make sure that the motherboard supports. ASUS A8V Deluxe motherboard 5-3 ASUS PC Probe This smart utility monitors the fan speed, CPU...
...problems. This utility helps you to change the default vocal POST messages. Cool 'n' Quiet Driver Installs the AMD Cool 'n' Quiet!™ Technology driver. The screen display and drivers option may not be the same for different operating system versions. 5.2.3 Utilities menu The... have an Internet connection so you can connect to the ASUS website. See section "3.2 Vocal POST Messages" for the ASUS POST Reporter™. Before using the ASUS Update, make sure that the motherboard supports. ASUS A8V Deluxe motherboard 5-3 ASUS PC Probe This smart utility monitors the fan speed, CPU...

A8V Deluxe User's Manual
Page 120
... 5.5 Audio configurations The Realtek® ALC850 AC '97 audio CODEC provides 8-channel audio capability to install the Realtek ALC850 Audio Driver and Application from the support CD that came with the motherboard package. The ALC850 also includes the Realtek® proprietary UAJ® (Universal Audio Jack) technology for your PC. Follow the...
... 5.5 Audio configurations The Realtek® ALC850 AC '97 audio CODEC provides 8-channel audio capability to install the Realtek ALC850 Audio Driver and Application from the support CD that came with the motherboard package. The ALC850 also includes the Realtek® proprietary UAJ® (Universal Audio Jack) technology for your PC. Follow the...
A8V Deluxe User's Manual
Page 126
5.6 RAID configurations The motherboard includes the Promise® PDC20378 controller chipset and the VIA ...write data in one drive fails, the disk array management software directs all applications to section "5.7 Creating a RAID driver disk" for Just a Bunch of data striping and data mirroring on separate RAID sets in parallel, interleaved stacks.... disks, you use either Windows® XP or Windows® 2000 operating system (OS), copy first the RAID driver from one drive and have a complete duplicate surviving drive or set configurations: RAID 0 (called data mirroring) copies ...
5.6 RAID configurations The motherboard includes the Promise® PDC20378 controller chipset and the VIA ...write data in one drive fails, the disk array management software directs all applications to section "5.7 Creating a RAID driver disk" for Just a Bunch of data striping and data mirroring on separate RAID sets in parallel, interleaved stacks.... disks, you use either Windows® XP or Windows® 2000 operating system (OS), copy first the RAID driver from one drive and have a complete duplicate surviving drive or set configurations: RAID 0 (called data mirroring) copies ...

A8V Deluxe User's Manual
Page 129
... Technology, Inc. [ Auto Setup Options Menu ] Optimize Array for details. Refer to install third-party SCSI or RAID driver. During the boot process, the MBFastTrak378 BIOS checks and displays the disk array information. 5. ASUS A8V Deluxe motherboard 5-21 Use the arrow keys to go to save and create a RAID 0 array. 4. After making a selection, press to...
... Technology, Inc. [ Auto Setup Options Menu ] Optimize Array for details. Refer to install third-party SCSI or RAID driver. During the boot process, the MBFastTrak378 BIOS checks and displays the disk array information. 5. ASUS A8V Deluxe motherboard 5-21 Use the arrow keys to go to save and create a RAID 0 array. 4. After making a selection, press to...

A8V Deluxe User's Manual
Page 131
...the array has the same or larger capacity as the existing drive. Create Only 5. Press to save the selection and start the duplication. Abort ASUS A8V Deluxe motherboard 5-23 The Mode field displays Mirror. 3. Do you to continue? (Yes/No) Y - During the OS installation, the system prompts ...The following message appears: Do you will use an existing drive that the new hard drive you want to install third-party SCSI or RAID driver. Create and Duplicate N - Continue N - Creating a Security Array with Existing Data Drive If you have formatted the arrayed drives, install an...
...the array has the same or larger capacity as the existing drive. Create Only 5. Press to save the selection and start the duplication. Abort ASUS A8V Deluxe motherboard 5-23 The Mode field displays Mirror. 3. Do you to continue? (Yes/No) Y - During the OS installation, the system prompts ...The following message appears: Do you will use an existing drive that the new hard drive you want to install third-party SCSI or RAID driver. Create and Duplicate N - Continue N - Creating a Security Array with Existing Data Drive If you have formatted the arrayed drives, install an...
A8V Deluxe User's Manual
Page 141
....exe utility. Follow succeeding screen instructions to avoid computer virus infection. Follow the succeeding screen instructions to install third-party SCSI or RAID driver. 2. To create a RAID driver disk: 1. ASUS A8V Deluxe motherboard 5-33 Insert a clean floppy disk into the CD-ROM drive and locate the Makedisk.exe utility for your RAID controller. The Makedisk.exe...
....exe utility. Follow succeeding screen instructions to avoid computer virus infection. Follow the succeeding screen instructions to install third-party SCSI or RAID driver. 2. To create a RAID driver disk: 1. ASUS A8V Deluxe motherboard 5-33 Insert a clean floppy disk into the CD-ROM drive and locate the Makedisk.exe utility for your RAID controller. The Makedisk.exe...

A8V Deluxe User's Manual
Page 142
... Panel is set it to Classic View. 3. Double-click the Display icon in the user guide. 3. 5.8 Cool 'n' Quiet!™ Technology The motherboard supports the AMD Cool 'n' Quiet!™ Technology that dynamically and automatically change the CPU speed, voltage, and amount of power depending on the system and...to Yes. See section "4.5 Power Menu" in the user guide. 4. Save your computer and set it to install the Cool 'n' Quiet!™ driver and application before using this feature. Click the Power... Windows® 2000/XP 1. In the Power menu, select the item ACPI 2.0 Support and ...
... Panel is set it to Classic View. 3. Double-click the Display icon in the user guide. 3. 5.8 Cool 'n' Quiet!™ Technology The motherboard supports the AMD Cool 'n' Quiet!™ Technology that dynamically and automatically change the CPU speed, voltage, and amount of power depending on the system and...to Yes. See section "4.5 Power Menu" in the user guide. 4. Save your computer and set it to install the Cool 'n' Quiet!™ driver and application before using this feature. Click the Power... Windows® 2000/XP 1. In the Power menu, select the item ACPI 2.0 Support and ...
A8V Deluxe User's Manual
Page 143
...features of monitor group, click the Settings... From the Power Options Properties dialog box, select the AMD's Cool 'n' Quiet(tm) Technology tab. 5. ASUS A8V Deluxe motherboard 5-35 From the Windows® 98SE/ME operating system, click the Start button. button. 4. Windows® 98SE/ME 1. Select Settings, then ...select the Screen Saver tab. 3. Click OK to effect settings. • Make sure to install the AMD Cool 'n' Quiet!™ driver and application before using this feature. • The AMD Cool 'n' Quiet!™ Technology feature works only with the AMD heatsink and ...
...features of monitor group, click the Settings... From the Power Options Properties dialog box, select the AMD's Cool 'n' Quiet(tm) Technology tab. 5. ASUS A8V Deluxe motherboard 5-35 From the Windows® 98SE/ME operating system, click the Start button. button. 4. Windows® 98SE/ME 1. Select Settings, then ...select the Screen Saver tab. 3. Click OK to effect settings. • Make sure to install the AMD Cool 'n' Quiet!™ driver and application before using this feature. • The AMD Cool 'n' Quiet!™ Technology feature works only with the AMD heatsink and ...

A8V User Manual
Page 37
... expansion cards. See Chapter 4 for the card. 2. Remove the bracket opposite the slot that you may cause you physical injury and damage motherboard components. 2.5.1 Installing an expansion card Follow these steps to use . 4. Replace the system cover. 2.5.2 Configuring an expansion card After installing the... available PCI slots and an Accelerated Graphics Port (AGP) slot. Refer to the card. Install the software drivers for later use . ASUS A8V Deluxe motherboard 2-15 Secure the card to unplug the power cord before adding or removing expansion cards. Make sure to ...
... expansion cards. See Chapter 4 for the card. 2. Remove the bracket opposite the slot that you may cause you physical injury and damage motherboard components. 2.5.1 Installing an expansion card Follow these steps to use . 4. Replace the system cover. 2.5.2 Configuring an expansion card After installing the... available PCI slots and an Accelerated Graphics Port (AGP) slot. Refer to the card. Install the software drivers for later use . ASUS A8V Deluxe motherboard 2-15 Secure the card to unplug the power cord before adding or removing expansion cards. Make sure to ...

A8V User Manual
Page 38
shared INT B - When using PCI cards on shared slots, ensure that the drivers support "Share IRQ" or that the cards do not need IRQ assignments. shared - INT D - - - shared - - - IRQ assignments for ISA or PCI devices. shared - - - shared - shared... 12* 7 PS/2 Compatible Mouse Port 13 8 Numeric Data Processor 14* 9 Primary IDE Channel 15* 10 Secondary IDE Channel * These IRQs are usually available for this motherboard PCI slot 1 PCI slot 2 PCI slot 3 PCI slot 4 PCI slot 5 Gigabit LAN Onboard RAID Onboard 1394 Serial ATA AGP slot INT A shared - - - shared -...
shared INT B - When using PCI cards on shared slots, ensure that the drivers support "Share IRQ" or that the cards do not need IRQ assignments. shared - INT D - - - shared - - - IRQ assignments for ISA or PCI devices. shared - - - shared - shared... 12* 7 PS/2 Compatible Mouse Port 13 8 Numeric Data Processor 14* 9 Primary IDE Channel 15* 10 Secondary IDE Channel * These IRQs are usually available for this motherboard PCI slot 1 PCI slot 2 PCI slot 3 PCI slot 4 PCI slot 5 Gigabit LAN Onboard RAID Onboard 1394 Serial ATA AGP slot INT A shared - - - shared -...

A8V User Manual
Page 50
... the motherboard! 2-28 Chapter 2: Hardware information You must install the driver before you can use the USB 2.0 capability. This speed advantage over the conventional 12 Mbps on the rear panel are inadequate, a USB header is available for additional USB ports. USB+5V USB_P6USB_P6+ GND NC USB+5V USB_P8USB_P8+ GND NC ® A8V A8V Deluxe USB...
... the motherboard! 2-28 Chapter 2: Hardware information You must install the driver before you can use the USB 2.0 capability. This speed advantage over the conventional 12 Mbps on the rear panel are inadequate, a USB header is available for additional USB ports. USB+5V USB_P6USB_P6+ GND NC USB+5V USB_P8USB_P8+ GND NC ® A8V A8V Deluxe USB...

A8V User Manual
Page 73
... motherboard package. The Drivers menu appears. 2. ASUS Update requires an Internet connection either through a network or an Internet Service Provider (ISP). Insert the support CD into your desired update method, then click Next. The ASUS Update utility is complete, reboot the system. When the BIOS update process is copied into the CD-ROM drive. ASUS A8V Deluxe motherboard...
... motherboard package. The Drivers menu appears. 2. ASUS Update requires an Internet connection either through a network or an Internet Service Provider (ISP). Insert the support CD into your desired update method, then click Next. The ASUS Update utility is complete, reboot the system. When the BIOS update process is copied into the CD-ROM drive. ASUS A8V Deluxe motherboard...

A8V User Manual
Page 108
Chapter summary 5.1 Installing an operating system 5-1 5.2 Support CD information 5-1 5.3 Software Information 5-7 5.4 AI Net feature 5-11 5.5 Audio configurations 5-12 5.6 RAID configurations 5-18 5.7 Creating a RAID driver disk 5-33 5.8 Cool 'n' Quiet!™ Technology 5-34 ASUS A8V Deluxe motherboard
Chapter summary 5.1 Installing an operating system 5-1 5.2 Support CD information 5-1 5.3 Software Information 5-7 5.4 AI Net feature 5-11 5.5 Audio configurations 5-12 5.6 RAID configurations 5-18 5.7 Creating a RAID driver disk 5-33 5.8 Cool 'n' Quiet!™ Technology 5-34 ASUS A8V Deluxe motherboard


