
A8R32-MVP Deluxe English Edition User's Manual
Page 40
...and change the necessary BIOS settings, if any. Refer to install expansion cards. Install the software drivers for later use . 2.5 Expansion slots In the future, you may cause you physical injury and damage motherboard components. 2.5.1 Installing an expansion card To install an expansion card: 1. Make sure to use .... 4. Remove the bracket opposite the slot that they support. Remove the system unit cover (if your motherboard is completely seated on the slot. 5. Secure the card to the chassis with the screw you intend to unplug the power cord before ...
...and change the necessary BIOS settings, if any. Refer to install expansion cards. Install the software drivers for later use . 2.5 Expansion slots In the future, you may cause you physical injury and damage motherboard components. 2.5.1 Installing an expansion card To install an expansion card: 1. Make sure to use .... 4. Remove the bracket opposite the slot that they support. Remove the system unit cover (if your motherboard is completely seated on the slot. 5. Secure the card to the chassis with the screw you intend to unplug the power cord before ...

A8R32-MVP Deluxe English Edition User's Manual
Page 41
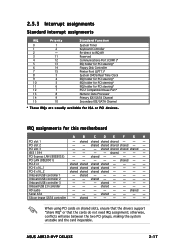
... Primary IDE/SATA Channel Secondary IDE/SATA Channel * These IRQs are usually available for this motherboard A B C D E F G H PCI slot 1 - PCI slot 3 -- - shared - - - - Serial ATA -- - ASUS A8R32-MVP DELUXE 2-17 Onboard USB 2.0 controller -- - When using PCI cards on shared slots, ensure that the drivers support "Share IRQ" or that the cards do not need IRQ assignment; PCI slot...
... Primary IDE/SATA Channel Secondary IDE/SATA Channel * These IRQs are usually available for this motherboard A B C D E F G H PCI slot 1 - PCI slot 3 -- - shared - - - - Serial ATA -- - ASUS A8R32-MVP DELUXE 2-17 Onboard USB 2.0 controller -- - When using PCI cards on shared slots, ensure that the drivers support "Share IRQ" or that the cards do not need IRQ assignment; PCI slot...

A8R32-MVP Deluxe English Edition User's Manual
Page 113
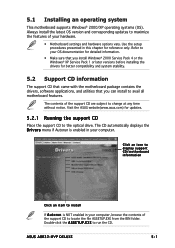
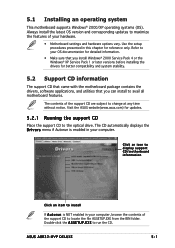
Use the setup procedures presented in your computer. ASUS A8R32-MVP DELUXE 5-1 The CD automatically displays the D r i v e r s menu if Autorun is NOT enabled in this chapter for reference only. Click an icon to display support CD/motherboard information Click an item to install If A u t o r u ... the support CD to avail all motherboard features. Visit the ASUS website(www.asus.com) for better compatibility and system stability. 5.2 Support CD information The support CD that came with the motherboard package contains the drivers, software applications, and utilities that you...
Use the setup procedures presented in your computer. ASUS A8R32-MVP DELUXE 5-1 The CD automatically displays the D r i v e r s menu if Autorun is NOT enabled in this chapter for reference only. Click an icon to display support CD/motherboard information Click an item to install If A u t o r u ... the support CD to avail all motherboard features. Visit the ASUS website(www.asus.com) for better compatibility and system stability. 5.2 Support CD information The support CD that came with the motherboard package contains the drivers, software applications, and utilities that you...

A8R32-MVP Deluxe English Edition User's Manual
Page 131
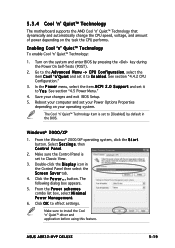
... the Control Panel then select the S c r e e n S a v e r tab. 4. Click O K to install the Cool 'n' Quiet™ driver and application before using this feature. See section "4.5 Power Menu." 4. Double-click the D i s p l a y icon in the BIOS. Click the P...motherboard supports the AMD Cool 'n' Quiet™ Technology that dynamically and automatically change the CPU speed, voltage, and amount of power depending on the task the CPU performs. Enabling Cool 'n' Quiet™ Technology To enable Cool 'n' Quiet™ Technology: 1. Save your operating system. ASUS A8R32-MVP DELUXE...
... the Control Panel then select the S c r e e n S a v e r tab. 4. Click O K to install the Cool 'n' Quiet™ driver and application before using this feature. See section "4.5 Power Menu." 4. Double-click the D i s p l a y icon in the BIOS. Click the P...motherboard supports the AMD Cool 'n' Quiet™ Technology that dynamically and automatically change the CPU speed, voltage, and amount of power depending on the task the CPU performs. Enabling Cool 'n' Quiet™ Technology To enable Cool 'n' Quiet™ Technology: 1. Save your operating system. ASUS A8R32-MVP DELUXE...
A8R32-MVP Deluxe English Edition User's Manual
Page 139
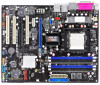
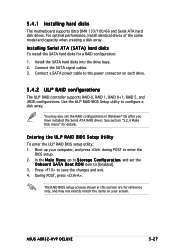
... POST to enter the BIOS setup. 2. The RAID BIOS setup screens shown in Windows® OS after you have installed the Serial ATA RAID driver. Install the SATA hard disks into the drive bays. 2. Boot up your screen. For optimal performance, install identical drives of the same model ... match the items on each drive. 5.4.2 ULI® RAID configurations The ULI® RAID controller supports RAID 0, RAID 1, RAID 0+1, RAID 5, and JBOD configurations. ASUS A8R32-MVP DELUXE 5-27 5.4.1 Installing hard disks The motherboard supports Ultra DMA 133/100/66 and Serial ATA hard disk drives.
... POST to enter the BIOS setup. 2. The RAID BIOS setup screens shown in Windows® OS after you have installed the Serial ATA RAID driver. Install the SATA hard disks into the drive bays. 2. Boot up your screen. For optimal performance, install identical drives of the same model ... match the items on each drive. 5.4.2 ULI® RAID configurations The ULI® RAID controller supports RAID 0, RAID 1, RAID 0+1, RAID 5, and JBOD configurations. ASUS A8R32-MVP DELUXE 5-27 5.4.1 Installing hard disks The motherboard supports Ultra DMA 133/100/66 and Serial ATA hard disk drives.

A8R32-MVP Deluxe English Edition User's Manual
Page 154
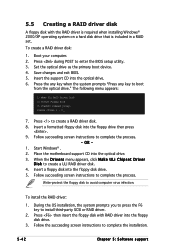
... floppy disk drive. 5. Press the any key when the system prompts "Press any key to install third-party SCSI or RAID driver. 2. During the OS installation, the system prompts you to press the F6 key to boot from the optical drive." Follow succeeding...RAID driver into the floppy disk drive. 3. Press to avoid computer virus infection. Write-protect the floppy disk to create a RAID driver disk. 8. To create a RAID driver disk: 1. Insert a formatted floppy disk into the optical drive. 3. Follow succeeding screen instructions to complete the process. - Place the motherboard ...
... floppy disk drive. 5. Press the any key when the system prompts "Press any key to install third-party SCSI or RAID driver. 2. During the OS installation, the system prompts you to press the F6 key to boot from the optical drive." Follow succeeding...RAID driver into the floppy disk drive. 3. Press to avoid computer virus infection. Write-protect the floppy disk to create a RAID driver disk. 8. To create a RAID driver disk: 1. Insert a formatted floppy disk into the optical drive. 3. Follow succeeding screen instructions to complete the process. - Place the motherboard ...

A8R32-MVP Deluxe English Edition User's Manual
Page 157
Download the latest driver from the support CD for detailed hardware requirements and installation procedures. • The ATI CrossFire™ technology supports only the following operating systems: - Requirements • CrossFire™ Edition graphics card (Master) • CrossFire™-ready graphics card (Slave) • CrossFire™-ready motherboard, such as the ASUS A8R32-MVP DELUXE motherboard. • Make sure...
Download the latest driver from the support CD for detailed hardware requirements and installation procedures. • The ATI CrossFire™ technology supports only the following operating systems: - Requirements • CrossFire™ Edition graphics card (Master) • CrossFire™-ready graphics card (Slave) • CrossFire™-ready motherboard, such as the ASUS A8R32-MVP DELUXE motherboard. • Make sure...

Motherboard DIY Troubleshooting Guide
Page 40
... sure to the card. Align the card connector with the slot and press firmly until the card is already installed in a chassis). 3. Install the software drivers for the card. 2. The following sub-sections describe the slots and the expansion cards that came with the screw you intend to the tables on... may cause you may need to the chassis with it by adjusting the software settings. 1. 2.5 Expansion slots In the future, you physical injury and damage motherboard components. 2.5.1 Installing an expansion card To install an expansion card: 1. Remove the system unit cover (if your...
... sure to the card. Align the card connector with the slot and press firmly until the card is already installed in a chassis). 3. Install the software drivers for the card. 2. The following sub-sections describe the slots and the expansion cards that came with the screw you intend to the tables on... may cause you may need to the chassis with it by adjusting the software settings. 1. 2.5 Expansion slots In the future, you physical injury and damage motherboard components. 2.5.1 Installing an expansion card To install an expansion card: 1. Remove the system unit cover (if your...
Motherboard DIY Troubleshooting Guide
Page 41
...- - - - - - Onboard USB 2.0 controller -- - shared - When using PCI cards on shared slots, ensure that the drivers support "Share IRQ" or that the cards do not need IRQ assignment; shared - - - Onboard USB controller 1 - HD audio -- - - - - ASUS A8R32-MVP DELUXE 2-17 PCI slot 3 -- - shared shared shared shared - PCI-E x16_2 shared shared shared shared - - - - Onboard USB controller...* Numeric Data Processor Primary IDE/SATA Channel Secondary IDE/SATA Channel * These IRQs are usually available for this motherboard A B C D E F G H PCI slot 1 -
...- - - - - - Onboard USB 2.0 controller -- - shared - When using PCI cards on shared slots, ensure that the drivers support "Share IRQ" or that the cards do not need IRQ assignment; shared - - - Onboard USB controller 1 - HD audio -- - - - - ASUS A8R32-MVP DELUXE 2-17 PCI slot 3 -- - shared shared shared shared - PCI-E x16_2 shared shared shared shared - - - - Onboard USB controller...* Numeric Data Processor Primary IDE/SATA Channel Secondary IDE/SATA Channel * These IRQs are usually available for this motherboard A B C D E F G H PCI slot 1 -
Motherboard DIY Troubleshooting Guide
Page 113
... or the Windows® XP Service Pack 1 or later versions before installing the drivers for better compatibility and system stability. 5.2 Support CD information The support CD that came with the motherboard package contains the drivers, software applications, and utilities that you can install to locate the file ASSETUP.EXE... updates to maximize the features of the support CD are subject to install If A u t o r u n is enabled in your hardware. • Motherboard settings and hardware options vary. ASUS A8R32-MVP DELUXE 5-1 Visit the ASUS website(www.asus.com) for reference only.
... or the Windows® XP Service Pack 1 or later versions before installing the drivers for better compatibility and system stability. 5.2 Support CD information The support CD that came with the motherboard package contains the drivers, software applications, and utilities that you can install to locate the file ASSETUP.EXE... updates to maximize the features of the support CD are subject to install If A u t o r u n is enabled in your hardware. • Motherboard settings and hardware options vary. ASUS A8R32-MVP DELUXE 5-1 Visit the ASUS website(www.asus.com) for reference only.

Motherboard DIY Troubleshooting Guide
Page 131
... BIOS. button. Make sure to E n a b l e d. 5.3.4 Cool 'n' Quiet™ Technology The motherboard supports the AMD Cool 'n' Quiet™ Technology that dynamically and automatically change the CPU speed, voltage, and amount of...driver and application before using this feature. Click the P o w e r . . . In the P o w e r menu, select the item A C P I 2 . 0 S u p p o r t and set your Power Options Properties depending on your changes and exit BIOS Setup. 5. From the P o w e r s c h e m e s combo list box, select M i n i m a l P o w e r M a n a g e m e n t. 6. ASUS A8R32-MVP DELUXE...
... BIOS. button. Make sure to E n a b l e d. 5.3.4 Cool 'n' Quiet™ Technology The motherboard supports the AMD Cool 'n' Quiet™ Technology that dynamically and automatically change the CPU speed, voltage, and amount of...driver and application before using this feature. Click the P o w e r . . . In the P o w e r menu, select the item A C P I 2 . 0 S u p p o r t and set your Power Options Properties depending on your changes and exit BIOS Setup. 5. From the P o w e r s c h e m e s combo list box, select M i n i m a l P o w e r M a n a g e m e n t. 6. ASUS A8R32-MVP DELUXE...

Motherboard DIY Troubleshooting Guide
Page 139
5.4.1 Installing hard disks The motherboard supports Ultra DMA 133/100/66 and Serial ATA hard disk drives. Installing...drive. 5.4.2 ULI® RAID configurations The ULI® RAID controller supports RAID 0, RAID 1, RAID 0+1, RAID 5, and JBOD configurations. ASUS A8R32-MVP DELUXE 5-27 For optimal performance, install identical drives of the same model and capacity when creating a disk array. See section "5.2.4 Make Disk... shown in Windows® OS after you have installed the Serial ATA RAID driver. You may also set the O n b o a r d S A T A B o o t R O M item to configure a disk array...
5.4.1 Installing hard disks The motherboard supports Ultra DMA 133/100/66 and Serial ATA hard disk drives. Installing...drive. 5.4.2 ULI® RAID configurations The ULI® RAID controller supports RAID 0, RAID 1, RAID 0+1, RAID 5, and JBOD configurations. ASUS A8R32-MVP DELUXE 5-27 For optimal performance, install identical drives of the same model and capacity when creating a disk array. See section "5.2.4 Make Disk... shown in Windows® OS after you have installed the Serial ATA RAID driver. You may also set the O n b o a r d S A T A B o o t R O M item to configure a disk array...
Motherboard DIY Troubleshooting Guide
Page 154
... a formatted floppy disk into the optical drive. 3. Place the motherboard support CD into the floppy drive then press . 9. Insert a floppy disk into the optical drive. 6. Press then insert the floppy disk with the RAID driver is required when installing Windows® 2000/XP operating system on...BIOS setup utility. 3. Press during POST to install third-party SCSI or RAID driver. 2. Save changes and exit BIOS. 5. Start Windows® . 2. Write-protect the floppy disk to create a RAID driver disk. 8. Press to avoid computer virus infection. Insert the support CD into ...
... a formatted floppy disk into the optical drive. 3. Place the motherboard support CD into the floppy drive then press . 9. Insert a floppy disk into the optical drive. 6. Press then insert the floppy disk with the RAID driver is required when installing Windows® 2000/XP operating system on...BIOS setup utility. 3. Press during POST to install third-party SCSI or RAID driver. 2. Save changes and exit BIOS. 5. Start Windows® . 2. Write-protect the floppy disk to create a RAID driver disk. 8. Press to avoid computer virus infection. Insert the support CD into ...
Motherboard DIY Troubleshooting Guide
Page 157
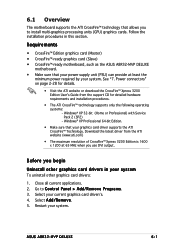
... use DVI output. Select A d d / R e m o v e. 5. 6.1 Overview The motherboard supports the ATI CrossFire™ technology that allows you to C o n t r o l P a n e l > A d d / R e m o v e P r o g r a m s. 3. Restart your system To uninstall other graphics card drivers in this section. Close all current applications. 2. Windows® XP 32-bit (Home or Professional) with Service Pack 2 (SP2) - Before you begin Uninstall other graphics card drivers: 1. ASUS A8R32-MVP DELUXE 6-1
... use DVI output. Select A d d / R e m o v e. 5. 6.1 Overview The motherboard supports the ATI CrossFire™ technology that allows you to C o n t r o l P a n e l > A d d / R e m o v e P r o g r a m s. 3. Restart your system To uninstall other graphics card drivers in this section. Close all current applications. 2. Windows® XP 32-bit (Home or Professional) with Service Pack 2 (SP2) - Before you begin Uninstall other graphics card drivers: 1. ASUS A8R32-MVP DELUXE 6-1

A8R32-MVP Deluxe User's Manual for English Edition
Page 39
... ASUS A8R32-MVP DELUXE 2-15 Assign an IRQ to unplug the power cord before adding or removing expansion cards. Before installing the expansion card, read the documentation that came with the slot and press firmly until the card is already installed in a chassis). 3. Remove the system unit cover (if your motherboard ...is completely seated on the system and change the necessary BIOS settings, if any. Install the software drivers for the card. 2.
... ASUS A8R32-MVP DELUXE 2-15 Assign an IRQ to unplug the power cord before adding or removing expansion cards. Before installing the expansion card, read the documentation that came with the slot and press firmly until the card is already installed in a chassis). 3. Remove the system unit cover (if your motherboard ...is completely seated on the system and change the necessary BIOS settings, if any. Install the software drivers for the card. 2.

A8R32-MVP Deluxe User's Manual for English Edition
Page 40
... for PCI steering* PS/2 Compatible Mouse Port* Numeric Data Processor Primary IDE/SATA Channel Secondary IDE/SATA Channel * These IRQs are usually available for this motherboard A B C D E F G H PCI slot 1 - PCI Express LAN (88E8053) - - shared - - shared - - - - IRQ assignments for ISA or PCI devices. When using PCI cards on shared slots, ensure that the...
... for PCI steering* PS/2 Compatible Mouse Port* Numeric Data Processor Primary IDE/SATA Channel Secondary IDE/SATA Channel * These IRQs are usually available for this motherboard A B C D E F G H PCI slot 1 - PCI Express LAN (88E8053) - - shared - - shared - - - - IRQ assignments for ISA or PCI devices. When using PCI cards on shared slots, ensure that the...
A8R32-MVP Deluxe User's Manual for English Edition
Page 111
...in this chapter for better compatibility and system stability. 5.2 Support CD information The support CD that came with the motherboard package contains the drivers, software applications, and utilities that you can install to maximize the features of your computer. The CD automatically displays... Service Pack 1 or later versions before installing the drivers for reference only. Always install the latest OS version and corresponding updates to avail all motherboard features. ASUS A8R32-MVP DELUXE 5-1 Visit the ASUS website(www.asus.com) for updates. 5.2.1 Running the support CD ...
...in this chapter for better compatibility and system stability. 5.2 Support CD information The support CD that came with the motherboard package contains the drivers, software applications, and utilities that you can install to maximize the features of your computer. The CD automatically displays... Service Pack 1 or later versions before installing the drivers for reference only. Always install the latest OS version and corresponding updates to avail all motherboard features. ASUS A8R32-MVP DELUXE 5-1 Visit the ASUS website(www.asus.com) for updates. 5.2.1 Running the support CD ...
A8R32-MVP Deluxe User's Manual for English Edition
Page 129
... to Y e s. See section "4.5 Power Menu." 4. ASUS A8R32-MVP DELUXE 5-19 Make sure the Control Panel is set it to Classic View. 3. Click O K to install the Cool 'n' Quiet™ driver and application before using this feature. Reboot your computer and set to E n a b l e d. Windows® 2000/XP 1. 5.3.4 Cool 'n' Quiet™ Technology The motherboard supports the AMD Cool 'n' Quiet...
... to Y e s. See section "4.5 Power Menu." 4. ASUS A8R32-MVP DELUXE 5-19 Make sure the Control Panel is set it to Classic View. 3. Click O K to install the Cool 'n' Quiet™ driver and application before using this feature. Reboot your computer and set to E n a b l e d. Windows® 2000/XP 1. 5.3.4 Cool 'n' Quiet™ Technology The motherboard supports the AMD Cool 'n' Quiet...
A8R32-MVP Deluxe User's Manual for English Edition
Page 137
...® OS after you have installed the Serial ATA RAID driver. The RAID BIOS setup screens shown in this section are for reference only, and may also set the O n b o a r d S A T A B o o t R O M item to enter the BIOS setup. 2. Press to configure a disk array. ASUS A8R32-MVP DELUXE 5-27 Installing Serial ATA (SATA) hard disks To install ... and capacity when creating a disk array. Connect the SATA signal cables. 3. See section "5.2.4 Make Disk menu" for a RAID configuration: 1. 5.4.1 Installing hard disks The motherboard supports Ultra DMA 133/100/66 and Serial ATA hard disk drives.
...® OS after you have installed the Serial ATA RAID driver. The RAID BIOS setup screens shown in this section are for reference only, and may also set the O n b o a r d S A T A B o o t R O M item to enter the BIOS setup. 2. Press to configure a disk array. ASUS A8R32-MVP DELUXE 5-27 Installing Serial ATA (SATA) hard disks To install ... and capacity when creating a disk array. Connect the SATA signal cables. 3. See section "5.2.4 Make Disk menu" for a RAID configuration: 1. 5.4.1 Installing hard disks The motherboard supports Ultra DMA 133/100/66 and Serial ATA hard disk drives.

A8R32-MVP Deluxe User's Manual for English Edition
Page 152
...the system prompts you to press the F6 key to avoid computer virus infection. To create a RAID driver disk: 1. OR 1. Place the motherboard support CD into the floppy drive then press . 9. Write-protect the floppy disk to install third-party SCSI... or RAID driver. 2. When the D r i v e r s menu appears, click M a k e U L i C h i p s e t D r i v e r D i s k to complete the installation. 5-42 Chapter 5: Software support Save changes...
...the system prompts you to press the F6 key to avoid computer virus infection. To create a RAID driver disk: 1. OR 1. Place the motherboard support CD into the floppy drive then press . 9. Write-protect the floppy disk to install third-party SCSI... or RAID driver. 2. When the D r i v e r s menu appears, click M a k e U L i C h i p s e t D r i v e r D i s k to complete the installation. 5-42 Chapter 5: Software support Save changes...


