User Manual
Page 9
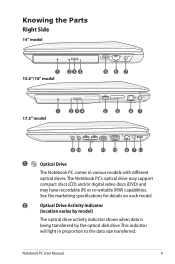
... transferred. See the marketing specifications for details on each model. 2 Optical Drive Activity Indicator (location varies by model) The optical drive activity indicator shows when data is being transferred by the optical disk drive. This indicator will light in various models with different optical drives.The Notebook PC's optical drive may support compact discs (CD) and/or digital video discs...
... transferred. See the marketing specifications for details on each model. 2 Optical Drive Activity Indicator (location varies by model) The optical drive activity indicator shows when data is being transferred by the optical disk drive. This indicator will light in various models with different optical drives.The Notebook PC's optical drive may support compact discs (CD) and/or digital video discs...
User Manual
Page 10
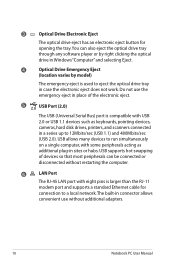
... in case the electronic eject does not work. You can also eject the optical drive tray through any software player or by right clicking the optical drive in Windows "Computer" and selecting Eject. 4 Optical Drive Emergency Eject (location varies by model) The emergency eject is used to run simultaneously on... Serial Bus) port is larger than the RJ-11 modem port and supports a standard Ethernet cable for opening the tray. 3 Optical Drive Electronic Eject The optical drive eject has an electronic eject button for connection to 12Mbits/sec (USB 1.1) and 480Mbits/sec (USB 2.0).
... in case the electronic eject does not work. You can also eject the optical drive tray through any software player or by right clicking the optical drive in Windows "Computer" and selecting Eject. 4 Optical Drive Emergency Eject (location varies by model) The emergency eject is used to run simultaneously on... Serial Bus) port is larger than the RJ-11 modem port and supports a standard Ethernet cable for opening the tray. 3 Optical Drive Electronic Eject The optical drive eject has an electronic eject button for connection to 12Mbits/sec (USB 1.1) and 480Mbits/sec (USB 2.0).
User Manual
Page 14
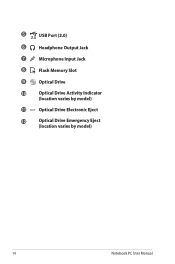
5 USB Port (2.0) 6 Headphone Output Jack 7 Microphone Input Jack 8 Flash Memory Slot 9 Optical Drive 10 Optical Drive Activity Indicator (location varies by model) 11 Optical Drive Electronic Eject 12 Optical Drive Emergency Eject (location varies by model) 14 Notebook PC User Manual
5 USB Port (2.0) 6 Headphone Output Jack 7 Microphone Input Jack 8 Flash Memory Slot 9 Optical Drive 10 Optical Drive Activity Indicator (location varies by model) 11 Optical Drive Electronic Eject 12 Optical Drive Emergency Eject (location varies by model) 14 Notebook PC User Manual
User Manual
Page 18
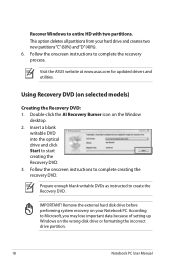
...optical drive and click Start to create the Recovery DVD. According to entire HD with two partitions. Using Recovery DVD (on the wrong disk drive or formatting the incorrect drive partition. 18 Notebook PC User Manual Prepare enough blank writable DVDs as instructed to start creating the Recovery DVD. 3. Visit the ASUS website at www.asus....com for updated drivers and utilities. IMPORTANT! Double-click the AI Recovery Burner icon on your hard drive and creates two new partitions"C"(60%) and"D"(40%). 6....
...optical drive and click Start to create the Recovery DVD. According to entire HD with two partitions. Using Recovery DVD (on the wrong disk drive or formatting the incorrect drive partition. 18 Notebook PC User Manual Prepare enough blank writable DVDs as instructed to start creating the Recovery DVD. 3. Visit the ASUS website at www.asus....com for updated drivers and utilities. IMPORTANT! Double-click the AI Recovery Burner icon on your hard drive and creates two new partitions"C"(60%) and"D"(40%). 6....
User Manual
Page 19
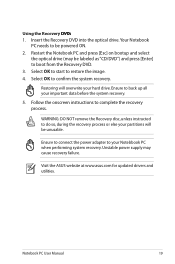
... Notebook PC needs to complete the recovery process. Restart the Notebook PC and press [Esc] on bootup and select the optical drive (may cause recovery failure. Ensure to boot from the Recovery DVD. 3. Notebook PC User Manual 19 Select OK to your partitions will... overwrite your important data before the system recovery. 5. Visit the ASUS website at www.asus.com for updated drivers and utilities. Using the Recovery D��V�D��: 1. Ensure to connect the power adapter to confirm...
... Notebook PC needs to complete the recovery process. Restart the Notebook PC and press [Esc] on bootup and select the optical drive (may cause recovery failure. Ensure to boot from the Recovery DVD. 3. Notebook PC User Manual 19 Select OK to your partitions will... overwrite your important data before the system recovery. 5. Visit the ASUS website at www.asus.com for updated drivers and utilities. Using the Recovery D��V�D��: 1. Ensure to connect the power adapter to confirm...


