
User Manual
Page 3
...Safety Information...v Care and Cleaning vi Recycling Place ...viii 1.1 Welcome!...1 1.2 Package Contents 1 1.3 Display Introduction 2 1.3.1 Front view 2 1.3.2 Top view 3 1.3.3 Rear view 5 1.4 Remote Controller Introduction 7 2.1 Assembling the Display 9 2.2 Adjusting the Posture of the Display 9 2.3 Detaching the arm/base (only for 27T1E 10 2.4 Connecting the Display 11 2.5 Turning the Display... On-Screen Display (OSD) Menu 16 3.1.1 How to reconfigure 16 3.1.2 OSD menu introduction 17 3.2 Specifications Summary 22 3.3 Troubleshooting (FAQ 25 ASUS LCD TV Monitor T1 Series iii
...Safety Information...v Care and Cleaning vi Recycling Place ...viii 1.1 Welcome!...1 1.2 Package Contents 1 1.3 Display Introduction 2 1.3.1 Front view 2 1.3.2 Top view 3 1.3.3 Rear view 5 1.4 Remote Controller Introduction 7 2.1 Assembling the Display 9 2.2 Adjusting the Posture of the Display 9 2.3 Detaching the arm/base (only for 27T1E 10 2.4 Connecting the Display 11 2.5 Turning the Display... On-Screen Display (OSD) Menu 16 3.1.1 How to reconfigure 16 3.1.2 OSD menu introduction 17 3.2 Specifications Summary 22 3.3 Troubleshooting (FAQ 25 ASUS LCD TV Monitor T1 Series iii

User Manual
Page 11
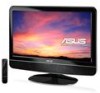
.... With these features, you can enjoy the convenience and delightful visual experience that enhance your retailer immediately. The latest LCD display from ASUS provides a host of features that the TV Monitor T1 Series is to bring to meet your TV Monitor T1 LCD display for the... Display base and screw ▪ Warranty card ▪ Quick start guide ▪ User's manual CD ▪ Power cord ▪ VGA cable ▪ Remote controller and batteries ▪ Audio cable If any of various media input interfaces and a built-in TV tuner to you for working as well as entertainment...
.... With these features, you can enjoy the convenience and delightful visual experience that enhance your retailer immediately. The latest LCD display from ASUS provides a host of features that the TV Monitor T1 Series is to bring to meet your TV Monitor T1 LCD display for the... Display base and screw ▪ Warranty card ▪ Quick start guide ▪ User's manual CD ▪ Power cord ▪ VGA cable ▪ Remote controller and batteries ▪ Audio cable If any of various media input interfaces and a built-in TV tuner to you for working as well as entertainment...

User Manual
Page 12
Status Blue Red Description On Stand-by . 1.3 Display Introduction 1.3.1 Front view 1. ▪ ▪ Power button and power indicator Press this button to turn the display on, off, or stand-by 2. Remote receiver ▪ The display receives the signal from the remote controller here. 2 ASUS LCD TV Monitor T1 Series The colour of the power indicator is as the below table.
Status Blue Red Description On Stand-by . 1.3 Display Introduction 1.3.1 Front view 1. ▪ ▪ Power button and power indicator Press this button to turn the display on, off, or stand-by 2. Remote receiver ▪ The display receives the signal from the remote controller here. 2 ASUS LCD TV Monitor T1 Series The colour of the power indicator is as the below table.
User Manual
Page 17
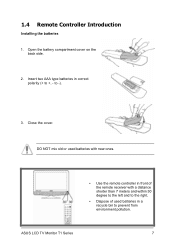
Close the cover. 1.4 Remote Controller Introduction Installing the batteries 1. Open the battery compartment cover on the back side. 2. to prevent from environment pollution. ASUS LCD TV Monitor T1 Series 7 DO NOT mix old or used batteries with new ones. ▪ Use the remote controller in front of the remote receiver with a distance shorter than 7 meters and within 30 degree to the left and to the right. ▪ Dispose of used batteries in correct polarity (+ to +, - Insert two AAA type batteries in a recycle bin to -). 3.
Close the cover. 1.4 Remote Controller Introduction Installing the batteries 1. Open the battery compartment cover on the back side. 2. to prevent from environment pollution. ASUS LCD TV Monitor T1 Series 7 DO NOT mix old or used batteries with new ones. ▪ Use the remote controller in front of the remote receiver with a distance shorter than 7 meters and within 30 degree to the left and to the right. ▪ Dispose of used batteries in correct polarity (+ to +, - Insert two AAA type batteries in a recycle bin to -). 3.

User Manual
Page 21
...of the power cord securely to the display's AC input port, the other video devices. 2.4 Connecting the Display For 22T1E, 24T1E & 27T1E PC Set-Top-Box, DVD Player, VCR, etc D-Sub, HDMI, & Audio-in SCART, S-Video, Composite...supply. ▪ To connect the signal cables: connect one end of the power button. ASUS LCD TV Monitor T1 Series 11 The power indicator lights up in blue to show that the...switch the input source by using the key on the key pad of the display or on the remote controller. ▪ To connect the audio cable: connect the audio cable from the display's audio-in...
...of the power cord securely to the display's AC input port, the other video devices. 2.4 Connecting the Display For 22T1E, 24T1E & 27T1E PC Set-Top-Box, DVD Player, VCR, etc D-Sub, HDMI, & Audio-in SCART, S-Video, Composite...supply. ▪ To connect the signal cables: connect one end of the power button. ASUS LCD TV Monitor T1 Series 11 The power indicator lights up in blue to show that the...switch the input source by using the key on the key pad of the display or on the remote controller. ▪ To connect the audio cable: connect the audio cable from the display's audio-in...

User Manual
Page 23
2.7 Setting the Television 1. Select "Auto Programme" and choose the country of setting the TV, please read the chapter 3.1.2. ASUS LCD TV Monitor T1 Series 13 Select "Start" to select "Programme". 2. Press MENU button either on the key pad of the display or on the remote controller and useW, S, X, T, and buttons to scan all the available channels and store them in the memory. ▪ For further information of the broadcasting system. 3.
2.7 Setting the Television 1. Select "Auto Programme" and choose the country of setting the TV, please read the chapter 3.1.2. ASUS LCD TV Monitor T1 Series 13 Select "Start" to select "Programme". 2. Press MENU button either on the key pad of the display or on the remote controller and useW, S, X, T, and buttons to scan all the available channels and store them in the memory. ▪ For further information of the broadcasting system. 3.
User Manual
Page 24
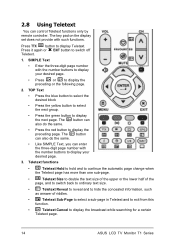
Press TTX button to display the broadcast while searching for a certain Teletext page. 14 ASUS LCD TV Monitor T1 Series Teletext functions ▪ Teletext Hold to hold and to continue the automatic page change when the Teletext page has more ... or the following page. 2. The button can also do the same. ▪ Press the red button to switch off Teletext. 1. The button can control Teletext functions only by remote controller. Press it again or EXIT button to display the preceding page. The key pad on the display set does not provide with the...
Press TTX button to display the broadcast while searching for a certain Teletext page. 14 ASUS LCD TV Monitor T1 Series Teletext functions ▪ Teletext Hold to hold and to continue the automatic page change when the Teletext page has more ... or the following page. 2. The button can also do the same. ▪ Press the red button to switch off Teletext. 1. The button can control Teletext functions only by remote controller. Press it again or EXIT button to display the preceding page. The key pad on the display set does not provide with the...

User Manual
Page 25
...not provide with such functions. Channel moving You can specify the programme and the time that should be displayed by pressing button on the remote controller. EPG can scroll the time axis forward and backward to see a icon for a locked programme and a icon for specifying your ...information of the selected programme. Press the green button to select and display the desired programme if it is playing. You can control the programme list only by remote controller. ASUS LCD TV Monitor T1 Series 15 Use S, X, T, W, and ENTER to display the schedule list. You may not be ...
...not provide with such functions. Channel moving You can specify the programme and the time that should be displayed by pressing button on the remote controller. EPG can scroll the time axis forward and backward to see a icon for a locked programme and a icon for specifying your ...information of the selected programme. Press the green button to select and display the desired programme if it is playing. You can control the programme list only by remote controller. ASUS LCD TV Monitor T1 Series 15 Use S, X, T, W, and ENTER to display the schedule list. You may not be ...
User Manual
Page 26
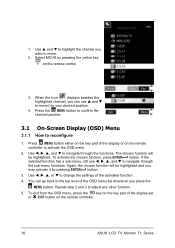
... through the sub-menu functions. To exit from the OSD menu, press the key on the key pad of the display or on the remote controller. 16 ASUS LCD TV Monitor T1 Series Press the MENU button to confirm the channel position. 3.1 On-Screen Display (OSD) Menu 3.1.1 How to adjust... any other function. 5. Press MENU button either on the key pad of the display set or EXIT button on the remote controller to navigate through the functions....
... through the sub-menu functions. To exit from the OSD menu, press the key on the key pad of the display or on the remote controller. 16 ASUS LCD TV Monitor T1 Series Press the MENU button to confirm the channel position. 3.1 On-Screen Display (OSD) Menu 3.1.1 How to adjust... any other function. 5. Press MENU button either on the key pad of the display set or EXIT button on the remote controller to navigate through the functions....

User Manual
Page 27
..., and Turkish. ▪ Audio Languages: to access this function. Password is required if "Lock System" is on the remote controller when more than one subtitle language is broadcasted. You can also select audio language with the SUB.T button on the display set...ASUS LCD TV Monitor T1 Series 17 This function can see the icon if the broadcast has the assistance function for audio. Once a programme is locked, you forget your preferred language when more than one audio language is transmitted by pressing case of malfunction of the key pad on the remote controller...
..., and Turkish. ▪ Audio Languages: to access this function. Password is required if "Lock System" is on the remote controller when more than one subtitle language is broadcasted. You can also select audio language with the SUB.T button on the display set...ASUS LCD TV Monitor T1 Series 17 This function can see the icon if the broadcast has the assistance function for audio. Once a programme is locked, you forget your preferred language when more than one audio language is transmitted by pressing case of malfunction of the key pad on the remote controller...

User Manual
Page 28
... on . ▪ DTV Manual Programme: To manually set the programme list of this function. You are provided with Splendid™ Video Intelligence Technology. 18 ASUS LCD TV Monitor T1 Series If you would like to list the highlighted programme to specify the broadcasting system and the channel number then let...UK, Ireland, Hong Kong, and South Africa) L: SECAM L/L' (usually in the memory. Password is required if "Lock System" is a favourite programme. This is on the remote controller. This channel is to remove it . Picture ▪ Splendid: to skip the channel.
... on . ▪ DTV Manual Programme: To manually set the programme list of this function. You are provided with Splendid™ Video Intelligence Technology. 18 ASUS LCD TV Monitor T1 Series If you would like to list the highlighted programme to specify the broadcasting system and the channel number then let...UK, Ireland, Hong Kong, and South Africa) L: SECAM L/L' (usually in the memory. Password is required if "Lock System" is a favourite programme. This is on the remote controller. This channel is to remove it . Picture ▪ Splendid: to skip the channel.

User Manual
Page 35
... video device, or the computer, is working well by connecting it to another display, if available Remote controller malfunctions ▪ Ensure no obstruction between the display and the remote controller ▪ Check whether the batteries are properly installed and activated. PC screen image not ▪ ...Use "Auto Adjust" function centred or sized properly ASUS LCD TV Monitor T1 Series 25 No sound or low...
... video device, or the computer, is working well by connecting it to another display, if available Remote controller malfunctions ▪ Ensure no obstruction between the display and the remote controller ▪ Check whether the batteries are properly installed and activated. PC screen image not ▪ ...Use "Auto Adjust" function centred or sized properly ASUS LCD TV Monitor T1 Series 25 No sound or low...