
User Manual
Page 2
......v Knowing the Parts Top Side...1-2 Bottom Side...1-5 Front Side...1-6 Right Side...1-7 Left Side...1-8 Keyboard Usage...1-9 Touchpad Usage...1-11 Getting Started Powering on your Eee PC...2-2 First-time Startup...2-3 Desktop...2-4 ASUS EeePC Tray Utility...2-5 Enabling and Disabling Devices 2-5 Adjusting the display resolution 2-5 Network Connection...2-6 Configuring a wireless network connection 2-6 Local Area Network 2-7 Browsing web pages 2-10...
......v Knowing the Parts Top Side...1-2 Bottom Side...1-5 Front Side...1-6 Right Side...1-7 Left Side...1-8 Keyboard Usage...1-9 Touchpad Usage...1-11 Getting Started Powering on your Eee PC...2-2 First-time Startup...2-3 Desktop...2-4 ASUS EeePC Tray Utility...2-5 Enabling and Disabling Devices 2-5 Adjusting the display resolution 2-5 Network Connection...2-6 Configuring a wireless network connection 2-6 Local Area Network 2-7 Browsing web pages 2-10...
User Manual
Page 25
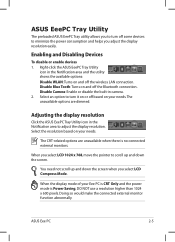
... unavailable when there is Power Saving, DO NOT use a resolution higher than 1024 x 600 pixels. When the display mode of your Eee PC is CRT Only and the power mode is no connected external monitors. Enabling and Disabling Devices To disable or enable devices 1. Disable Camera...ASUS EeePC Tray Utility The preloaded ASUS EeePC Tray utility allows you to turn off some devices to turn it on or off based on your needs. Select an option to minimize the power consumption and helps you adjust the display resolution easily. Right-click the ASUS EeePC Tray Utility icon in camera. 2. ASUS Eee PC...
... unavailable when there is Power Saving, DO NOT use a resolution higher than 1024 x 600 pixels. When the display mode of your Eee PC is CRT Only and the power mode is no connected external monitors. Enabling and Disabling Devices To disable or enable devices 1. Disable Camera...ASUS EeePC Tray Utility The preloaded ASUS EeePC Tray utility allows you to turn off some devices to turn it on or off based on your needs. Select an option to minimize the power consumption and helps you adjust the display resolution easily. Right-click the ASUS EeePC Tray Utility icon in camera. 2. ASUS Eee PC...
User Manual
Page 30
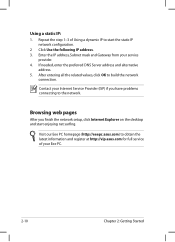
If needed, enter the preferred DNS Server address and alternative address. 5. Visit our Eee PC homepage (http://eeepc.asus.com) to the network. Repeat the step 1-3 of your service provider. 4. Enter the IP address, Subnet mask and Gateway from your Eee PC. 2-10 Chapter 2: Getting Started After entering all the related values, click OK to ... 2 Click Use the following IP address. 3. Browsing web pages After you have problems connecting to obtain the latest information and register at http://vip.asus.com for full service of Using a dynamic IP to build the network connection.
If needed, enter the preferred DNS Server address and alternative address. 5. Visit our Eee PC homepage (http://eeepc.asus.com) to the network. Repeat the step 1-3 of your service provider. 4. Enter the IP address, Subnet mask and Gateway from your Eee PC. 2-10 Chapter 2: Getting Started After entering all the related values, click OK to ... 2 Click Use the following IP address. 3. Browsing web pages After you have problems connecting to obtain the latest information and register at http://vip.asus.com for full service of Using a dynamic IP to build the network connection.
User Manual
Page 35
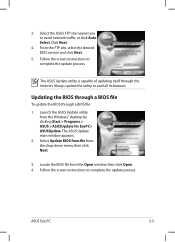
... to avail all its features. Locate the BIOS file from the drop‑down menu, then click Next. 3. 3. Select the ASUS FTP site nearest you to complete the update process. Follow the screen instructions to avoid network traffic, or click Auto Select. From ...select the desired BIOS version and click Next. 5. The ASUS Update main window appears. 2. Select Update BIOS from file from the Open window, then click Open. 4. Launch the ASUS Update utility from the Windows® desktop by clicking Start > Programs > ASUS > ASUSUpdate for EeePC> ASUSUpdate. ASUS Eee PC 3-3 Click Next. 4.
... to avail all its features. Locate the BIOS file from the drop‑down menu, then click Next. 3. 3. Select the ASUS FTP site nearest you to complete the update process. Follow the screen instructions to avoid network traffic, or click Auto Select. From ...select the desired BIOS version and click Next. 5. The ASUS Update main window appears. 2. Select Update BIOS from file from the Open window, then click Open. 4. Launch the ASUS Update utility from the Windows® desktop by clicking Start > Programs > ASUS > ASUSUpdate for EeePC> ASUSUpdate. ASUS Eee PC 3-3 Click Next. 4.

