User Guide
Page 3
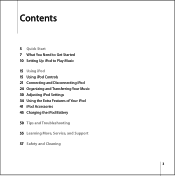
Contents 5 Quick Start 7 What You Need to Get Started 10 Setting Up iPod to Play Music 15 Using iPod 15 Using iPod Controls 21 Connecting and Disconnecting iPod 24 Organizing and Transferring Your Music 30 Adjusting iPod Settings 34 Using the Extra Features of Your iPod 41 iPod Accessories 45 Charging the iPod Battery 50 Tips and Troubleshooting 55 Learning More, Service, and Support 57 Safety and Cleaning 3
Contents 5 Quick Start 7 What You Need to Get Started 10 Setting Up iPod to Play Music 15 Using iPod 15 Using iPod Controls 21 Connecting and Disconnecting iPod 24 Organizing and Transferring Your Music 30 Adjusting iPod Settings 34 Using the Extra Features of Your iPod 41 iPod Accessories 45 Charging the iPod Battery 50 Tips and Troubleshooting 55 Learning More, Service, and Support 57 Safety and Cleaning 3
User Guide
Page 5
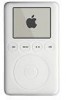
Quick Start 1 Congratulations on the iPod CD. Then organize the songs and transfer them to your iPod. Read this section to iPod. 5 Use iTunes to import songs from your CD or digital music collection to your computer, or use the iTunes Music Store (available in some countries only) to purchase songs and download them to get started using iPod quickly. iPod works with the iTunes music software included on purchasing your computer.
Quick Start 1 Congratulations on the iPod CD. Then organize the songs and transfer them to your iPod. Read this section to iPod. 5 Use iTunes to import songs from your CD or digital music collection to your computer, or use the iTunes Music Store (available in some countries only) to purchase songs and download them to get started using iPod quickly. iPod works with the iTunes music software included on purchasing your computer.
User Guide
Page 6
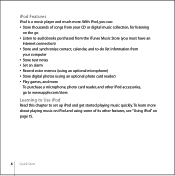
iPod Features iPod is a music player and much more To purchase a microphone, photo card reader, and other features, see "Using iPod" on the go to set up iPod and get started playing music quickly. To learn more about playing music on iPod and using an optional photo card ...iPod Read this chapter to www.apple.com/store. With iPod, you must have an Internet connection) • Store and synchronize contact, calendar, and to-do list information from your computer • Store text notes • Set an alarm • Record voice memos (using an optional microphone) • Store digital...
iPod Features iPod is a music player and much more To purchase a microphone, photo card reader, and other features, see "Using iPod" on the go to set up iPod and get started playing music quickly. To learn more about playing music on iPod and using an optional photo card ...iPod Read this chapter to www.apple.com/store. With iPod, you must have an Internet connection) • Store and synchronize contact, calendar, and to-do list information from your computer • Store text notes • Set an alarm • Record voice memos (using an optional microphone) • Store digital...
User Guide
Page 7
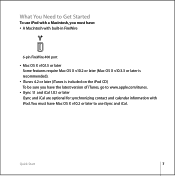
... Start 7 What You Need to Get Started To use iPod with a Macintosh, you must have the latest version of iTunes, go to www.apple.com/itunes. • iSync 1.1 and iCal 1.0.1 or later iSync and iCal are optional for synchronizing contact and calendar information with built-in FireWire 6-pin FireWire ... later Some features require Mac OS X v10.2 or later (Mac OS X v10.3.3 or later is recommended). • iTunes 4.2 or later (iTunes is included on the iPod CD) To be sure you have Mac OS X v10.2 or later to use iSync and iCal.
... Start 7 What You Need to Get Started To use iPod with a Macintosh, you must have the latest version of iTunes, go to www.apple.com/itunes. • iSync 1.1 and iCal 1.0.1 or later iSync and iCal are optional for synchronizing contact and calendar information with built-in FireWire 6-pin FireWire ... later Some features require Mac OS X v10.2 or later (Mac OS X v10.3.3 or later is recommended). • iTunes 4.2 or later (iTunes is included on the iPod CD) To be sure you have Mac OS X v10.2 or later to use iSync and iCal.
User Guide
Page 8
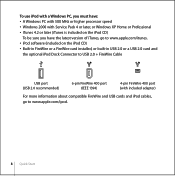
... Windows XP Home or Professional • iTunes 4.2 or later (iTunes is included on the iPod CD) To be sure you have the latest version of iTunes, go to www.apple.com/itunes. • iPod software (included on the iPod CD) • Built-in FireWire or a FireWire card installed, or built-in USB ...2.0 or a USB 2.0 card and the optional iPod Dock Connector to USB 2.0 + FireWire Cable USB port (USB 2.0 ...
... Windows XP Home or Professional • iTunes 4.2 or later (iTunes is included on the iPod CD) To be sure you have the latest version of iTunes, go to www.apple.com/itunes. • iPod software (included on the iPod CD) • Built-in FireWire or a FireWire card installed, or built-in USB ...2.0 or a USB 2.0 card and the optional iPod Dock Connector to USB 2.0 + FireWire Cable USB port (USB 2.0 ...
User Guide
Page 9
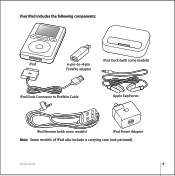
Your iPod includes the following components: iPod Dock (with some models) iPod 6-pin-to-4-pin FireWire adapter iPod Dock Connector to FireWire Cable Apple Earphones iPod Remote (with some models) iPod Power Adapter Note: Some models of iPod also include a carrying case (not pictured). Quick Start 9
Your iPod includes the following components: iPod Dock (with some models) iPod 6-pin-to-4-pin FireWire adapter iPod Dock Connector to FireWire Cable Apple Earphones iPod Remote (with some models) iPod Power Adapter Note: Some models of iPod also include a carrying case (not pictured). Quick Start 9
User Guide
Page 10
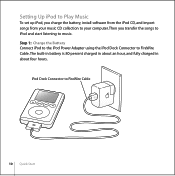
iPod Dock Connector to FireWire Cable. Step 1: Charge the Battery Connect iPod to the iPod Power Adapter using the iPod Dock Connector to FireWire Cable 10 Quick Start The built-in battery is 80-percent charged in about an hour, and fully charged in about four hours. Then you charge the battery, install software from the iPod CD, and import songs from your music CD collection to your computer. Setting Up iPod to Play Music To set up iPod, you transfer the songs to iPod and start listening to music.
iPod Dock Connector to FireWire Cable. Step 1: Charge the Battery Connect iPod to the iPod Power Adapter using the iPod Dock Connector to FireWire Cable 10 Quick Start The built-in battery is 80-percent charged in about an hour, and fully charged in about four hours. Then you charge the battery, install software from the iPod CD, and import songs from your music CD collection to your computer. Setting Up iPod to Play Music To set up iPod, you transfer the songs to iPod and start listening to music.
User Guide
Page 11
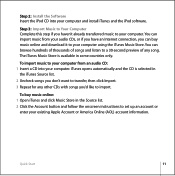
... any song. Quick Start 11 You can import music from an audio CD: 1 Insert a CD into your computer and install iTunes and the iPod software. You can browse hundreds of thousands of songs and listen to a 30-second preview of any other CDs with songs you can buy music... online: 1 Open iTunes and click Music Store in the Source list. 2 Click the Account button and follow the onscreen instructions to your existing Apple Account or America Online (AOL) account information. iTunes opens automatically and the CD is available in the iTunes Source list. 2 Uncheck songs you don...
... any song. Quick Start 11 You can import music from an audio CD: 1 Insert a CD into your computer and install iTunes and the iPod software. You can browse hundreds of thousands of songs and listen to a 30-second preview of any other CDs with songs you can buy music... online: 1 Open iTunes and click Music Store in the Source list. 2 Click the Account button and follow the onscreen instructions to your existing Apple Account or America Online (AOL) account information. iTunes opens automatically and the CD is available in the iTunes Source list. 2 Uncheck songs you don...
User Guide
Page 12
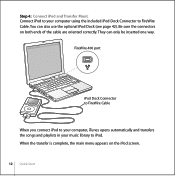
FireWire 400 port iPod Dock Connector to FireWire Cable When you connect iPod to your computer, iTunes opens automatically and transfers the songs and playlists in your computer using the included iPod Dock Connector to iPod. They can also use the optional iPod Dock (see page 42). Be sure the connectors on the iPod screen. 12 Quick Start You can only be inserted one way. When the transfer is complete, the main menu appears on both ends of the cable are oriented correctly. Step 4: Connect iPod and Transfer Music Connect iPod to your music library to FireWire Cable.
FireWire 400 port iPod Dock Connector to FireWire Cable When you connect iPod to your computer, iTunes opens automatically and transfers the songs and playlists in your computer using the included iPod Dock Connector to iPod. They can also use the optional iPod Dock (see page 42). Be sure the connectors on the iPod screen. 12 Quick Start You can only be inserted one way. When the transfer is complete, the main menu appears on both ends of the cable are oriented correctly. Step 4: Connect iPod and Transfer Music Connect iPod to your music library to FireWire Cable.

User Guide
Page 13
...adapter. 6-pin-to-4-pin FireWire adapter Note: You can't charge iPod through your computer using a 4-pin FireWire port. • If your computer has a USB 2.0 port, you can purchase an iPod Dock Connector to www.apple.com/ipod for more information on cables and compatible FireWire and USB cards. ...Go to USB 2.0 + FireWire Cable from Apple. • If your computer doesn't have a FireWire port or a USB port, you...
...adapter. 6-pin-to-4-pin FireWire adapter Note: You can't charge iPod through your computer using a 4-pin FireWire port. • If your computer has a USB 2.0 port, you can purchase an iPod Dock Connector to www.apple.com/ipod for more information on cables and compatible FireWire and USB cards. ...Go to USB 2.0 + FireWire Cable from Apple. • If your computer doesn't have a FireWire port or a USB port, you...
User Guide
Page 14
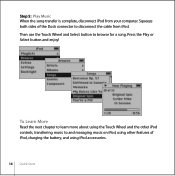
Step 5: Play Music When the song transfer is complete, disconnect iPod from iPod. Squeeze both sides of iPod, charging the battery, and using other iPod controls, transferring music to and managing music on iPod, using iPod accessories. 14 Quick Start To Learn More Read the next chapter to learn more about using the Touch Wheel and the other features of the Dock connector to browse for a song. Then use the Touch Wheel and Select button to disconnect the cable from your computer. Press the Play or Select button and enjoy!
Step 5: Play Music When the song transfer is complete, disconnect iPod from iPod. Squeeze both sides of iPod, charging the battery, and using other iPod controls, transferring music to and managing music on iPod, using iPod accessories. 14 Quick Start To Learn More Read the next chapter to learn more about using the Touch Wheel and the other features of the Dock connector to browse for a song. Then use the Touch Wheel and Select button to disconnect the cable from your computer. Press the Play or Select button and enjoy!
User Guide
Page 15
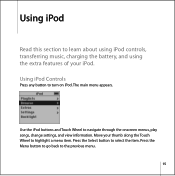
Use the iPod buttons and Touch Wheel to select the item. Press the Select button to navigate through the onscreen menus, play songs, change settings, and view information. Move your iPod. Press the Menu button to go back to turn on iPod. The main menu appears. Using iPod Controls Press any button to the previous menu. 15 Using iPod 1 Read this section to learn about using iPod controls, transferring music, charging the battery, and using the extra features of your thumb along the Touch Wheel to highlight a menu item.
Use the iPod buttons and Touch Wheel to select the item. Press the Select button to navigate through the onscreen menus, play songs, change settings, and view information. Move your iPod. Press the Menu button to go back to turn on iPod. The main menu appears. Using iPod Controls Press any button to the previous menu. 15 Using iPod 1 Read this section to learn about using iPod controls, transferring music, charging the battery, and using the extra features of your thumb along the Touch Wheel to highlight a menu item.
User Guide
Page 16
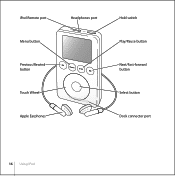
iPod Remote port Menu button Previous/Rewind button Touch Wheel Apple Earphones Headphones port Hold switch Play/Pause button Next/Fast-forward button Select button Dock connector port 16 Using iPod
iPod Remote port Menu button Previous/Rewind button Touch Wheel Apple Earphones Headphones port Hold switch Play/Pause button Next/Fast-forward button Select button Dock connector port 16 Using iPod
User Guide
Page 17
...Scroll to the previous menu Browse for example) and press Play/Pause. You can also use the iPod Remote (included with some models) from any button. Highlight the list title (an album title, ...a menu item Go back to the item and press the Select button. Using iPod 17 iPod Controls Reset iPod (For use during troubleshooting) Turn on iPod Turn off iPod Turn the backlight on or off again). Press Menu. Select Playlists or Browse from... Then press Menu and Play/Pause simultaneously for about 5 seconds, until the Apple logo appears. From the Now Playing screen, use the Touch Wheel.
...Scroll to the previous menu Browse for example) and press Play/Pause. You can also use the iPod Remote (included with some models) from any button. Highlight the list title (an album title, ...a menu item Go back to the item and press the Select button. Using iPod 17 iPod Controls Reset iPod (For use during troubleshooting) Turn on iPod Turn off iPod Turn the backlight on or off again). Press Menu. Select Playlists or Browse from... Then press Menu and Play/Pause simultaneously for about 5 seconds, until the Apple logo appears. From the Now Playing screen, use the Touch Wheel.
User Guide
Page 18
Press Previous/Rewind. Press Next/Fast-forward. Press Previous/Rewind twice. Press and hold Next/Fast-forward. From the Now Playing screen, press the Select button. Press and hold Previous/Rewind. 18 Using iPod iPod Controls Disable the iPod buttons (So you don't press them accidentally) Skip to Hold (an orange bar appears). Then scroll to any point in a song Skip to the next song Start a song over Play the previous song Fast-forward Rewind Set the Hold switch to any point in the song.
Press Previous/Rewind. Press Next/Fast-forward. Press Previous/Rewind twice. Press and hold Next/Fast-forward. From the Now Playing screen, press the Select button. Press and hold Previous/Rewind. 18 Using iPod iPod Controls Disable the iPod buttons (So you don't press them accidentally) Skip to Hold (an orange bar appears). Then scroll to any point in a song Skip to the next song Start a song over Play the previous song Fast-forward Rewind Set the Hold switch to any point in the song.
User Guide
Page 19
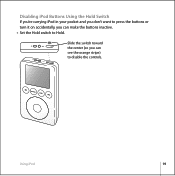
n Set the Hold switch to disable the controls. Slide the switch toward the center (so you can see the orange stripe) to Hold. Disabling iPod Buttons Using the Hold Switch If you're carrying iPod in your pocket and you don't want to press the buttons or turn it on accidentally, you can make the buttons inactive. Using iPod 19
n Set the Hold switch to disable the controls. Slide the switch toward the center (so you can see the orange stripe) to Hold. Disabling iPod Buttons Using the Hold Switch If you're carrying iPod in your pocket and you don't want to press the buttons or turn it on accidentally, you can make the buttons inactive. Using iPod 19
User Guide
Page 20
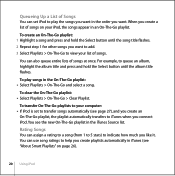
... want in the order you want . You see "About Smart Playlists" on your list of songs. When you connect iPod. To transfer On-The-Go playlists to your computer: n If iPod is set iPod to play songs in the On-The-Go playlist: n Select Playlists > On-The-Go and select a song. Rating Songs... the Select button until the song title flashes. 2 Repeat step 1 for other songs you want to add. 3 Select Playlists > On-The-Go to view your iPod, the songs appear in an On-The-Go playlist. Queueing Up a List of Songs You can set to transfer songs automatically (see page 27), and...
... want in the order you want . You see "About Smart Playlists" on your list of songs. When you connect iPod. To transfer On-The-Go playlists to your computer: n If iPod is set iPod to play songs in the On-The-Go playlist: n Select Playlists > On-The-Go and select a song. Rating Songs... the Select button until the song title flashes. 2 Repeat step 1 for other songs you want to add. 3 Select Playlists > On-The-Go to view your iPod, the songs appear in an On-The-Go playlist. Queueing Up a List of Songs You can set to transfer songs automatically (see page 27), and...
User Guide
Page 21
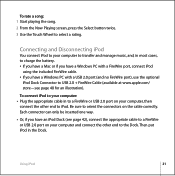
...your computer and connect the other end to iPod. n Or, if you have an iPod Dock (see page 42), connect the appropriate cable to a FireWire or USB 2.0 port on your computer, then connect the other end to USB 2.0 + FireWire Cable (available at www.apple.com/ store-see page 48 for an ...illustration). Using iPod 21 To rate a song: 1 Start playing the song. 2 From the Now Playing screen, press the Select button twice. 3 Use...
...your computer and connect the other end to iPod. n Or, if you have an iPod Dock (see page 42), connect the appropriate cable to a FireWire or USB 2.0 port on your computer, then connect the other end to USB 2.0 + FireWire Cable (available at www.apple.com/ store-see page 48 for an ...illustration). Using iPod 21 To rate a song: 1 Start playing the song. 2 From the Now Playing screen, press the Select button twice. 3 Use...
User Guide
Page 22
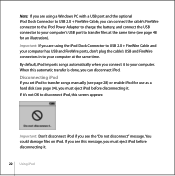
..., and connect the USB connector to your computer's USB port to transfer files at the same time. You could damage files on iPod. Important: If you are using the iPod Dock Connector to USB 2.0 + FireWire Cable and your computer has USB and FireWire ports, don't plug the cable's USB and FireWire ... in to your computer at the same time (see page 48 for use as a hard disk (see page 34), you must eject iPod before disconnecting it . 22 Using iPod When this message, you must eject iPod before disconnecting it . Note: If you are using a Windows PC with a USB port and the optional...
..., and connect the USB connector to your computer's USB port to transfer files at the same time. You could damage files on iPod. Important: If you are using the iPod Dock Connector to USB 2.0 + FireWire Cable and your computer has USB and FireWire ports, don't plug the cable's USB and FireWire ... in to your computer at the same time (see page 48 for use as a hard disk (see page 34), you must eject iPod before disconnecting it . 22 Using iPod When this message, you must eject iPod before disconnecting it . Note: If you are using a Windows PC with a USB port and the optional...
User Guide
Page 23
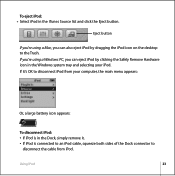
...Eject button. Eject button If you're using a Windows PC, you can eject iPod by dragging the iPod icon on the desktop to the Trash. If you're using a Mac, you can also eject iPod by clicking the Safely Remove Hardware icon in the Windows system tray and selecting your... computer, the main menu appears: Or, a large battery icon appears: To disconnect iPod: • If iPod is connected to an iPod cable, squeeze both sides of the Dock connector to disconnect the cable from your iPod. To eject iPod: n Select iPod in the Dock, simply remove it 's OK to disconnect...
...Eject button. Eject button If you're using a Windows PC, you can eject iPod by dragging the iPod icon on the desktop to the Trash. If you're using a Mac, you can also eject iPod by clicking the Safely Remove Hardware icon in the Windows system tray and selecting your... computer, the main menu appears: Or, a large battery icon appears: To disconnect iPod: • If iPod is connected to an iPod cable, squeeze both sides of the Dock connector to disconnect the cable from your iPod. To eject iPod: n Select iPod in the Dock, simply remove it 's OK to disconnect...