

owners
Page 1
STANDARD CLEANING GAS RANGE Use & Care Guide For questions about features, operation/performance, parts, accessories or service, call: 1-800-843-0304 or visit our website at...www.amana.com W10620405A
STANDARD CLEANING GAS RANGE Use & Care Guide For questions about features, operation/performance, parts, accessories or service, call: 1-800-843-0304 or visit our website at...www.amana.com W10620405A

owners
Page 10
... START or START/ENTER. Press OFF/CANCEL or CANCEL/OFF when finished. The cycle time will enter a timed preheat cycle. Use an oven rack for Part Number 4396923. 10 ■ Pull out the rack to the stop position, raise the front edge, then lift out. Please refer to avoid the loss...
... START or START/ENTER. Press OFF/CANCEL or CANCEL/OFF when finished. The cycle time will enter a timed preheat cycle. Use an oven rack for Part Number 4396923. 10 ■ Pull out the rack to the stop position, raise the front edge, then lift out. Please refer to avoid the loss...

owners
Page 11
... affect the finish. Gently clean control panel because scrubbing may remove graphics or text. ■ affresh® Kitchen and Appliance Cleaner Part Number W10355010 (not included): See the "Assistance or Service" section to order. Plug in the Off position. EXTERIOR PORCELAIN ENAMEL SURFACES...are in range or reconnect power. 11 To Replace: 1. These spills may remove numbers. ■ affresh® Kitchen and Appliance Cleaner Part Number W10355010 (not included): See the "Assistance or Service" section to order. Cleaning Method: ■ Glass cleaner, mild liquid cleaner or...
... affect the finish. Gently clean control panel because scrubbing may remove graphics or text. ■ affresh® Kitchen and Appliance Cleaner Part Number W10355010 (not included): See the "Assistance or Service" section to order. Plug in the Off position. EXTERIOR PORCELAIN ENAMEL SURFACES...are in range or reconnect power. 11 To Replace: 1. These spills may remove numbers. ■ affresh® Kitchen and Appliance Cleaner Part Number W10355010 (not included): See the "Assistance or Service" section to order. Cleaning Method: ■ Glass cleaner, mild liquid cleaner or...

owners
Page 15
... complete model and serial number of your correspondence. To locate factory specified replacement parts in your area, you can write to Amana® Appliances with any questions or concerns at: Amana Customer Service 553 Benson Road Benton Harbor, MI 49022-2692 Please include a...right and work right because they are trained to local dealers, repair parts distributors and service companies. If You Need Replacement Parts If you need further assistance, you use only factory specified replacement parts. Amana designated service technicians are made with : ■ Features and specifications ...
... complete model and serial number of your correspondence. To locate factory specified replacement parts in your area, you can write to Amana® Appliances with any questions or concerns at: Amana Customer Service 553 Benson Road Benton Harbor, MI 49022-2692 Please include a...right and work right because they are trained to local dealers, repair parts distributors and service companies. If You Need Replacement Parts If you need further assistance, you use only factory specified replacement parts. Amana designated service technicians are made with : ■ Features and specifications ...

owners
Page 16
... Guide. Repairs to better help you obtain assistance or service if you may find this warranty. 8. AMANA SHALL NOT BE LIABLE FOR INCIDENTAL OR CONSEQUENTIAL DAMAGES. Write down the following information about your major appliance to parts or systems resulting from warranty coverage. 3. All rights reserved. 9/13 Printed in materials or workmanship...
... Guide. Repairs to better help you obtain assistance or service if you may find this warranty. 8. AMANA SHALL NOT BE LIABLE FOR INCIDENTAL OR CONSEQUENTIAL DAMAGES. Write down the following information about your major appliance to parts or systems resulting from warranty coverage. 3. All rights reserved. 9/13 Printed in materials or workmanship...

Installation Guide
Page 1
.... W10860789A Installer: Leave installation instructions with the homeowner. INSTALLATION INSTRUCTIONS 30" (76.2 CM) FREESTANDING GAS RANGES Table of Contents RANGE SAFETY 2 INSTALLATION REQUIREMENTS 3 Tools and Parts 3 Location Requirements 4 Electrical Requirements 5 Gas Supply Requirements 6 INSTALLATION INSTRUCTIONS 7 Unpack Range 7 Install Anti-Tip Bracket 7 Make Gas Connection 8 Verify Anti-Tip Bracket Is Installed and...
.... W10860789A Installer: Leave installation instructions with the homeowner. INSTALLATION INSTRUCTIONS 30" (76.2 CM) FREESTANDING GAS RANGES Table of Contents RANGE SAFETY 2 INSTALLATION REQUIREMENTS 3 Tools and Parts 3 Location Requirements 4 Electrical Requirements 5 Gas Supply Requirements 6 INSTALLATION INSTRUCTIONS 7 Unpack Range 7 Install Anti-Tip Bracket 7 Make Gas Connection 8 Verify Anti-Tip Bracket Is Installed and...
Installation Guide
Page 3
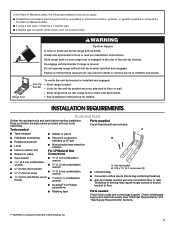
...9632;■ Literature bag ■■ Conversion orifice spuds (inside bag containing literature) ■■ Anti-tip bracket must be a T-handle type. Parts needed A ■■ Tape measure ■■ Marker or pencil ■■ Flat-blade screwdriver ■■ Pipe-joint compound B &#...back so rear range foot is under anti-tip bracket. • See installation instructions for details. Check that all parts are included. Parts supplied Read and follow these instructions can tip the range and be performed by a qualified or licensed contractor, plumber...
...9632;■ Literature bag ■■ Conversion orifice spuds (inside bag containing literature) ■■ Anti-tip bracket must be a T-handle type. Parts needed A ■■ Tape measure ■■ Marker or pencil ■■ Flat-blade screwdriver ■■ Pipe-joint compound B &#...back so rear range foot is under anti-tip bracket. • See installation instructions for details. Check that all parts are included. Parts supplied Read and follow these instructions can tip the range and be performed by a qualified or licensed contractor, plumber...

Installation Guide
Page 4
... should be installed. When such standard is to the Manufactured Home Construction and Safety Standard, Title 24 CFR, Part 3280 (formerly the Federal Standard for Mobile Home Construction and Safety, Title 24, HUD Part 280). A. 36" (91.4 cm) B. 297⁄8" (75.9 cm) C. 257⁄64" (63.8 cm) D. 475⁄64" (119.6 cm...
... should be installed. When such standard is to the Manufactured Home Construction and Safety Standard, Title 24 CFR, Part 3280 (formerly the Federal Standard for Mobile Home Construction and Safety, Title 24, HUD Part 280). A. 36" (91.4 cm) B. 297⁄8" (75.9 cm) C. 257⁄64" (63.8 cm) D. 475⁄64" (119.6 cm...
Installation Guide
Page 7
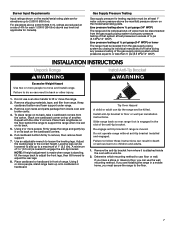
... to floor or wall per installation instructions. Failure to do so can result in excess of ½ psi (3.5 kPa/14" WCP). Remove oven racks and parts package from range. Place them lengthwise on the floor behind the range to support the range when it is standing, tilt the range back to...
... to floor or wall per installation instructions. Failure to do so can result in excess of ½ psi (3.5 kPa/14" WCP). Remove oven racks and parts package from range. Place them lengthwise on the floor behind the range to support the range when it is standing, tilt the range back to...

Installation Guide
Page 9
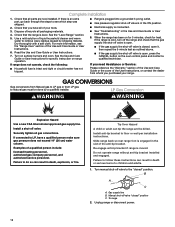
... by brushing on the cooktop. If you encounter immediate resistance, the range foot is in the ON position. 3. Remove cooktop burner caps and grates from parts package. ON position B. OFF position IMPORTANT: The factory default setting is parallel to follow these instructions can result in the anti-tip bracket. 9 Do not...
... by brushing on the cooktop. If you encounter immediate resistance, the range foot is in the ON position. 3. Remove cooktop burner caps and grates from parts package. ON position B. OFF position IMPORTANT: The factory default setting is parallel to follow these instructions can result in the anti-tip bracket. 9 Do not...
Installation Guide
Page 12
...in death, explosion, or fire. Manual shut-off the range and check that all gas connections. See the "Level Range" section. 5. Securely tighten all parts are now installed. Failure to children and adults. 1. Install anti-tip bracket to the "closed " position C. Do not operate range without anti-tip ...outlined above. ■■ If the gas supply line shut-off valve is in the ON position. ■■ Electrical supply is an extra part, go back through the steps to Natural gas must be killed. If there is connected. ■■ See "Troubleshooting" in the slot of ...
...in death, explosion, or fire. Manual shut-off the range and check that all gas connections. See the "Level Range" section. 5. Securely tighten all parts are now installed. Failure to children and adults. 1. Install anti-tip bracket to the "closed " position C. Do not operate range without anti-tip ...outlined above. ■■ If the gas supply line shut-off valve is in the ON position. ■■ Electrical supply is an extra part, go back through the steps to Natural gas must be killed. If there is connected. ■■ See "Troubleshooting" in the slot of ...
Installation Guide
Page 14
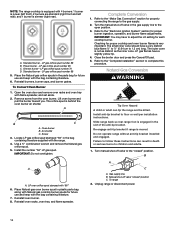
LP gas orifice spud number 70 D. Place the Natural gas orifice spuds in the parts bag for future use and keep with the bag containing literature. 7. The orifice spud is moved. A B C A. Install the number "56" LP gas spud. The small ... press the Cancel/Off pad. 5. Failure to follow these instructions can tip the range and be killed. Place Natural gas oven burner spud in plastic parts bag along with Natural gas cooktop burner spuds for future use and keep with the bag containing literature. 6. Reinstall oven burner. 8. To range 2. LP gas...
LP gas orifice spud number 70 D. Place the Natural gas orifice spuds in the parts bag for future use and keep with the bag containing literature. 7. The orifice spud is moved. A B C A. Install the number "56" LP gas spud. The small ... press the Cancel/Off pad. 5. Failure to follow these instructions can tip the range and be killed. Place Natural gas oven burner spud in plastic parts bag along with Natural gas cooktop burner spuds for future use and keep with the bag containing literature. 6. Reinstall oven burner. 8. To range 2. LP gas...

Installation Guide
Page 16
... spuds in the gas supply line to 1.3 cm) long. To Convert Oven Burner 1. Turn the manual shut-off valve in the parts bag for properly connecting the range to the "Electronic Ignition System" section for future use and keep with LP gas cooktop burner spuds ... operation, and burner flame adjustments. Natural gas flames do not have to complete this procedure. Locate Natural gas orifice spud stamped "47" in plastic parts bag along with the bag containing literature. 7. Standard burner - Screw A. Place LP gas oven burner spud in the bag containing literature supplied with...
... spuds in the gas supply line to 1.3 cm) long. To Convert Oven Burner 1. Turn the manual shut-off valve in the parts bag for properly connecting the range to the "Electronic Ignition System" section for future use and keep with LP gas cooktop burner spuds ... operation, and burner flame adjustments. Natural gas flames do not have to complete this procedure. Locate Natural gas orifice spud stamped "47" in plastic parts bag along with the bag containing literature. 7. Standard burner - Screw A. Place LP gas oven burner spud in the bag containing literature supplied with...


