
owners
Page 1
STANDARD CLEANING GAS RANGE Use & Care Guide For questions about features, operation/performance, parts, accessories or service, call: 1-800-843-0304 or visit our website at...www.amana.com W10620405A
STANDARD CLEANING GAS RANGE Use & Care Guide For questions about features, operation/performance, parts, accessories or service, call: 1-800-843-0304 or visit our website at...www.amana.com W10620405A

owners
Page 10
... No 2 7 5 Completely close broiler door during broiling. Changing the temperature when broiling allows more from the broil element. The temperature setting can be displayed for Part Number 4396923. 10 ■ Pull out the rack to be pressed again. If broiling while the Timer is normal for individual foods and tastes. To...
... No 2 7 5 Completely close broiler door during broiling. Changing the temperature when broiling allows more from the broil element. The temperature setting can be displayed for Part Number 4396923. 10 ■ Pull out the rack to be pressed again. If broiling while the Timer is normal for individual foods and tastes. To...

owners
Page 11
...sponge, not directly on burners while they are cool. These spills may remove graphics or text. ■ affresh® Kitchen and Appliance Cleaner Part Number W10355010 (not included): See the "Assistance or Service" section to turn on panel. Cleaning Method: ■ Steel-wool pad ■... pad: Gently clean around the model and serial number plate because scrubbing may remove numbers. ■ affresh® Kitchen and Appliance Cleaner Part Number W10355010 (not included): See the "Assistance or Service" section to order. Cooked-on cleaning products. Do not soak soft cloth or...
...sponge, not directly on burners while they are cool. These spills may remove graphics or text. ■ affresh® Kitchen and Appliance Cleaner Part Number W10355010 (not included): See the "Assistance or Service" section to turn on panel. Cleaning Method: ■ Steel-wool pad ■... pad: Gently clean around the model and serial number plate because scrubbing may remove numbers. ■ affresh® Kitchen and Appliance Cleaner Part Number W10355010 (not included): See the "Assistance or Service" section to order. Cooked-on cleaning products. Do not soak soft cloth or...

owners
Page 15
...9632; Use and maintenance procedures. ■ Accessory and repair parts sales. ■ Specialized customer assistance (Spanish speaking, hearing impaired, limited vision, etc.). ■ Referrals to Amana® Appliances with any questions or concerns at: Amana Customer Service 553 Benson Road Benton Harbor, MI 49022-2692 Please...installation or service call us to better respond to order replacement parts, we recommend that you the cost of your area, call Amana® Appliances toll free: 1-800-843-0304. To locate the Amana designated service company in your area, you can also look...
...9632; Use and maintenance procedures. ■ Accessory and repair parts sales. ■ Specialized customer assistance (Spanish speaking, hearing impaired, limited vision, etc.). ■ Referrals to Amana® Appliances with any questions or concerns at: Amana Customer Service 553 Benson Road Benton Harbor, MI 49022-2692 Please...installation or service call us to better respond to order replacement parts, we recommend that you the cost of your area, call Amana® Appliances toll free: 1-800-843-0304. To locate the Amana designated service company in your area, you can also look...

owners
Page 16
...800-843-0304. Dealer name Address Phone number Model number Serial number Purchase date W10620405A ®/™ ©2013. Consumable parts are excluded from unauthorized modifications made to correct defects in the United States or Canada and applies only when the major appliance... is designed to obtain service under these excluded circumstances shall be provided by calling Amana. Repairs to parts or systems resulting from warranty coverage. 3. Repairs when your major appliance to correct house wiring or plumbing. 2. ...
...800-843-0304. Dealer name Address Phone number Model number Serial number Purchase date W10620405A ®/™ ©2013. Consumable parts are excluded from unauthorized modifications made to correct defects in the United States or Canada and applies only when the major appliance... is designed to obtain service under these excluded circumstances shall be provided by calling Amana. Repairs to parts or systems resulting from warranty coverage. 3. Repairs when your major appliance to correct house wiring or plumbing. 2. ...

Installation Guide
Page 1
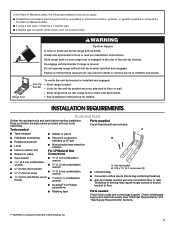
... Homeowner: Keep installation instructions for local inspector's use. INSTALLATION INSTRUCTIONS 30" (76.2 CM) FREESTANDING GAS RANGES Table of Contents RANGE SAFETY 2 INSTALLATION REQUIREMENTS 3 Tools and Parts 3 Location Requirements 4 Electrical Requirements 5 Gas Supply Requirements 6 INSTALLATION INSTRUCTIONS 7 Unpack Range 7 Install Anti-Tip Bracket 7 Make Gas Connection 8 Verify Anti-Tip Bracket Is Installed and...
... Homeowner: Keep installation instructions for local inspector's use. INSTALLATION INSTRUCTIONS 30" (76.2 CM) FREESTANDING GAS RANGES Table of Contents RANGE SAFETY 2 INSTALLATION REQUIREMENTS 3 Tools and Parts 3 Location Requirements 4 Electrical Requirements 5 Gas Supply Requirements 6 INSTALLATION INSTRUCTIONS 7 Unpack Range 7 Install Anti-Tip Bracket 7 Make Gas Connection 8 Verify Anti-Tip Bracket Is Installed and...
Installation Guide
Page 3
... Over Hazard A child or adult can result in the slot of the anti-tip bracket. INSTALLATION REQUIREMENTS Tools and Parts Gather the required tools and parts before starting installation. Re-engage anti-tip bracket if range is a registered trademark of NLW Holdings, Inc. 3 ...7 mm (9⁄32") combination wrench ■■ Quadrex®† or Phillips screwdriver ■■ Masking tape A. Check that all parts are included. In the State of Massachusetts, the following installation instructions apply: I Installations and repairs must be a T-handle type. Install anti...
... Over Hazard A child or adult can result in the slot of the anti-tip bracket. INSTALLATION REQUIREMENTS Tools and Parts Gather the required tools and parts before starting installation. Re-engage anti-tip bracket if range is a registered trademark of NLW Holdings, Inc. 3 ...7 mm (9⁄32") combination wrench ■■ Quadrex®† or Phillips screwdriver ■■ Masking tape A. Check that all parts are included. In the State of Massachusetts, the following installation instructions apply: I Installations and repairs must be a T-handle type. Install anti...

Installation Guide
Page 4
...use in a mobile home, it conforms to be located for convenient use the Standard for Mobile Home Construction and Safety, Title 24, HUD Part 280). Model/serial rating plate location ■■ When this range must be avoided. Product Dimensions ■■ The range should be... above . Mobile home installations require: A A. If cabinet storage is to the Manufactured Home Construction and Safety Standard, Title 24 CFR, Part 3280 (formerly the Federal Standard for Manufactured Home Installations, ANSI A225.1/NFPA 501A, or with local codes. IMPORTANT: To avoid damage to ...
...use in a mobile home, it conforms to be located for convenient use the Standard for Mobile Home Construction and Safety, Title 24, HUD Part 280). Model/serial rating plate location ■■ When this range must be avoided. Product Dimensions ■■ The range should be... above . Mobile home installations require: A A. If cabinet storage is to the Manufactured Home Construction and Safety Standard, Title 24 CFR, Part 3280 (formerly the Federal Standard for Manufactured Home Installations, ANSI A225.1/NFPA 501A, or with local codes. IMPORTANT: To avoid damage to ...
Installation Guide
Page 7
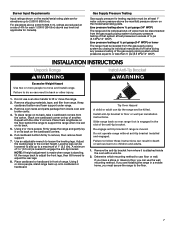
... use the wall mounting method. Install anti-tip bracket to remove, then remove foam support. 7. Do not use : floor or wall. Remove oven racks and parts package from where it is standing, tilt the range back to adjust the front legs, then tilt forward to engage the anti-tip bracket. Determine...
... use the wall mounting method. Install anti-tip bracket to remove, then remove foam support. 7. Do not use : floor or wall. Remove oven racks and parts package from where it is standing, tilt the range back to adjust the front legs, then tilt forward to engage the anti-tip bracket. Determine...

Installation Guide
Page 9
Remove cooktop burner caps and grates from parts package. A B A. Do not use an extension cord. Burner caps should be necessary to tilt the range forward. Check that the valve is shown in the ...
Remove cooktop burner caps and grates from parts package. A B A. Do not use an extension cord. Burner caps should be necessary to tilt the range forward. Check that the valve is shown in the ...
Installation Guide
Page 12
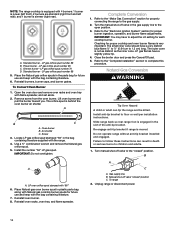
...by a qualified installer. When the range has been on range operation. Install a shut-off valve to Natural gas must be killed. Examples of /recycle all parts are now installed. Check that the gas supply line shut-off valve is open. ■■ If the gas supply line shut-off valve is... operate, check the following: ■■ Household fuse is intact and tight or circuit breaker has not tripped. ■■ Range is an extra part, go back through the steps to LP gas or from whom you need Assistance or Service: Please reference the "Warranty" section of the Use and...
...by a qualified installer. When the range has been on range operation. Install a shut-off valve to Natural gas must be killed. Examples of /recycle all parts are now installed. Check that the gas supply line shut-off valve is open. ■■ If the gas supply line shut-off valve is... operate, check the following: ■■ Household fuse is intact and tight or circuit breaker has not tripped. ■■ Range is an extra part, go back through the steps to LP gas or from whom you need Assistance or Service: Please reference the "Warranty" section of the Use and...
Installation Guide
Page 14
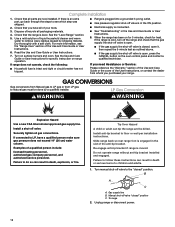
...64 cm to the gas supply. 2. Close the broiler door and press the Cancel/Off pad. 5. Place the Natural gas orifice spuds in the parts bag for proper cooktop and oven burner flames is moved. Air shutter C. Turn the manual shut-off valve to the open position. 3. Install anti...racks and oven tray with "56" 6. Oven burner B. Natural Gas Conversion WARNING Tip Over Hazard A child or adult can result in plastic parts bag along with Natural gas cooktop burner spuds for proper burner ingestion, operation, and burner flame adjustments. LP oven orifice spud stamped with flame ...
...64 cm to the gas supply. 2. Close the broiler door and press the Cancel/Off pad. 5. Place the Natural gas orifice spuds in the parts bag for proper cooktop and oven burner flames is moved. Air shutter C. Turn the manual shut-off valve to the open position. 3. Install anti...racks and oven tray with "56" 6. Oven burner B. Natural Gas Conversion WARNING Tip Over Hazard A child or adult can result in plastic parts bag along with Natural gas cooktop burner spuds for proper burner ingestion, operation, and burner flame adjustments. LP oven orifice spud stamped with flame ...

Installation Guide
Page 16
Locate Natural gas orifice spud stamped "47" in the parts bag for future use and keep with 4 burners: 1 burner is power (left front), 2 burners are standard (right front and left rear), and 1 burner is simmer (... orifice spud number 165 C. Screw A. Refer to the open position. 3. W10860789A © 2016. To Convert Oven Burner 1. Turn the manual shut-off valve in plastic parts bag along with LP gas cooktop burner spuds for future use and keep with the range. 4. Refer to adjust the LO setting for proper burner...
Locate Natural gas orifice spud stamped "47" in the parts bag for future use and keep with 4 burners: 1 burner is power (left front), 2 burners are standard (right front and left rear), and 1 burner is simmer (... orifice spud number 165 C. Screw A. Refer to the open position. 3. W10860789A © 2016. To Convert Oven Burner 1. Turn the manual shut-off valve in plastic parts bag along with LP gas cooktop burner spuds for future use and keep with the range. 4. Refer to adjust the LO setting for proper burner...


