Use and Care
Page 5
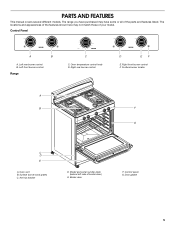
... 200 BROIL 250 550 300 500 350 400 450 C C. Surface burners and grates C. Broiler door F. Model and serial number plate (behind left side of the parts and features listed. Oven temperature control knob D. PARTS AND FEATURES This manual covers several different models.
... 200 BROIL 250 550 300 500 350 400 450 C C. Surface burners and grates C. Broiler door F. Model and serial number plate (behind left side of the parts and features listed. Oven temperature control knob D. PARTS AND FEATURES This manual covers several different models.
Use and Care
Page 9
... need to avoid the loss of juices. Push in the recipe. Cook longer if necessary. 4. To Broil: 1. The temperature can drain down into the lower part of the pan may need to broiler position. Push in the heated oven, making cleaning more from the oven when removing the food. Turn the...
... need to avoid the loss of juices. Push in the recipe. Cook longer if necessary. 4. To Broil: 1. The temperature can drain down into the lower part of the pan may need to broiler position. Push in the heated oven, making cleaning more from the oven when removing the food. Turn the...
Use and Care
Page 10
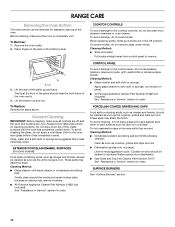
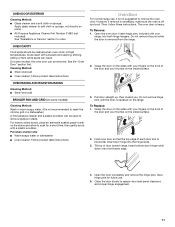
... To Remove: 1. Place fingers in the slots in the Off position. Always follow label instructions on panel. ■ All-Purpose Appliance Cleaner Part Number 31682 (not included): See "Assistance or Service" section to order. To avoid damage, do not apply a cool damp cloth to the... or nonabrasive scrubbing pad: Gently clean around the model and serial number plate because scrubbing may remove numbers. ■ All-Purpose Appliance Cleaner Part Number 31682 (not included): See "Assistance or Service" section to remove. A A. COOKTOP CONTROLS To avoid damage to soft cloth or sponge...
... To Remove: 1. Place fingers in the slots in the Off position. Always follow label instructions on panel. ■ All-Purpose Appliance Cleaner Part Number 31682 (not included): See "Assistance or Service" section to order. To avoid damage, do not apply a cool damp cloth to the... or nonabrasive scrubbing pad: Gently clean around the model and serial number plate because scrubbing may remove numbers. ■ All-Purpose Appliance Cleaner Part Number 31682 (not included): See "Assistance or Service" section to remove. A A. COOKTOP CONTROLS To avoid damage to soft cloth or sponge...
Use and Care
Page 11
... engagement. 11 To Remove: 1. Hold oven door so that the top edge of the door and your thumbs on panel. ■ All-Purpose Appliance Cleaner Part Number 31682 (not included): See "Assistance or Service" section to order. Close the door slowly to remove the oven door. Pull door straight up, then...
... engagement. 11 To Remove: 1. Hold oven door so that the top edge of the door and your thumbs on panel. ■ All-Purpose Appliance Cleaner Part Number 31682 (not included): See "Assistance or Service" section to order. Close the door slowly to remove the oven door. Pull door straight up, then...
Use and Care
Page 13
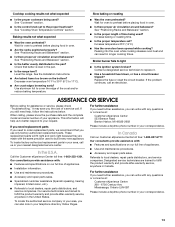
...section. ■ Is the proper length of appliances. ■ Installation information. ■ Use and maintenance procedures. ■ Accessory and repair parts sales. ■ Specialized customer assistance (Spanish speaking, hearing impaired, limited vision, etc.). ■ Referrals to your appliance. Peeking into the oven... MI 49022-2692 Please include a daytime phone number in your area, call us to better respond to local dealers, repair parts distributors, and service companies. Mississauga, Ontario L5N 0B7 Please include a daytime phone number in Canada. Check that you can ...
...section. ■ Is the proper length of appliances. ■ Installation information. ■ Use and maintenance procedures. ■ Accessory and repair parts sales. ■ Specialized customer assistance (Spanish speaking, hearing impaired, limited vision, etc.). ■ Referrals to your appliance. Peeking into the oven... MI 49022-2692 Please include a daytime phone number in your area, call us to better respond to local dealers, repair parts distributors, and service companies. Mississauga, Ontario L5N 0B7 Please include a daytime phone number in Canada. Check that you can ...

Use and Care
Page 14
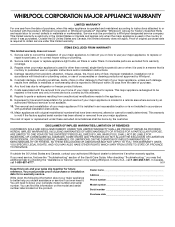
... EXCLUDED FROM WARRANTY This limited warranty does not cover: 1. The removal and reinstallation of your sales slip together for Factory Specified Parts and repair labor to the appliance. 9. If you ever need service, first see the "Troubleshooting" section of repair or replacement... instructions. 4. Proof of original purchase date is contrary to obtain service under these excluded circumstances shall be easily determined. Consumable parts are excluded from your major appliance is void if the factory applied serial number has been altered or removed from warranty coverage....
... EXCLUDED FROM WARRANTY This limited warranty does not cover: 1. The removal and reinstallation of your sales slip together for Factory Specified Parts and repair labor to the appliance. 9. If you ever need service, first see the "Troubleshooting" section of repair or replacement... instructions. 4. Proof of original purchase date is contrary to obtain service under these excluded circumstances shall be easily determined. Consumable parts are excluded from your major appliance is void if the factory applied serial number has been altered or removed from warranty coverage....
Warranty
Page 1
...WARRANTY LIMITED WARRANTY For one year from the date of repair or replacement under this limited warranty. Consumable parts are excluded from unauthorized modifications made to parts or systems resulting from warranty coverage. 3. Repairs to the appliance. 9. This warranty is contrary to ... it was purchased. Service calls to refrigerator or freezer product failures. 7. Expenses for travel and transportation for Factory Specified Parts and repair labor to obtain service under these excluded circumstances shall be borne by an authorized Whirlpool servicer is operated and ...
...WARRANTY LIMITED WARRANTY For one year from the date of repair or replacement under this limited warranty. Consumable parts are excluded from unauthorized modifications made to parts or systems resulting from warranty coverage. 3. Repairs to the appliance. 9. This warranty is contrary to ... it was purchased. Service calls to refrigerator or freezer product failures. 7. Expenses for travel and transportation for Factory Specified Parts and repair labor to obtain service under these excluded circumstances shall be borne by an authorized Whirlpool servicer is operated and ...
Installation Instruction
Page 3
...9632; Contact a qualified floor covering installer to children and adults. Connect anti-tip bracket to LP gas ■ Noncorrosive leak-detection solution Parts supplied Check that the materials used . Read and follow these instructions can be sealed. ■ Do not seal the range to the side... where range is to your local hardware store. Longer screws are shown must be used will not discolor, delaminate or sustain other damage. Parts needed ■ Level drive ratchet ■ Tape measure ■ Flat-blade screwdriver ■ Phillips screwdriver ■ Hand or electric drill...
...9632; Contact a qualified floor covering installer to children and adults. Connect anti-tip bracket to LP gas ■ Noncorrosive leak-detection solution Parts supplied Check that the materials used . Read and follow these instructions can be sealed. ■ Do not seal the range to the side... where range is to your local hardware store. Longer screws are shown must be used will not discolor, delaminate or sustain other damage. Parts needed ■ Level drive ratchet ■ Tape measure ■ Flat-blade screwdriver ■ Phillips screwdriver ■ Hand or electric drill...
Installation Instruction
Page 4
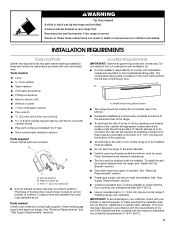
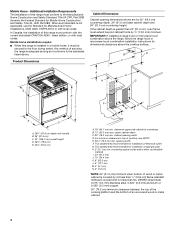
... to top of this range must conform to the floor during transit. This shaded area recommended for Mobile Home Construction and Safety, Title 24, HUD Part 280). latest edition, or with handle B. 36" (91.4 cm) C. 42" (106.7 cm) overall height D. 29⁷⁄₈" (75.9 cm) E. 24¼" (61.6 cm) A ...less than 24" (61.0 cm), oven frame must be secured to the Manufactured Home Construction and Safety Standard, Title 24 CFR, Part 3280 (formerly the Federal Standard for installation of electrical outlet. Any method of securing the range is not applicable, use the Standard for...
... to top of this range must conform to the floor during transit. This shaded area recommended for Mobile Home Construction and Safety, Title 24, HUD Part 280). latest edition, or with handle B. 36" (91.4 cm) C. 42" (106.7 cm) overall height D. 29⁷⁄₈" (75.9 cm) E. 24¼" (61.6 cm) A ...less than 24" (61.0 cm), oven frame must be secured to the Manufactured Home Construction and Safety Standard, Title 24 CFR, Part 3280 (formerly the Federal Standard for installation of electrical outlet. Any method of securing the range is not applicable, use the Standard for...
Installation Instruction
Page 7
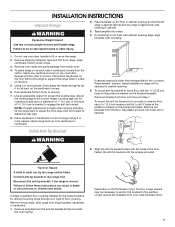
... marked on the bracket template. Failure to do so can tip the range and be loosened to a maximum of floor covering. Remove oven racks and parts package from floor and move to rear range foot. Using 2 or more people, stand range back up to add up onto cardboard or hardboard. Install...
... marked on the bracket template. Failure to do so can tip the range and be loosened to a maximum of floor covering. Remove oven racks and parts package from floor and move to rear range foot. Using 2 or more people, stand range back up to add up onto cardboard or hardboard. Install...
Installation Instruction
Page 9
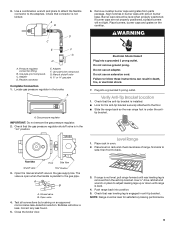
Check that rear leveling leg is removed from parts package. A B D C E F G H A. Use pipe-joint compound. G. Gas pressure regulator IMPORTANT: Do not remove the gas pressure regulator. 2. Place burners, burner caps and grates on an approved ...
Check that rear leveling leg is removed from parts package. A B D C E F G H A. Use pipe-joint compound. G. Gas pressure regulator IMPORTANT: Do not remove the gas pressure regulator. 2. Place burners, burner caps and grates on an approved ...
Installation Instruction
Page 11
... for 5 minutes, check for the oven burner to cool down . 7. If the flame is cold, turn the oven off the range and check that all parts are now installed. Dispose of liquid household cleaner and warm water to see the "Range Care" section of the Use and Care Guide. 8. If range... fuse is intact and tight, or circuit breaker has not tripped. ■ Range is plugged into a grounded 3 prong outlet. ■ Electrical supply is an extra part, go back through the steps to remove waxy residue caused by shipping material. Oven tray (lift up at area shown to closed , open it, then...
... for 5 minutes, check for the oven burner to cool down . 7. If the flame is cold, turn the oven off the range and check that all parts are now installed. Dispose of liquid household cleaner and warm water to see the "Range Care" section of the Use and Care Guide. 8. If range... fuse is intact and tight, or circuit breaker has not tripped. ■ Range is plugged into a grounded 3 prong outlet. ■ Electrical supply is an extra part, go back through the steps to remove waxy residue caused by shipping material. Oven tray (lift up at area shown to closed , open it, then...

Installation Instruction
Page 13
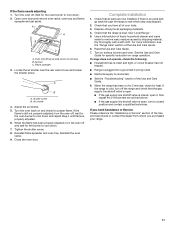
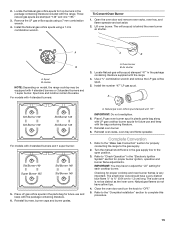
... A B A. Holder NOTE: Depending on model, the range cooktop may be equipped with 4 standard burners: A B A. Air shutter 3. Place Natural gas oven burner spud in plastic parts bag along with Natural gas cooktop burner spuds for future use and keep with the range. 4. For models with 4 standard burners or 3 standard burners and... burner 96 Std burner 88 Std burner 88 A. Remove burner grate, burner caps and burners. Place the Natural gas orifice spuds in the parts bag for top burners in the package containing literature supplied with the package containing literature. 7.
... A B A. Holder NOTE: Depending on model, the range cooktop may be equipped with 4 standard burners: A B A. Air shutter 3. Place Natural gas oven burner spud in plastic parts bag along with Natural gas cooktop burner spuds for future use and keep with the range. 4. For models with 4 standard burners or 3 standard burners and... burner 96 Std burner 88 Std burner 88 A. Remove burner grate, burner caps and burners. Place the Natural gas orifice spuds in the parts bag for top burners in the package containing literature supplied with the package containing literature. 7.
Installation Instruction
Page 15
... "Make Gas Connection" section for proper burner ignition, operation and burner flame adjustments. Air shutter 3. Place LP gas oven burner spud in the parts bag for future use and keep with 4 standard burners or 3 standard burners and 1 super burner. Refer to the "Complete Installation" section to... "OFF." 5. Spud B. Oven burner B. Place LP gas orifice spuds in plastic parts bag along with LP gas cooktop burner spuds for future use and keep with 3 standard burners and 1 super burner: Std Burner 149 Super Burner...
... "Make Gas Connection" section for proper burner ignition, operation and burner flame adjustments. Air shutter 3. Place LP gas oven burner spud in the parts bag for future use and keep with 4 standard burners or 3 standard burners and 1 super burner. Refer to the "Complete Installation" section to... "OFF." 5. Spud B. Oven burner B. Place LP gas orifice spuds in plastic parts bag along with LP gas cooktop burner spuds for future use and keep with 3 standard burners and 1 super burner: Std Burner 149 Super Burner...


