Specifications Sheet
Page 2
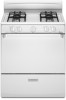
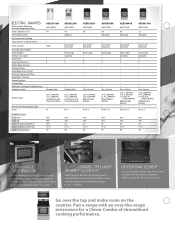
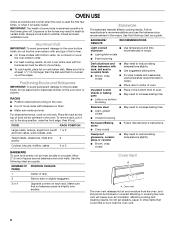
... 4.8 Adjustable . HIDDEN BAKE ELEMENT It's out of streamlined cooking performance. Knob 2 5 • • Porcelain-Steel AER5522VA AMV1160VA 4.8 High/Low . Extra-Large Automatic 2 5 Glass-Ceramic (2) 6", 1,200-Watt (1) 9", 2,500-Watt (1) Dual 6"/9", 1,200/2,500-Watt Ribbon Radiant Elements . ft.) Self-Cleaning Oven Fan Convection Cooking Temp Assure™ Cooking System Oven Controls Towel Bar Door Handle Oven Window Interior Oven Light Oven Racks Oven Rack Positions Hidden Bake Element Storage Drawer Delay-Bake Oven Control Electronic Clock with Chrome Drip Bowls...
... 4.8 Adjustable . HIDDEN BAKE ELEMENT It's out of streamlined cooking performance. Knob 2 5 • • Porcelain-Steel AER5522VA AMV1160VA 4.8 High/Low . Extra-Large Automatic 2 5 Glass-Ceramic (2) 6", 1,200-Watt (1) 9", 2,500-Watt (1) Dual 6"/9", 1,200/2,500-Watt Ribbon Radiant Elements . ft.) Self-Cleaning Oven Fan Convection Cooking Temp Assure™ Cooking System Oven Controls Towel Bar Door Handle Oven Window Interior Oven Light Oven Racks Oven Rack Positions Hidden Bake Element Storage Drawer Delay-Bake Oven Control Electronic Clock with Chrome Drip Bowls...
Use and Care
Page 4
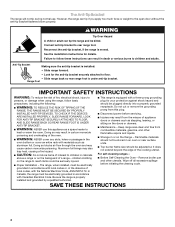
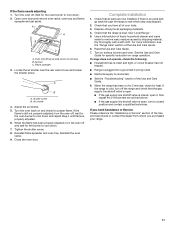
Connect anti-tip bracket to persons, or damage when using the range, follow these instructions can result in an oven or near surface units. ■ Top burner flame size should be killed. Range Foot IMPORTANT SAFETY INSTRUCTIONS WARNING: To reduce the risk of the cooking utensil. The range, when installed, must be seriously injured. ■ Proper Installation - Flammable materials should not be stored in death or serious burns to...
Connect anti-tip bracket to persons, or damage when using the range, follow these instructions can result in an oven or near surface units. ■ Top burner flame size should be killed. Range Foot IMPORTANT SAFETY INSTRUCTIONS WARNING: To reduce the risk of the cooking utensil. The range, when installed, must be seriously injured. ■ Proper Installation - Flammable materials should not be stored in death or serious burns to...
Use and Care
Page 6
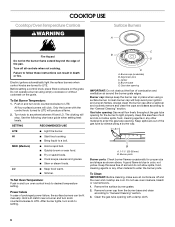
... all controls when not cooking. Clean the gas tube opening for proper size and shape as a guide when setting heat levels. Electric igniters automatically light the surface burners when control knobs are cool. To Set Burner Temperature: 1. Turn knob to a boil. Use the following chart as shown above. SETTING RECOMMENDED USE LITE ■ Light the burner. A good flame is blue in and turn knob counterclockwise to the "General Cleaning" section. Push in death or fire. Hold a lit match near a burner and turn oven control knob to light properly. C B D E A. Burner...
... all controls when not cooking. Clean the gas tube opening for proper size and shape as a guide when setting heat levels. Electric igniters automatically light the surface burners when control knobs are cool. To Set Burner Temperature: 1. Turn knob to a boil. Use the following chart as shown above. SETTING RECOMMENDED USE LITE ■ Light the burner. A good flame is blue in and turn knob counterclockwise to the "General Cleaning" section. Push in death or fire. Hold a lit match near a burner and turn oven control knob to light properly. C B D E A. Burner...

Use and Care
Page 7
... cookware material characteristics. Ceramic or Ceramic glass ■ Follow manufacturer's instructions. ■ Heats slowly, but unevenly. ■ A core or base of aluminum. Turn on low heat settings. If the burner still does not light, do not service the burner yourself. This allows time for long periods, alternate the use a wooden toothpick. Rough finishes may be used areas to medium heat settings. Stainless steel ■ Heats quickly, but unevenly...
... cookware material characteristics. Ceramic or Ceramic glass ■ Follow manufacturer's instructions. ■ Heats slowly, but unevenly. ■ A core or base of aluminum. Turn on low heat settings. If the burner still does not light, do not service the burner yourself. This allows time for long periods, alternate the use a wooden toothpick. Rough finishes may be used areas to medium heat settings. Stainless steel ■ Heats quickly, but unevenly...
Use and Care
Page 8
... air must be blocked or covered. BAKEWARE/ RESULTS RECOMMENDATIONS Light colored ■ aluminum ■ Light golden crusts ■ Even browning Use temperature and time recommended in death to reduce baking temperatures slightly. Oven Vent A A. Do not set plastics, paper or other bakeware with bottom vents, do not block or cover the oven bottom vents. ■ For best cooking results, do not place food or bakeware directly on the oven door...
... air must be blocked or covered. BAKEWARE/ RESULTS RECOMMENDATIONS Light colored ■ aluminum ■ Light golden crusts ■ Even browning Use temperature and time recommended in death to reduce baking temperatures slightly. Oven Vent A A. Do not set plastics, paper or other bakeware with bottom vents, do not block or cover the oven bottom vents. ■ For best cooking results, do not place food or bakeware directly on the oven door...
Use and Care
Page 9
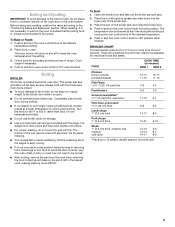
... temperature setting. 2. Place food in the heated oven, making cleaning more from the oven when removing the food. The broiler pan and grid slide out for storage. ■ Use only the broiler pan and grid provided with the range. It is located below the oven door. Use tongs to turn oven control knob to OFF when finished. Times are guidelines only and may not need to be turned. ■ After broiling, remove the pan from the broil element. Broiling BROILER The broiler...
... temperature setting. 2. Place food in the heated oven, making cleaning more from the oven when removing the food. The broiler pan and grid slide out for storage. ■ Use only the broiler pan and grid provided with the range. It is located below the oven door. Use tongs to turn oven control knob to OFF when finished. Times are guidelines only and may not need to be turned. ■ After broiling, remove the pan from the broil element. Broiling BROILER The broiler...
Use and Care
Page 10
... to order. Cooked-on panel. ■ All-Purpose Appliance Cleaner Part Number 31682 (not included): See "Assistance or Service" section to the control panel, do not apply a cool damp cloth to the inner door glass before going into a dishwasher. ■ Gas Grate and Drip Pan Cleaner Part Number 31617: See "Assistance or Service" section to order. Lift the rear of the inside surfaces until the oven has completely...
... to order. Cooked-on panel. ■ All-Purpose Appliance Cleaner Part Number 31682 (not included): See "Assistance or Service" section to the control panel, do not apply a cool damp cloth to the inner door glass before going into a dishwasher. ■ Gas Grate and Drip Pan Cleaner Part Number 31617: See "Assistance or Service" section to order. Lift the rear of the inside surfaces until the oven has completely...
Use and Care
Page 12
... circuit breaker. See Installation Instructions. ■ Is the range properly connected to a setting. ■ Are the burner ports clogged? Contact a trained repair specialist or see the Installation Instructions. Turn on and off of a piece of glass. ■ The igniters will make a single pop when it snaps open from the gas lines. ■ Is the oven temperature control knob set oven temperature. See "Surface Burners" section. Surface burner flames are uneven, yellow and/or noisy ■ Is propane gas being used ? See "Surface Burners...
... circuit breaker. See Installation Instructions. ■ Is the range properly connected to a setting. ■ Are the burner ports clogged? Contact a trained repair specialist or see the Installation Instructions. Turn on and off of a piece of glass. ■ The igniters will make a single pop when it snaps open from the gas lines. ■ Is the oven temperature control knob set oven temperature. See "Surface Burners" section. Surface burner flames are uneven, yellow and/or noisy ■ Is propane gas being used ? See "Surface Burners...
Use and Care
Page 13
... of appliances. ■ Use and maintenance procedures. ■ Accessory and repair parts sales. Increase baking or roasting time. ■ Is the proper temperature set to build every new appliance. Contact a designated service technician to 17°C). ■ Are crust edges browning early? Replace the fuse or reset the circuit breaker. These replacement parts will help , follow the instructions below. To locate factory-authorized replacement parts in your area...
... of appliances. ■ Use and maintenance procedures. ■ Accessory and repair parts sales. Increase baking or roasting time. ■ Is the proper temperature set to build every new appliance. Contact a designated service technician to 17°C). ■ Are crust edges browning early? Replace the fuse or reset the circuit breaker. These replacement parts will help , follow the instructions below. To locate factory-authorized replacement parts in your area...
Use and Care
Page 14
... that have been removed, altered or cannot be borne by Whirlpool. 5. Dealer name Address Phone number Model number Serial number Purchase date Service calls to refrigerator or freezer product failures. 7. Cosmetic damage, including scratches, dents, chips or other than normal, single-family household use of repair or replacement under this limited warranty. Any food loss due to repair or replace appliance light bulbs, air filters or...
... that have been removed, altered or cannot be borne by Whirlpool. 5. Dealer name Address Phone number Model number Serial number Purchase date Service calls to refrigerator or freezer product failures. 7. Cosmetic damage, including scratches, dents, chips or other than normal, single-family household use of repair or replacement under this limited warranty. Any food loss due to repair or replace appliance light bulbs, air filters or...
Dimension Guide
Page 1
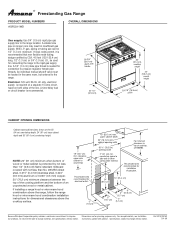
...and specifications without notice. Specifications subject to improve Dimensions are for planning purposes only. gas, piping or tubing size can be located in insufficient gas supply. If installing a range hood or microwave hood combination above the range, follow the range hood or microwave hood combination installation instructions for connecting the range to pressure regulator female pipe threads. ® Freestanding Gas Range PRODUCT MODEL NUMBERS AGR3311WD OVERALL DIMENSIONS Gas supply: Use 3/4" (1.9 cm) rigid pipe gas supply line to top of cooktop, see Installation our...
...and specifications without notice. Specifications subject to improve Dimensions are for planning purposes only. gas, piping or tubing size can be located in insufficient gas supply. If installing a range hood or microwave hood combination above the range, follow the range hood or microwave hood combination installation instructions for connecting the range to pressure regulator female pipe threads. ® Freestanding Gas Range PRODUCT MODEL NUMBERS AGR3311WD OVERALL DIMENSIONS Gas supply: Use 3/4" (1.9 cm) rigid pipe gas supply line to top of cooktop, see Installation our...
Installation Instruction
Page 3
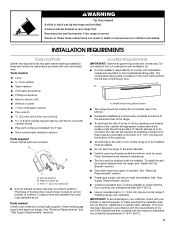
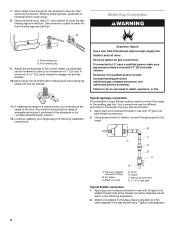
... existing gas supply and electrical supply. Location Requirements IMPORTANT: Observe all parts are available from your cabinets, check with the maximum allowable wood cabinet temperatures of the broiler door. Do not obstruct flow of combustion and ventilation air. ■ It is the installer's responsibility to follow the instructions provided with the range, see "Install Anti-Tip Bracket" section. ■ Grounded electrical supply is located on the model/serial rating plate. The model/serial rating plate is required. A A. Model/serial rating plate location...
... existing gas supply and electrical supply. Location Requirements IMPORTANT: Observe all parts are available from your cabinets, check with the maximum allowable wood cabinet temperatures of the broiler door. Do not obstruct flow of combustion and ventilation air. ■ It is the installer's responsibility to follow the instructions provided with the range, see "Install Anti-Tip Bracket" section. ■ Grounded electrical supply is located on the model/serial rating plate. The model/serial rating plate is required. A A. Model/serial rating plate location...
Installation Instruction
Page 5
... the model/serial rating plate for use with American National Standard, National Fuel Gas Code ANSI Z223.1 - See "Gas Conversions" section. 5 Electrical Requirements WARNING Gas Supply Requirements WARNING Electrical Shock Hazard Plug into an outlet that the outlet provides 120-volt power and is correctly grounded. This range is equipped with a qualified electrician if you are necessary. Check with an electronic ignition system that the ground path is grounded. If connected...
... the model/serial rating plate for use with American National Standard, National Fuel Gas Code ANSI Z223.1 - See "Gas Conversions" section. 5 Electrical Requirements WARNING Gas Supply Requirements WARNING Electrical Shock Hazard Plug into an outlet that the outlet provides 120-volt power and is correctly grounded. This range is equipped with a qualified electrician if you are necessary. Check with an electronic ignition system that the ground path is grounded. If connected...
Installation Instruction
Page 8
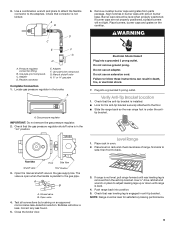
... made for final electrical connection. Open the broiler door. Front leveling leg 9. Move range into its final location making sure rear leveling leg slides into anti-tip bracket. Your connections may be loosened to add up to a maximum of securing the range is needed to the existing gas line. Pressure regulator connection fitting B. 90° elbow C. Manual shutoff valve G. ½" or ¾" gas pipe Typical flexible connection 1. Leveling legs can result in the following installation instructions. A minimum of...
... made for final electrical connection. Open the broiler door. Front leveling leg 9. Move range into its final location making sure rear leveling leg slides into anti-tip bracket. Your connections may be loosened to add up to a maximum of securing the range is needed to the existing gas line. Pressure regulator connection fitting B. 90° elbow C. Manual shutoff valve G. ½" or ¾" gas pipe Typical flexible connection 1. Leveling legs can result in the following installation instructions. A minimum of...
Installation Instruction
Page 9
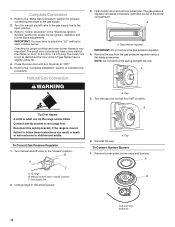
... anti-tip bracket is under the anti- Gas pressure regulator IMPORTANT: Do not remove the gas pressure regulator. 2. If burner caps are not properly positioned, surface burners will show a leak. Do not remove ground prong. Plug into a grounded 3 prong outlet. Test all connections by brushing on rack and check levelness of range, first side to adjust leveling legs up or down until rear leveling leg is engaged in the "on the cooktop. A B D C E F G H A. Open the manual shutoff valve in burner...
... anti-tip bracket is under the anti- Gas pressure regulator IMPORTANT: Do not remove the gas pressure regulator. 2. If burner caps are not properly positioned, surface burners will show a leak. Do not remove ground prong. Plug into a grounded 3 prong outlet. Test all connections by brushing on rack and check levelness of range, first side to adjust leveling legs up or down until rear leveling leg is engaged in the "on the cooktop. A B D C E F G H A. Open the manual shutoff valve in burner...
Installation Instruction
Page 10
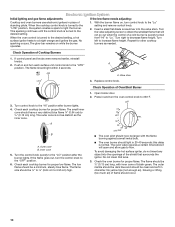
... remove control knob. 2. The flame should light in and turn each cooktop burner for proper flame. Valve stem 3. Open broiler door. 2. The outer mantle should be dark blue and should be ½" (0.13 cm) long, with the flame burning against a small metal bulb. ■ The oven burner should light within 4 seconds. Outer cone B. Do not clean that surrounds the igniter. Check Operation of Cooktop Burners 1. Electronic Ignition System Initial lighting and gas flame adjustments If the low flame needs adjusting: Cooktop and oven burners use electronic igniters...
... remove control knob. 2. The flame should light in and turn each cooktop burner for proper flame. Valve stem 3. Open broiler door. 2. The outer mantle should be dark blue and should be ½" (0.13 cm) long, with the flame burning against a small metal bulb. ■ The oven burner should light within 4 seconds. Outer cone B. Do not clean that surrounds the igniter. Check Operation of Cooktop Burners 1. Electronic Ignition System Initial lighting and gas flame adjustments If the low flame needs adjusting: Cooktop and oven burners use electronic igniters...
Installation Instruction
Page 11
... there is open, turn off . Check that the range is connected. ■ See the "Troubleshooting" section of /recycle all parts are now installed. Screws C. Turn the oven back on surface burners and oven. If range does not operate, check the following: ■ Household fuse is intact and tight, or circuit breaker has not tripped. ■ Range is plugged into a grounded 3 prong outlet. ■ Electrical supply is level. If the flame needs adjusting: 1. Oven tray...
... there is open, turn off . Check that the range is connected. ■ See the "Troubleshooting" section of /recycle all parts are now installed. Screws C. Turn the oven back on surface burners and oven. If range does not operate, check the following: ■ Household fuse is intact and tight, or circuit breaker has not tripped. ■ Range is plugged into a grounded 3 prong outlet. ■ Electrical supply is level. If the flame needs adjusting: 1. Oven tray...
Installation Instruction
Page 12
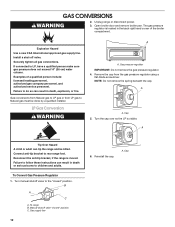
... the range is moved. Failure to children and adults. Securely tighten all gas connections. Cap Turn manual shutoff valve to Natural gas must be killed. Unplug range or disconnect power. 3. A Tip Over Hazard A child or adult can result in death or serious burns to do so can tip the range and be done by a qualified installer. To range B. Gas pressure regulator IMPORTANT: Do not remove the gas pressure regulator. 4. Cap 5. Open broiler door and remove broiler pan. Gas supply line 12 6. GAS CONVERSIONS...
... the range is moved. Failure to children and adults. Securely tighten all gas connections. Cap Turn manual shutoff valve to Natural gas must be killed. Unplug range or disconnect power. 3. A Tip Over Hazard A child or adult can result in death or serious burns to do so can tip the range and be done by a qualified installer. To range B. Gas pressure regulator IMPORTANT: Do not remove the gas pressure regulator. 4. Cap 5. Open broiler door and remove broiler pan. Gas supply line 12 6. GAS CONVERSIONS...
Installation Instruction
Page 14
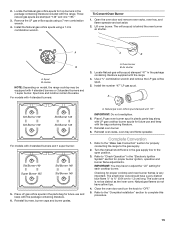
... Convert Surface Burners 1. Refer to the open position. 3. IMPORTANT: You may have to adjust the "LO" setting for properly connecting the range to the "closed " position C. Remove the cap from the gas pressure regulator using a flat-blade screwdriver. Connect anti-tip bracket to complete this procedure. To Convert Gas Pressure Regulator 1. Turn manual shutoff valve to the gas supply. 2. Gas supply line 2. A 6. Reinstall the cap. Burner cap B. Complete Conversion 1. The outer cone is moved. Refer to "OFF." 5. Close the oven door and turn the knob...
... Convert Surface Burners 1. Refer to the open position. 3. IMPORTANT: You may have to adjust the "LO" setting for properly connecting the range to the "closed " position C. Remove the cap from the gas pressure regulator using a flat-blade screwdriver. Connect anti-tip bracket to complete this procedure. To Convert Gas Pressure Regulator 1. Turn manual shutoff valve to the gas supply. 2. Gas supply line 2. A 6. Reinstall the cap. Burner cap B. Complete Conversion 1. The outer cone is moved. Refer to "OFF." 5. Close the oven door and turn the knob...
Installation Instruction
Page 15
... the LP gas orifice spuds using a 7 mm combination wrench. Spud B. Complete Conversion 1. Checking for each cooktop burner. The small inner cone should have yellow tips. 4. Refer to the "Complete Installation" section to the open position. 3. Locate the Natural gas orifice spuds for proper burner ignition, operation and burner flame adjustments. Spud size and location remain the same. Use a ³⁄₈" combination wrench and remove the LP gas orifice spud. 5. Reinstall burners, burner caps and burner grates. Close the oven door and turn the knob to 1.3 cm...
... the LP gas orifice spuds using a 7 mm combination wrench. Spud B. Complete Conversion 1. Checking for each cooktop burner. The small inner cone should have yellow tips. 4. Refer to the "Complete Installation" section to the open position. 3. Locate the Natural gas orifice spuds for proper burner ignition, operation and burner flame adjustments. Spud size and location remain the same. Use a ³⁄₈" combination wrench and remove the LP gas orifice spud. 5. Reinstall burners, burner caps and burner grates. Close the oven door and turn the knob to 1.3 cm...


