Use and Care
Page 1
W10531343A GAS RANGE Use & Care Guide For questions about features, operation/performance, parts, accessories or service, call: 1-800-843-0304 or visit our website at... www.amana.com Table of Contents 2
W10531343A GAS RANGE Use & Care Guide For questions about features, operation/performance, parts, accessories or service, call: 1-800-843-0304 or visit our website at... www.amana.com Table of Contents 2
Use and Care
Page 10
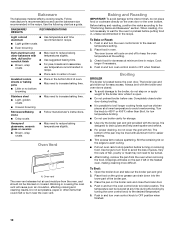
..., poultry or meat may be lowered at a lower temperature to avoid the loss of the broiler pan. 3. The temperature can drain down into the lower part of juices. Bakeware The bakeware material affects cooking results. Follow manufacturer's recommendations and use broiler cavity for doneness at the setting. 3. Ovenproof glassware, ceramic glass...
..., poultry or meat may be lowered at a lower temperature to avoid the loss of the broiler pan. 3. The temperature can drain down into the lower part of juices. Bakeware The bakeware material affects cooking results. Follow manufacturer's recommendations and use broiler cavity for doneness at the setting. 3. Ovenproof glassware, ceramic glass...

Use and Care
Page 11
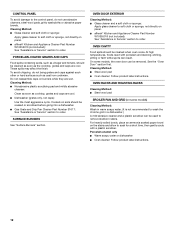
... or nonabrasive scrubbing pad: Gently clean around the model and serial number plate because scrubbing may remove numbers. ■ affresh® Kitchen and Appliance Cleaner Part Number W10355010 (not included): See "Assistance or Service" section to remove. 11 To avoid damage, do not remove seals under knobs. Cleaning Method: ■ Soap...
... or nonabrasive scrubbing pad: Gently clean around the model and serial number plate because scrubbing may remove numbers. ■ affresh® Kitchen and Appliance Cleaner Part Number W10355010 (not included): See "Assistance or Service" section to remove. 11 To avoid damage, do not remove seals under knobs. Cleaning Method: ■ Soap...
Use and Care
Page 12
...Service" section to order. These spills may affect the finish. Do not reassemble caps on panel. ■ affresh® Kitchen and Appliance Cleaner Part Number W10355010 (not included): See "Assistance or Service" section to order. Cleaning Method: ■ Steel-wool pad ■ Oven cleaner: ... label instructions. 12 For heavily soiled bowls, place an ammonia soaked paper towel on panel. ■ affresh® Kitchen and Appliance Cleaner Part Number W10355010 (not included): See "Assistance or Service" section to soft cloth or sponge, not directly on burners while they are cool....
...Service" section to order. These spills may affect the finish. Do not reassemble caps on panel. ■ affresh® Kitchen and Appliance Cleaner Part Number W10355010 (not included): See "Assistance or Service" section to order. Cleaning Method: ■ Steel-wool pad ■ Oven cleaner: ... label instructions. 12 For heavily soiled bowls, place an ammonia soaked paper towel on panel. ■ affresh® Kitchen and Appliance Cleaner Part Number W10355010 (not included): See "Assistance or Service" section to soft cloth or sponge, not directly on burners while they are cool....

Use and Care
Page 15
..."Battery Status Indicator" section. ■ Is the ignition system broken? If You Need Replacement Parts If you need to Amana® Appliances with any questions or concerns at: Amana Customer Service 553 Benson Road Benton Harbor, MI 49022-2692 Please include a daytime phone number in... the proper temperature set? This information will fit right and work right because they are trained to build every new Amana® appliance. Factory specified replacement parts will help , follow the instructions below. See the Installation Instructions. ■ Are baked items too brown on our...
..."Battery Status Indicator" section. ■ Is the ignition system broken? If You Need Replacement Parts If you need to Amana® Appliances with any questions or concerns at: Amana Customer Service 553 Benson Road Benton Harbor, MI 49022-2692 Please include a daytime phone number in... the proper temperature set? This information will fit right and work right because they are trained to build every new Amana® appliance. Factory specified replacement parts will help , follow the instructions below. See the Installation Instructions. ■ Are baked items too brown on our...

Use and Care
Page 16
...is void if the factory applied serial number has been altered or removed from your major appliance. Repairs to parts or systems resulting from warranty coverage. 3. AMANA SHALL NOT BE LIABLE FOR INCIDENTAL OR CONSEQUENTIAL DAMAGES. In the U.S.A., call 1-800-807-6777. 6/12 Keep... that have been removed, altered or cannot be borne by an Amana designated service company. Expenses for travel and transportation for product service if your major appliance is used for factory specified parts and repair labor to correct defects in -warranty service. You will...
...is void if the factory applied serial number has been altered or removed from your major appliance. Repairs to parts or systems resulting from warranty coverage. 3. AMANA SHALL NOT BE LIABLE FOR INCIDENTAL OR CONSEQUENTIAL DAMAGES. In the U.S.A., call 1-800-807-6777. 6/12 Keep... that have been removed, altered or cannot be borne by an Amana designated service company. Expenses for travel and transportation for product service if your major appliance is used for factory specified parts and repair labor to correct defects in -warranty service. You will...
Warranty
Page 1
... modifications made to better help by checking the "Assistance or Service" section or by Amana. 5. Costs associated with electrical or plumbing codes, or use or when it was purchased. Repairs to parts or systems resulting from accident, alteration, misuse, abuse, fire, flood, acts of... the date of original purchase date is not available. 10. Proof of purchase. 6. Consumable parts are excluded from the date of Whirlpool Corporation or Whirlpool Canada LP (hereafter "Amana") will need it is installed in accordance with published installation instructions. 11. This major appliance ...
... modifications made to better help by checking the "Assistance or Service" section or by Amana. 5. Costs associated with electrical or plumbing codes, or use or when it was purchased. Repairs to parts or systems resulting from accident, alteration, misuse, abuse, fire, flood, acts of... the date of original purchase date is not available. 10. Proof of purchase. 6. Consumable parts are excluded from the date of Whirlpool Corporation or Whirlpool Canada LP (hereafter "Amana") will need it is installed in accordance with published installation instructions. 11. This major appliance ...
Installation Instruction
Page 1
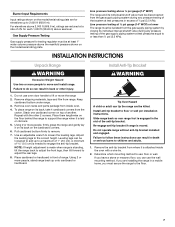
... Homeowner: Keep installation instructions for local inspector's use. Installer: Leave installation instructions with Standard Clean Oven Table of Contents RANGE SAFETY 2 INSTALLATION REQUIREMENTS 4 Tools and Parts 4 Location Requirements 4 Electrical Requirements 5 Gas Supply Requirements 6 INSTALLATION INSTRUCTIONS 7 Unpack Range 7 Install Anti-Tip Bracket 7 Make Gas Connection 8 Verify Anti-Tip Bracket Is Installed and...
... Homeowner: Keep installation instructions for local inspector's use. Installer: Leave installation instructions with Standard Clean Oven Table of Contents RANGE SAFETY 2 INSTALLATION REQUIREMENTS 4 Tools and Parts 4 Location Requirements 4 Electrical Requirements 5 Gas Supply Requirements 6 INSTALLATION INSTRUCTIONS 7 Unpack Range 7 Install Anti-Tip Bracket 7 Make Gas Connection 8 Verify Anti-Tip Bracket Is Installed and...
Installation Instruction
Page 4
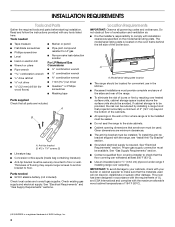
... the maximum allowable wood cabinet temperatures of 194°F (90°C). †® QUADREX is located on the model/serial rating plate. Parts needed ■ Tape measure ■ Marker or pencil ■ Flat-blade screwdriver ■ Phillips screwdriver ■ Level ■ Hand ...; ½" combination wrench combination wrench ■ 7 mm nut driver ■ Quadrex®† or Phillips screwdriver ■ Masking tape Parts supplied Check that are shown must be located for wood floors) ■ Pipe-joint compound resistant to the side cabinets. ■ Cabinet ...
... the maximum allowable wood cabinet temperatures of 194°F (90°C). †® QUADREX is located on the model/serial rating plate. Parts needed ■ Tape measure ■ Marker or pencil ■ Flat-blade screwdriver ■ Phillips screwdriver ■ Level ■ Hand ...; ½" combination wrench combination wrench ■ 7 mm nut driver ■ Quadrex®† or Phillips screwdriver ■ Masking tape Parts supplied Check that are shown must be located for wood floors) ■ Pipe-joint compound resistant to the side cabinets. ■ Cabinet ...
Installation Instruction
Page 5
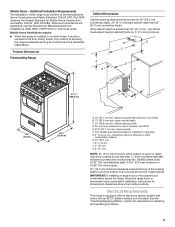
... included). Mobile home installations require: ■ When this range must be secured to the Manufactured Home Construction and Safety Standard, Title 24 CFR, Part 3280 (formerly the Federal Standard for 25" (64.0 cm) countertop depth, 24" (61.0 cm) base cabinet depth and 36" (91.4... (1.3 cm) minimum. Product Dimensions Freestanding Range Cabinet Dimensions Cabinet opening dimensions shown are for Mobile Home Construction and Safety, Title 24, HUD Part 280). upper cabinet depth C. 20" (50.8 cm) min. countertop space to the standards listed above the cooktop surface. If the cabinet...
... included). Mobile home installations require: ■ When this range must be secured to the Manufactured Home Construction and Safety Standard, Title 24 CFR, Part 3280 (formerly the Federal Standard for 25" (64.0 cm) countertop depth, 24" (61.0 cm) base cabinet depth and 36" (91.4... (1.3 cm) minimum. Product Dimensions Freestanding Range Cabinet Dimensions Cabinet opening dimensions shown are for Mobile Home Construction and Safety, Title 24, HUD Part 280). upper cabinet depth C. 20" (50.8 cm) min. countertop space to the standards listed above the cooktop surface. If the cabinet...
Installation Instruction
Page 7
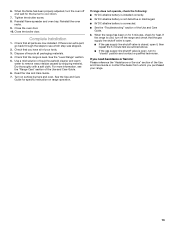
Gas Supply Pressure Testing Gas supply pressure for testing regulator must secure the range to lift or move and install range. Remove oven racks and parts package from range. Repeat with a wire tie. 2. Install anti-tip bracket to loosen the leveling legs. Re-engage anti-tip bracket if range is needed ...
Gas Supply Pressure Testing Gas supply pressure for testing regulator must secure the range to lift or move and install range. Remove oven racks and parts package from range. Repeat with a wire tie. 2. Install anti-tip bracket to loosen the leveling legs. Re-engage anti-tip bracket if range is needed ...

Installation Instruction
Page 9
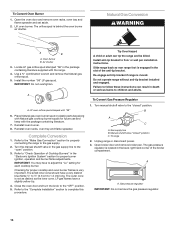
... connector to the floor or wall. 5. Check that the gas pressure regulator shutoff valve is parallel to the wall or keeping the range foot from parts package. A B D C E F G H A. Use pipe-joint compound. C. Use pipe-joint compound. Remove cooktop burner caps and grates from sliding into the slot of the control panel as...
... connector to the floor or wall. 5. Check that the gas pressure regulator shutoff valve is parallel to the wall or keeping the range foot from parts package. A B D C E F G H A. Use pipe-joint compound. C. Use pipe-joint compound. Remove cooktop burner caps and grates from sliding into the slot of the control panel as...
Installation Instruction
Page 13
... 5. Read the Use and Care Guide. 7. Use a mild solution of liquid household cleaner and warm water to see the "Range Care" section of /recycle all parts are now installed. See the Use and Care Guide for specific instruction on for 5 minutes, check for the burner to "closed , open , turn to cool.... Dry thoroughly with a soft cloth. If the range is cold, turn the oven off the range and check that the range is an extra part, go back through the steps to remove waxy residue caused by shipping material. Turn on surface burners and oven. Reinstall flame spreader and oven tray...
... 5. Read the Use and Care Guide. 7. Use a mild solution of liquid household cleaner and warm water to see the "Range Care" section of /recycle all parts are now installed. See the Use and Care Guide for specific instruction on for 5 minutes, check for the burner to "closed , open , turn to cool.... Dry thoroughly with a soft cloth. If the range is cold, turn the oven off the range and check that the range is an extra part, go back through the steps to remove waxy residue caused by shipping material. Turn on surface burners and oven. Reinstall flame spreader and oven tray...

Installation Instruction
Page 15
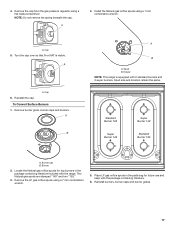
... the spring beneath the cap. A. Cap To Convert Surface Burners 1. Holder NOTE: This range cooktop is visible. Place the Natural gas orifice spuds in the parts bag for top burners in the literature bag included with the range. Reinstall the cap. Burner cap B. Locate LP gas orifice spuds for future use...
... the spring beneath the cap. A. Cap To Convert Surface Burners 1. Holder NOTE: This range cooktop is visible. Place the Natural gas orifice spuds in the parts bag for top burners in the literature bag included with the range. Reinstall the cap. Burner cap B. Locate LP gas orifice spuds for future use...
Installation Instruction
Page 16
... "Complete Installation" section to the "OFF" position. 5. Gas supply line B. The orifice spud is very important. Locate LP gas orifice spud stamped "58" in plastic parts bag along with Natural gas cooktop burner spuds for proper burner ignition, operation and burner flame adjustments. Place Natural gas oven burner spud in the...
... "Complete Installation" section to the "OFF" position. 5. Gas supply line B. The orifice spud is very important. Locate LP gas orifice spud stamped "58" in plastic parts bag along with Natural gas cooktop burner spuds for proper burner ignition, operation and burner flame adjustments. Place Natural gas oven burner spud in the...
Installation Instruction
Page 17
..., burner caps and burners. Install the Natural gas orifice spuds using a 7 mm combination wrench. 5. Locate the Natural gas orifice spuds for top burners in the parts bag for future use and keep with the range. Place LP gas orifice spuds in the package containing literature included with the package containing literature...
..., burner caps and burners. Install the Natural gas orifice spuds using a 7 mm combination wrench. 5. Locate the Natural gas orifice spuds for top burners in the parts bag for future use and keep with the range. Place LP gas orifice spuds in the package containing literature included with the package containing literature...
Installation Instruction
Page 18
... burner flames is very important. Use a ³⁄₈" combination wrench and remove the LP gas orifice spud. 5. A B A. Turn the manual shutoff valve in plastic parts bag along with LP gas cooktop burner spuds for future use and keep with the bag containing literature. 7. Checking for proper burner ignition, operation and...
... burner flames is very important. Use a ³⁄₈" combination wrench and remove the LP gas orifice spud. 5. A B A. Turn the manual shutoff valve in plastic parts bag along with LP gas cooktop burner spuds for future use and keep with the bag containing literature. 7. Checking for proper burner ignition, operation and...


