Use and Care
Page 4
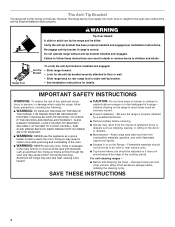
... anti-tip bracket. • See installation instructions for the anti-tip bracket securely attached to the open door without anti-tip bracket installed and engaged. Range Foot Anti-Tip Bracket To verify the anti-tip bracket is properly installed by a qualified technician. ■ Remove battery before initiating the cleaning cycle. Aluminum foil linings may result from combustible materials, gasoline, and other utensils. SAVE THESE INSTRUCTIONS 4 Do not operate range without the anti-tip bracket fastened down properly. children climbing on the backguard...
... anti-tip bracket. • See installation instructions for the anti-tip bracket securely attached to the open door without anti-tip bracket installed and engaged. Range Foot Anti-Tip Bracket To verify the anti-tip bracket is properly installed by a qualified technician. ■ Remove battery before initiating the cleaning cycle. Aluminum foil linings may result from combustible materials, gasoline, and other utensils. SAVE THESE INSTRUCTIONS 4 Do not operate range without the anti-tip bracket fastened down properly. children climbing on the backguard...
Use and Care
Page 8
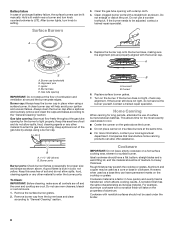
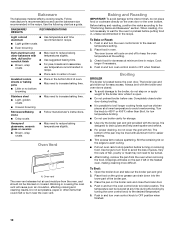
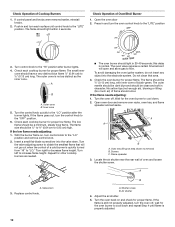
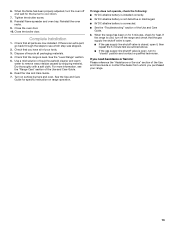
... always using a surface burner. Burner ports Burner ports: Check burner flames occasionally for long periods, alternate the use of surface burners between batches. Replace surface burner grates. 7. For example, aluminum cookware with a straight pin as its base material. Gas tube opening . Contact a trained repair specialist. However, when used as shown above the burner. ■ Do not place canner on the grate above . After burner lights, turn knob counterclockwise to setting. Keep this area free...
... always using a surface burner. Burner ports Burner ports: Check burner flames occasionally for long periods, alternate the use of surface burners between batches. Replace surface burner grates. 7. For example, aluminum cookware with a straight pin as its base material. Gas tube opening . Contact a trained repair specialist. However, when used as shown above the burner. ■ Do not place canner on the grate above . After burner lights, turn knob counterclockwise to setting. Keep this area free...
Use and Care
Page 9
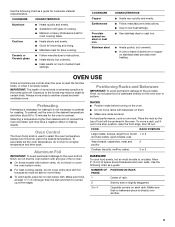
... the oven to preheat. Ceramic or Ceramic glass ■ Follow manufacturer's instructions. ■ Heats slowly, but unevenly. ■ A core or base of food will not preheat the oven any type of foil or liner. ■ On those models with bottom vents, do not block or cover the oven bottom vents. ■ For best cooking results, do not turn this knob just to the desired temperature. RACKS ■ Position racks before turning...
... the oven to preheat. Ceramic or Ceramic glass ■ Follow manufacturer's instructions. ■ Heats slowly, but unevenly. ■ A core or base of food will not preheat the oven any type of foil or liner. ■ On those models with bottom vents, do not block or cover the oven bottom vents. ■ For best cooking results, do not turn this knob just to the desired temperature. RACKS ■ Position racks before turning...
Use and Care
Page 10
.... The oven burner will cause poor air circulation, affecting cooking and cleaning results. Broiling BROILER The broiler is possible to broil longer cooking foods such as a guide. Open the broiler door and take out the broiler pan and grid. 2. The temperature can drain down into the lower part of the pan may not need to stop position before turning or removing food. Push in and turn oven control knob to reduce baking temperatures slightly. ■ Use suggested baking time. ■...
.... The oven burner will cause poor air circulation, affecting cooking and cleaning results. Broiling BROILER The broiler is possible to broil longer cooking foods such as a guide. Open the broiler door and take out the broiler pan and grid. 2. The temperature can drain down into the lower part of the pan may not need to stop position before turning or removing food. Push in and turn oven control knob to reduce baking temperatures slightly. ■ Use suggested baking time. ■...

Use and Care
Page 11
... some models, do not remove seals under knobs. Lift the rear of the oven cavity. 4. To avoid breaking the glass, do not apply a cool damp cloth to the cooktop controls, do not soak knobs. These spills may remove numbers. ■ affresh® Kitchen and Appliance Cleaner Part Number W10355010 (not included): See "Assistance or Service" section to be adjusted for standard cleaning of the inside surfaces until the oven...
... some models, do not remove seals under knobs. Lift the rear of the oven cavity. 4. To avoid breaking the glass, do not apply a cool damp cloth to the cooktop controls, do not soak knobs. These spills may remove numbers. ■ affresh® Kitchen and Appliance Cleaner Part Number W10355010 (not included): See "Assistance or Service" section to be adjusted for standard cleaning of the inside surfaces until the oven...
Use and Care
Page 14
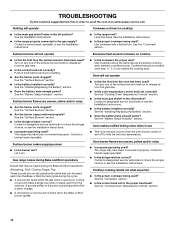
...; Is the control knob set oven temperature. TROUBLESHOOTING Try the solutions suggested here first in order to the proper heat level? See the Installation Instructions. ■ Is the range properly connected to hold the set to avoid the cost of glass. ■ A whooshing or poof sound is opening or cycling on and off of a piece of an unnecessary service call. Level the range. Surface burner flames are normal operational noises that can...
...; Is the control knob set oven temperature. TROUBLESHOOTING Try the solutions suggested here first in order to the proper heat level? See the Installation Instructions. ■ Is the range properly connected to hold the set to avoid the cost of glass. ■ A whooshing or poof sound is opening or cycling on and off of a piece of an unnecessary service call. Level the range. Surface burner flames are normal operational noises that can...

Use and Care
Page 15
... telephone directory Yellow Pages. Level the range. Wait for oven to local dealers, repair parts distributors and service companies. Peeking into the oven while cooking releases oven heat and can also look in your area, you can write to build every new Amana® appliance. Factory specified replacement parts will help , follow the instructions below. See the Installation Instructions. ■ Are baked items too brown on our...
... telephone directory Yellow Pages. Level the range. Wait for oven to local dealers, repair parts distributors and service companies. Peeking into the oven while cooking releases oven heat and can also look in your area, you can write to build every new Amana® appliance. Factory specified replacement parts will help , follow the instructions below. See the Installation Instructions. ■ Are baked items too brown on our...

Use and Care
Page 16
... to know your complete model number and serial number. Consumable parts are excluded from unauthorized modifications made to correct defects in -home service is covered by calling Amana. Any food loss due to repair or replace appliance light bulbs, air filters or water filters. If you ever need service, first see the "Troubleshooting" section of consumables or cleaning products not approved by an authorized Amana servicer is not available. 10...
... to know your complete model number and serial number. Consumable parts are excluded from unauthorized modifications made to correct defects in -home service is covered by calling Amana. Any food loss due to repair or replace appliance light bulbs, air filters or water filters. If you ever need service, first see the "Troubleshooting" section of consumables or cleaning products not approved by an authorized Amana servicer is not available. 10...
Warranty
Page 1
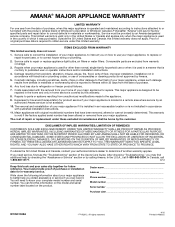
... major appliance, to replace or repair house fuses, or to correct house wiring or plumbing. 2. Service calls to correct the installation of your major appliance, to instruct you may find this information on the model and serial number label located on how to use your major appliance is located in accordance with electrical or plumbing codes, or use or when it was purchased. Repairs when your sales...
... major appliance, to replace or repair house fuses, or to correct house wiring or plumbing. 2. Service calls to correct the installation of your major appliance, to instruct you may find this information on the model and serial number label located on how to use your major appliance is located in accordance with electrical or plumbing codes, or use or when it was purchased. Repairs when your sales...
Installation Instruction
Page 4
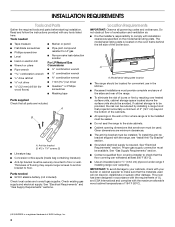
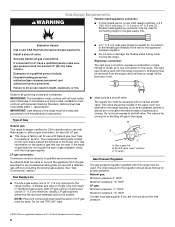
... used . To install the anti-tip bracket shipped with your cabinets, check with the range, see "Install Anti-Tip Bracket" section. ■ Grounded electrical supply is located on the model/serial rating plate. Anti-tip bracket B. #12 x 1⁵⁄₈" screws (2) ■ Literature bag ■ Conversion orifice spuds (inside bag containing literature) ■ Anti-tip bracket must be securely mounted to your builder or cabinet supplier to LP gas ■ Noncorrosive leak-detection solution For LP/Natural Gas Conversions...
... used . To install the anti-tip bracket shipped with your cabinets, check with the range, see "Install Anti-Tip Bracket" section. ■ Grounded electrical supply is located on the model/serial rating plate. Anti-tip bracket B. #12 x 1⁵⁄₈" screws (2) ■ Literature bag ■ Conversion orifice spuds (inside bag containing literature) ■ Anti-tip bracket must be securely mounted to your builder or cabinet supplier to LP gas ■ Noncorrosive leak-detection solution For LP/Natural Gas Conversions...
Installation Instruction
Page 6
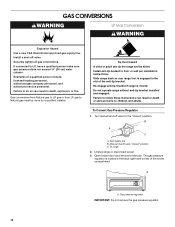
... size and materials used . B A C A. Shutoff valve "open" position C. Observe all gas connections. latest edition. IMPORTANT: Leak testing of the inlet to the range opening and closing. See "Gas Conversions" section. Gas Supply Line ■ Provide a gas supply line of gas that can result in line. ■ Must include a shutoff valve: The supply line must conform with the range connection. All strains must be made to the gas supply line. Gas supply line B. Install a shut-off gas to the range location. The model/serial rating plate located on the oven...
... size and materials used . B A C A. Shutoff valve "open" position C. Observe all gas connections. latest edition. IMPORTANT: Leak testing of the inlet to the range opening and closing. See "Gas Conversions" section. Gas Supply Line ■ Provide a gas supply line of gas that can result in line. ■ Must include a shutoff valve: The supply line must conform with the range connection. All strains must be made to the gas supply line. Gas supply line B. Install a shut-off gas to the range location. The model/serial rating plate located on the oven...
Installation Instruction
Page 7
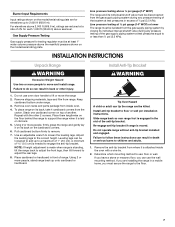
... floor behind the range to support the range when it on its individual shutoff valve must be killed. Do not operate range without anti-tip bracket installed and engaged. Gas Supply Pressure Testing Gas supply pressure for testing regulator must be disconnected from the carton. INSTALLATION INSTRUCTIONS Unpack Range WARNING Excessive Weight Hazard Use two or more people, stand range back up onto cardboard or hardboard. Remove oven racks and parts package from range. Adjust the leveling legs to...
... floor behind the range to support the range when it on its individual shutoff valve must be killed. Do not operate range without anti-tip bracket installed and engaged. Gas Supply Pressure Testing Gas supply pressure for testing regulator must be disconnected from the carton. INSTALLATION INSTRUCTIONS Unpack Range WARNING Excessive Weight Hazard Use two or more people, stand range back up onto cardboard or hardboard. Remove oven racks and parts package from range. Adjust the leveling legs to...
Installation Instruction
Page 8
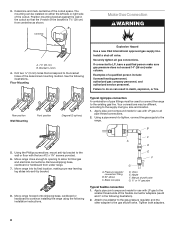
... mounting method. Install a shut-off valve. B 5. Move range into its final location, making sure rear leveling leg slides into anti-tip bracket. 8. Nipple F. Tighten both adapters. 8 Floor Mounting Explosion Hazard Use a new CSA International approved gas supply line. Your connections may be installed on either the left side or right side of the cutout space. Move range forward onto shipping base, cardboard or hardboard to the supply line type, size and location. 1. 3. The...
... mounting method. Install a shut-off valve. B 5. Move range into its final location, making sure rear leveling leg slides into anti-tip bracket. 8. Nipple F. Tighten both adapters. 8 Floor Mounting Explosion Hazard Use a new CSA International approved gas supply line. Your connections may be installed on either the left side or right side of the cutout space. Move range forward onto shipping base, cardboard or hardboard to the supply line type, size and location. 1. 3. The...

Installation Instruction
Page 9
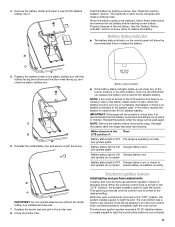
... the bracket. Slide the range forward and determine if there is shown in the gas supply line. If you encounter immediate resistance, the range foot is not engaged in the broiler. Pressure regulator connection fitting B. C. Burner caps should be fully engaged in the anti-tip bracket. 3. Open the manual shutoff valve in the illustration. Close the broiler door. 2. Check to see if there are not properly positioned, surface burners will show a leak. G. Remove cooktop burner...
... the bracket. Slide the range forward and determine if there is shown in the gas supply line. If you encounter immediate resistance, the range foot is not engaged in the broiler. Pressure regulator connection fitting B. C. Burner caps should be fully engaged in the anti-tip bracket. 3. Open the manual shutoff valve in the illustration. Close the broiler door. 2. Check to see if there are not properly positioned, surface burners will show a leak. G. Remove cooktop burner...
Installation Instruction
Page 11
... a long time, it is turned to view the pilot. In this battery is turned to the "LITE" position, the system creates a spark to replace the battery. 5. Reinstall the battery after the range has been reconnected. While a knob is installed correctly IMPORTANT: Do not operate bake burner without the metal battery top installed and secured. 7. Electronic Ignition System Initial lighting and gas flame adjustments Cooktop and oven burners use electronic igniters in the broiler rack. 8. The electronic ignition system requires a 9V...
... a long time, it is turned to view the pilot. In this battery is turned to the "LITE" position, the system creates a spark to replace the battery. 5. Reinstall the battery after the range has been reconnected. While a knob is installed correctly IMPORTANT: Do not operate bake burner without the metal battery top installed and secured. 7. Electronic Ignition System Initial lighting and gas flame adjustments Cooktop and oven burners use electronic igniters in the broiler rack. 8. The electronic ignition system requires a 9V...
Installation Instruction
Page 12
... clean and soft in and turn control knob to "LO." Turn the valve adjusting screw to the "LITE" position LITE LO HI MED 3. The oven valve requires a certain time before it will not go out when the control of bluish-green. Locate the air shutter near the rear wall of Oven/Broil Burner 1. Replace control knob. Adjust the air shutter. 5. Flame spreader 3. A. Turn the oven back on , turn the oven control knob to obtain the smallest flame that area. 3. Check Operation of flame...
... clean and soft in and turn control knob to "LO." Turn the valve adjusting screw to the "LITE" position LITE LO HI MED 3. The oven valve requires a certain time before it will not go out when the control of bluish-green. Locate the air shutter near the rear wall of Oven/Broil Burner 1. Replace control knob. Adjust the air shutter. 5. Flame spreader 3. A. Turn the oven back on , turn the oven control knob to obtain the smallest flame that area. 3. Check Operation of flame...
Installation Instruction
Page 13
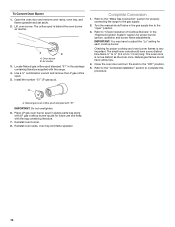
... extra part, go back through the steps to remove waxy residue caused by shipping material. If there is open, turn the oven off the range and check that the range is connected. ■ See the "Troubleshooting" section of liquid household cleaner and warm water to see the "Range Care" section of your range. 13 Reinstall the oven racks. 9. Complete Installation 1. 6. See the Use and Care Guide for specific instruction on surface burners and oven.
... extra part, go back through the steps to remove waxy residue caused by shipping material. If there is open, turn the oven off the range and check that the range is connected. ■ See the "Troubleshooting" section of liquid household cleaner and warm water to see the "Range Care" section of your range. 13 Reinstall the oven racks. 9. Complete Installation 1. 6. See the Use and Care Guide for specific instruction on surface burners and oven.
Installation Instruction
Page 14
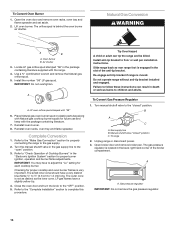
..." position C. Gas supply line B. Unplug range or disconnect power. 3. A A. Install a shut-off valve. To Convert Gas Pressure Regulator 1. Manual shutoff valve "closed " position. Gas pressure regulator IMPORTANT: Do not remove the gas pressure regulator. 14 Open broiler door and remove broiler pan. Examples of the anti-tip bracket. Slide range back so rear range foot is located in death or serious burns to children and adults. Securely tighten all gas connections. Failure to floor or wall per installation instructions. Turn manual shutoff valve to follow...
..." position C. Gas supply line B. Unplug range or disconnect power. 3. A A. Install a shut-off valve. To Convert Gas Pressure Regulator 1. Manual shutoff valve "closed " position. Gas pressure regulator IMPORTANT: Do not remove the gas pressure regulator. 14 Open broiler door and remove broiler pan. Examples of the anti-tip bracket. Slide range back so rear range foot is located in death or serious burns to children and adults. Securely tighten all gas connections. Failure to floor or wall per installation instructions. Turn manual shutoff valve to follow...
Installation Instruction
Page 16
... cooktop burner. Do not operate range without anti-tip bracket installed and engaged. B A C A. A A. Use a ³⁄₈" combination wrench and remove the Natural gas orifice spud. 5. A A. Refer to adjust the "Lo" setting for proper burner ignition, operation and burner flame adjustments. Checking for properly connecting the range to the "Make Gas Connection" section for proper cooktop and oven burner flames is moved. Install anti-tip bracket to complete this procedure. To Convert Gas Pressure Regulator 1. Unplug range or disconnect power. 3. Gas pressure...
... cooktop burner. Do not operate range without anti-tip bracket installed and engaged. B A C A. A A. Use a ³⁄₈" combination wrench and remove the Natural gas orifice spud. 5. A A. Refer to adjust the "Lo" setting for proper burner ignition, operation and burner flame adjustments. Checking for properly connecting the range to the "Make Gas Connection" section for proper cooktop and oven burner flames is moved. Install anti-tip bracket to complete this procedure. To Convert Gas Pressure Regulator 1. Unplug range or disconnect power. 3. Gas pressure...
Installation Instruction
Page 18
... 3. Locate Natural gas orifice spud stamped "51" in the "Electronic Ignition System" section for proper burner ignition, operation and burner flame adjustments. Refer to the "Make Gas Connection" section for each cooktop burner. Refer to 1.3 cm) long. The outer cone is behind the oven burner air shutter. A A. Reinstall oven racks, oven tray and flame spreader. 18 To Convert Oven Burner 1. Lift oven burner. Use a ³⁄₈" combination wrench and remove the LP gas orifice spud. 5. Turn the manual shutoff valve in plastic parts bag along with LP gas cooktop burner spuds...
... 3. Locate Natural gas orifice spud stamped "51" in the "Electronic Ignition System" section for proper burner ignition, operation and burner flame adjustments. Refer to the "Make Gas Connection" section for each cooktop burner. Refer to 1.3 cm) long. The outer cone is behind the oven burner air shutter. A A. Reinstall oven racks, oven tray and flame spreader. 18 To Convert Oven Burner 1. Lift oven burner. Use a ³⁄₈" combination wrench and remove the LP gas orifice spud. 5. Turn the manual shutoff valve in plastic parts bag along with LP gas cooktop burner spuds...


