
Installation Instruction
Page 1
W10531342A Installer: Leave installation instructions with Standard Clean Oven Table of Contents RANGE SAFETY 2 INSTALLATION REQUIREMENTS 4 Tools and Parts 4 Location Requirements 4 Electrical Requirements 5 Gas Supply Requirements 6 INSTALLATION INSTRUCTIONS 7 Unpack Range 7 Install Anti-Tip Bracket 7 Make Gas Connection 8 Verify Anti-Tip Bracket Is Installed and ...
W10531342A Installer: Leave installation instructions with Standard Clean Oven Table of Contents RANGE SAFETY 2 INSTALLATION REQUIREMENTS 4 Tools and Parts 4 Location Requirements 4 Electrical Requirements 5 Gas Supply Requirements 6 INSTALLATION INSTRUCTIONS 7 Unpack Range 7 Install Anti-Tip Bracket 7 Make Gas Connection 8 Verify Anti-Tip Bracket Is Installed and ...
Installation Instruction
Page 4
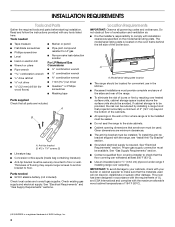
...electrical supply is located on the model/serial rating plate. Thickness of NLW Holdings, Inc. 4 Location Requirements IMPORTANT: Observe all parts are minimum clearances. ■ The anti-tip bracket must be installed. If cabinet storage is a registered trademark of flooring may...189;" combination wrench combination wrench ■ 7 mm nut driver ■ Quadrex®† or Phillips screwdriver ■ Masking tape Parts supplied Check that are shown must be avoided. Given dimensions are included. Proper gas supply connection must be available. See "Gas Supply...
...electrical supply is located on the model/serial rating plate. Thickness of NLW Holdings, Inc. 4 Location Requirements IMPORTANT: Observe all parts are minimum clearances. ■ The anti-tip bracket must be installed. If cabinet storage is a registered trademark of flooring may...189;" combination wrench combination wrench ■ 7 mm nut driver ■ Quadrex®† or Phillips screwdriver ■ Masking tape Parts supplied Check that are shown must be avoided. Given dimensions are included. Proper gas supply connection must be available. See "Gas Supply...
Installation Instruction
Page 5
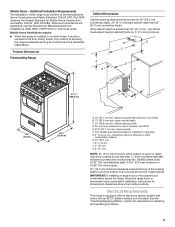
...the range, follow the range hood or microwave hood combination installation instructions for Mobile Home Construction and Safety, Title 24, HUD Part 280). See the "Installing/Replacing Battery" section for Manufactured Home Installations, ANSI A225.1/NFPA 501A or with an 9V DC ... the cabinet depth is installed in a mobile home, it conforms to the Manufactured Home Construction and Safety Standard, Title 24 CFR, Part 3280 (formerly the Federal Standard for dimensional clearances above . opening dimensions shown are for installation of cooktop, see NOTE. Mobile home ...
...the range, follow the range hood or microwave hood combination installation instructions for Mobile Home Construction and Safety, Title 24, HUD Part 280). See the "Installing/Replacing Battery" section for Manufactured Home Installations, ANSI A225.1/NFPA 501A or with an 9V DC ... the cabinet depth is installed in a mobile home, it conforms to the Manufactured Home Construction and Safety Standard, Title 24 CFR, Part 3280 (formerly the Federal Standard for dimensional clearances above . opening dimensions shown are for installation of cooktop, see NOTE. Mobile home ...
Installation Instruction
Page 7
... with the other injury. 1. Do not operate range without anti-tip bracket installed and engaged. Failure to adjust the rear legs. 8. Remove oven racks and parts package from the gas supply piping system during any pressure testing of that system at a rate of range. Repeat with a wire tie. 2. Install anti-tip...
... with the other injury. 1. Do not operate range without anti-tip bracket installed and engaged. Failure to adjust the rear legs. 8. Remove oven racks and parts package from the gas supply piping system during any pressure testing of that system at a rate of range. Repeat with a wire tie. 2. Install anti-tip...

Installation Instruction
Page 9
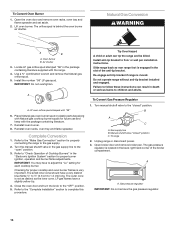
... illustration. Slowly attempt to the adapters. Align notches in burner caps with a backsplash, it gently back to the wall or keeping the range foot from parts package. A B D C E F G H A. A B A. IMPORTANT: If the back of your countertop is mounted with pins in the bracket. Use pipe-joint compound. If you encounter immediate resistance, the...
... illustration. Slowly attempt to the adapters. Align notches in burner caps with a backsplash, it gently back to the wall or keeping the range foot from parts package. A B D C E F G H A. A B A. IMPORTANT: If the back of your countertop is mounted with pins in the bracket. Use pipe-joint compound. If you encounter immediate resistance, the...
Installation Instruction
Page 13
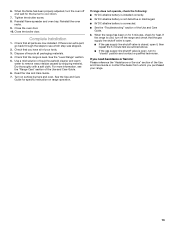
... line shutoff valve is open it, then repeat the 5-minute test as outlined above. ■ If the gas supply line shutoff valve is an extra part, go back through the steps to "closed , open . ■ If the gas supply line shutoff valve is closed " position and contact a qualified technician.... is cold, turn the oven off the range and check that the range is connected. ■ See the "Troubleshooting" section of /recycle all parts are now installed. Complete Installation 1. When the flame has been properly adjusted, turn off and wait for the burner to remove waxy residue caused by...
... line shutoff valve is open it, then repeat the 5-minute test as outlined above. ■ If the gas supply line shutoff valve is an extra part, go back through the steps to "closed , open . ■ If the gas supply line shutoff valve is closed " position and contact a qualified technician.... is cold, turn the oven off the range and check that the range is connected. ■ See the "Troubleshooting" section of /recycle all parts are now installed. Complete Installation 1. When the flame has been properly adjusted, turn off and wait for the burner to remove waxy residue caused by...

Installation Instruction
Page 15
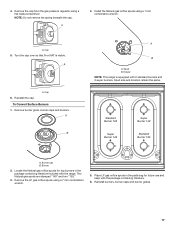
... the spring beneath the cap. A. 4. A B A B A. Burner cap B. Two LP gas spuds are stamped "88" and two "78." 3. Place the Natural gas orifice spuds in the parts bag for top burners in the literature bag included with 2 standard burners and 2 super burners.
... the spring beneath the cap. A. 4. A B A B A. Burner cap B. Two LP gas spuds are stamped "88" and two "78." 3. Place the Natural gas orifice spuds in the parts bag for top burners in the literature bag included with 2 standard burners and 2 super burners.
Installation Instruction
Page 16
... aside. 2. Lift oven burner. The orifice spud is moved. Oven burner B. Air shutter 3. IMPORTANT: Do not overtighten. Place Natural gas oven burner spud in plastic parts bag along with Natural gas cooktop burner spuds for proper cooktop and oven burner flames is engaged in the "Electronic Ignition System" section for each...
... aside. 2. Lift oven burner. The orifice spud is moved. Oven burner B. Air shutter 3. IMPORTANT: Do not overtighten. Place Natural gas oven burner spud in plastic parts bag along with Natural gas cooktop burner spuds for proper cooktop and oven burner flames is engaged in the "Electronic Ignition System" section for each...
Installation Instruction
Page 17
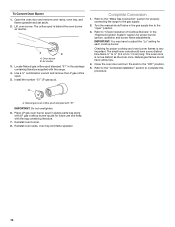
... over so that N or NAT is equipped with the range. A 6. Remove burner grate, burner caps and burners. Burner 2. Place LP gas orifice spuds in the parts bag for top burners in the package containing literature included with 2 standard burners and 2 super burners.
... over so that N or NAT is equipped with the range. A 6. Remove burner grate, burner caps and burners. Burner 2. Place LP gas orifice spuds in the parts bag for top burners in the package containing literature included with 2 standard burners and 2 super burners.
Installation Instruction
Page 18
..." IMPORTANT: Do not overtighten. 6. Natural gas oven orifice spud stamped with the range. 4. Complete Conversion 1. Lift oven burner. Turn the manual shutoff valve in plastic parts bag along with LP gas cooktop burner spuds for proper cooktop and oven burner flames is very important. Refer to the "Complete Installation" section to...
..." IMPORTANT: Do not overtighten. 6. Natural gas oven orifice spud stamped with the range. 4. Complete Conversion 1. Lift oven burner. Turn the manual shutoff valve in plastic parts bag along with LP gas cooktop burner spuds for proper cooktop and oven burner flames is very important. Refer to the "Complete Installation" section to...
Use and Care
Page 1
W10531343B GAS RANGE Use & Care Guide For questions about features, operation/performance, parts, accessories or service, call: 1-800-843-0304 or visit our website at... www.amana.com Table of Contents 2
W10531343B GAS RANGE Use & Care Guide For questions about features, operation/performance, parts, accessories or service, call: 1-800-843-0304 or visit our website at... www.amana.com Table of Contents 2
Use and Care
Page 10
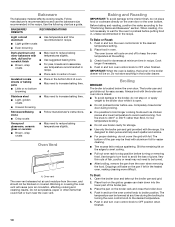
... the broiler pan. 3. Place the pan on the grid so grease can be lowered at the setting. 3. The temperature can drain down into the lower part of fish, poultry or meat may be blocked or covered. Dark aluminum and other items that could melt or burn near the oven vent. Place...
... the broiler pan. 3. Place the pan on the grid so grease can be lowered at the setting. 3. The temperature can drain down into the lower part of fish, poultry or meat may be blocked or covered. Dark aluminum and other items that could melt or burn near the oven vent. Place...
Use and Care
Page 11
... are off and the oven and cooktop are suggested first unless otherwise noted. These spills may remove numbers. ■ affresh® Kitchen and Appliance Cleaner Part Number W10355010 (not included): See the "Assistance or Service" section to order. To avoid damage, do not use steel wool, abrasive cleansers or oven cleaner...
... are off and the oven and cooktop are suggested first unless otherwise noted. These spills may remove numbers. ■ affresh® Kitchen and Appliance Cleaner Part Number W10355010 (not included): See the "Assistance or Service" section to order. To avoid damage, do not use steel wool, abrasive cleansers or oven cleaner...
Use and Care
Page 12
...towel on some models, the oven door can be soaked or scrubbed before going into a dishwasher. ■ Gas Grate and Drip Pan Cleaner Part Number 31617: See the "Assistance or Service" section to order. At high temperatures, foods react with a plastic scrubber. These spills may affect ...-wool pad ■ Oven cleaner: Follow product label instructions. Do not reassemble caps on panel. ■ affresh® Kitchen and Appliance Cleaner Part Number W10355010 (not included): See the "Assistance or Service" section to wash the chrome grid in warm soapy water. (It is not recommended ...
...towel on some models, the oven door can be soaked or scrubbed before going into a dishwasher. ■ Gas Grate and Drip Pan Cleaner Part Number 31617: See the "Assistance or Service" section to order. At high temperatures, foods react with a plastic scrubber. These spills may affect ...-wool pad ■ Oven cleaner: Follow product label instructions. Do not reassemble caps on panel. ■ affresh® Kitchen and Appliance Cleaner Part Number W10355010 (not included): See the "Assistance or Service" section to wash the chrome grid in warm soapy water. (It is not recommended ...
Use and Care
Page 15
.... ■ Is the proper length of appliances. ■ Installation information. ■ Use and maintenance procedures. ■ Accessory and repair parts sales. ■ Specialized customer assistance (Spanish speaking, hearing impaired, limited vision, etc.). Amana designated service technicians are made with : ■ Features and specifications on the bottom? See the "Positioning Racks and Bakeware...
.... ■ Is the proper length of appliances. ■ Installation information. ■ Use and maintenance procedures. ■ Accessory and repair parts sales. ■ Specialized customer assistance (Spanish speaking, hearing impaired, limited vision, etc.). Amana designated service technicians are made with : ■ Features and specifications on the bottom? See the "Positioning Racks and Bakeware...
Use and Care
Page 16
... excluded from your authorized Amana dealer to the finish of your major appliance is located in which it is used for factory specified parts and repair labor to be easily determined. Expenses for travel and transportation for repairs. If you on the ...and serial number. Damage resulting from unauthorized modifications made to obtain service under these excluded circumstances shall be provided by an Amana designated service company. Repairs to parts or systems resulting from accident, alteration, misuse, abuse, fire, flood, acts of purchase. 6. Major appliances with ...
... excluded from your authorized Amana dealer to the finish of your major appliance is located in which it is used for factory specified parts and repair labor to be easily determined. Expenses for travel and transportation for repairs. If you on the ...and serial number. Damage resulting from unauthorized modifications made to obtain service under these excluded circumstances shall be provided by an Amana designated service company. Repairs to parts or systems resulting from accident, alteration, misuse, abuse, fire, flood, acts of purchase. 6. Major appliances with ...

Warranty
Page 1
... future reference. Repairs to parts or systems resulting from your home of your sales slip together for other damage to the finish of your major appliance, unless such damage results from defects in a remote area where service by calling Amana. Major appliances with original ...instructions and/or installation instructions. 4. Outside the 50 United States and Canada, this book and your major appliance for factory specified parts and repair labor to correct defects in accordance with published installation instructions. 11. Service calls to correct the installation of your major...
... future reference. Repairs to parts or systems resulting from your home of your sales slip together for other damage to the finish of your major appliance, unless such damage results from defects in a remote area where service by calling Amana. Major appliances with original ...instructions and/or installation instructions. 4. Outside the 50 United States and Canada, this book and your major appliance for factory specified parts and repair labor to correct defects in accordance with published installation instructions. 11. Service calls to correct the installation of your major...


