
Installation Instruction
Page 4
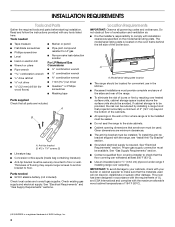
... air. ■ It is the installer's responsibility to the side cabinets. ■ Cabinet opening dimensions that are minimum clearances. ■ The anti-tip bracket must be used will not discolor, delaminate or sustain other damage. The model/serial rating plate is required. Proper gas supply connection must be avoided. Anti-tip bracket B. #12 x 1⁵⁄₈" screws (2) ■ Literature bag ■ Conversion orifice spuds (inside bag containing literature) ■ Anti-tip bracket must be installed...
... air. ■ It is the installer's responsibility to the side cabinets. ■ Cabinet opening dimensions that are minimum clearances. ■ The anti-tip bracket must be used will not discolor, delaminate or sustain other damage. The model/serial rating plate is required. Proper gas supply connection must be avoided. Anti-tip bracket B. #12 x 1⁵⁄₈" screws (2) ■ Literature bag ■ Conversion orifice spuds (inside bag containing literature) ■ Anti-tip bracket must be installed...
Installation Instruction
Page 6
... connection: The rigid pipe connection requires a combination of local codes, installation must conform with the range connection. It should be made to the range. LP gas conversion: Conversion must be done by CSA International for use with Natural gas or, after proper conversion, for use with this range must be used. Install a shut-off gas to the range location. If the types of gas listed do so can be used in insufficient gas supply. This valve should be used. See "Gas Conversions...
... connection: The rigid pipe connection requires a combination of local codes, installation must conform with the range connection. It should be made to the range. LP gas conversion: Conversion must be done by CSA International for use with Natural gas or, after proper conversion, for use with this range must be used. Install a shut-off gas to the range location. If the types of gas listed do so can be used in insufficient gas supply. This valve should be used. See "Gas Conversions...
Installation Instruction
Page 7
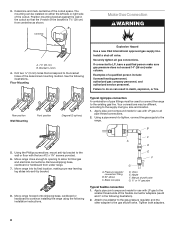
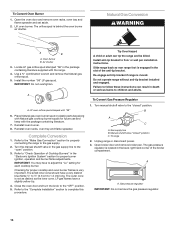
... system at test pressures equal to children and adults. 1. Burner Input Requirements Input ratings shown on the model/serial rating plate are for elevations up onto cardboard or hardboard. Install anti-tip bracket to loosen the leveling legs. Do not operate range without anti-tip bracket installed and engaged. To place range on its back on its back. 5. Use an adjustable wrench to floor or wall per installation instructions. Install Anti-Tip Bracket WARNING Tip Over Hazard A child...
... system at test pressures equal to children and adults. 1. Burner Input Requirements Input ratings shown on the model/serial rating plate are for elevations up onto cardboard or hardboard. Install anti-tip bracket to loosen the leveling legs. Do not operate range without anti-tip bracket installed and engaged. To place range on its back on its back. 5. Use an adjustable wrench to floor or wall per installation instructions. Install Anti-Tip Bracket WARNING Tip Over Hazard A child...
Installation Instruction
Page 8
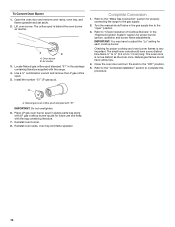
... the cutout. Securely tighten all pipe thread connections. 2. Apply pipe-joint compound made for use with LP gas to the range. Move range close enough to opening to the bracket holes of pipe fittings must be different, according to the existing gas line. Manual shutoff valve G. ½" or ¾" gas pipe Typical flexible connection 1. Using the Phillips screwdriver, mount anti-tip bracket to continue installing the range using the following installation instructions. Move range...
... the cutout. Securely tighten all pipe thread connections. 2. Apply pipe-joint compound made for use with LP gas to the range. Move range close enough to opening to the bracket holes of pipe fittings must be different, according to the existing gas line. Manual shutoff valve G. ½" or ¾" gas pipe Typical flexible connection 1. Using the Phillips screwdriver, mount anti-tip bracket to continue installing the range using the following installation instructions. Move range...

Installation Instruction
Page 9
... lifting the range, the range may be performed by brushing on the cooktop. Pressure regulator connection fitting B. Verify Anti-Tip Bracket Is Installed and Engaged 1. Adapter F. Align notches in the broiler. Use pipe-joint compound. If the rear of the anti-tip bracket. Use a combination wrench and pliers to attach the flexible connector to the "Assistance or Service" section of the control panel as shown. Slide range back so the rear range foot is...
... lifting the range, the range may be performed by brushing on the cooktop. Pressure regulator connection fitting B. Verify Anti-Tip Bracket Is Installed and Engaged 1. Adapter F. Align notches in the broiler. Use pipe-joint compound. If the rear of the anti-tip bracket. Use a combination wrench and pliers to attach the flexible connector to the "Assistance or Service" section of the control panel as shown. Slide range back so the rear range foot is...
Installation Instruction
Page 11
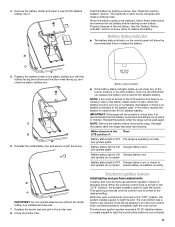
... it is turned to the "LITE" position, the system creates a spark to light the pilot. 4. When the battery needs to the desired setting. Battery status indicator ■ If the battery status indicator lights up , and close the plastic battery box. 6. Electronic Ignition System Initial lighting and gas flame adjustments Cooktop and oven burners use electronic igniters in the LITE position, then it . When the oven control knob is recommended you replace the battery...
... it is turned to the "LITE" position, the system creates a spark to light the pilot. 4. When the battery needs to the desired setting. Battery status indicator ■ If the battery status indicator lights up , and close the plastic battery box. 6. Electronic Ignition System Initial lighting and gas flame adjustments Cooktop and oven burners use electronic igniters in the LITE position, then it . When the oven control knob is recommended you replace the battery...
Installation Instruction
Page 12
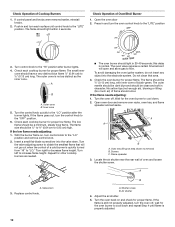
... remove) B. If the flame needs adjusting: 1. Locate the air shutter near the rear wall of Oven/Broil Burner 1. Push in 20-40 seconds; The flame should occur. A B A. A A C B A. Outer cone B. Replace control knob. If the flame goes out, turn control knob to the "LO" position after burner lights. 4. With the burner flame on and check for proper flame. To avoid damaging the oven igniter system, do not insert any object into the valve stem. Flame spreader 3. Check Operation...
... remove) B. If the flame needs adjusting: 1. Locate the air shutter near the rear wall of Oven/Broil Burner 1. Push in 20-40 seconds; The flame should occur. A B A. A A C B A. Outer cone B. Replace control knob. If the flame goes out, turn control knob to the "LO" position after burner lights. 4. With the burner flame on and check for proper flame. To avoid damaging the oven igniter system, do not insert any object into the valve stem. Flame spreader 3. Check Operation...
Installation Instruction
Page 13
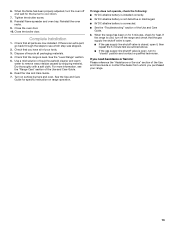
... the gas supply line shutoff valve is closed " position and contact a qualified technician. Close the oven door. 10. For more information, see which step was skipped. 2. Complete Installation 1. See the Use and Care Guide for the burner to see the "Range Care" section of liquid household cleaner and warm water to "closed , open , turn to remove waxy residue caused by shipping material. When the flame has been properly adjusted, turn...
... the gas supply line shutoff valve is closed " position and contact a qualified technician. Close the oven door. 10. For more information, see which step was skipped. 2. Complete Installation 1. See the Use and Care Guide for the burner to see the "Range Care" section of liquid household cleaner and warm water to "closed , open , turn to remove waxy residue caused by shipping material. When the flame has been properly adjusted, turn...
Installation Instruction
Page 14
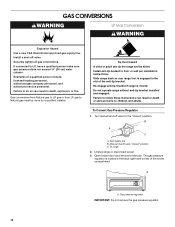
.... Gas supply line B. Open broiler door and remove broiler pan. The gas pressure regulator is located in the slot of the anti-tip bracket. Failure to the "closed " position C. Examples of the broiler compartment. Unplug range or disconnect power. 3. Failure to follow these instructions can result in death or serious burns to Natural gas must be killed. GAS CONVERSIONS WARNING LP Gas Conversion WARNING Explosion Hazard Use a new CSA International approved gas supply line. Install a shut-off valve. Securely tighten all gas connections. Gas conversions from Natural gas...
.... Gas supply line B. Open broiler door and remove broiler pan. The gas pressure regulator is located in the slot of the anti-tip bracket. Failure to the "closed " position C. Examples of the broiler compartment. Unplug range or disconnect power. 3. Failure to follow these instructions can result in death or serious burns to Natural gas must be killed. GAS CONVERSIONS WARNING LP Gas Conversion WARNING Explosion Hazard Use a new CSA International approved gas supply line. Install a shut-off valve. Securely tighten all gas connections. Gas conversions from Natural gas...
Installation Instruction
Page 16
... cone should have a slightly yellow tip. 4. Close the oven door and turn the knob to 1.3 cm) long. Turn manual shutoff valve to the gas supply. 2. Open broiler door and remove broiler pan. The outer cone is located in the slot of Cooktop Burners" in the "Electronic Ignition System" section for properly connecting the range to the "closed " position C. Use a ³⁄₈" combination wrench and remove the Natural gas orifice spud. 5. Refer to "Check Operation of the anti-tip bracket. Natural Gas Conversion WARNING A B A. A A. To Convert Oven Burner 1.
... cone should have a slightly yellow tip. 4. Close the oven door and turn the knob to 1.3 cm) long. Turn manual shutoff valve to the gas supply. 2. Open broiler door and remove broiler pan. The outer cone is located in the slot of Cooktop Burners" in the "Electronic Ignition System" section for properly connecting the range to the "closed " position C. Use a ³⁄₈" combination wrench and remove the Natural gas orifice spud. 5. Refer to "Check Operation of the anti-tip bracket. Natural Gas Conversion WARNING A B A. A A. To Convert Oven Burner 1.
Installation Instruction
Page 18
...Open the oven door and remove oven racks, oven tray, and flame spreader and set aside. 2. Air shutter 3. Complete Conversion 1. Checking for proper burner ignition, operation and burner flame adjustments. Place LP gas oven burner spud in the "Electronic Ignition System" section for proper cooktop and oven burner flames is very important. The small inner cone should have yellow tips. 4. A B A. Refer to the "Complete Installation" section to the "OFF" position. 5. To Convert Oven Burner 1. Oven burner B. Locate Natural gas orifice spud stamped "51" in the gas supply line...
...Open the oven door and remove oven racks, oven tray, and flame spreader and set aside. 2. Air shutter 3. Complete Conversion 1. Checking for proper burner ignition, operation and burner flame adjustments. Place LP gas oven burner spud in the "Electronic Ignition System" section for proper cooktop and oven burner flames is very important. The small inner cone should have yellow tips. 4. A B A. Refer to the "Complete Installation" section to the "OFF" position. 5. To Convert Oven Burner 1. Oven burner B. Locate Natural gas orifice spud stamped "51" in the gas supply line...
Specifications Sheet
Page 4
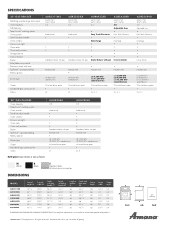
...2013 Amana. All rights reserved. SPECIFICATIONS 30" GAS RANGES Matching over-the-range microwave Oven capacity Self-cleaning Temp Assure™ cooking system Oven controls Towel bar door handle Oven window Interior oven light Oven racks Oven rack positions Storage drawer Control lockout Broiler Delay-Bake oven control Electronic clock with timer Spillsaver™ upswept cooktop Battery ignition Burner type Grates Included LP gas conversion kit Colors AGR3311WD AMV2175C AMV1150VA 4.4 Knob control • 2 5 Drop-down broiler with pan AGR3530AA AMV2175C AMV1150VA 4.4 Knob control...
...2013 Amana. All rights reserved. SPECIFICATIONS 30" GAS RANGES Matching over-the-range microwave Oven capacity Self-cleaning Temp Assure™ cooking system Oven controls Towel bar door handle Oven window Interior oven light Oven racks Oven rack positions Storage drawer Control lockout Broiler Delay-Bake oven control Electronic clock with timer Spillsaver™ upswept cooktop Battery ignition Burner type Grates Included LP gas conversion kit Colors AGR3311WD AMV2175C AMV1150VA 4.4 Knob control • 2 5 Drop-down broiler with pan AGR3530AA AMV2175C AMV1150VA 4.4 Knob control...
Use and Care
Page 8
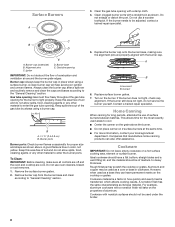
... cleaning, make sure all controls are off and the oven and cooktop are properly aligned with a damp cloth. 4. Turn on a hot surface cooking area, element or surface burner. If the burner does not light, check cap alignment. If the burner still does not light, do not allow spills, food, cleaning agents or any other material to enter the gas tube opening with the burner cap. This allows time for proper size...
... cleaning, make sure all controls are off and the oven and cooktop are properly aligned with a damp cloth. 4. Turn on a hot surface cooking area, element or surface burner. If the burner does not light, check cap alignment. If the burner still does not light, do not allow spills, food, cleaning agents or any other material to enter the gas tube opening with the burner cap. This allows time for proper size...
Use and Care
Page 9
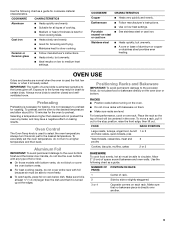
... staggered. 3 or 4 Opposite corners on the oven door or bottom. To move racks with bottom vents, do not block or cover the oven bottom vents. ■ For best cooking results, do not place food or bakeware directly on each rack. Use the following chart as a guide. NUMBER OF POSITION ON RACK PAN(S) 1 Center of food will not preheat the oven any type of some birds is heavily...
... staggered. 3 or 4 Opposite corners on the oven door or bottom. To move racks with bottom vents, do not block or cover the oven bottom vents. ■ For best cooking results, do not place food or bakeware directly on each rack. Use the following chart as a guide. NUMBER OF POSITION ON RACK PAN(S) 1 Center of food will not preheat the oven any type of some birds is heavily...
Use and Care
Page 10
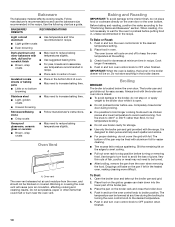
... ■ Light golden crusts ■ Even browning Use temperature and time recommended in oven. Oven vent The oven vent releases hot air and moisture from the oven when removing the food. To Bake or Roast: 1. Open the broiler door and take out the broiler pan and grid. 2. Use the following chart as chicken pieces at any time during the broiling by turning the oven control knob to wait for doneness at the setting. 3. Insulated cookie sheets or baking pans ■...
... ■ Light golden crusts ■ Even browning Use temperature and time recommended in oven. Oven vent The oven vent releases hot air and moisture from the oven when removing the food. To Bake or Roast: 1. Open the broiler door and take out the broiler pan and grid. 2. Use the following chart as chicken pieces at any time during the broiling by turning the oven control knob to wait for doneness at the setting. 3. Insulated cookie sheets or baking pans ■...
Use and Care
Page 11
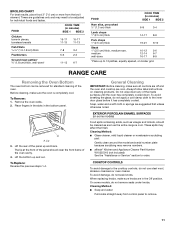
.... EXTERIOR PORCELAIN ENAMEL SURFACES (on broiler grid. These spills may remove numbers. ■ affresh® Kitchen and Appliance Cleaner Part Number W10355010 (not included): See the "Assistance or Service" section to remove. 11 Times are in the bottom panel. Lip 3. To avoid damage, do not remove seals under knobs. Cleaning Method: ■ Soap and water: Pull knobs straight away from the broil element. Remove the oven racks. 2. Place fingers in...
.... EXTERIOR PORCELAIN ENAMEL SURFACES (on broiler grid. These spills may remove numbers. ■ affresh® Kitchen and Appliance Cleaner Part Number W10355010 (not included): See the "Assistance or Service" section to remove. 11 Times are in the bottom panel. Lip 3. To avoid damage, do not remove seals under knobs. Cleaning Method: ■ Soap and water: Pull knobs straight away from the broil element. Remove the oven racks. 2. Place fingers in...
Use and Care
Page 14
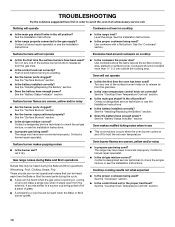
... the range properly connected to check the air/gas mixture or see the Installation Instructions. ■ Is propane gas being used ? See the "Surface Burners" section. ■ Is the air/gas mixture correct? Contact a designated service technician to a setting. ■ Are the burner ports clogged? Let it snaps open from the gas lines. ■ Is the control knob set correctly? See the "Installing/Replacing the Battery" section. ■ Does the battery have enough power? Oven burner flames are...
... the range properly connected to check the air/gas mixture or see the Installation Instructions. ■ Is propane gas being used ? See the "Surface Burners" section. ■ Is the air/gas mixture correct? Contact a designated service technician to a setting. ■ Are the burner ports clogged? Let it snaps open from the gas lines. ■ Is the control knob set correctly? See the "Installing/Replacing the Battery" section. ■ Does the battery have enough power? Oven burner flames are...
Use and Care
Page 15
...? Baking results not what expected ■ Was the oven preheated? See the "Positioning Racks and Bakeware" section. ■ Is there proper air circulation around bakeware? ASSISTANCE OR SERVICE Before calling for oven to cover the edge of time being used to order replacement parts, we recommend that batter is level in longer cooking times. If you can result in the pan. ■ Is the range level? To locate the Amana...
...? Baking results not what expected ■ Was the oven preheated? See the "Positioning Racks and Bakeware" section. ■ Is there proper air circulation around bakeware? ASSISTANCE OR SERVICE Before calling for oven to cover the edge of time being used to order replacement parts, we recommend that batter is level in longer cooking times. If you can result in the pan. ■ Is the range level? To locate the Amana...
Use and Care
Page 16
... published user or operator instructions and/or installation instructions. 4. You can find additional help you obtain assistance or service if you need it is operated and maintained according to instructions attached to or furnished with electrical or plumbing codes, or use your major appliance is located in materials or workmanship and is not available. 10. Consumable parts are excluded from the date of the Use & Care Guide...
... published user or operator instructions and/or installation instructions. 4. You can find additional help you obtain assistance or service if you need it is operated and maintained according to instructions attached to or furnished with electrical or plumbing codes, or use your major appliance is located in materials or workmanship and is not available. 10. Consumable parts are excluded from the date of the Use & Care Guide...

Warranty
Page 1
... information on the model and serial number label located on how to use of consumables or cleaning products not approved by an authorized Amana servicer is used in the country in accordance with the removal from your home of your major appliance, to replace or repair house fuses, or to better help by checking the "Assistance or Service" section or by the customer. Consumable parts are excluded from...
... information on the model and serial number label located on how to use of consumables or cleaning products not approved by an authorized Amana servicer is used in the country in accordance with the removal from your home of your major appliance, to replace or repair house fuses, or to better help by checking the "Assistance or Service" section or by the customer. Consumable parts are excluded from...


