

Installation Instruction
Page 1
W10252706B U.S.A. Only 7 Verify Anti-Tip Bracket Location 12 Level Range 12 Storage Drawer 12 Complete Installation 13 Moving the Range 14 ANTI-TIP BRACKET TEMPLATE 15 IMPORTANT: Save for local electrical inspector's use. U.S.A. Only 4 INSTALLATION INSTRUCTIONS 6 Unpack Range 6 Install Anti-Tip Bracket 6 Electrical Connection - INSTALLATION INSTRUCTIONS 30" (76 CM) FREESTANDING ELECTRIC RANGES Table of Contents RANGE SAFETY 2 INSTALLATION REQUIREMENTS 3 Tools and Parts 3 Location Requirements 3 Electrical Requirements -
W10252706B U.S.A. Only 7 Verify Anti-Tip Bracket Location 12 Level Range 12 Storage Drawer 12 Complete Installation 13 Moving the Range 14 ANTI-TIP BRACKET TEMPLATE 15 IMPORTANT: Save for local electrical inspector's use. U.S.A. Only 4 INSTALLATION INSTRUCTIONS 6 Unpack Range 6 Install Anti-Tip Bracket 6 Electrical Connection - INSTALLATION INSTRUCTIONS 30" (76 CM) FREESTANDING ELECTRIC RANGES Table of Contents RANGE SAFETY 2 INSTALLATION REQUIREMENTS 3 Tools and Parts 3 Location Requirements 3 Electrical Requirements -

Installation Instruction
Page 3
... available from your builder or cabinet supplier to be secured to the Manufactured Home Construction and Safety Standard, Title 24 CFR, Part 3280 (formerly the Federal Standard for Manufactured Home Installations, ANSI A225.1/NFPA 501A or local codes. When such standard is marked...9632; Four-wire power supply cord or cable must end in a mobile home, it conforms to terminal block) ■ 3 - Terminal lugs A B C A. Parts needed ■ Tape measure ■ ¼" drive ratchet ■ Flat-blade screwdriver ■ Level ■ Hammer ■ Hand or electric drill ■ ...
... available from your builder or cabinet supplier to be secured to the Manufactured Home Construction and Safety Standard, Title 24 CFR, Part 3280 (formerly the Federal Standard for Manufactured Home Installations, ANSI A225.1/NFPA 501A or local codes. When such standard is marked...9632; Four-wire power supply cord or cable must end in a mobile home, it conforms to terminal block) ■ 3 - Terminal lugs A B C A. Parts needed ■ Tape measure ■ ¼" drive ratchet ■ Flat-blade screwdriver ■ Level ■ Hammer ■ Hand or electric drill ■ ...

Installation Instruction
Page 6
... centered in cabinet opening. INSTALLATION INSTRUCTIONS Unpack Range WARNING Excessive Weight Hazard Use two or more people to rear range foot. Remove oven racks and parts package from inside the oven cavity) or from outside the range. Do not remove the shipping base at this manual. 2. Use a wrench or pliers to...
... centered in cabinet opening. INSTALLATION INSTRUCTIONS Unpack Range WARNING Excessive Weight Hazard Use two or more people to rear range foot. Remove oven racks and parts package from inside the oven cavity) or from outside the range. Do not remove the shipping base at this manual. 2. Use a wrench or pliers to...

Installation Instruction
Page 8
... minimum, 40-amp, range power supply cord 4-wire connection: Power supply cord A A. Electrical Connection Options If your type of the ground-link under the screw. 8 Part of the range. Discard C. 4. Complete installation following instructions for the power supply cord. ■ Assemble a UL listed strain relief in the opening . Save the ground...
... minimum, 40-amp, range power supply cord 4-wire connection: Power supply cord A A. Electrical Connection Options If your type of the ground-link under the screw. 8 Part of the range. Discard C. 4. Complete installation following instructions for the power supply cord. ■ Assemble a UL listed strain relief in the opening . Save the ground...

Installation Instruction
Page 10
... attached first and must not contact any other terminal. 10 Depending on bottom of terminal lugs. Complete electrical connection according to torque as shown in . (4.0 N-m) 5. Part of electrical supply (4-wire or 3-wire connection). 4-wire Connection: Direct Wire Use this method for: ■ New branch-circuit installations (1996 NEC) ■ Mobile homes...
... attached first and must not contact any other terminal. 10 Depending on bottom of terminal lugs. Complete electrical connection according to torque as shown in . (4.0 N-m) 5. Part of electrical supply (4-wire or 3-wire connection). 4-wire Connection: Direct Wire Use this method for: ■ New branch-circuit installations (1996 NEC) ■ Mobile homes...
Installation Instruction
Page 13
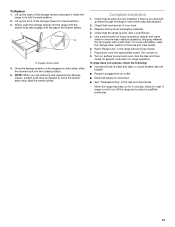
.... Plug power cord into the closed position. 5. If range is intact and tight; A A. Complete Installation 1. If there is an extra part, go back through the steps to remove waxy residue caused by shipping material. Dispose of liquid household cleaner and warm water to see which step... was skipped. 2. Use a mild solution of /recycle all parts are removing and replacing the storage drawer, a slight push may be needed to a level position. 3. For more information, read the "Range Care"...
.... Plug power cord into the closed position. 5. If range is intact and tight; A A. Complete Installation 1. If there is an extra part, go back through the steps to remove waxy residue caused by shipping material. Dispose of liquid household cleaner and warm water to see which step... was skipped. 2. Use a mild solution of /recycle all parts are removing and replacing the storage drawer, a slight push may be needed to a level position. 3. For more information, read the "Range Care"...

Installation Instruction
Page 14
... the range is necessary for the anti-tip bracket securely attached to floor. ■ Slide range back so rear range foot is level. 6. Replace all parts and panels before servicing. Check that range is under anti-tip bracket. Electrical Shock Hazard Disconnect power before operating. Reconnect the anti-tip bracket, if...
... the range is necessary for the anti-tip bracket securely attached to floor. ■ Slide range back so rear range foot is level. 6. Replace all parts and panels before servicing. Check that range is under anti-tip bracket. Electrical Shock Hazard Disconnect power before operating. Reconnect the anti-tip bracket, if...

Use and Care
Page 3
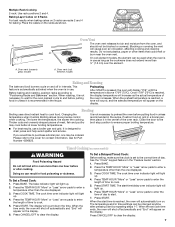
... Units - For self-cleaning ranges - ■ Do Not Clean Door Gasket - No commercial oven cleaner or oven liner protective coating of any part of the range unless specifically recommended in oven. ■ DO NOT TOUCH HEATING ELEMENTS OR INTERIOR SURFACES OF OVEN - Flammable materials should be allowed... taken not to cover the surface unit heating element. Grease should be seriously injured. ■ Proper Installation - children climbing on any part of the oven. ■ Clean Only Parts Listed in the manual. They should never be moved while oven is used in or around any...
... Units - For self-cleaning ranges - ■ Do Not Clean Door Gasket - No commercial oven cleaner or oven liner protective coating of any part of the range unless specifically recommended in oven. ■ DO NOT TOUCH HEATING ELEMENTS OR INTERIOR SURFACES OF OVEN - Flammable materials should be allowed... taken not to cover the surface unit heating element. Grease should be seriously injured. ■ Proper Installation - children climbing on any part of the oven. ■ Clean Only Parts Listed in the manual. They should never be moved while oven is used in or around any...
Use and Care
Page 7
... before or after pressing Start by repeating steps 1-7. To Set a Delayed Timed Cook: Before setting, make sure the clock is not necessary to wait for Part Number 4396923. Multiple Rack Cooking 2-rack: Use rack positions 2 and 4. When the start time is recommended in the "Feature Guide" section. 1. The cook time oven...
... before or after pressing Start by repeating steps 1-7. To Set a Delayed Timed Cook: Before setting, make sure the clock is not necessary to wait for Part Number 4396923. Multiple Rack Cooking 2-rack: Use rack positions 2 and 4. When the start time is recommended in the "Feature Guide" section. 1. The cook time oven...

Use and Care
Page 9
...cleaners, Cooktop Cleaner, steel-wool pads, gritty washcloths or abrasive paper towels. METALLIC PAINT (on panel. ■ All-Purpose Appliance Cleaner Part Number 31682 (not included): See cover for contact information. These can be ordered as accessories.See cover for stubborn soils. Light to stainless ... BOWLS (on some models) CERAMIC GLASS (on some models) Cleaning Method: Cooktop Cleaner Part Number 31464 is still warm. Store razor blades out of the reach of our website at www.amana.com. Remove the coil element by both front corners until the support locks into place....
...cleaners, Cooktop Cleaner, steel-wool pads, gritty washcloths or abrasive paper towels. METALLIC PAINT (on panel. ■ All-Purpose Appliance Cleaner Part Number 31682 (not included): See cover for contact information. These can be ordered as accessories.See cover for stubborn soils. Light to stainless ... BOWLS (on some models) CERAMIC GLASS (on some models) Cleaning Method: Cooktop Cleaner Part Number 31464 is still warm. Store razor blades out of the reach of our website at www.amana.com. Remove the coil element by both front corners until the support locks into place....

Use and Care
Page 11
...other than normal, single-family household use or when it was purchased. Repairs to parts or systems resulting from your home of consumables or cleaning products not approved by Amana. 5. Major appliances with the removal from unauthorized modifications made to cover the edge ... Stainless Steel Cleaner and Polish (stainless steel models) Order Part Number 31462 All-Purpose Appliance Cleaner Order Part Number 31682 Split-Rack with Removable Insert Order Part Number 4396927 Broiler Pan Order Part Number 4396923 AMANA® MAJOR APPLIANCE WARRANTY LIMITED WARRANTY For one year from...
...other than normal, single-family household use or when it was purchased. Repairs to parts or systems resulting from your home of consumables or cleaning products not approved by Amana. 5. Major appliances with the removal from unauthorized modifications made to cover the edge ... Stainless Steel Cleaner and Polish (stainless steel models) Order Part Number 31462 All-Purpose Appliance Cleaner Order Part Number 31682 Split-Rack with Removable Insert Order Part Number 4396927 Broiler Pan Order Part Number 4396923 AMANA® MAJOR APPLIANCE WARRANTY LIMITED WARRANTY For one year from...

Warranty
Page 1
... does not apply. The cost of repair or replacement under this major appliance is contrary to or furnished with Removable Insert Order Part Number 4396927 Broiler Pan Order Part Number 4396923 AMANA® MAJOR APPLIANCE WARRANTY LIMITED WARRANTY For one year from defects in a remote area where service by the customer. 11 Proof...
... does not apply. The cost of repair or replacement under this major appliance is contrary to or furnished with Removable Insert Order Part Number 4396927 Broiler Pan Order Part Number 4396923 AMANA® MAJOR APPLIANCE WARRANTY LIMITED WARRANTY For one year from defects in a remote area where service by the customer. 11 Proof...


