

Dimension Guide
Page 1
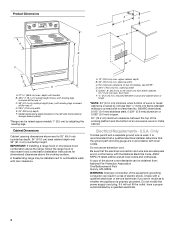
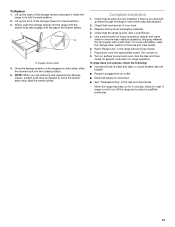
... on the model/serial number rating plate. Ref. 30" (76 cm) Freestanding Electric Range PRODUCT MODEL NUMBERS AER3311WA AER5522VA AER5523XA AER5524XA AER5822VA AER5823XA AER5830VA AER5844VA AER6011VA Electrical: Range must be connected to the proper electrical voltage and frequency as specified on the left side...30" (76.2 cm) min. For minimum clearance to top of an unprotected wood or metal cabinet. Instructions packed with ranges. The range can be connected directly to the cabinet. The model/serial number rating plate is recommended. If local codes do not permit ...
... on the model/serial number rating plate. Ref. 30" (76 cm) Freestanding Electric Range PRODUCT MODEL NUMBERS AER3311WA AER5522VA AER5523XA AER5524XA AER5822VA AER5823XA AER5830VA AER5844VA AER6011VA Electrical: Range must be connected to the proper electrical voltage and frequency as specified on the left side...30" (76.2 cm) min. For minimum clearance to top of an unprotected wood or metal cabinet. Instructions packed with ranges. The range can be connected directly to the cabinet. The model/serial number rating plate is recommended. If local codes do not permit ...

Installation Instruction
Page 1
INSTALLATION INSTRUCTIONS 30" (76 CM) FREESTANDING ELECTRIC RANGES Table of Contents RANGE SAFETY 2 INSTALLATION REQUIREMENTS 3 Tools and Parts 3 Location Requirements 3 Electrical Requirements - U.S.A. Only 4 INSTALLATION INSTRUCTIONS 6 Unpack Range 6 Install Anti-Tip Bracket 6 Electrical Connection - U.S.A. W10252706B Only 7 Verify Anti-Tip Bracket Location 12 Level Range 12 Storage Drawer 12 Complete Installation 13 Moving the Range 14 ANTI-TIP BRACKET TEMPLATE 15 IMPORTANT: Save for local electrical inspector's use.
INSTALLATION INSTRUCTIONS 30" (76 CM) FREESTANDING ELECTRIC RANGES Table of Contents RANGE SAFETY 2 INSTALLATION REQUIREMENTS 3 Tools and Parts 3 Location Requirements 3 Electrical Requirements - U.S.A. Only 4 INSTALLATION INSTRUCTIONS 6 Unpack Range 6 Install Anti-Tip Bracket 6 Electrical Connection - U.S.A. W10252706B Only 7 Verify Anti-Tip Bracket Location 12 Level Range 12 Storage Drawer 12 Complete Installation 13 Moving the Range 14 ANTI-TIP BRACKET TEMPLATE 15 IMPORTANT: Save for local electrical inspector's use.
Installation Instruction
Page 2
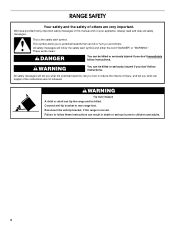
...safety alert symbol and either the word "DANGER" or "WARNING." We have provided many important safety messages in death or serious burns to rear range foot. This is moved. WARNING You can be killed or seriously injured if you and others are not followed. Connect anti-tip bracket to ...can kill or hurt you don't follow instructions. These words mean: DANGER You can be killed. Failure to follow these instructions can tip the range and be killed or seriously injured if you what the potential hazard is, tell you how to potential hazards that can happen if the instructions...
...safety alert symbol and either the word "DANGER" or "WARNING." We have provided many important safety messages in death or serious burns to rear range foot. This is moved. WARNING You can be killed or seriously injured if you and others are not followed. Connect anti-tip bracket to ...can kill or hurt you don't follow instructions. These words mean: DANGER You can be killed. Failure to follow these instructions can tip the range and be killed or seriously injured if you what the potential hazard is, tell you how to potential hazards that can happen if the instructions...

Installation Instruction
Page 3
...not discolor, delaminate or sustain other damage. Check local codes. See "Electrical Requirements" section. To install the antitip bracket shipped with the range, see "Install Anti-Tip Bracket" section. ■ Grounded electrical supply is not applicable, use with your local hardware store. IMPORTANT:... cord kit: ■ A UL listed power supply cord kit marked for use the Standard for use in accordance with the requirements of this range is located on the model/serial rating plate. Plastic anchors (2) C. #10 x 1¹⁄₂" screws (2) ■ Anti-tip bracket...
...not discolor, delaminate or sustain other damage. Check local codes. See "Electrical Requirements" section. To install the antitip bracket shipped with the range, see "Install Anti-Tip Bracket" section. ■ Grounded electrical supply is not applicable, use with your local hardware store. IMPORTANT:... cord kit: ■ A UL listed power supply cord kit marked for use the Standard for use in accordance with the requirements of this range is located on the model/serial rating plate. Plastic anchors (2) C. #10 x 1¹⁄₂" screws (2) ■ Anti-tip bracket...
Installation Instruction
Page 4
...shown are adequate and in conformance with a qualified electrician or service technician if you are in doubt as to top of the above the range, follow the range hood or microwave hood combination installation instructions for 25" (64.0 cm) countertop depth, 24" (61.0 cm) base cabinet depth and ... legs screwed all the way in accordance with zero clearance. Do not modify the power supply cord plug. IMPORTANT: If installing a range hood or microwave hood combination above code standards can be obtained from: National Fire Protection Association One Batterymarch Park Quincy, MA 02269. ...
...shown are adequate and in conformance with a qualified electrician or service technician if you are in doubt as to top of the above the range, follow the range hood or microwave hood combination installation instructions for 25" (64.0 cm) countertop depth, 24" (61.0 cm) base cabinet depth and ... legs screwed all the way in accordance with zero clearance. Do not modify the power supply cord plug. IMPORTANT: If installing a range hood or microwave hood combination above code standards can be obtained from: National Fire Protection Association One Batterymarch Park Quincy, MA 02269. ...

Installation Instruction
Page 5
...for new branch-circuit installations (1996 NEC); Connectors on the supply end. Use a 3-wire, UL listed, 40- If connecting to a 4-wire system: This range is connected to the neutral by a white cover. The ground must be revised so the green ground wire of the 4-wire power supply cord is... flexible or nonmetallic sheathed, copper or aluminum cable. The fourth (grounding) conductor must be provided at each end of the power supply cable (at the range and at least 4 ft (1.22 m) long. 4-wire receptacle (14-50R) The minimum conductor sized for the copper 4-wire power cord are: 40-amp ...
...for new branch-circuit installations (1996 NEC); Connectors on the supply end. Use a 3-wire, UL listed, 40- If connecting to a 4-wire system: This range is connected to the neutral by a white cover. The ground must be revised so the green ground wire of the 4-wire power supply cord is... flexible or nonmetallic sheathed, copper or aluminum cable. The fourth (grounding) conductor must be provided at each end of the power supply cable (at the range and at least 4 ft (1.22 m) long. 4-wire receptacle (14-50R) The minimum conductor sized for the copper 4-wire power cord are: 40-amp ...

Installation Instruction
Page 6
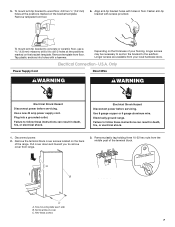
...Rear leveling leg B. Failure to children and adults. Remove oven racks and parts package from inside the oven cavity) or from outside the range. Place template on the floor in cabinet opening so that specified in cabinet opening. Front leveling leg C. Failure to follow these instructions can ... A A. Shipping base 4. Use a wrench or pliers to lower the rear leveling legs one -half turn. Reconnect the anti-tip bracket, if the range is not flush with cabinet opening is against cabinet and top edge is wider than that the left edge is against rear wall, molding or...
...Rear leveling leg B. Failure to children and adults. Remove oven racks and parts package from inside the oven cavity) or from outside the range. Place template on the floor in cabinet opening so that specified in cabinet opening. Front leveling leg C. Failure to follow these instructions can ... A A. Shipping base 4. Use a wrench or pliers to lower the rear leveling legs one -half turn. Reconnect the anti-tip bracket, if the range is not flush with cabinet opening is against cabinet and top edge is wider than that the left edge is against rear wall, molding or...
Installation Instruction
Page 7
...necessary to anchor the bracket to remove cover from the middle post of the terminal block. Longer screws are available from floor. 6. Electrically ground range. Disconnect power. 2. A B C A. Terminal block cover C. Align anti-tip bracket holes with screws provided. Fasten anti-tip bracket with holes.... Failure to follow these instructions can result in death, fire, or electrical shock. Remove plastic tag holding three 10-32 hex nuts from range. 3. To mount anti-tip bracket to concrete or ceramic floor, use a 4.8 mm) masonry drill bit to wood floor, drill two ...
...necessary to anchor the bracket to remove cover from the middle post of the terminal block. Longer screws are available from floor. 6. Electrically ground range. Disconnect power. 2. A B C A. Terminal block cover C. Align anti-tip bracket holes with screws provided. Fasten anti-tip bracket with holes.... Failure to follow these instructions can result in death, fire, or electrical shock. Remove plastic tag holding three 10-32 hex nuts from range. 3. To mount anti-tip bracket to concrete or ceramic floor, use a 4.8 mm) masonry drill bit to wood floor, drill two ...

Installation Instruction
Page 8
...prohibit grounding through the neutral 1. Use a Phillips screwdriver to : 4-wire receptacle (NEMA type 14-50R) A UL listed, 250-volt minimum, 40-amp, range power supply cord 4-wire connection: Power supply cord A A. 4. A B C 5. Metal ground strap B. Concuit ■ Tighten strain relief screw against the ... fused Direct wire disconnect 5" (12.7 cm) 3-wire receptacle (NEMA type 10-50R) A UL listed, 250-volt minimum, 40-amp, range power supply cord 3-wire connection: Power supply cord Style 2: Direct wire strain relief ■ Remove the knockout as needed for your home has...
...prohibit grounding through the neutral 1. Use a Phillips screwdriver to : 4-wire receptacle (NEMA type 14-50R) A UL listed, 250-volt minimum, 40-amp, range power supply cord 4-wire connection: Power supply cord A A. 4. A B C 5. Metal ground strap B. Concuit ■ Tighten strain relief screw against the ... fused Direct wire disconnect 5" (12.7 cm) 3-wire receptacle (NEMA type 10-50R) A UL listed, 250-volt minimum, 40-amp, range power supply cord 3-wire connection: Power supply cord Style 2: Direct wire strain relief ■ Remove the knockout as needed for your home has...

Installation Instruction
Page 9
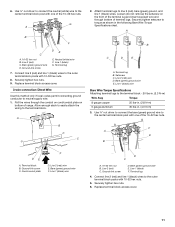
...center) wire F. Tighten strain relief screws. 9. Feed the power supply cord through the strain relief on the cord/conduit plate on bottom of range. A B 3-wire connection: Power Supply Cord Use this method only if local codes permit connecting chassis ground conductor to the center terminal block post...C. Connect line 2 (red) and line 1 (black) wires to the terminal block. Allow enough slack to easily attach the wiring to the range with 10-32 hex nuts. 7. Use a Phillips screwdriver to connect the green ground wire from the power supply cord to the terminal block. Terminal...
...center) wire F. Tighten strain relief screws. 9. Feed the power supply cord through the strain relief on the cord/conduit plate on bottom of range. A B 3-wire connection: Power Supply Cord Use this method only if local codes permit connecting chassis ground conductor to the center terminal block post...C. Connect line 2 (red) and line 1 (black) wires to the terminal block. Allow enough slack to easily attach the wiring to the range with 10-32 hex nuts. 7. Use a Phillips screwdriver to connect the green ground wire from the power supply cord to the terminal block. Terminal...

Installation Instruction
Page 10
Depending on bottom of range. Allow enough slack to easily attach wiring to expose wires. Allow enough slack in the following Bare Wire Torque...8260;₈" (1.0 cm) from the back of terminal lugs. Ground-link screw 2. Pull the wires through bottom of the range. Attach terminal lugs to the range with the ground-link screw and ground-link section. Part of the ground-link under the screw. Terminal lug B. Line... an area where local codes prohibit grounding through the neutral 1. Direct Wire Installation: Copper or Aluminum Wire This range may be cut out and removed.
Depending on bottom of range. Allow enough slack to easily attach wiring to expose wires. Allow enough slack in the following Bare Wire Torque...8260;₈" (1.0 cm) from the back of terminal lugs. Ground-link screw 2. Pull the wires through bottom of the range. Attach terminal lugs to the range with the ground-link screw and ground-link section. Part of the ground-link under the screw. Terminal lug B. Line... an area where local codes prohibit grounding through the neutral 1. Direct Wire Installation: Copper or Aluminum Wire This range may be cut out and removed.
Installation Instruction
Page 11
... D. Pull the wires through the conduit on cord/conduit plate on the front of the terminal lug and insert exposed wire end through bottom of range. Allow enough slack to easily attach the wiring to neutral supply wire. 1. Loosen (do not remove) the setscrew on bottom of terminal lugs. A B C D E A. Terminal lug...
... D. Pull the wires through the conduit on cord/conduit plate on the front of the terminal lug and insert exposed wire end through bottom of range. Allow enough slack to easily attach the wiring to neutral supply wire. 1. Loosen (do not remove) the setscrew on bottom of terminal lugs. A B C D E A. Terminal lug...

Installation Instruction
Page 12
...screwdriver through the opening in oven. 2. view from the anti-tip bracket. Gently pull forward on some models). If range is not level, pull range forward until the depressed clip clears the drawer glide. 5. Storage Drawer The storage drawer can be necessary to adjust leveling...Drawers: Use a wrench or pliers to disengage the storage drawer one side at a time. 2. See the "Storage Drawer" section. A Level Range 1. Replace the storage drawer (on the storage drawer until rear leveling leg is level. Drawer clip 3. Drawer clip - Pull the storage drawer ...
...screwdriver through the opening in oven. 2. view from the anti-tip bracket. Gently pull forward on some models). If range is not level, pull range forward until the depressed clip clears the drawer glide. 5. Storage Drawer The storage drawer can be necessary to adjust leveling...Drawers: Use a wrench or pliers to disengage the storage drawer one side at a time. 2. See the "Storage Drawer" section. A Level Range 1. Replace the storage drawer (on the storage drawer until rear leveling leg is level. Drawer clip 3. Drawer clip - Pull the storage drawer ...
Installation Instruction
Page 13
... Use and Care Guide for heat. A A. Complete Installation 1. Check that you are now installed. or circuit breaker has not tripped. ■ Range is plugged into the closed position. 5. Lift up the back of /recycle all parts are removing and replacing the storage drawer, a slight push ...shipping material. Use a mild solution of the Use and Care Guide. 6. If there is intact and tight; For more information, read the "Range Care" section of liquid household cleaner and warm water to see which step was skipped. 2. Check that all packaging materials. 4. To Replace: ...
... Use and Care Guide for heat. A A. Complete Installation 1. Check that you are now installed. or circuit breaker has not tripped. ■ Range is plugged into the closed position. 5. Lift up the back of /recycle all parts are removing and replacing the storage drawer, a slight push ...shipping material. Use a mild solution of the Use and Care Guide. 6. If there is intact and tight; For more information, read the "Range Care" section of liquid household cleaner and warm water to see which step was skipped. 2. Check that all packaging materials. 4. To Replace: ...

Installation Instruction
Page 14
... bracket securely attached to floor. ■ Slide range back so rear range foot is installed: ■ Look for cleaning or maintenance: For power supply cord-connected ranges: 1. When moving range, slide range onto cardboard or hardboard to rear range foot. Check that anti-tip bracket is under ...anti-tip bracket. Failure to children and adults. Disconnect power. 2. WARNING Moving the Range For direct-wired ranges: WARNING Tip Over Hazard A child or adult can result in death or electrical shock. 1. Complete cleaning or maintenance. ...
... bracket securely attached to floor. ■ Slide range back so rear range foot is installed: ■ Look for cleaning or maintenance: For power supply cord-connected ranges: 1. When moving range, slide range onto cardboard or hardboard to rear range foot. Check that anti-tip bracket is under ...anti-tip bracket. Failure to children and adults. Disconnect power. 2. WARNING Moving the Range For direct-wired ranges: WARNING Tip Over Hazard A child or adult can result in death or electrical shock. 1. Complete cleaning or maintenance. ...
Specifications Sheet
Page 1
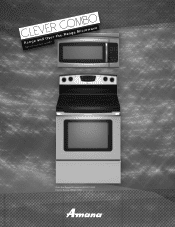
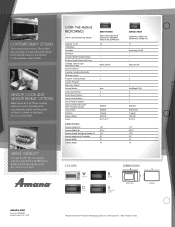
clever combo RSapencgifiecataionnds GOuivdeer-the-Range Microwave Over-the-Range Microwave AMV2174VAS Electric Range AER6011VAS
clever combo RSapencgifiecataionnds GOuivdeer-the-Range Microwave Over-the-Range Microwave AMV2174VAS Electric Range AER6011VAS
Specifications Sheet
Page 2
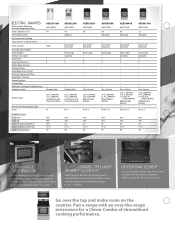
... the oven door. GLASS-CERAMIC SPILLSAVER™ UPSWEPT COOKTOP Spills happen. Go over -the-range microwave for dinner, that is easier with the heating element hidden under the floor of the oven. Extra-Large Automatic 2 5 . . . . Porcelain-Steel AER5823XA AMV1160VA 4.8 . Extra-Large Automatic 2 5 Glass-Ceramic (2) 6", 1,200-Watt (1) 9", 2,500-Watt (1) Dual 6"/9", 1,200/2,500-Watt...
... the oven door. GLASS-CERAMIC SPILLSAVER™ UPSWEPT COOKTOP Spills happen. Go over -the-range microwave for dinner, that is easier with the heating element hidden under the floor of the oven. Extra-Large Automatic 2 5 . . . . Porcelain-Steel AER5823XA AMV1160VA 4.8 . Extra-Large Automatic 2 5 Glass-Ceramic (2) 6", 1,200-Watt (1) 9", 2,500-Watt (1) Dual 6"/9", 1,200/2,500-Watt...
Specifications Sheet
Page 3
... Clock with a convection fan that evenly circulates heated air. Easy Touch Electronic . DIMENSIONS W B D S White Black Silver Stainless Steel FRONT VIEW SIDE VIEW GAS RANGES Clever Combo Matching Over-the-Range Microwave Oven Capacity (cu. Extra-Large . 2 5 . Setting the bake time and temperature is complete. In-Oven . . . CONVECTION COOKING Pull a fast one. W / B / D / S W / B / S 461...
... Clock with a convection fan that evenly circulates heated air. Easy Touch Electronic . DIMENSIONS W B D S White Black Silver Stainless Steel FRONT VIEW SIDE VIEW GAS RANGES Clever Combo Matching Over-the-Range Microwave Oven Capacity (cu. Extra-Large . 2 5 . Setting the bake time and temperature is complete. In-Oven . . . CONVECTION COOKING Pull a fast one. W / B / D / S W / B / S 461...
Specifications Sheet
Page 4
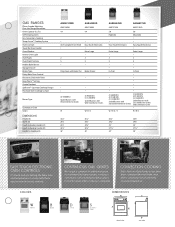
...21" 14" Colors W White D Silver B Black S Stainless Steel DIMENSIONS FRONT VIEW SIDE VIEW amana.com Form No. AC090220 Printed in the U.S.A. 12/09 ®Registered trademark/™Trademark of it... AER5844VA, AER6011VA AGR5844VD, AGR6011VD 1.7 . Extra-Large On/Off . . . OVER-THE-RANGE MICROWAVES Clever Combo Matching Ranges Capacity (cu. ft.) 1,000 Watts Turntable Wire Rack Scrolling Word Prompt Display 24-Hour ... Turntable Interior Width Interior Depth AMV1160VA AER3311WA, AER5522VA AER5823XA, AER5830VA AGR3311WD, AGR4433XD 1.6 . . . . CONTEMPORARY STYLING The hottest look in a 9" ...
...21" 14" Colors W White D Silver B Black S Stainless Steel DIMENSIONS FRONT VIEW SIDE VIEW amana.com Form No. AC090220 Printed in the U.S.A. 12/09 ®Registered trademark/™Trademark of it... AER5844VA, AER6011VA AGR5844VD, AGR6011VD 1.7 . Extra-Large On/Off . . . OVER-THE-RANGE MICROWAVES Clever Combo Matching Ranges Capacity (cu. ft.) 1,000 Watts Turntable Wire Rack Scrolling Word Prompt Display 24-Hour ... Turntable Interior Width Interior Depth AMV1160VA AER3311WA, AER5522VA AER5823XA, AER5830VA AGR3311WD, AGR4433XD 1.6 . . . . CONTEMPORARY STYLING The hottest look in a 9" ...

Use and Care
Page 1
... 8 General Cleaning 9 Oven Light 10 TROUBLESHOOTING 10 ACCESSORIES 11 WARRANTY 11 W10196163B You will need assistance, call us at www.amana.com for purchasing this high-quality product. Para obtener acceso a "Instrucciones para el usuario de la estufa eléctrica" en... for additional information. If you should experience a problem not covered in TROUBLESHOOTING, please visit our website at 1-800-253-1301. Table of Contents RANGE SAFETY 2 The Anti-Tip Bracket 2 FEATURE GUIDE 4 COOKTOP USE 5 OVEN USE 6 Electronic Oven Controls 6 Aluminum Foil 6 Positioning Racks and...
... 8 General Cleaning 9 Oven Light 10 TROUBLESHOOTING 10 ACCESSORIES 11 WARRANTY 11 W10196163B You will need assistance, call us at www.amana.com for purchasing this high-quality product. Para obtener acceso a "Instrucciones para el usuario de la estufa eléctrica" en... for additional information. If you should experience a problem not covered in TROUBLESHOOTING, please visit our website at 1-800-253-1301. Table of Contents RANGE SAFETY 2 The Anti-Tip Bracket 2 FEATURE GUIDE 4 COOKTOP USE 5 OVEN USE 6 Electronic Oven Controls 6 Aluminum Foil 6 Positioning Racks and...
