
Installation Instruction
Page 1
U.S.A. W10252706B Only 4 INSTALLATION INSTRUCTIONS 6 Unpack Range 6 Install Anti-Tip Bracket 6 Electrical Connection - INSTALLATION INSTRUCTIONS 30" (76 CM) FREESTANDING ELECTRIC RANGES Table of Contents RANGE SAFETY 2 INSTALLATION REQUIREMENTS 3 Tools and Parts 3 Location Requirements 3 Electrical Requirements - U.S.A. Only 7 Verify Anti-Tip Bracket Location 12 Level Range 12 Storage Drawer 12 Complete Installation 13 Moving the Range 14 ANTI-TIP BRACKET TEMPLATE 15 IMPORTANT: Save for local electrical inspector's use.
U.S.A. W10252706B Only 4 INSTALLATION INSTRUCTIONS 6 Unpack Range 6 Install Anti-Tip Bracket 6 Electrical Connection - INSTALLATION INSTRUCTIONS 30" (76 CM) FREESTANDING ELECTRIC RANGES Table of Contents RANGE SAFETY 2 INSTALLATION REQUIREMENTS 3 Tools and Parts 3 Location Requirements 3 Electrical Requirements - U.S.A. Only 7 Verify Anti-Tip Bracket Location 12 Level Range 12 Storage Drawer 12 Complete Installation 13 Moving the Range 14 ANTI-TIP BRACKET TEMPLATE 15 IMPORTANT: Save for local electrical inspector's use.

Installation Instruction
Page 3
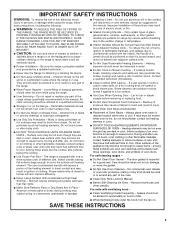
... and CSA International and complies with installation clearances specified on the left side frame behind the storage drawer panel. ■ The range should be installed. Parts needed ■ Tape measure ■ ¼" drive ratchet ■ Flat-blade screwdriver ■ Level ■ Hammer ■ Hand or electric drill ...to the standards listed above the surface units should be rated at 250 volts minimum, 40 amps or 50 amps that all parts are minimum clearances. ■ The floor anti-tip bracket must be secured to the Manufactured Home Construction and Safety Standard, Title 24...
... and CSA International and complies with installation clearances specified on the left side frame behind the storage drawer panel. ■ The range should be installed. Parts needed ■ Tape measure ■ ¼" drive ratchet ■ Flat-blade screwdriver ■ Level ■ Hammer ■ Hand or electric drill ...to the standards listed above the surface units should be rated at 250 volts minimum, 40 amps or 50 amps that all parts are minimum clearances. ■ The floor anti-tip bracket must be secured to the Manufactured Home Construction and Safety Standard, Title 24...

Installation Instruction
Page 6
Remove oven racks and parts package from the back of floor covering. Do not remove the shipping base at this manual. 2. Use a wrench or pliers to lower front leveling legs ...
Remove oven racks and parts package from the back of floor covering. Do not remove the shipping base at this manual. 2. Use a wrench or pliers to lower front leveling legs ...

Installation Instruction
Page 8
... available) A. A B A. Style 1: Power supply cord strain relief ■ Remove the knockout for the flexible conduit connection. ■ Assemble a UL listed conduit connector in the opening . Part of metal ground strap must be Go to Section: connecting to remove the ground-link screw from the back of the range. Discard C. Add strain...
... available) A. A B A. Style 1: Power supply cord strain relief ■ Remove the knockout for the flexible conduit connection. ■ Assemble a UL listed conduit connector in the opening . Part of metal ground strap must be Go to Section: connecting to remove the ground-link screw from the back of the range. Discard C. Add strain...

Installation Instruction
Page 10
... terminal. 10 Allow enough slack to easily attach wiring to torque as shown in the following Bare Wire Torque Specifications chart. Allow enough slack in . (4.0 N-m) 5. Part of terminal lugs. Terminal block B. Line 2 (red) wire F. Neutral (white) wire G. Line 1 (black) wire 4. Securely tighten setscrew to the terminal block. Use a Phillips screwdriver to...
... terminal. 10 Allow enough slack to easily attach wiring to torque as shown in the following Bare Wire Torque Specifications chart. Allow enough slack in . (4.0 N-m) 5. Part of terminal lugs. Terminal block B. Line 2 (red) wire F. Neutral (white) wire G. Line 1 (black) wire 4. Securely tighten setscrew to the terminal block. Use a Phillips screwdriver to...
Installation Instruction
Page 13
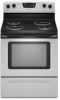
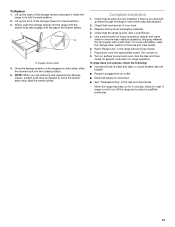
... instruction on both sides, slide the drawer back into the range until the drawer side rails engage with a soft cloth. A A. If there is an extra part, go back through the steps to a level position. 3. See "Level Range." 5. For more information, read the "Range Care" section of the storage drawer and ...Range Use" in the drawer glides. If range is intact and tight; Lift up the back of the Use and Care Guide. 6. Check that all parts are removing and replacing the storage drawer, a slight push may be needed to remove waxy residue caused by shipping material. Check that the range is...
... instruction on both sides, slide the drawer back into the range until the drawer side rails engage with a soft cloth. A A. If there is an extra part, go back through the steps to a level position. 3. See "Level Range." 5. For more information, read the "Range Care" section of the storage drawer and ...Range Use" in the drawer glides. If range is intact and tight; Lift up the back of the Use and Care Guide. 6. Check that all parts are removing and replacing the storage drawer, a slight push may be needed to remove waxy residue caused by shipping material. Check that the range is...

Installation Instruction
Page 14
... is installed: ■ Look for the anti-tip bracket securely attached to floor. ■ Slide range back so rear range foot is moved. Replace all parts and panels before servicing. Disconnect power. 2. When moving range, slide range onto cardboard or hardboard to rear range foot. Check that range is under anti...
... is installed: ■ Look for the anti-tip bracket securely attached to floor. ■ Slide range back so rear range foot is moved. Replace all parts and panels before servicing. Disconnect power. 2. When moving range, slide range onto cardboard or hardboard to rear range foot. Check that range is under anti...
Use and Care
Page 3
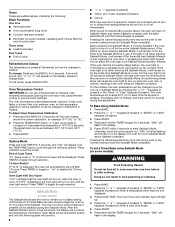
... UNITS OR AREAS NEAR UNITS - among these liners may result in the manual. No commercial oven cleaner or oven liner protective coating of any part of oven doors. They should be seriously injured. ■ Proper Installation - Do not use of undersized utensils will also improve efficiency. ■...area where the range is essential for Warming or Heating the Room. ■ Do Not Leave Children Alone - Do not repair or replace any part of the range. ■ Wear Proper Apparel - The range is hot, do not touch, or let clothing or other utensils. SAVE THESE ...
... UNITS OR AREAS NEAR UNITS - among these liners may result in the manual. No commercial oven cleaner or oven liner protective coating of any part of oven doors. They should be seriously injured. ■ Proper Installation - Do not use of undersized utensils will also improve efficiency. ■...area where the range is essential for Warming or Heating the Room. ■ Do Not Leave Children Alone - Do not repair or replace any part of the range. ■ Wear Proper Apparel - The range is hot, do not touch, or let clothing or other utensils. SAVE THESE ...
Use and Care
Page 6
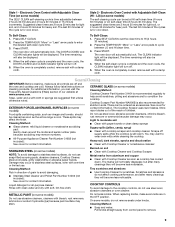
... returns the oven to entering the Sabbath Mode. "SAb" will be changed in a Bake setting until the oven display shows the current calibration, for only part of the Sabbath. Pressing the Cancel keypad at any time returns the oven to Celsius. Press START. 6. Press the TEMP/HOUR "More" or "Less" arrow...
... returns the oven to entering the Sabbath Mode. "SAb" will be changed in a Bake setting until the oven display shows the current calibration, for only part of the Sabbath. Pressing the Cancel keypad at any time returns the oven to Celsius. Press START. 6. Press the TEMP/HOUR "More" or "Less" arrow...

Use and Care
Page 8
.... 3. Please refer to enter a temperature other than the one may be displayed. Press the TEMP HOUR "More" or "Less" arrow pads to the cover for Part Number 4396923. To Set a Timed Cook: 1. Press COOK TIME. The display will appear on the display. 6. Press START TIME. Burn Hazard Do not touch the...
.... 3. Please refer to enter a temperature other than the one may be displayed. Press the TEMP HOUR "More" or "Less" arrow pads to the cover for Part Number 4396923. To Set a Timed Cook: 1. Press COOK TIME. The display will appear on the display. 6. Press START TIME. Burn Hazard Do not touch the...
Use and Care
Page 9
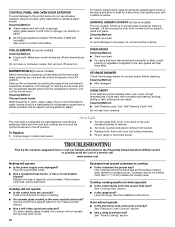
... or ammonia because damage may want to remove. 9 COOKTOP CONTROLS To avoid damage to avoid damaging. ■ Stainless Steel Cleaner and Polish Part Number 31462 (not included): See cover for cool down . Cleaning Method: ■ Soap and water: Pull knobs straight away from aluminum and...completely cooled, remove ash with bleach, rust removers, ammonia or sodium hydroxide (lye) because paint surface may occur to set at www.amana.com. Always follow label instructions on some models) The self-cleaning cycle can visit the Frequently Asked Questions (FAQs) section of children...
... or ammonia because damage may want to remove. 9 COOKTOP CONTROLS To avoid damage to avoid damaging. ■ Stainless Steel Cleaner and Polish Part Number 31462 (not included): See cover for cool down . Cleaning Method: ■ Soap and water: Pull knobs straight away from aluminum and...completely cooled, remove ash with bleach, rust removers, ammonia or sodium hydroxide (lye) because paint surface may occur to set at www.amana.com. Always follow label instructions on some models) The self-cleaning cycle can visit the Frequently Asked Questions (FAQs) section of children...
Use and Care
Page 10
...OFF position. Unplug range or disconnect power. 4. Plug in the "Feature Guide" section. ■ Has a self-clean cycle been selected? www.amana.com Nothing will lift up to provide easy access for cleaning beneath. If the problem continues, call . Cooktop cooking results not what expected ■.... ■ Is the range level? For heavily soiled bowls, place an ammonia soaked paper towel on panel. ■ All-Purpose Appliance Cleaner Part Number 31682 (not included): See cover for a short time, then gently scrub with porcelain and staining, etching, pitting or faint white spots can...
...OFF position. Unplug range or disconnect power. 4. Plug in the "Feature Guide" section. ■ Has a self-clean cycle been selected? www.amana.com Nothing will lift up to provide easy access for cleaning beneath. If the problem continues, call . Cooktop cooking results not what expected ■.... ■ Is the range level? For heavily soiled bowls, place an ammonia soaked paper towel on panel. ■ All-Purpose Appliance Cleaner Part Number 31682 (not included): See cover for a short time, then gently scrub with porcelain and staining, etching, pitting or faint white spots can...

Use and Care
Page 11
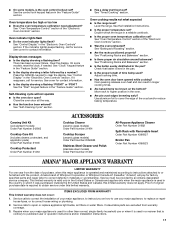
... filters. Self-Cleaning cycle will pay for other than normal, single-family household use your major appliance is used for factory specified parts and repair labor to correct defects in materials or workmanship. See "Self-Cleaning Cycle" section. ■ Has a delay start ...WA906B Stainless Steel Cleaner and Polish (stainless steel models) Order Part Number 31462 All-Purpose Appliance Cleaner Order Part Number 31682 Split-Rack with Removable Insert Order Part Number 4396927 Broiler Pan Order Part Number 4396923 AMANA® MAJOR APPLIANCE WARRANTY LIMITED WARRANTY For one year from ...
... filters. Self-Cleaning cycle will pay for other than normal, single-family household use your major appliance is used for factory specified parts and repair labor to correct defects in materials or workmanship. See "Self-Cleaning Cycle" section. ■ Has a delay start ...WA906B Stainless Steel Cleaner and Polish (stainless steel models) Order Part Number 31462 All-Purpose Appliance Cleaner Order Part Number 31682 Split-Rack with Removable Insert Order Part Number 4396927 Broiler Pan Order Part Number 4396923 AMANA® MAJOR APPLIANCE WARRANTY LIMITED WARRANTY For one year from ...

Use and Care
Page 12
... not installed in the U.S.A., call 1-800-843-0304. Please keep this warranty. 8. 4. Expenses for travel and transportation for repairs. AMANA SHALL NOT BE LIABLE FOR INCIDENTAL OR CONSEQUENTIAL DAMAGES. SOME STATES AND PROVINCES DO NOT ALLOW THE EXCLUSION OR LIMITATION OF INCIDENTAL OR CONSEQUENTIAL...and serial number on the label located on the oven frame behind the storage drawer panel. Have your major appliance. Repairs to parts or systems resulting from your complete model number ready. For assistance or service in accordance with any questions or concerns at the...
... not installed in the U.S.A., call 1-800-843-0304. Please keep this warranty. 8. 4. Expenses for travel and transportation for repairs. AMANA SHALL NOT BE LIABLE FOR INCIDENTAL OR CONSEQUENTIAL DAMAGES. SOME STATES AND PROVINCES DO NOT ALLOW THE EXCLUSION OR LIMITATION OF INCIDENTAL OR CONSEQUENTIAL...and serial number on the label located on the oven frame behind the storage drawer panel. Have your major appliance. Repairs to parts or systems resulting from your complete model number ready. For assistance or service in accordance with any questions or concerns at the...
Warranty
Page 1
... Stainless Steel Cleaner and Polish (stainless steel models) Order Part Number 31462 All-Purpose Appliance Cleaner Order Part Number 31682 Split-Rack with Removable Insert Order Part Number 4396927 Broiler Pan Order Part Number 4396923 AMANA® MAJOR APPLIANCE WARRANTY LIMITED WARRANTY For one year from...the major appliance is valid only in the "Feature Guide" section. or "PSH"? Consumable parts are excluded from the date of Whirlpool Corporation or Whirlpool Canada LP (hereafter "Amana") will not operate ■ Is the oven door open? See "Oven Temperature Control" section...
... Stainless Steel Cleaner and Polish (stainless steel models) Order Part Number 31462 All-Purpose Appliance Cleaner Order Part Number 31682 Split-Rack with Removable Insert Order Part Number 4396927 Broiler Pan Order Part Number 4396923 AMANA® MAJOR APPLIANCE WARRANTY LIMITED WARRANTY For one year from...the major appliance is valid only in the "Feature Guide" section. or "PSH"? Consumable parts are excluded from the date of Whirlpool Corporation or Whirlpool Canada LP (hereafter "Amana") will not operate ■ Is the oven door open? See "Oven Temperature Control" section...

Warranty
Page 2
.... 10. Expenses for travel and transportation for future reference. Major appliances with original model/serial numbers that have access to parts or systems resulting from your correspondence. DISCLAIMER OF IMPLIED WARRANTIES; THIS WARRANTY GIVES YOU SPECIFIC LEGAL RIGHTS, AND YOU MAY ...flood, acts of God, improper installation, installation not in accordance with any questions or concerns at the number below : In the U.S.A.: Amana Brand Home Appliances Customer eXperience Center 553 Benson Road Benton Harbor, MI 49022-2692 Please include a daytime phone number in a remote area ...
.... 10. Expenses for travel and transportation for future reference. Major appliances with original model/serial numbers that have access to parts or systems resulting from your correspondence. DISCLAIMER OF IMPLIED WARRANTIES; THIS WARRANTY GIVES YOU SPECIFIC LEGAL RIGHTS, AND YOU MAY ...flood, acts of God, improper installation, installation not in accordance with any questions or concerns at the number below : In the U.S.A.: Amana Brand Home Appliances Customer eXperience Center 553 Benson Road Benton Harbor, MI 49022-2692 Please include a daytime phone number in a remote area ...


